background image


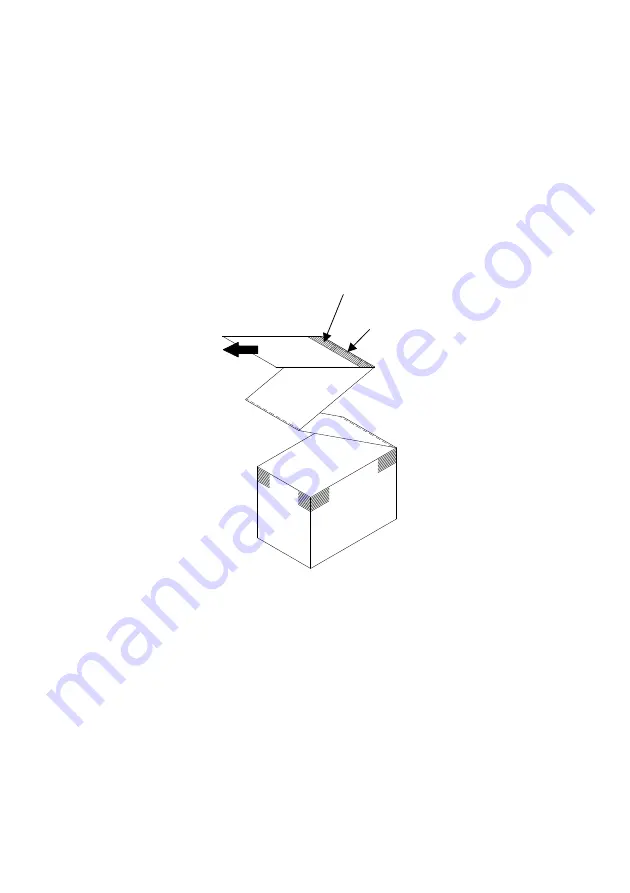
Note: When using perforated paper, make sure that the printer does not 

cut the paper at perforations or in an area that is 0 to 15 mm in 

front of perforations (as viewed from the paper feed direction). 

Otherwise, incorrect cutting may result. (See Figure 3.)


Note: When using perforated paper, be sure to prevent paper from being 

caught, paper jams, paper from being cut during transport, and 

other such problems. These problems may shorten the life of the 
thermal head.


Figure 3


Area that is 0 to 15 mm in front of perforations 

(cutting prohibited in this area)


Fold at perforations


Paper feed direction


Note

Should you find that the blinking ERROR lamp annoys you, perform 

printer setup to change PNE DETECT to DISABLE. 

(See Example (6) in Section 10-2, "Setting Up the Printer.") 


42 

Содержание LD670

Страница 1: ...LD670...

Страница 2: ...y Microsoft Windows Windows Server and Windows Vista are registered trademarks of Microsoft Corporation Apple Macintosh Rosetta Mac and Mac OS are registered trademarks of Apple Inc Other product name...

Страница 3: ...general enquiries contact your local distributor IMPORTER TO THE EU AUTHORISED REPRESENTATIVE OKI Europe Limited trading as OKI Printing Solutions Blays House Wick Road Egham Surrey TW20 0HJ United K...

Страница 4: ...bring it into the stand by condition 3 General warning caution To identify a general warning caution 4 Caution hot surface To indicate that the marked item can be hot and should not be touched without...

Страница 5: ...tion 10 2 Setting Up the Printer 6 If roll paper with an outside core diameter of other than 32 mm is used the paper near end detection accuracy deteriorates If roll paper with an outside core diamete...

Страница 6: ...printed characters Before starting printing in such cases feed the paper by 20 to 30 mm 12 If the type of paper used is other than the recommended ones the print quality and thermal head life are not...

Страница 7: ...aper or thick paper may contain blurs depending on humidity and other environmental conditions Adjust the print speed and print density appropriate for the type of paper used and verify the readabilit...

Страница 8: ...on the switch again If the host computer or printer cannot be restored to normal operation after the cable is reconnected or power switch is turned on again restart the host computer 5 The USB hub fu...

Страница 9: ...e connected with a connector that leads to a public switched line or other such destination Note on using the printer in special mode 1 If a large diameter roll is used paper may fold or unusual noise...

Страница 10: ...ck cable 26 4 3 Connecting the AC Adapter 27 4 4 Disconnecting the AC Adapter 29 4 5 Turning on the Power 30 5 Inserting Paper for Printing 31 5 1 Opening the Top Cover 31 5 2 Setting the Paper Width...

Страница 11: ...ring a Paper Jam 75 9 Troubleshooting 76 9 1 Power on Problems and Errors 76 9 2 Cutter related Problems 76 9 3 Printing related Problems 77 10 Special Modes 78 10 1 Test Printing 78 10 2 Setting Up t...

Страница 12: ...Supply 194 13 Specifications 195 13 1 General Specifications 195 13 2 Cutter Specifications 199 13 3 Paper Supply Specifications 200 13 4 Interface Specifications 201 13 5 Environment Specifications 2...

Страница 13: ...gth is longer than 50 mm Release lever Paper guide Top cover Open and close this cover to replace forms This panel contains status lamps and operating switches Control panel Power switch This switch t...

Страница 14: ...Appended goods Thermal paper CD MANUAL PRINTER DRIVER UTILITY SOFT Instruction sheet Safety warranty sheet AC adapter Power cable 12...

Страница 15: ...pter specified below Model name KA02951 0120 Input 100 to 240V AC 50 60Hz Output DC24V 5 1 5A Caution Only use authorized AC adapters Caution Do not use the bundled AC adapter and Power cable for any...

Страница 16: ...eter 102 0 5 mm or less With the large diameter roll paper unit option attached the printer can use a roll with an outside diameter of up to 200 mm Core dimension Inside diameter of 1 inch inside diam...

Страница 17: ...15 2 Fanfold paper Maximum stack height 180 mm or less Fold length 76 2 to 203 2 0 5 mm 3 to 8 inches Perforation specifications 3 cuts 1 tie...

Страница 18: ...provide the printer with paper layout information including the paper type and size before printing Use of the printer without these settings may result in a paper layout error or unexpected printout...

Страница 19: ...bel paper with black marks be careful regarding the print position and cut position Printing on base paper which is not covered with label sheet may damage the thermal head Note Note on preprinting on...

Страница 20: ...o the print head or paper guide use label paper that has undergone margin removal as shown below Margin removal means cutting the margins at the time of manufacturing 18 Slits on both sides on the pri...

Страница 21: ...B on the paper must be the combination of values specified in the table below Reflection factor A Black mark area 8 B Margins above or below black marks 75 Note The reflectivity values were measured u...

Страница 22: ...lack marks confirm that the conditions stated in Section 3 4 2 Conditions for using black mark paper are also satisfied Print area Printable side of paper Paper feed direction 4 5 mm or more 2 0 5 mm...

Страница 23: ...coh Co Ltd 150LHB Monochrome label paper high grade preservation type 150 m 130 Note A recommended type of paper must be used If a type of paper other than a recommended one is used head damage printi...

Страница 24: ...ion 10 2 Setting Up the Printer In particular note that the paper transport accuracy may be negatively affected by printing a barcode in the top margin at the beginning of paper transport or in the Lo...

Страница 25: ...adapter power cable has been unplugged from the outlet 4 1 Connecting Interface Cable Open the connector cover at the rear of the printer by pulling it up and connect the interface cable to its rear...

Страница 26: ...nterface connector LEDs 24 Caution Do not touch the DIP switches during normal use This may change the network settings disabling normal printing Caution If the device is installed vertically the LAN...

Страница 27: ...ce Interface connector Serial interface Interface Connector USB Interface Type B Connect the printer to a PC through this connector Serial interface cable Secure the connector with screws after making...

Страница 28: ...er connecting the cable Note If the cable is arranged so that it extends from the rear remove the inserts in the connector cover with nippers or a similar tool Unless the inserts are removed in this c...

Страница 29: ...and specified AC adapter power cable 2 Open the connector cover at the rear of the printer by pulling it up and connect the AC adapter cable to the power socket Close the cover after connecting the c...

Страница 30: ...base of the cable 2 while sliding the outer section of the connector upwards 3 and insert the connector until it locks in place with a click sound Base of the cable 28 1 2 3 Outer section of the conn...

Страница 31: ...k mechanism of the connector will then disengage and the cable can be unplugged easily Conversely forcibly pulling on the cable itself may damage the connector Note Before disconnecting the AC adapter...

Страница 32: ...4 5 Turning on the Power After the AC adapter is connected turn on the power switch at the side of the printer The POWER lamp on the control panel lights Power switch Control panel 30...

Страница 33: ...t of the top cover Bottom part of the cover release lever 2 When manipulating the top cover note that the cover seems to lock in position before it is open completely Make sure that the cover is reall...

Страница 34: ...width appropriate to the print area referring to Special Modes See Examples 7 in Section 10 2 Setting Up the Printer Note If the printer is using narrow paper e g width of 70 mm do not replace the pa...

Страница 35: ...ever and b slide the lever to the desired position Then set the separator in place Use the scale as necessary Note Separator A must be set in place with an allowance of about 0 5 mm for the maximum pa...

Страница 36: ...tor A While holding part b on separator A with part a lever pushed in the arrow indicated direction lift it to disengage the lock and then remove the rear bearing section Separator A Location a lever...

Страница 37: ...ing separator B Holding separator B at location a lift the separator to disengage the lock Then remove the separator at the rear bearing section Separator B Separator B Rear bearing section Location a...

Страница 38: ...ng separator A Attach separator A from the rear bearing section Aligned horizontally Rear hook for the axis Note Push the separator down until it engages with an audible click and confirm that the top...

Страница 39: ...tach separator B from the rear bearing section Rear hook for the axis Aligned horizontally Note Push the separator down until it engages with an audible click and confirm that the top of the separator...

Страница 40: ...the roll paper from the beginning so that none of the remaining paper has glue on it Any adhesive or other matter remaining from the glue may adhere to the thermal head and cause a problem such as vo...

Страница 41: ...roll paper must have no deformities Using roll paper such as that shown in the figure below may cause a paper jam uneven printing or other printing problem Note If the loaded roll paper is loose slac...

Страница 42: ...e facing up 2 Open the top cover and then pass the fanfold paper through the paper feed section at the rear of the printer Load the paper with its thermo sensitive side facing up Paper feed section No...

Страница 43: ...e printer When this requirement is satisfied paper can be stacked up to 180 mm see Figure 1 When fanfold paper is placed in contact with the rear of the printer paper can only be stacked up to 80 mm s...

Страница 44: ...per be sure to prevent paper from being caught paper jams paper from being cut during transport and other such problems These problems may shorten the life of the thermal head Figure 3 Area that is 0...

Страница 45: ...r with the paper guide open When it is equal to or less than 50 mm use the printer with the paper guide closed Paper guide For print length equal to or less than 50 mm Use the printer with the paper g...

Страница 46: ...the paper in the correct orientation If the top cover is closed while the paper is not correctly in place a paper jam or misaligned printing might occur Note To close the top cover press it down near...

Страница 47: ...required setting Items 3 to 6 are optional settings Reference documents The CD ROM that comes with the printer contains some PDF formatted online manuals For details on how to install and use each of...

Страница 48: ...ype plain paper black mark paper or die cut label paper 3 change the paper size or 4 switch to die cut label paper of the same size as the current paper but with a different base color or other specif...

Страница 49: ...ter with the paper layout information described in the Manual Section 6 1 1 Paper layout III Custom paper creation Create your custom paper as described in the Manual Section 6 1 2 Custom paper IV Pri...

Страница 50: ...old down the FEED switch The POWER and ERROR lamps blink alternately Continue to hold down the FEED switch until the POWER and ERROR lamps blink at the same time At this time release the FEED switch F...

Страница 51: ...ion Control Panel Follow the procedure below to register layout information with the printer This procedure indicates how to create a custom paper type and send the resulting information to the printe...

Страница 52: ...mation S1 to S5 Do not change S5 cut position with its default value 3 Enter the left right top and bottom margins 4 Click the Save button This registers your custom paper settings in the printer driv...

Страница 53: ...type of paper Procedure 1 Select the desired paper that has already been created 2 Click the Transfer to Printer button The selected paper layout information is sent to the printer and becomes effecti...

Страница 54: ...paper to black mark paper Change to paper having a different paper layout If the error remains even after setting is completed re verify that the paper loaded on the printer matches the custom paper s...

Страница 55: ...se in Excel Some applications including Word also assume use of the Print window for setting printing preferences instead of providing a separate Page Setup window For details on the Print window see...

Страница 56: ...cover open 4 Press and hold down the FEED switch The POWER and ERROR lamps blink alternately Continue to hold down the FEED switch until the POWER and ERROR lamps blink at the same time At this time r...

Страница 57: ...register layout information with the printer This procedure explains how to send layout information to the printer The use of Windows XP Professional is assumed for the screen shots 1 Click Start All...

Страница 58: ...enter the appropriate paper information S1 to S5 Do not change S5 cut position with its default value 3 Enter the left right top and bottom margins as required 4 Click the Set Layout button The paper...

Страница 59: ...place the paper with paper targeted by the layout setting Replace the paper and click the OK button If the error remains even after setting is completed re verify that the paper loaded on the printer...

Страница 60: ...t this time release the FEED switch For details on how to initialize the paper layout see How to initialize the paper layout in Section 7 1 Control Panel 6 Close the top cover 7 The printer feeds the...

Страница 61: ...This procedure explains how to send your paper width setting to the printer The use of Windows XP Professional is assumed for the screen shots 1 Click Start All Programs Okidata and LD670 Utility in...

Страница 62: ...s instructed and then click the OK button 5 A message appears prompting you to replace the paper with paper targeted by the layout setting Replace the paper and click the OK button Note Automatic pape...

Страница 63: ...e of the paper to the left end of the print area 11 0 mm for a paper width of 83 mm 4 0 mm for a paper width of 80 mm 3 0 mm for other paper widths L7 Print area width 80 0 mm for a paper width of 83...

Страница 64: ...x 2 mm L6 Length from the left edge of the paper to the left end of the print area 5 0 mm L7 Print area width Paper width setting L6 x 2 mm Note L1 to L7 above are values detected by the printer sens...

Страница 65: ...to the cutting position Not determined L5 Print area length Not determined L6 Length from the left edge of the paper to the left end of the print area 1 0 mm for a paper width of 83 mm 4 0 mm for a pa...

Страница 66: ...ately Continue to hold down the FEED switch until the POWER and ERROR lamps blink at the same time At this time release the FEED switch 5 Close the top cover 6 The printer feeds the paper automaticall...

Страница 67: ...rmation for the printer If not replace the paper with paper that matches the paper layout information 2 Error during printing If a paper layout error occurs during printing open the top cover check wh...

Страница 68: ...r on the printer and initially power on the printer the automatic layout detection function will set the sensor adjustment values Manual sensor adjustment 1 You can start manual adjustment of a sensor...

Страница 69: ...ng the Windows printer driver See Section 4 4 Graphics Tab in the Windows Driver User s Guide 2 Using the printer utility See Section 3 2 5 Customize Value in the Utility User s Guide 3 Setting up the...

Страница 70: ...ction 10 2 Setting Up the Printer If you have specified a print speed using the Windows driver the print speed specified by the driver will be used for printing The print speed specified by the driver...

Страница 71: ...ition and tear off position Change the setting as required You can use one of the following methods to change this setting 1 Using the Windows printer driver See Section 4 1 Custom Paper Tab in the Wi...

Страница 72: ...he printer Change the setting as described in Example 4 in Section 10 2 Setting Up the Printer 2 Using the printer utility See Section 3 2 4 Memory Switch settings in the Utility User s Guide 6 11 Ini...

Страница 73: ...aper continuously Paper type other than plain paper FEED switch Plain paper including full sheet label paper Pressing this switch once advances the paper one line Holding down this switch POWER lamp L...

Страница 74: ...n changing the layout information while using the same type of paper Procedure Press and hold down the FEED switch for a while The POWER and ERROR lamps will start blinking alternately At this time re...

Страница 75: ...stantly on Cover open ERROR Constantly on POWER Constantly on Head hot 1 ERROR Constantly on 1 Printing is suspended because of a high thermal head temperature Error condition LED LAMP Blinking patter...

Страница 76: ...ce POWER ERROR Low voltage Repeated pattern in which the green lamp blinks four times and the amber lamp blinks once POWER ERROR Over voltage Repeated pattern in which the green lamp blinks five times...

Страница 77: ...aring a Paper Jam If a paper jam occurs remove the jammed paper as follows 1 Turn off the printer power by turning off the power switch 2 Press the cover open lever down and open the top cover 3 Pull...

Страница 78: ...closed completely 3 The thermal head is at a high temperature 1 Insert paper 2 Close the top cover completely 3 Wait until the thermal head temperature decreases sufficiently 9 2 Cutter related Proble...

Страница 79: ...1 Adjust the print density and print speed settings of the printer so that they are appropriate to the paper See 10 2 Setting Up the Printer 2 Turn off the power and ask for repairs The print density...

Страница 80: ...aper and ends the test printing To terminate test printing in progress press the FEED switch Then the printer cuts the paper and terminates the test printing Note You must hold down the FEED switch un...

Страница 81: ...ter ends test printing When you press and hold down the FEED switch for one second or longer the printer continues test printing to print a list of fonts To terminate printing of the font list in prog...

Страница 82: ...ion Guide For details on the functions of the utility and how to use it see the Utility User s Guide This section describes the typical setting changes listed below in detail Example 1 Changing the pr...

Страница 83: ...n the FEED switch on the left part of the Top cover Note You must hold down the FEED switch until the printer starts printing Note If you have passed the item that you want to select quickly press the...

Страница 84: ...Print Data Analysis Cleaning Sensor Adjustment Setup Test Print Paper feed direction Selection Item Then press and hold down the FEED switch for one second or longer to accept the selection The print...

Страница 85: ...or one second or longer to accept the selection The printer prints the following when you accept the selection of SETUP Paper Setting Return to Top Menu Others Serial Condition Customize Value Memory...

Страница 86: ...ory Switch Paper Setting Setup Paper feed direction Selection Item Then press and hold down the FEED switch for at least one second to accept the selection The printer prints the following upon your a...

Страница 87: ...Power Max Speed BK Density Print Density Print Color NV Graphics Memory User NV Memory Paper feed direction Selection Item Then press and hold down the FEED switch for one second or longer to accept t...

Страница 88: ...80 75 70 Lightest Paper feed direction Selection Item Then press and hold down the FEED switch for one second or longer to accept the selection The printer prints the following when you accept the se...

Страница 89: ...URN TO UP Return to Top Menu Return to Top Menu Others Serial Condition Customize Value Memory Switch Paper Setting Return to Up Paper feed direction Selection Item 9 Select RETURN TO TOP MENU as your...

Страница 90: ...e FEED switch for one second or longer to accept the selection The printer cuts the paper and exits from setup mode when you accept the selection of END Note If you turn off the printer power switch w...

Страница 91: ...lding down the FEED switch on the left part of the Top cover Note You must hold down the FEED switch until the printer starts printing Note If you have passed the item that you want to select quickly...

Страница 92: ...Print Data Analysis Cleaning Sensor Adjustment Setup Test Print Paper feed direction Selection Item Then press and hold down the FEED switch for one second or longer to accept the selection The print...

Страница 93: ...u Others Serial Condition Customize Value Memory Switch Paper Setting Setup Paper feed direction Selection Item 5 Select CUSTOMIZE VALUE as your option Quickly press the FEED switch two times up to on...

Страница 94: ...mory Customize Value Paper feed direction Selection Item 6 Select MAX SPEED as your option Press the FEED switch briefly one second or less five times to move to MAX SPEED Max Speed BK Density Print D...

Страница 95: ...th 5th 4th 3rd 2nd 1st Low Speed Max Speed Paper feed direction Selection Item 7 Select 9th as your option Press the FEED switch briefly one second or less until 9th is reached Then press and hold dow...

Страница 96: ...t Paper Width Paper Detection 9th High Speed Paper feed direction Selection Item 8 Select RETURN TO UP as your option Press and hold down the FEED switch for one second or longer to accept the selecti...

Страница 97: ...up Return to Top Menu Paper feed direction Selection Item 10 Select END as your option Press the FEED switch briefly one second or less three times to move to END End Default Set Setup Print Setup End...

Страница 98: ...witch without first selecting END your setting will be lost Verifying your setting To verify your setting execute a test print referring to Section 10 1 The test printing prints a list of printer sett...

Страница 99: ...er while holding down the FEED switch on the left part of the Top cover Note You must hold down the FEED switch until the printer starts printing Note If you have passed the item that you want to sele...

Страница 100: ...Print Data Analysis Cleaning Sensor Adjustment Setup Test Print Paper feed direction Selection Item Then press and hold down the FEED switch for one second or longer to accept the selection The print...

Страница 101: ...Menu Others Serial Condition Customize Value Memory Switch Paper Setting Setup Paper feed direction Selection Item 5 Select CUSTOMIZE VALUE as your option Press the FEED switch briefly one second or...

Страница 102: ...Density Print Density Print Color NV Graphics Memory User NV Memory Customize Value Paper feed direction Selection Item 6 Select PRINT COLOR as your option Press the FEED switch briefly one second or...

Страница 103: ...prints the following when you accept the selection of PRINT COLOR Mono 2 Color Mono Print Color Paper feed direction Selection Item 7 Select 2 COLOR as your option Press the FEED switch briefly one se...

Страница 104: ...stment Paper Width Paper Detection 2 Color Paper feed direction Selection Item 8 Select RETURN TO UP as your option Press and hold down the FEED switch for one second or longer to accept the selection...

Страница 105: ...Item 10 Select END as your option Press the FEED switch briefly one second or less three times to move to END End Default Set Setup Print Setup End Default Set Setup Print Setup Paper feed direction S...

Страница 106: ...ned off 2 Paper is loaded on the printer 3 The cover is closed 2 Enter special mode Turn on the power switch on the right side of the printer while holding down the FEED switch on the left part of the...

Страница 107: ...Item Selection Please push the feed switch short Item Decision Please push the feed switch long Paper feed direction Selection Item 3 Enter setup mode from special mode Quickly press the FEED switch u...

Страница 108: ...Setup Setup Paper feed direction Selection Item 4 In setup mode select SETUP Press and hold down the FEED switch for at least one second to accept the selection The printer prints the following upon y...

Страница 109: ...ter prints the following upon your acceptance of PAPER SETTING selection Paper Detection Return to Top Menu Return to Up Sensor Auto Adjust Mark Feed with Cut Feed at Power On Layout Er Recovery Layou...

Страница 110: ...Menu Return to Up Sensor Auto Adjust Mark Feed with Cut Feed at Power On Layout Er Recovery Layout Er Process TearOff Adjustment Base Adjustment Paper Width Paper Detection Paper feed direction Selec...

Страница 111: ...hold down the FEED switch for at least one second to accept the selection The printer prints the following upon your acceptance of DISABLE selection Return to Up Return to Top Menu Return to Up Sensor...

Страница 112: ...Menu Others Serial Condition Customize Value Memory Switch Paper Setting Return to Up Paper feed direction Selection Item 9 Select RETURN TO TOP MENU as your option Press and hold down the FEED switch...

Страница 113: ...e FEED switch for at least one second to accept the selection After you accept END selection the printer cuts the paper and exits from setup mode Note If you turn off the printer power switch without...

Страница 114: ...efore starting work for this setting verify the following printer conditions 1 The power is turned off 2 Paper is loaded on the printer 3 The cover is closed 2 Enter special mode Turn on the power swi...

Страница 115: ...Item Selection Please push the feed switch short Item Decision Please push the feed switch long Paper feed direction Selection Item 3 Enter setup mode from special mode Quickly press the FEED switch u...

Страница 116: ...en entering setup mode Setup End Default Set Setup Print Setup Setup Paper feed direction Selection Item 4 In setup mode select DEFAULT SET Quickly press the FEED switch twice up to one second each to...

Страница 117: ...ection Setup End Default Set Setup Print Setup Clear Completed Paper feed direction Selection Item Note If you turn off the printer power switch without first selecting END your settings will be lost...

Страница 118: ...is loaded on the printer 3 The cover is closed 2 Enter special mode Turn on the power switch on the right side of the printer while holding down the FEED switch on the left part of the top cover Note...

Страница 119: ...Item Selection Please push the feed switch short Item Decision Please push the feed switch long Paper feed direction Selection Item 3 Enter setup mode from special mode Quickly press the FEED switch u...

Страница 120: ...de Setup End Default Set Setup Print Setup Setup Paper feed direction Selection Item 4 In setup mode select SETUP Press and hold down the FEED switch for at least one second to accept the selection Pa...

Страница 121: ...Paper Setting Setup Paper feed direction Selection Item Then press and hold down the FEED switch for at least one second to accept the selection The printer prints the following upon your acceptance o...

Страница 122: ...move to PNE DETECT PNE Detect Process ID Error Serial Number USB ACK Pulse Width Return to Top Menu Return to Up Roll Paper Unit PE Roll Paper Unit Buzzer Batch OTHER IF Batch COM IF Font B PNE Detec...

Страница 123: ...e following upon your acceptance of PNE DETECT selection Enable Disable Enable PNE Detect Paper feed direction Selection Item 7 Select DISABLE as your option Quickly press the FEED switch up to one se...

Страница 124: ...Font B PNE Detect Process ID Error Serial Number USB ACK Pulse Width Disable Paper feed direction Selection Item 8 Select RETURN TO UP as your option Press and hold down the FEED switch for at least...

Страница 125: ...etup Return to Top Menu Paper feed direction Selection Item 10 Select END as your option Quickly press the FEED switch three times up to one second each to move to END End Default Set Setup Print Setu...

Страница 126: ...ch without first selecting END your settings will be lost Verifying your settings To verify your settings execute a test print as described in Section 10 1 The test printing prints a list of printer s...

Страница 127: ...ed off 2 Paper is loaded on the printer 3 The cover is closed 2 Enter special mode Turn on the power switch on the right side of the printer while holding down the FEED switch on the left part of the...

Страница 128: ...Item Selection Please push the feed switch short Item Decision Please push the feed switch long Paper feed direction Selection Item 3 Enter setup mode from special mode Quickly press the FEED switch u...

Страница 129: ...de Setup End Default Set Setup Print Setup Setup Paper feed direction Selection Item 4 In setup mode select SETUP Press and hold down the FEED switch for at least one second to accept the selection Pa...

Страница 130: ...second to accept the selection Paper Detection Return to Top Menu Return to Up Sensor Auto Adjust Mark Feed with Cut Feed at Power On Layout Er Recovery Layout Er Process TearOff Adjustment Base Adju...

Страница 131: ...at Power On Layout Er Recovery Layout Er Process TearOff Adjustment Base Adjustment Paper Width Paper Detection Paper feed direction Selection Item Press and hold down the FEED switch for at least on...

Страница 132: ...and hold down the FEED switch for at least one second to accept the selection The printer prints the following upon your acceptance of 80mm selection Return to Up Return to Top Menu Return to Up Sens...

Страница 133: ...Menu Others Serial Condition Customize Value Memory Switch Paper Setting Return to Up Paper feed direction Selection Item 9 Select RETURN TO TOP MENU as your option Press and hold down the FEED switch...

Страница 134: ...e FEED switch for at least one second to accept the selection After you accept END selection the printer cuts the paper and exits from setup mode Note If you turn off the printer power switch without...

Страница 135: ...wer is turned off 2 Paper is loaded on the printer 3 The cover is closed 2 Enter special mode Turn on the power switch on the right side of the printer while holding down the FEED switch on the left p...

Страница 136: ...Item Selection Please push the feed switch short Item Decision Please push the feed switch long Paper feed direction Selection Item 3 Enter setup mode from special mode Quickly press the FEED switch u...

Страница 137: ...de Setup End Default Set Setup Print Setup Setup Paper feed direction Selection Item 4 In setup mode select SETUP Press and hold down the FEED switch for at least one second to accept the selection Pa...

Страница 138: ...tting Return to Top Menu Others Serial Condition Customize Value Memory Switch Paper Setting Setup Paper feed direction Selection Item the selection The printer prints the following upon your acceptan...

Страница 139: ...HER IF Batch OTHER IF Batch COM IF Font B PNE Detect Process ID Error Serial Number USB ACK Pulse Width Return to Top Menu Return to Up Roll Paper Unit PE Roll Paper Unit Buzzer Batch OTHER IF Batch C...

Страница 140: ...lowing upon your acceptance of BATCH OTHER IF selection Disable Disable Enable Batch OTHER IF Paper feed direction Selection Item 7 Select ENABLE as your option Quickly press the FEED switch up to one...

Страница 141: ...Font B PNE Detect Process ID Error Serial Number USB ACK Pulse Width Enable Paper feed direction Selection Item 8 Select RETURN TO UP as your option Press and hold down the FEED switch for at least o...

Страница 142: ...etup Return to Top Menu Paper feed direction Selection Item 10 Select END as your option Quickly press the FEED switch three times up to one second each to move to END End Default Set Setup Print Setu...

Страница 143: ...ch without first selecting END your settings will be lost Verifying your settings To verify your settings execute a test print as described in Section 10 1 The test printing prints a list of printer s...

Страница 144: ...n to Top Menu Returns to the setup mode menu Setup items and their details 1 Paper Setting setup items Item Explanation Detailed setup item 1 Paper Detection Specifies the paper detection mode assumed...

Страница 145: ...mm 2 X mm 3 X mm 4 X mm 5 0 mm When 4 X mm is selected 4 0 to 4 9 mm When 3 X mm is selected 3 0 to 3 9 mm When 2 X mm is selected 2 0 to 2 9 mm When 1 X mm is selected 1 0 to 1 9 mm When 0 X mm is se...

Страница 146: ...en 4 X mm is selected 4 0 to 4 9 mm When 3 X mm is selected 3 0 to 3 9 mm When 2 X mm is selected 2 0 to 2 9 mm When 1 X mm is selected 1 0 to 1 9 mm When 0 X mm is selected 0 0 to 0 9 mm When 0 X mm...

Страница 147: ...ifies whether to feed paper to the start position at power on If Disable is specified and the head is not positioned at the start position at power on a print misalignment or paper layout error may re...

Страница 148: ...valid only for the Parallel interface Enable Disable 6 DSR 6 Reset Specifies the reset operation using the DSR 6 signal This item is valid only for the serial interface Enable Disable 7 INIT 25 Reset...

Страница 149: ...hic Memory Capacity of the NV graphic memory None 64KByte 128KByte 192KByte 256KByte 320KByte 384KByte 3 Print Color Print colors Mono 2 Color 4 Print Density Print density 70 Lightest 75 80 85 90 95...

Страница 150: ...1st Low Speed 2nd 3rd 4th 5th 6th 7th 8th 9th High Speed 7 Low Power Print speed maximum Mode1 Printing at 80 of the specified print density Mode2 Varying of the strobe pulse width Normal Mode1 Reduct...

Страница 151: ...he ACK pulse width 1 s 8 s 2 USB Specifies the use of the USB connection V COM Printer 3 Serial Number Specifies the type of Serial Number notification in a USB connection Generally specify ENABLE Ena...

Страница 152: ...Disable 10 Buzzer Specifies whether to sound the buzzer at error occurrence The buzzer can be sounded by a command even if Disable is specified This item is valid only for a device specified to have...

Страница 153: ...he printer 3 The cover is closed 2 Enter special mode Turn on the power switch on the right side of the printer while holding down the FEED switch on the left part of the top cover Note You must hold...

Страница 154: ...rint Special Mode Usage Item Selection Please push the feed switch short Item Decision Please push the feed switch long Paper feed direction Selection Item 1 Quickly press the FEED switch twice up to...

Страница 155: ...ct an item 1 Each time that you press the FEED switch briefly and release it the printer operates as follows 2 The printer prints ADJUSTMENT ADJUSTMENT PRINT END ADJUSTMENT and so on cyclically in thi...

Страница 156: ...END 1 When END is printed press and hold down the FEED switch for one second or longer to end sensor adjustment 2 The printer returns to normal operation mode ADJUSTMENT 1 When ADJUSTMENT PRINT is pr...

Страница 157: ...ress and hold down the FEED switch for one second or longer to start sensor adjustment a The printer prints the selection items 2 The printer prints BM SENSOR LABEL SENSOR PNE SENSOR PE SENSOR BM SENS...

Страница 158: ...the FEED switch for one second or longer to start BM sensor adjustment 2 The printer prints the following and then cuts the paper when BM sensor adjustment begins 3 Open the top cover and load the pap...

Страница 159: ...paper feeding stops load the original paper again The printer prints the adjustment result 6 The printer writes the adjustment result in memory and then returns to the previous state when sensor adju...

Страница 160: ...sor adjustment begins 3 Open the top cover and load the paper you want to adjust When you close the top cover the printer starts feeding paper Note Using any paper not meeting the requirements specifi...

Страница 161: ...the adjustment result 6 The printer writes the adjustment result in memory and then returns to the previous state when sensor adjustment began 7 If the adjustment failed the printer prints ADJUSTMENT...

Страница 162: ...s the following and then cuts the paper when PNE sensor adjustment begins 3 Open the top cover and load the paper you want to adjust When you close the top cover the printer starts feeding paper 4 The...

Страница 163: ...adjustment result in flash memory and then returns to its state at the start of sensor adjustment 7 The printer writes the adjustment result in memory and then returns to the previous state when sens...

Страница 164: ...rk paper 1 When PE SENSOR is printed press and hold down the FEED switch for one second or longer to start PE sensor adjustment 2 The printer prints the following and then cuts the paper when PE senso...

Страница 165: ...Note When loading die cut label paper partially peel off the label from the base paper with the label peeled portion facing the label sensor and then close the cover label sensor 163...

Страница 166: ...the original paper again The printer prints the adjustment result 7 The printer writes the adjustment result in memory and then returns to the previous state when sensor adjustment began 8 If the adj...

Страница 167: ...e printed If you turn on the switch again and press the FEED switch briefly the data shown below will be printed The printer prints the following when it enters the special mode Test Print End Sample...

Страница 168: ...ample Print Data Analysis Cleaning Sensor Adjustment Setup Test Print Paper feed direction Selection Item The printer enters received data analysis mode from the special mode Press the FEED switch bri...

Страница 169: ...one second or longer to place the printer in hex dump mode In hex dump mode all signals sent from the host computer to the printer are printed as hexadecimal codes The printed data can be used to con...

Страница 170: ...ond to accept the selection In command trace mode all data sent from the host computer to the printer is printed as command names The printed data can be used to confirm that correct control codes hav...

Страница 171: ...printed If you turn on the switch again and press the FEED switch briefly the data shown below will be printed The printer prints the following when it enters the special mode Test Print End Sample P...

Страница 172: ...aning Sensor Adjustment Setup Test Print Paper feed direction Selection Item The printer enters sample print mode from the special mode Press the FEED switch briefly one second or less five times to m...

Страница 173: ...pattern e LABEL5 pattern When the FEED switch is pressed short the following pattern is printed LABEL1 LABEL2 LABEL3 LABEL4 LABEL5 LABEL1 When the FEED switch is pressed long about one second the same...

Страница 174: ...Printed result of sample printings LABEL1 pattern LABEL2 pattern LABEL3 pattern LABEL4 pattern 172...

Страница 175: ...LABEL5 pattern 173...

Страница 176: ...sive matter adhering to the paper ejecting part of the paper guide may cause a paper ejection error Using an alcohol solvent remove adhesive matter periodically from the paper guide Recommended cleani...

Страница 177: ...on the switch again while holding down the FEED switch on the control panel Then the data shown below is printed Test Print End Sample Print Data Analysis Cleaning Sensor Adjustment Setup Test Print S...

Страница 178: ...Data Analysis Cleaning Sensor Adjustment Setup Test Print Special Mode Usage Item Selection Please push the feed switch short Item Decision Please push the feed switch long Paper feed direction Selec...

Страница 179: ...d cuts the paper when it enters platen roller cleaning mode 4 Open the top cover and remove the roll paper 5 Press the FEED switch to rotate the platen roller to a position that will facilitate cleani...

Страница 180: ...close the top cover Note Take care not to dent or otherwise damage the platen roller A dent on the platen roller may result in incomplete printing or line feed errors Note Each time that the FEED swi...

Страница 181: ...hermal head must be removed Thermal head Note The thermal head is susceptible to damage When cleaning it use a soft cloth and be especially careful not to damage the head Note Immediately after printi...

Страница 182: ...about once a month to ensure stability in cutting Note Although the edge of the cutter blade is not as sharp as the edges of utility knives generally used in offices there is a risk of injury to a han...

Страница 183: ...he data shown below is printed Test Print End Sample Print Data Analysis Cleaning Sensor Adjustment Setup Test Print Special Mode Usage Item Selection Please push the feed switch short Item Decision P...

Страница 184: ...Data Analysis Cleaning Sensor Adjustment Setup Test Print Special Mode Usage Item Selection Please push the feed switch short Item Decision Please push the feed switch long Paper feed direction Selec...

Страница 185: ...hen press the FEED switch for one second or longer to accept the selection The printer enters cutter cleaning mode The printer prints the following and cuts the paper when it enters cutter cleaning mo...

Страница 186: ...Be very careful not to damage the edge of the Upper cutter when handling the utility knife or screwdriver Also take care not to dent or otherwise damage the platen roller A dent on the platen roller...

Страница 187: ...as sharp as the edges of the utility knives generally used in offices there is a risk of injury to a finger that is moved while pressed directly against the edge of the cutter 7 After completing clean...

Страница 188: ...adhering to the surface and edge of the Lower cutter Note Be very careful not to damage the edge of the Lower cutter when handling the utility knife or screwdriver Also take care not to dent or other...

Страница 189: ...ity knives generally used in offices there is a risk of injury to a finger that is moved while pressed directly against the edge of the cutter 5 After completing cleaning reposition the roll paper and...

Страница 190: ...RX Input Input data 4 N C 5 N C 6 RX Input Input data 7 N C 8 N C 2 LEDs 1 2 3 No Display Description 1 10BASE T link Light goes on when printer recognizes connection destination as 10BASE T 2 100BASE...

Страница 191: ...initializing setup information 1 Turn off the printer power 2 Set switch 2 to ON 3 Turn on the printer power Initialization takes about five seconds 4 Turn off the printer power 5 Set switch 2 to OFF...

Страница 192: ...n No Signal name I O direction Function 1 FG Frame ground 2 TXD Output Send data 3 RXD Input Receive data 4 RTS Output Send request 5 CTS Input Send permission 6 DSR Input Data set ready 7 SG Signal g...

Страница 193: ...Output Drawer frame ground signal 2 DRD1 Output Drawer kick drive signal 1 3 DRSNS1 Input Drawer sense signal 1 4 24V Output Drive power 5 DRD2 Output Drawer kick drive signal 2 6 SG Output Drawer sen...

Страница 194: ...be as follows ON time ON time OFF time 0 2 Notes The drawer power must always be supplied from the printer power supply unit via connector pin 4 Notes The resistance of the drawer kick solenoid must...

Страница 195: ...Drawer connection 2 193 Printer 2 3 4 5 6 Cable 2 4 Drawer kick solenoid 24 minimum Drawer open close switch Drawer 2 3 Drawer kick solenoid 24 minimum Drawer open close switch 2 4 6 1 3 6 Drawer 1...

Страница 196: ...9 Arrangement of power connector pins Pin No Signal name 1 24 V 2 SG 3 N C 3 2 1 Note Use our AC adapter to supply power Note If our AC adapter is not used power supply is supplied by the user problem...

Страница 197: ...oved you can select a paper width of up to 83 mm Note Paper with a width within a range of 71 to 79 mm cannot be used 4 Print speed single color thermal paper Maximum print speed 260 mm s Paper width...

Страница 198: ...x24 36 columns 12x24 ANK Font B Extension Font 38 columns 10x24 42 columns 9x24 42 columns 10x24 46 columns 9x24 43 columns 10x24 48 columns 9x24 For paper 80mm wide For paper 83mm wide 42 column prin...

Страница 199: ...75 ANK Font B 10 x 24 9 x 24 1 25 x 3 0 1 125 x 3 0 9 x 17 9 x 17 1 125 x 2 125 1 125 x 2 125 ANK Font C 8 x 16 1 0 x 2 0 8 x 13 1 0 x 1 625 Kanji Font A 24 x 24 3 0 x 3 0 24 x 24 3 0 x 3 0 Kanji Font...

Страница 200: ...8 External views Paper guide opened Paper guide 198...

Страница 201: ...blade periodically to remove the adhesive matter Note Full cutting may lead to irregularities at the center of the cutting surface If paper fiber remains at these locations this may eventually lead to...

Страница 202: ...ed diameter remaining paper length are theoretical values These values vary depending on actual conditions including the paper roll condition and paper thickness Note The outside core diameter is assu...

Страница 203: ...201 13 4 Interface Specifications 1 LAN IEEE802 3 10BASE T IEEE802 3U 100BASE TX 2 Dual Conforms to USB 1 1 and RS 232C...

Страница 204: ...When operating Operation guaranteed from 10 to 95 RH no condensation Printing guaranteed from 10 to 85 RH no condensation When no operating 8 to 95 RH no condensation When being transported or stored...

Страница 205: ...or the recommended paper with a thickness of 75 m 500 000 cuts for the recommended paper with a thickness of 75 to 150 m Label cutting 1 000 000 cuts cutting in base area 500 000 cuts cutting of full...

Страница 206: ...r to use 14 2 Nomenclature 204 Adjust position according to paper width Partition PNE sensor Roll paper shaft for 1 5 inches and two inch diameter is an option sold separately Roll paper shaft enclose...

Страница 207: ...Enclosed Products Fitting mounting screws x2 Printer connector fitting Instruction sheet Roll paper shaft One inch diameter Roll paper shaft Three inch diameter 205...

Страница 208: ...4 0 5mm external diameter B 32 0 5mm One inch Roll paper Inside diameter C 76 2 0 5mm external diameter B 82 0 5mm Three inch Roll paper 5 Coloration surface outside of paper roll 6 Runout processing...

Страница 209: ...is described below Paper thickness m External Core diameter B mm Detection diameter A mm Remaining paper m 75 82 Approx 100 20 to 30 150 82 Approx 100 10 to 20 C B A core Note The above values i e se...

Страница 210: ...apter power supply cable from the outlet 1 Remove the connector cover at the rear of the printer Open the connector cover and warp the middle cover in the direction of the arrow Then remove the rotary...

Страница 211: ...wide roll paper unit to the connector at the rear of the printer Printer connection fitting Mounting screws roll paper unit sensor cable interface cable AC adapter cable Note For how to connect the AC...

Страница 212: ...the holes on the left and right of the printer connector fitting into the left and right protrusions on the wide roll paper unit connector to connect Left and right holes of printer connection bracket...

Страница 213: ...o the outside of the roll paper unit as shown in the diagram below Open the cable clamp by warping A part in the direction of the arrow as shown in the figure and wire the cables as illustrated in the...

Страница 214: ...6 Take up the slack in the sensor cable between the roll paper unit and printer by securing the excess length with a cable clamp as shown in the diagram below Sensor cable Secured with cable clamp 212...

Страница 215: ...then pinch and fix the screw 1 is default position The following chart is a position where the paper tube of one inch diameter is set 1 Position for 1 0 inch core size 1 5 Position for 1 5 inch core s...

Страница 216: ...t position then fix the knurled screw 1 is default position The following chart is a position where the core of one inch diameter is set 1 Position for 1 0 inch core size 1 5 Position for 1 5 inch cor...

Страница 217: ...ing of the roll Note The printer cannot print on the glued portion of the paper so remove about one turn of the roll paper from the beginning Any adhesive or other matter remaining from the glue may s...

Страница 218: ...neven printing or other printing problem Note If the loaded roll paper is loose slack as shown below take up the slack before printing on the paper Printing on roll paper that is loose may cause a pap...

Страница 219: ...artition leaving a slight gap as shown in the diagram Front Leave a gap of one gradation on the scale between the partition and the paper roll and then tighten the front knob screws to fix Back Leave...

Страница 220: ...ler as illustrated in Figure b shown below the paper may not get through Make sure that the paper is guided under the guide roller as in Figure a shown above Note If a paper roll is set as illustrated...

Страница 221: ...e leading edge of the paper from the front of the printer Top cover Pull out the leading edge of the roll paper from the front of the printer Roll paper Open the top cover 5 After finishing setting th...

Страница 222: ...14 9 Roll Paper Unit Appearance When connected to the printer 220...

Страница 223: ...I Europe Ltd Ukraine Raisy Opkinoy Street 8 Building B 2nd Floor Kiev 02002 Ukraine Tel 380 44 537 5288 Website www oki ua OKI Sistem ve Yaz c z mler Tic Ltd ti Harman sok Duran Is Merkezi No 4 Kat 6...

Страница 224: ...www oki nl Oki Systems Norway AS Tevlingveien 23 N 1081 Oslo Website www oki no Var v nlig kontakta din terf rs ljare i f rsta hand f r konsultation I andra hand kontakta Oki Systems Sweden AB Borgafj...

Страница 225: ...LD670...

Страница 226: ...ques d pos es de Microsoft Corporation Apple Macintosh Rosetta Mac et Mac OS sont des marques d pos es de Apple Inc D autres noms de produits et noms de fabriques sont des marques d pos es ou marques...

Страница 227: ...le support contactez votre distributeur local IMPORTATEUR VERS L UE REPR SENTANT AGR OKI Europe Limited Solutions pour l impression OKI Blays House Wick Road Egham Surrey TW20 0HJ Royaume Uni Pour to...

Страница 228: ...Q mode veille 3 Avertissement Mise en garde g n ral e 3RXU LGHQWL HU XQ DYHUWLVVHPHQW PLVH HQ JDUGH JpQpUDO H 4 WWHQWLRQ VXUIDFH FKDXGH Pour indiquer que l l ment marqu peut tre chaud HW QH GRLW SDV r...

Страница 229: ...priorit est la qualit d impression utilisez le mode d impression par lots Reportez vous l exemple 8 de la Section 10 2 R glage de l imprimante 5 L imprimante est pr r gl e en usine sur la densit d imp...

Страница 230: ...support papier peut provoquer une erreur de d coupe d impression ou de transport du papier liminez r guli rement toute substance adh sive g n ralement tous les mois 11 Si vous laissez du papier dans l...

Страница 231: ...ur du papier pour tiquettes ou du papier pais peuvent pr senter des flous cela d pend de l humidit et d autres conditions environnementales R glez la vitesse et la densit d impression comme il convien...

Страница 232: ...commutateur de marche arr t Si l ordinateur h te ou l imprimante ne reprend pas un fonctionnement normal apr s que le c ble a t rebranch ou l imprimante remise sous tension red marrez l ordinateur h t...

Страница 233: ...d avec un connecteur de ligne commut e publique ou d autres types de connecteurs Remarque concernant l utilisation de l imprimante en mode sp cial 1 Si vous utilisez un rouleau de diam tre large il se...

Страница 234: ...t du c ble d ouverture du tiroir 26 4 3 Branchement de l adaptateur CA 27 4 4 D branchement de l adaptateur CA 29 4 5 Mise sous tension 30 5 Insertion du papier pour l impression 31 5 1 Ouverture du p...

Страница 235: ...e commande 71 7 1 Tableau de commande 71 7 2 Indications d erreur 73 8 Pr vention et correction des bourrages papier 75 8 1 Pr vention des bourrages papier 75 8 2 Correction d un bourrage papier 75 9...

Страница 236: ...Connecteur d ouverture du tiroir 191 12 4 Caract ristiques d alimentation 194 13 Caract ristiques 195 13 1 Caract ristiques g n rales 195 13 2 Caract ristiques de l outil de coupe 199 13 3 Caract ris...

Страница 237: ...rrouillage Guide papier Panneau sup rieur Ouvrez et fermez ce panneau pour remplacer le papier Ce panneau contient des voyants d tat et des commutateurs Tableau de commande Commutateur de marche arr t...

Страница 238: ...Accessoires Papier thermique CD UTILITAIRE DU PILOTE D IMPRIMANTE MANUEL Mode d emploi Garantie de s curit Adaptateur CA Cordon d alimentation 12...

Страница 239: ...ci dessous Nom du mod le KA02951 0120 Entr e 100 240 V CA 50 60 Hz Sortie 24 V 5 CC 1 5 A Attention Utilisez uniquement les adaptateurs CA autoris s Attention N utilisez pas cet adaptateur CA et le c...

Страница 240: ...nit de rouleau de papier de diam tre large en option l imprimante peut utiliser un rouleau d un diam tre ext rieur de 200 mm maximum Dimension du mandrin diam tre int rieur de 1 pouce diam tre int rie...

Страница 241: ...15 2 Papier en accord on Hauteur d empilage maximale 180 mm maximum Longueur de pli 76 2 203 2 0 5 mm 3 8 pouces Caract ristiques de perforation 3 trous 1 attache...

Страница 242: ...a disposition du papier y compris le type et le format du papier avant l impression L utilisation de l imprimante sans ces r glages peut occasionner une erreur de disposition du papier ou des impressi...

Страница 243: ...ssion sur papier pour tiquettes pr d coup sans marque noire faites attention aux positions d impression et de d coupe L impression sur papier support non recouvert d une feuille d tiquettes peut endom...

Страница 244: ...ou au guide papier utilisez un papier pour tiquettes dont les marges ont t retir es comme indiqu ci dessous Le retrait des marges signifie que les marges ont t supprim es au moment de la fabrication F...

Страница 245: ...ments A et B sur le papier doivent tre la combinaison des valeurs sp cifi es dans le tableau ci dessous Facteur de r flexion A zone de la marque noire 8 B marges au dessus ou au dessous des marques no...

Страница 246: ...coup avec marques noires v rifiez que les conditions d finies la Section 3 4 2 Conditions d utilisation du papier avec marque noire sont galement r unies Zone d impression Face imprimable du papier S...

Страница 247: ...shi Paper Mills Limited PB770 Papier thermique bichrome bleu noir type normal 75 m 100 Ricoh Co Ltd 150LHB Papier pour tiquettes monochrome type longue conservation 150 m 130 Remarque Vous devez utili...

Страница 248: ...ironnementales R glez la vitesse et la densit d impression comme il convient pour le type de papier utilis Reportez vous aux exemples 1 et 2 de la Section 10 2 R glage de l imprimante veuillez noter q...

Страница 249: ...ateur CA est d branch de la prise de courant 4 1 Branchement du c ble d interface Ouvrez le cache du connecteur l arri re de l imprimante en le tirant vers le haut puis branchez le c ble d interface a...

Страница 250: ...LAN 24 Attention Ne touchez pas les commutateurs DIP pendant une utilisation normale Cela pourrait modifier les param tres r seau et d sactiver l impression normale Attention Si l appareil est install...

Страница 251: ...branch C ble d interface USB Type B Branchez l imprimante un ordinateur par ce connecteur Cache du connecteur Insert Connecteur d alimentation Connecteur d ouverture du tiroir Connecteur d interface I...

Страница 252: ...ch Remarque Si le c ble est dispos de fa on sortir l arri re retirez les inserts sous le cache du connecteur l aide d une pince coupante ou d un autre outil similaire Si vous ne retirez pas les insert...

Страница 253: ...mentation de l adaptateur CA sp cifi s 2 Ouvrez le cache du connecteur l arri re de l imprimante en le tirant vers le haut puis branchez le cordon de l adaptateur CA la prise d alimentation Refermez l...

Страница 254: ...base du cordon 2 tout en faisant glisser la partie ext rieure du connecteur vers le haut 3 puis ins rez le connecteur jusqu ce qu il s encliquette bruyamment Base du cordon 28 1 2 3 Partie ext rieure...

Страница 255: ...ouillage du connecteur se d clenche alors et vous pouvez d brancher facilement le cordon Inversement si vous tirez brusquement sur le cordon vous risquez d endommager le connecteur Remarque Avant de d...

Страница 256: ...s l adaptateur CA branch mettez l imprimante sous tension l aide du commutateur de marche arr t situ sur le c t Le voyant d alimentation POWER sur le tableau de commande s allume Commutateur de marche...

Страница 257: ...ieur Partie inf rieure du levier de d verrouillage du panneau 2 Lorsque vous manipulez le panneau sup rieur notez qu il semble se verrouiller en position avant de s ouvrir compl tement Veillez ce qu i...

Страница 258: ...ppropri e la zone d impression en vous reportant aux Modes sp ciaux Reportez vous aux exemples 7 de la Section 10 2 R glage de l imprimante Remarque Si l imprimante utilise du papier troit par exemple...

Страница 259: ...b faites coulisser le levier jusqu la position souhait e Placez ensuite le s parateur Utilisez l chelle si n cessaire Remarque Le s parateur A doit tre plac avec un jeu d environ 0 5 mm pour la large...

Страница 260: ...la partie b du s parateur A en poussant la partie a levier dans le sens indiqu par la fl che soulevez pour d verrouiller puis sortez la partie articul e l arri re 34 Verrouillage S parateur A Emplace...

Страница 261: ...e s parateur B au niveau de l emplacement a et soulevez le pour le d verrouiller Retirez ensuite le s parateur en sortant la partie articul e l arri re S parateur B S parateur B Partie articul e l arr...

Страница 262: ...arateur A Fixez le s parateur A par la partie articul e l arri re Align horizontalement Crochet arri re pour l axe Remarque Enfoncez le s parateur jusqu ce qu il s encliquette bruyamment puis v rifiez...

Страница 263: ...s parateur B par la partie articul e l arri re Crochet arri re pour l axe Align horizontalement Remarque Enfoncez le s parateur jusqu ce qu il s encliquette bruyamment puis v rifiez que le haut du s p...

Страница 264: ...m du rouleau partir du d but de sorte qu il n y ait plus de colle sur le papier restant Toute substance adh sive ou autre substance issue de la colle peut adh rer la t te thermique et provoquer un pro...

Страница 265: ...u de papier ne doit pr senter aucune asp rit L utilisation d un rouleau comme indiqu ci dessous peut entra ner un bourrage papier une impression in gale ou un autre probl me d impression Remarque Si l...

Страница 266: ...uvrez le panneau sup rieur puis passez le papier en accord on par la section d alimentation du papier l arri re de l imprimante Chargez le papier face thermique vers le haut Section d alimentation du...

Страница 267: ...que cela est fait vous pouvez empiler le papier jusqu 180 mm reportez vous la Figure 1 Si vous placez le papier en accord on contre l arri re de l imprimante vous ne pouvez l empiler que jusqu 80 mm r...

Страница 268: ...z viter le coincement du papier les bourrages papier la d coupe du papier en cours de transport et tout autre probl me de ce type Ce type de probl me peut raccourcir la dur e de vie de la t te thermiq...

Страница 269: ...ide papier ouvert Si elle est inf rieure ou gale 50 mm utilisez l imprimante avec le guide papier ferm Guide papier Pour une longueur d impression inf rieure ou gale 50 mm utilisez l imprimante avec l...

Страница 270: ...apier dans l orientation correcte Si vous fermez le panneau sup rieur alors que le papier est mal plac un bourrage papier ou une impression mal align e pourrait se produire Remarque Pour fermer le pan...

Страница 271: ...primante Les param tres 1 et 2 sont des r glages obligatoires Les param tres 3 6 sont des r glages facultatifs Documents de r f rence Le CD ROM fourni avec l imprimante contient des manuels en ligne a...

Страница 272: ...s 2 vous changez le type de papier papier ordinaire avec marque noire ou pour tiquettes pr d coup 3 vous changez le format du papier ou 4 vous passez un papier pour tiquettes pr d coup de m me format...

Страница 273: ...formations sur la disposition du papier d crites dans la Section 6 1 1 du manuel Disposition du papier III Cr ation de papier personnalis Cr ez votre papier personnalis comme d crit dans la Section 6...

Страница 274: ...yants POWER et ERROR clignotent tour tour Maintenez enfonc le commutateur FEED jusqu ce que les voyants POWER et ERROR clignotent ensemble Rel chez alors le commutateur FEED Pour plus de d tails sur l...

Страница 275: ...ande Suivez la proc dure ci apr s pour enregistrer les informations sur la disposition l aide de l imprimante Cette proc dure indique comment cr er un type de papier personnalis et envoyer les informa...

Страница 276: ...cut position sa valeur par d faut 3 Saisissez les marges gauche droite sup rieure et inf rieure 4 Cliquez sur le bouton Save Cela permet d enregistrer dans le pilote d imprimante vos r glages de papie...

Страница 277: ...tant Proc dure 1 S lectionnez le papier souhait qui a d j t cr 2 Cliquez sur le bouton Transfer to Printer Les informations s lectionn es sur la disposition du papier sont envoy es l imprimante et dev...

Страница 278: ...uettes pr d coup par du papier avec marque noire Remplacer du papier de disposition diff rente Si l erreur persiste m me apr s le r glage rev rifiez que le papier charg dans l imprimante correspond au...

Страница 279: ...isent aussi la fen tre Imprimer pour le r glage des pr f rences d impression au lieu de proposer une fen tre Mise en page distincte Pour plus de d tails sur la fen tre Imprimer reportez vous la descri...

Страница 280: ...d alimentation papier FEED Les voyants POWER et ERROR clignotent tour tour Maintenez enfonc le commutateur FEED jusqu ce que les voyants POWER et ERROR clignotent ensemble Rel chez alors le commutateu...

Страница 281: ...rer les informations sur la disposition l aide de l imprimante Cette proc dure explique comment envoyer les informations sur la disposition l imprimante On suppose que Windows XP Professionnel est uti...

Страница 282: ...ppropri es sur le papier S1 S5 Ne passez pas S5 cut position sa valeur par d faut 3 Saisissez si n cessaire les marges gauche droite sup rieure et inf rieure 4 Cliquez sur le bouton Set Layout Les inf...

Страница 283: ...ar celui qui correspond au r glage de la disposition Remplacez le papier puis cliquez sur le bouton OK Si l erreur persiste m me apr s le r glage rev rifiez que le papier charg dans l imprimante corre...

Страница 284: ...disposition du papier reportez vous Comment initialiser la disposition du papier dans la Section 7 1 Tableau de commande 6 Refermez le panneau sup rieur 7 Le papier est aliment dans l imprimante cell...

Страница 285: ...xplique comment envoyer votre r glage de largeur de papier l imprimante On suppose que Windows XP Professionnel est utilis pour les captures d cran 1 Cliquez sur D marrer Tous les programmes Okidata p...

Страница 286: ...outon OK 5 Un message appara t pour vous inviter remplacer le papier par celui qui correspond au r glage de la disposition Remplacez le papier puis cliquez sur le bouton OK Remarque Le r glage automat...

Страница 287: ...de la zone d impression 11 0 mm pour une largeur de papier de 83 mm 4 0 mm pour une largeur de papier de 80 mm 3 0 mm pour les autres largeurs de papier L7 largeur de la zone d impression 80 0 mm pou...

Страница 288: ...re le bord gauche du papier et l extr mit gauche de la zone d impression 5 0 mm L7 largeur de la zone d impression R glage de largeur de papier L6 x 2 mm Remarque Les valeurs L1 L7 ci dessus sont d te...

Страница 289: ...e L5 longueur de la zone d impression non d termin e L6 longueur entre le bord gauche du papier et l extr mit gauche de la zone d impression 1 0 mm pour une largeur de papier de 83 mm 4 0 mm pour une...

Страница 290: ...ur FEED jusqu ce que les voyants POWER et ERROR clignotent ensemble Rel chez alors le commutateur FEED 5 Refermez le panneau sup rieur 6 Le papier est aliment dans l imprimante celle ci obtient automa...

Страница 291: ...er pour l imprimante Si ce n est pas le cas remplacez le papier par celui qui correspond ces informations 2 Erreur pendant l impression Si une erreur de disposition du papier survient en cours d impre...

Страница 292: ...rimante et que vous la mettez sous tension la fonction de d tection automatique de la disposition d finit les valeurs de r glage du capteur R glage de capteur manuel 1 Vous pouvez d marrer le r glage...

Страница 293: ...mprimante Windows Reportez vous la Section 4 4 Onglet Graphics dans le Windows Driver User s Guide 2 Utilisation de l utilitaire de l imprimante Reportez vous la Section 3 2 5 Customize Value dans le...

Страница 294: ...d crit dans l Exemple 2 de la Section 10 2 R glage de l imprimante Si vous avez sp cifi une vitesse d impression l aide du pilote Windows la vitesse sp cifi e par le pilote sera utilis e pour l impres...

Страница 295: ...de retrait Modifiez le r glage comme il convient Vous pouvez utiliser l une des m thodes suivantes pour modifier ce r glage 1 Utilisation du pilote d imprimante Windows Reportez vous la Section 4 1 O...

Страница 296: ...d crit dans l Exemple 4 de la Section 10 2 R glage de l imprimante 2 Utilisation de l utilitaire de l imprimante Reportez vous la Section 3 2 4 Memory Switch settings dans le Utility User s Guide 6 1...

Страница 297: ...e y compris le papier pour tiquettes pleine page Appuyez une fois sur ce commutateur pour faire avancer le papier d une ligne Maintenez le enfonc pour faire avancer le papier en continu Commutateur d...

Страница 298: ...ouvez utiliser l initialisation lorsque vous modifiez les informations sur la disposition tout en utilisant le m me type de papier Proc dure maintenez enfonc le commutateur FEED pendant un instant Les...

Страница 299: ...ermanent Panneau ouvert ERROR Permanent POWER Permanent T te chaude 1 ERROR Permanent 1 L impression est suspendue pour cause de temp rature lev e de la t te thermique Condition d erreur VOYANT LED Ty...

Страница 300: ...ent du voyant orange POWER ERROR Tension faible Quatre clignotements du voyant vert et un clignotement du voyant orange POWER ERROR Surtension Cinq clignotements du voyant vert et un clignotement du v...

Страница 301: ...urrage papier En cas de bourrage papier retirez le papier coinc comme suit 1 Mettez l imprimante hors tension en basculant le commutateur de marche arr t 2 Abaissez le levier d ouverture du panneau et...

Страница 302: ...1 Ins rez du papier 2 Fermez compl tement le panneau sup rieur 3 Attendez que la t te thermique refroidisse suffisamment 9 2 Probl mes au niveau de l outil de coupe Sympt me Cause Mesure corrective Im...

Страница 303: ...la vitesse d impression de l imprimante de sorte qu elles soient adapt es au papier Reportez vous la Section 10 2 R glage de l imprimante 2 Mettez l imprimante hors tension et demandez une r paration...

Страница 304: ...quement le papier et met fin l essai d impression Pour mettre fin l essai d impression en cours appuyez sur le commutateur FEED L imprimante d coupe alors le papier et met fin l essai d impression Rem...

Страница 305: ...d impression Si vous maintenez enfonc le commutateur FEED pendant une seconde ou davantage l imprimante poursuit l essai pour imprimer une liste de polices Pour mettre fin l impression de la liste de...

Страница 306: ...s et l utilisation de l utilitaire reportez vous au Utility User s Guide Cette section d crit en d tails les modifications de r glages types indiqu es ci dessous Exemple 1 Modification de la densit d...

Страница 307: ...ntenant enfonc le commutateur FEED situ sur la partie gauche du panneau sup rieur Remarque Vous devez maintenir enfonc le commutateur FEED jusqu ce que l imprimante d marre l impression Remarque Si vo...

Страница 308: ...t Print End Sample Print Data Analysis Cleaning Sensor Adjustment Setup Test Print Paper feed direction Selection Item Ensuite maintenez enfonc le commutateur FEED pendant une seconde ou davantage pou...

Страница 309: ...dant une seconde ou davantage pour accepter la s lection Lorsque vous acceptez la s lection de SETUP l imprimante imprime ce qui suit Paper Setting Return to Top Menu Others Serial Condition Customize...

Страница 310: ...ustomize Value Memory Switch Paper Setting Setup Paper feed direction Selection Item Ensuite maintenez enfonc le commutateur FEED pendant au moins une seconde pour accepter la s lection Lorsque vous a...

Страница 311: ...o Up Low Power Max Speed BK Density Print Density Print Color NV Graphics Memory User NV Memory Paper feed direction Selection Item Ensuite maintenez enfonc le commutateur FEED pendant une seconde ou...

Страница 312: ...70 Lightest Paper feed direction Selection Item Ensuite maintenez enfonc le commutateur FEED pendant une seconde ou davantage pour accepter la s lection Lorsque vous acceptez la s lection de 100 l im...

Страница 313: ...me ce qui suit Return to Top Menu Return to Top Menu Others Serial Condition Customize Value Memory Switch Paper Setting Return to Up Paper feed direction Selection Item 9 S lectionnez RETURN TO TOP M...

Страница 314: ...e seconde ou davantage pour accepter la s lection Lorsque vous acceptez la s lection de END l imprimante d coupe le papier et quitte le mode de r glage Remarque Si vous mettez l imprimante hors tensio...

Страница 315: ...out en maintenant enfonc le commutateur FEED situ sur la partie gauche du panneau sup rieur Remarque Vous devez maintenir enfonc le commutateur FEED jusqu ce que l imprimante d marre l impression Rema...

Страница 316: ...t Print End Sample Print Data Analysis Cleaning Sensor Adjustment Setup Test Print Paper feed direction Selection Item Ensuite maintenez enfonc le commutateur FEED pendant une seconde ou davantage pou...

Страница 317: ...erial Condition Customize Value Memory Switch Paper Setting Setup Paper feed direction Selection Item 5 S lectionnez CUSTOMIZE VALUE VALEUR PERSONNALIS E comme option Appuyez rapidement deux fois sur...

Страница 318: ...Value Paper feed direction Selection Item 6 S lectionnez MAX SPEED VITESSE MAXIMALE comme option Appuyez bri vement cinq fois sur le commutateur FEED maximum une seconde pour passer MAX SPEED Max Spee...

Страница 319: ...th 3rd 2nd 1st Low Speed Max Speed Paper feed direction Selection Item 7 S lectionnez 9th 9 me comme option Appuyez bri vement sur le commutateur FEED maximum une seconde jusqu atteindre 9th Ensuite m...

Страница 320: ...Paper Detection 9th High Speed Paper feed direction Selection Item 8 S lectionnez RETURN TO UP HAUT DE PAGE comme option Maintenez enfonc le commutateur FEED pendant une seconde ou davantage pour acce...

Страница 321: ...urn to Top Menu Paper feed direction Selection Item 10 S lectionnez END FIN comme option Appuyez bri vement trois fois sur le commutateur FEED maximum une seconde pour passer END End Default Set Setup...

Страница 322: ...lectionn END votre r glage est perdu V rification de votre r glage Pour v rifier votre r glage lancez un essai d impression en vous reportant la Section 10 1 L essai d impression pr sente une liste d...

Страница 323: ...ur le c t droit tout en maintenant enfonc le commutateur FEED situ sur la partie gauche du panneau sup rieur Remarque Vous devez maintenir enfonc le commutateur FEED jusqu ce que l imprimante d marre...

Страница 324: ...t Print End Sample Print Data Analysis Cleaning Sensor Adjustment Setup Test Print Paper feed direction Selection Item Ensuite maintenez enfonc le commutateur FEED pendant une seconde ou davantage pou...

Страница 325: ...hers Serial Condition Customize Value Memory Switch Paper Setting Setup Paper feed direction Selection Item 5 S lectionnez CUSTOMIZE VALUE VALEUR PERSONNALIS E comme option Appuyez bri vement deux foi...

Страница 326: ...t Density Print Color NV Graphics Memory User NV Memory Customize Value Paper feed direction Selection Item 6 S lectionnez PRINT COLOR COULEUR D IMPRESSION comme option Appuyez bri vement deux fois su...

Страница 327: ...a s lection de PRINT COLOR l imprimante imprime ce qui suit Mono 2 Color Mono Print Color Paper feed direction Selection Item 7 S lectionnez 2 COLOR BICHROME comme option Appuyez bri vement une fois s...

Страница 328: ...idth Paper Detection 2 Color Paper feed direction Selection Item 8 S lectionnez RETURN TO UP HAUT DE PAGE comme option Maintenez enfonc le commutateur FEED pendant une seconde ou davantage pour accept...

Страница 329: ...ND FIN comme option Appuyez bri vement trois fois sur le commutateur FEED maximum une seconde pour passer END End Default Set Setup Print Setup End Default Set Setup Print Setup Paper feed direction S...

Страница 330: ...panneau est ferm 2 Saisissez un mode sp cial Mettez l imprimante sous tension en basculant le commutateur de marche arr t situ sur le c t droit tout en maintenant enfonc le commutateur FEED situ sur l...

Страница 331: ...push the feed switch short Item Decision Please push the feed switch long Paper feed direction Selection Item 3 Saisissez un mode de r glage partir du mode sp cial Appuyez rapidement sur le commutateu...

Страница 332: ...up Paper feed direction Selection Item 4 En mode de r glage s lectionnez SETUP Maintenez enfonc le commutateur FEED pendant au moins une seconde pour accepter la s lection Lorsque vous acceptez la s l...

Страница 333: ...ion Lorsque vous acceptez la s lection de PAPER SETTING l imprimante imprime ce qui suit Paper Detection Return to Top Menu Return to Up Sensor Auto Adjust Mark Feed with Cut Feed at Power On Layout E...

Страница 334: ...Detection Return to Top Menu Return to Up Sensor Auto Adjust Mark Feed with Cut Feed at Power On Layout Er Recovery Layout Er Process TearOff Adjustment Base Adjustment Paper Width Paper Detection Pap...

Страница 335: ...maintenez enfonc le commutateur FEED pendant au moins une seconde pour accepter la s lection Lorsque vous acceptez la s lection de DISABLE l imprimante imprime ce qui suit Return to Up Return to Top...

Страница 336: ...enu Others Serial Condition Customize Value Memory Switch Paper Setting Return to Up Paper feed direction Selection Item 9 S lectionnez RETURN TO TOP MENU MENU SUP RIEUR comme option Maintenez enfonc...

Страница 337: ...au moins une seconde pour accepter la s lection Apr s que vous avez accept la s lection de END l imprimante d coupe le papier et quitte le mode de r glage Remarque Si vous mettez l imprimante hors te...

Страница 338: ...glage v rifiez que l imprimante r unit les conditions suivantes 1 Elle est hors tension 2 Elle contient du papier 3 Le panneau est ferm 2 Saisissez un mode sp cial Mettez l imprimante sous tension en...

Страница 339: ...push the feed switch short Item Decision Please push the feed switch long Paper feed direction Selection Item 3 Saisissez un mode de r glage partir du mode sp cial Appuyez rapidement sur le commutateu...

Страница 340: ...up End Default Set Setup Print Setup Setup Paper feed direction Selection Item 4 En mode de r glage s lectionnez DEFAULT SET R GLAGE PAR D FAUT Appuyez rapidement deux fois sur le commutateur FEED une...

Страница 341: ...d Default Set Setup Print Setup Clear Completed Paper feed direction Selection Item Remarque Si vous mettez l imprimante hors tension sans avoir d abord s lectionn END vos r glages sont perdus V rific...

Страница 342: ...rm 2 Saisissez un mode sp cial Mettez l imprimante sous tension en basculant le commutateur de marche arr t situ sur le c t droit tout en maintenant enfonc le commutateur FEED situ sur la partie gauch...

Страница 343: ...push the feed switch short Item Decision Please push the feed switch long Paper feed direction Selection Item 3 Saisissez un mode de r glage partir du mode sp cial Appuyez rapidement sur le commutateu...

Страница 344: ...p End Default Set Setup Print Setup Setup Paper feed direction Selection Item 4 En mode de r glage s lectionnez SETUP Maintenez enfonc le commutateur FEED pendant au moins une seconde pour accepter la...

Страница 345: ...Memory Switch Paper Setting Setup Paper feed direction Selection Item Maintenez enfonc le commutateur FEED pendant au moins une seconde pour accepter la s lection Lorsque vous acceptez la s lection de...

Страница 346: ...ximum chaque fois pour passer PNE DETECT PNE Detect Process ID Error Serial Number USB ACK Pulse Width Return to Top Menu Return to Up Roll Paper Unit PE Roll Paper Unit Buzzer Batch OTHER IF Batch CO...

Страница 347: ...de PNE DETECT l imprimante imprime ce qui suit Enable Disable Enable PNE Detect Paper feed direction Selection Item 7 S lectionnez DISABLE D SACTIVER comme option Appuyez rapidement sur le commutateu...

Страница 348: ...NE Detect Process ID Error Serial Number USB ACK Pulse Width Disable Paper feed direction Selection Item 8 S lectionnez RETURN TO UP HAUT DE PAGE comme option Maintenez enfonc le commutateur FEED pend...

Страница 349: ...p Menu Paper feed direction Selection Item 10 S lectionnez END FIN comme option Appuyez rapidement trois fois sur le commutateur FEED une seconde maximum chaque fois pour passer END End Default Set Se...

Страница 350: ...rd s lectionn END vos r glages sont perdus V rification de vos r glages Pour v rifier vos r glages lancez un essai d impression comme d crit la Section 10 1 L essai d impression pr sente une liste de...

Страница 351: ...anneau est ferm 2 Saisissez un mode sp cial Mettez l imprimante sous tension en basculant le commutateur de marche arr t situ sur le c t droit tout en maintenant enfonc le commutateur FEED situ sur la...

Страница 352: ...push the feed switch short Item Decision Please push the feed switch long Paper feed direction Selection Item 3 Saisissez un mode de r glage partir du mode sp cial Appuyez rapidement sur le commutateu...

Страница 353: ...p End Default Set Setup Print Setup Setup Paper feed direction Selection Item 4 En mode de r glage s lectionnez SETUP Maintenez enfonc le commutateur FEED pendant au moins une seconde pour accepter la...

Страница 354: ...au moins une seconde pour accepter la s lection Paper Detection Return to Top Menu Return to Up Sensor Auto Adjust Mark Feed with Cut Feed at Power On Layout Er Recovery Layout Er Process TearOff Adju...

Страница 355: ...th Cut Feed at Power On Layout Er Recovery Layout Er Process TearOff Adjustment Base Adjustment Paper Width Paper Detection Paper feed direction Selection Item Maintenez enfonc le commutateur FEED pen...

Страница 356: ...aintenez enfonc le commutateur FEED pendant au moins une seconde pour accepter la s lection Lorsque vous acceptez la s lection de 80mm l imprimante imprime ce qui suit Return to Up Return to Top Menu...

Страница 357: ...enu Others Serial Condition Customize Value Memory Switch Paper Setting Return to Up Paper feed direction Selection Item 9 S lectionnez RETURN TO TOP MENU MENU SUP RIEUR comme option Maintenez enfonc...

Страница 358: ...moins une seconde pour accepter la s lection Apr s que vous avez accept la s lection de END l imprimante d coupe le papier et quitte le mode de r glage Remarque Si vous mettez l imprimante hors tensio...

Страница 359: ...3 Le panneau est ferm 2 Saisissez un mode sp cial Mettez l imprimante sous tension en basculant le commutateur de marche arr t situ sur le c t droit tout en maintenant enfonc le commutateur FEED situ...

Страница 360: ...push the feed switch short Item Decision Please push the feed switch long Paper feed direction Selection Item 3 Saisissez un mode de r glage partir du mode sp cial Appuyez rapidement sur le commutateu...

Страница 361: ...d Default Set Setup Print Setup Setup Paper feed direction Selection Item 4 En mode de r glage s lectionnez SETUP Maintenez enfonc le commutateur FEED pendant au moins une seconde pour accepter la s l...

Страница 362: ...ize Value Memory Switch Paper Setting Return to Top Menu Others Serial Condition Customize Value Memory Switch Paper Setting Setup Paper feed direction Selection Item Lorsque vous acceptez la s lectio...

Страница 363: ...pour passer BATCH OTHER IF Batch OTHER IF Batch COM IF Font B PNE Detect Process ID Error Serial Number USB ACK Pulse Width Return to Top Menu Return to Up Roll Paper Unit PE Roll Paper Unit Buzzer Ba...

Страница 364: ...BATCH OTHER IF l imprimante imprime ce qui suit Disable Disable Enable Batch OTHER IF Paper feed direction Selection Item 7 S lectionnez ENABLE ACTIVER comme option Appuyez rapidement sur le commutate...

Страница 365: ...NE Detect Process ID Error Serial Number USB ACK Pulse Width Enable Paper feed direction Selection Item 8 S lectionnez RETURN TO UP HAUT DE PAGE comme option Maintenez enfonc le commutateur FEED penda...

Страница 366: ...o Top Menu Paper feed direction Selection Item 10 S lectionnez END FIN comme option Appuyez rapidement trois fois sur le commutateur FEED une seconde maximum chaque fois pour passer END End Default Se...

Страница 367: ...rd s lectionn END vos r glages sont perdus V rification de vos r glages Pour v rifier vos r glages lancez un essai d impression comme d crit la Section 10 1 L essai d impression pr sente une liste de...

Страница 368: ...eturn to Top Menu Permet de revenir au menu du mode de r glage Param tres de r glage et leurs d tails 1 Paper Setting setup items Param tres de r glage papier Param tre Explication Param tre de r glag...

Страница 369: ...X mm 0 X mm 0 0 mm 0 X mm 1 X mm 2 X mm 3 X mm 4 X mm 5 0 mm Si 4 X mm est s lectionn 4 0 4 9 mm Si 3 X mm est s lectionn 3 0 3 9 mm Si 2 X mm est s lectionn 2 0 2 9 mm Si 1 X mm est s lectionn 1 0 1...

Страница 370: ...1 X mm est s lectionn 1 0 1 9 mm Si 2 X mm est s lectionn 2 0 2 9 mm Si 3 X mm est s lectionn 3 0 3 9 mm 4 TearOff Adjustment Si 4 X mm est s lectionn 4 0 4 9 mm 5 Layout Er Process Permet de sp cifi...

Страница 371: ...d impression ou une erreur de disposition du papier peut survenir Enable Activer Disable D sactiver 8 Mark Feed with Cut Permet de sp cifier si vous souhaitez d couper le papier apr s l alimentation e...

Страница 372: ...R Ce param tre n est valide que pour l interface parall le Enable Activer Disable D sactiver 6 DSR 6 Reset Permet de sp cifier l op ration de r initialisation l aide du signal DSR 6 Ce param tre n est...

Страница 373: ...cun 64KByte 64 Kilo octets 128KByte 128 Kilo octets 192KByte 192 Kilo octets 256KByte 256 Kilo octets 320KByte 320 Kilo octets 384KByte 384 Kilo octets 3 Print Color Couleurs d impression Mono Monochr...

Страница 374: ...me 5th 5 me 6th 6 me 7th 7 me 8th 8 me 9th High Speed 9 me Grande vitesse 7 Low Power Vitesse d impression maximale Mode1 impression 80 de la densit d impression sp cifi e Mode2 variation de la largeu...

Страница 375: ...ulse Width Permet de sp cifier la largeur d impulsion ACK 1 s 8 s 2 USB Permet de sp cifier l utilisation de la connexion USB V COM Printer Imprimante 3 Serial Number Permet de sp cifier le type de no...

Страница 376: ...une erreur soit indiqu e par une alarme L alarme peut tre d clench e par une commande m me si Disable est sp cifi Ce param tre n est valide que pour un dispositif quip d une alarme Enable Activer Disa...

Страница 377: ...cial Mettez l imprimante sous tension en basculant le commutateur de marche arr t situ sur le c t droit tout en maintenant enfonc le commutateur FEED situ sur la partie gauche du panneau sup rieur Re...

Страница 378: ...Selection Please push the feed switch short Item Decision Please push the feed switch long Paper feed direction Selection Item 1 Appuyez rapidement deux fois sur le commutateur FEED une seconde maxim...

Страница 379: ...e 1 Chaque fois que vous appuyez bri vement sur le commutateur FEED puis que vous le rel chez l imprimante proc de comme suit 2 L imprimante imprime ADJUSTMENT ADJUSTMENT PRINT END ADJUSTMENT dans cet...

Страница 380: ...que END est imprim maintenez enfonc le commutateur FEED pendant une seconde ou davantage pour terminer le r glage du capteur 2 L imprimante revient en mode de fonctionnement normal ADJUSTMENT 1 Lorsqu...

Страница 381: ...c le commutateur FEED pendant une seconde ou davantage pour d marrer le r glage du capteur a L imprimante imprime les param tres de s lection 2 L imprimante imprime BM SENSOR LABEL SENSOR PNE SENSOR P...

Страница 382: ...econde ou davantage pour d marrer le r glage du capteur BM 2 L imprimante imprime ce qui suit puis d coupe le papier au d marrage du r glage du capteur BM 3 Ouvrez le panneau sup rieur et chargez le p...

Страница 383: ...mentation du papier s arr te chargez de nouveau le papier d origine L imprimante imprime le r sultat du r glage 6 L imprimante inscrit le r sultat du r glage dans la m moire et revient son tat pr c da...

Страница 384: ...3 Ouvrez le panneau sup rieur et chargez le papier que vous souhaitez ajuster Lorsque vous refermez le panneau sup rieur l imprimante d marre l alimentation du papier Remarque L utilisation d un papie...

Страница 385: ...rimante imprime le r sultat du r glage 6 L imprimante inscrit le r sultat du r glage dans la m moire et revient son tat pr c dant le d but du r glage du capteur 7 Si le r glage choue l imprimante impr...

Страница 386: ...suit puis d coupe le papier au d marrage du r glage du capteur de PNE 3 Ouvrez le panneau sup rieur et chargez le papier que vous souhaitez ajuster Lorsque vous refermez le panneau sup rieur l imprima...

Страница 387: ...sultat du r glage dans la m moire flash et revient son tat au moment du d but du r glage du capteur 7 L imprimante inscrit le r sultat du r glage dans la m moire et revient son tat pr c dant le d but...

Страница 388: ...noire 1 Lorsque PE SENSOR est imprim maintenez enfonc le commutateur FEED pendant une seconde ou davantage pour d marrer le r glage du capteur de PE 2 L imprimante imprime ce qui suit puis d coupe le...

Страница 389: ...Lorsque vous chargez du papier pour tiquettes pr d coup d collez partiellement l tiquette du papier support avec la partie d coll e face au capteur d tiquette puis refermez le panneau capteur d tique...

Страница 390: ...nouveau le papier d origine L imprimante imprime le r sultat du r glage 7 L imprimante inscrit le r sultat du r glage dans la m moire et revient son tat pr c dant le d but du r glage du capteur 8 Si l...

Страница 391: ...es dans la Section 10 1 seront imprim es Si vous remettez l imprimante sous tension et appuyez bri vement sur le commutateur FEED les donn es affich es ci dessous seront imprim es En mode sp cial l im...

Страница 392: ...ata Analysis Cleaning Sensor Adjustment Setup Test Print Paper feed direction Selection Item L imprimante entre en mode d analyse des donn es re ues partir du mode sp cial Appuyez bri vement quatre fo...

Страница 393: ...nte en mode de vidage hexad cimal En mode de vidage hexad cimal tous les signaux envoy s partir de l ordinateur h te l imprimante sont imprim s en codes hexad cimaux Les donn es imprim es peuvent tre...

Страница 394: ...de commande toutes les donn es envoy es partir de l ordinateur h te l imprimante sont imprim es en noms de commandes Les donn es imprim es peuvent tre utilis es pour v rifier que les codes de contr l...

Страница 395: ...es dans la Section 10 1 seront imprim es Si vous remettez l imprimante sous tension et appuyez bri vement sur le commutateur FEED les donn es affich es ci dessous seront imprim es En mode sp cial l i...

Страница 396: ...djustment Setup Test Print Paper feed direction Selection Item L imprimante entre en mode d exemple d impression partir du mode sp cial Appuyez bri vement cinq fois sur le commutateur FEED maximum une...

Страница 397: ...vous appuyez bri vement sur le commutateur FEED le mod le suivant est imprim LABEL1 LABEL2 LABEL3 LABEL4 LABEL5 LABEL1 Lorsque vous appuyez plus longuement sur le commutateur FEED environ une seconde...

Страница 398: ...Exemples d impression Mod le LABEL1 Mod le LABEL2 Mod le LABEL3 Mod le LABEL4 172...

Страница 399: ...Mod le LABEL5 173...

Страница 400: ...stance adh sive coll e la partie du guide papier qui jecte le papier peut provoquer une erreur d jection du papier l aide d un solvant base d alcool retirez r guli rement la substance adh sive du guid...

Страница 401: ...arche arr t tout en maintenant enfonc le commutateur FEED sur le tableau de commande Les donn es affich es ci dessous sont alors imprim es Test Print End Sample Print Data Analysis Cleaning Sensor Adj...

Страница 402: ...Print Data Analysis Cleaning Sensor Adjustment Setup Test Print Special Mode Usage Item Selection Please push the feed switch short Item Decision Please push the feed switch long Paper feed direction...

Страница 403: ...le papier lorsqu elle passe en mode de nettoyage du cylindre 4 Ouvrez le panneau sup rieur et retirez le rouleau de papier 5 Appuyez sur le commutateur FEED pour faire pivoter le cylindre dans une po...

Страница 404: ...eau sup rieur Remarque Veillez ne pas d former ou endommager le cylindre Une bosse sur le cylindre peut entra ner des erreurs d impression incompl te ou d alimentation sur la ligne Remarque Chaque foi...

Страница 405: ...urface de la t te thermique doit tre limin e T te thermique Remarque La t te thermique peut tre endommag e Pour la nettoyer utilisez un chiffon doux et veillez bien ne pas l endommager Remarque Imm di...

Страница 406: ...mois afin de garantir la stabilit de la d coupe Remarque Bien que le tranchant de la lame de coupe ne soit pas aussi aff t que celui des couteaux lame r tractable g n ralement utilis s dans les burea...

Страница 407: ...Les donn es affich es ci dessous sont alors imprim es 181 Remarque Si vous avez pass l l ment s lectionner appuyez bri vement sur le commutateur FEED plusieurs reprises jusqu revenir au premier l ment...

Страница 408: ...Print Data Analysis Cleaning Sensor Adjustment Setup Test Print Special Mode Usage Item Selection Please push the feed switch short Item Decision Please push the feed switch long Paper feed direction...

Страница 409: ...le commutateur FEED pendant une seconde ou davantage pour accepter la s lection L imprimante passe en mode de nettoyage de l outil de coupe L imprimante imprime ce qui suit puis d coupe le papier lor...

Страница 410: ...endommager le tranchant de l outil de coupe sup rieur lorsque vous manipulez le couteau lame r tractable ou le tournevis Veillez aussi ne pas d former ou endommager le cylindre Une bosse sur le cylind...

Страница 411: ...ur ne soit pas aussi aff t que celui des couteaux lame r tractable g n ralement utilis s dans les bureaux vous risquez de vous blesser un doigt contre le tranchant de l outil 7 Au terme du nettoyage r...

Страница 412: ...et le tranchant de l outil de coupe inf rieur Remarque Veillez ne pas endommager le tranchant de l outil de coupe inf rieur lorsque vous manipulez le couteau lame r tractable ou le tournevis Veillez a...

Страница 413: ...des couteaux lame r tractable g n ralement utilis s dans les bureaux vous risquez de vous blesser un doigt contre le tranchant de l outil 5 Au terme du nettoyage replacez le rouleau de papier et refe...

Страница 414: ...N C 5 N C 6 RX Entr e Donn es saisies 7 N C 8 N C 2 LED 1 2 3 N Affichage Description 1 Connexion 10BASE T La lumi re s allume lorsque l imprimante reconna t la destination de connexion comme 10BASE T...

Страница 415: ...ge 1 Mettez l imprimante hors tension 2 Mettez le commutateur 2 sur ON 3 Mettez l imprimante sous tension L initialisation prend environ cinq secondes 4 Mettez l imprimante hors tension 5 Mettez le co...

Страница 416: ...Fonction 1 FG Terre du cadre 2 TXD Sortie Envoyer les donn es 3 RXD Entr e Recevoir les donn es 4 RTS Sortie Envoyer une requ te 5 CTS Entr e Envoyer une autorisation 6 DSR Entr e Poste de donn es pr...

Страница 417: ...tiroir 2 DRD1 Sortie Signal 1 d entra nement d ouverture du tiroir 3 DRSNS1 Entr e Signal 1 de d tection du tiroir 4 24V Sortie Alimentation d entra nement 5 DRD2 Sortie Signal 2 d entra nement d ouve...

Страница 418: ...t2 Remarque L entra nement du tiroir doit tre comme suit heure activation heure activation heure d sactivation 0 2 Remarque Le tiroir doit toujours tre aliment par l imprimante via la broche 4 Remarqu...

Страница 419: ...e 2 3 4 5 6 C ble 2 4 Sol no de d ouverture du tiroir 24 minimum Commutateur d ouverture fermeture du tiroir Commutateur d ouverture fermeture du tiroir Sol no de d ouverture du tiroir 24 minimum 2 4...

Страница 420: ...sposition des broches d alimentation Nb de broches Nom du signal 1 24 V 2 SG 3 N C 3 2 1 Remarque Utilisez notre adaptateur CA pour l alimentation Remarque Si vous n utilisez pas notre adaptateur CA a...

Страница 421: ...s pouvez s lectionner une largeur de papier jusqu 83 mm Remarque Vous ne pouvez pas utiliser un papier d une largeur de 71 79 mm 4 Vitesse d impression papier thermique monochrome Vitesse d impression...

Страница 422: ...police B Police suppl mentaire 38 colonnes 10x24 42 colonnes 9x24 42 colonnes 10x24 46 colonnes 9x24 43 colonnes 10x24 48 colonnes 9x24 Surface du corps Pour un papier de 80 mm de large Pour un papie...

Страница 423: ...2 75 ANK police B 10 x 24 9 x 24 1 25 x 3 0 1 125 x 3 0 9 x 17 9 x 17 1 125 x 2 125 1 125 x 2 125 ANK police C 8 x 16 1 0 x 2 0 8 x 13 1 0 x 1 625 Kanji police A 24 x 24 3 0 x 3 0 24 x 24 3 0 x 3 0 Ka...

Страница 424: ...8 Vue de l ext rieur Guide papier Guide papier ouvert 198...

Страница 425: ...sive Nettoyez r guli rement la lame de coupe pour ter la substance adh sive Remarque La d coupe compl te peut occasionner des irr gularit s au centre de la surface de d coupe S il reste de la fibre d...

Страница 426: ...stant etc ne sont que th oriques Ces valeurs varient selon les conditions r elles y compris l tat du rouleau de papier et l paisseur du papier Remarque On suppose que le diam tre de mandrin ext rieur...

Страница 427: ...201 13 4 Caract ristiques de l interface 1 LAN IEEE802 3 10BASE T IEEE802 3U 100BASE TX 2 Double Conforme USB 1 1 et RS 232C...

Страница 428: ...tionnement Fonctionnement garanti de 10 95 de HR sans condensation Impression garantie de 10 85 de HR sans condensation Hors fonctionnement 8 95 de HR sans condensation Pour le transport ou le stockag...

Страница 429: ...coupes pour le papier recommand d une paisseur de 75 m 500 000 d coupes pour le papier recommand d une paisseur de 75 150 m D coupe d tiquettes 1 000 000 de d coupes d coupe dans la zone de base 500 0...

Страница 430: ...enclature Tige du rouleau de papier fournie C ble du capteur de PNE Capteur de PNE Se connecte l imprimante S paration La tige du rouleau de papier pour un diam tre de 1 5 et 2 pouces est en option et...

Страница 431: ...Produits fournis Fixation du connecteur de l imprimante Vis de montage x2 Mode d emploi Tige du rouleau de papier diam tre 1 pouce Tige du rouleau de papier diam tre 3 pouces 205...

Страница 432: ...ext rieur B 32 0 5 mm rouleau de papier 1 pouce diam tre int rieur C 76 2 0 5 mm diam tre ext rieur B 82 0 5 mm rouleau de papier 3 pouces 5 Surface de coloration partie ext rieure du rouleau de papi...

Страница 433: ...tect comme d crit ci dessous paisseur du papier m Diam tre de mandrin ext rieur B mm D tection du diam tre A mm Papier restant m 75 82 Environ 100 20 30 150 82 Environ 100 10 20 C B A mandrin Remarque...

Страница 434: ...ordon d alimentation de l adaptateur CA de la prise murale 1 Retirez le cache du connecteur l arri re de l imprimante Ouvrez le cache du connecteur et faites coulisser le cache central dans le sens de...

Страница 435: ...arri re de l imprimante Fixation de connexion de l imprimante Vis de montage c ble du capteur de l unit de rouleau de papier c ble d interface cordon de l adaptateur CA Remarque Pour savoir comment b...

Страница 436: ...es gauche et droit de la fixation du connecteur de l imprimante sur les saillies gauche et droite du connecteur de l unit de rouleau de papier large Saillies de connexion gauche et droite de l unit de...

Страница 437: ...xt rieur de l unit comme indiqu sur le sch ma ci dessous Cordon de l adaptateur CA Supports de fixation des c bles Ouvrez le support de fixation des c bles en faisant coulisser la partie A dans le sen...

Страница 438: ...exc dent du c ble du capteur entre l unit de rouleau de papier et l imprimante en le maintenant par un support de fixation comme indiqu sur le sch ma ci dessous C ble du capteur Fix gr ce un support...

Страница 439: ...ixez la vis 1 est la position par d faut Les positions ci dessous concernent un tube de papier d un diam tre de 1 pouce 1 position pour une taille de mandrin de 1 pouce 1 5 position pour une taille de...

Страница 440: ...is t te molet e 1 est la position par d faut Les positions ci dessous concernent un mandrin d un diam tre de 1 pouce 1 position pour une taille de mandrin de 1 pouce 1 5 position pour une taille de ma...

Страница 441: ...et la partie coll e au d but du rouleau Remarque L imprimante ne peut pas imprimer sur la partie coll e du papier vous devez donc retirer l quivalent d un tour du rouleau partir du d but Toute substan...

Страница 442: ...ion in gale ou un autre probl me d impression Remarque Si le rouleau charg est l che d tendu comme indiqu ci dessous arrangez cela avant toute impression L impression sur un rouleau de papier l che pe...

Страница 443: ...en laissant un petit espace comme indiqu sur le sch ma Avant laissez un espace d un cran sur l chelle entre la s paration et le rouleau de papier puis serrez la vis serrage main avant pour la fixation...

Страница 444: ...sque le papier est guid au dessus du rouleau de guide comme illustr sur la Figure b ci dessous il se peut que le papier ne rentre pas Veillez guider le papier au dessous du rouleau de guide comme illu...

Страница 445: ...taque du papier par l avant de l imprimante Panneau sup rieur Rouleau de papier Tirez le bord d attaque du rouleau de papier par l avant de l imprimante Ouvrez le panneau sup rieur 5 Une fois le roule...

Страница 446: ...14 9 Aspect de l unit de rouleau de papier connect e l imprimante 220...

Страница 447: ...OKI Europe Ltd Ukraine Raisy Opkinoy Street 8 Building B 2nd Floor Kiev 02002 Ukraine Tel 380 44 537 5288 Website www oki ua OKI Sistem ve Yaz c z mler Tic Ltd ti Harman sok Duran Is Merkezi No 4 Kat...

Страница 448: ...www oki nl Oki Systems Norway AS Tevlingveien 23 N 1081 Oslo Website www oki no Var v nlig kontakta din terf rs ljare i f rsta hand f r konsultation I andra hand kontakta Oki Systems Sweden AB Borgafj...

Страница 449: ...LD670 Manuale d uso...

Страница 450: ...ndows Server e Windows Vista sono marchi registrati di propriet di Microsoft Corporation Apple Macintosh Rosetta Mac e Mac OS sono marchi registrati di propriet di Apple Inc Gli altri nomi di prodotto...

Страница 451: ...re il distributore locale IMPORTATORE PER L UNIONE EUROPEA RAPPRESENTANTE AUTORIZZATO OKI Europe Limited che commercializza i prodotti sotto il nome di OKI Printing Solutions Blays House Wick Road Egh...

Страница 452: ...ertimento Cautela generale 3HU LGHQWL FDUH XQ DYYHUWLPHQWR XQD FDXWHOD generale 4 Attenzione suSer ci bollenti Per indicare che il pezzo contrassegnato pu essere EROOHQWH H QRQ GHYH HVVHUH WRFFDWR VHQ...

Страница 453: ...di stampa prioritaria utilizzare il modo stampa batch Vedere l esempio 8 della Sezione 10 2 Configurazione della stampante 5 La stampante dispone di una preimpostazione di fabbrica pari a una densit d...

Страница 454: ...meccanismo di trasporto della carta e sul portarotolo potrebbe causare un errore nel taglio un errore di stampa o un errore di trasporto Rimuovere periodicamente il materiale adesivo generalmente una...

Страница 455: ...carta ad alto spessore potrebbero contenere imprecisioni in base all umidit e ad altre condizioni ambientali Regolare la velocit e la densit di stampa adeguata per il tipo di carta utilizzata e verifi...

Страница 456: ...e riaccendere una volta la stampante Se non possibile ripristinare il normale funzionamento del computer o della stampante dopo il ricollegamento del cavo o la riaccensione della stampante riavviare...

Страница 457: ...Il connettore non deve essere collegato a un connettore connesso a una linea telefonica fissa o altra destinazione simile Nota sull utilizzo della stampante in modo speciale 1 L utilizzo di un rotolo...

Страница 458: ...Collegamento del trasformatore CA 27 4 4 Scollegamento del trasformatore CA 29 4 5 Accensione 30 5 Inserimento della carta per la stampa 31 5 1 Apertura del coperchio superiore 31 5 2 Impostazione del...

Страница 459: ...azioni degli errori 73 8 Come evitare e rimuovere gli inceppamenti della carta 75 8 1 Come evitare gli inceppamenti della carta 75 8 2 Rimozione di un inceppamento della carta 75 9 Risoluzione dei pro...

Страница 460: ...interfaccia 190 12 3 Connettore per l apertura del cassetto 191 12 4 Specifiche dell alimentazione 194 13 Specifiche 195 13 1 Specifiche generali 195 13 2 Specifiche della taglierina 199 13 3 Specific...

Страница 461: ...ella stampa prevista superiore a 50 mm Guida per la carta Questo interruttore consente l accensione e lo spegnimento della stampante Coperchio superiore Aprire e chiudere questo coperchio per la sosti...

Страница 462: ...12 Elementi in dotazione Carta termica CD MANUALE DRIVER STAMPANTE UTILITY Istruzioni Garanzia di sicurezza Trasformatore CA Cavo di alimentazione...

Страница 463: ...i seguito Nome modello KA02951 0120 Ingresso da 100 a 240V CA 50 60 Hz Uscita 24 V DC 5 1 5 A Attenzione Utilizzare esclusivamente adattatori CA autorizzati Attenzione Non utilizzare il trasformatore...

Страница 464: ...ilizzo di un unit per rotoli di carta di grande diametro opzionale consente l impiego di un rotolo di diametro esterno fino a 200 mm Diametro del supporto diametro interno di 2 5 cm 1 pollice diametro...

Страница 465: ...15 2 Carta continua Altezza massima della risma 180 mm Lunghezza della piegatura da 76 2 a 203 2 0 5 mm da 3 a 8 pollici Specifiche della perforazione 3 tagli 1 giunzione...

Страница 466: ...tuare le impostazioni di layout della carta nella stampante tra cui il tipo e il formato della carta L utilizzo della stampante senza tali impostazioni potrebbe causare un errore di layout della carta...

Страница 467: ...fustellata con segni neri prestare attenzione alle posizioni di stampa e di taglio La stampa su carta di base non ricoperta da fogli per etichette potrebbe danneggiare la testina termica Nota Nota sul...

Страница 468: ...della carta utilizzare carta per etichette sottoposta a rimozione dei margini come illustrato di seguito Rimozione dei margini significa taglio dei margini durante la produzione Tagli longitudinali s...

Страница 469: ...combinazione di valori specificati nella tabella di seguito Coefficiente di riflessione A area con segno nero 8 B margini sovrastanti o sottostanti ai segni neri 75 Nota I valori di riflettivit sono...

Страница 470: ...a segno nero verificare che siano soddisfatte le condizioni descritte nella Sezione 3 4 2 Condizioni di utilizzo per la carta a segno nero Nota L opacit della carta di base ISO deve essere pari o inf...

Страница 471: ...tipo ad alto livello di conservazione 150 m 130 Nota necessario utilizzare un tipo di carta raccomandato L utilizzo di un tipo di carta non raccomandato potrebbe provocare danni alla testina irregola...

Страница 472: ...colare la precisione del meccanismo di trasporto della carta potrebbe essere negativamente alterato dalla stampa di un codice a barre nel margine superiore all inizio del trasporto o nel margine infer...

Страница 473: ...trasformatore CA non deve essere inserito nella presa 4 1 Collegamento del cavo di interfaccia Sollevare il coperchio dei connettori sul retro della stampante e collegare il cavo di interfaccia al con...

Страница 474: ...itando la stampa normale Attenzione Se il dispositivo viene installato in verticale il cavo LAN potrebbe non essere utilizzabile a causa della sua forma Eseguire una verifica prima dell installazione...

Страница 475: ...l connettore con le viti Cavo di interfaccia USB Tipo B Collegare la stampante a un PC mediante questo connettore Connettore di interfaccia Interfaccia seriale Connettore di interfaccia Interfaccia US...

Страница 476: ...effettuato il collegamento Nota Se il cavo sistemato in maniera tale da fuoriuscire dal retro rimuovere i tasselli presenti nel coperchio dei connettori mediante una pinza o uno strumento simile In c...

Страница 477: ...llevare il coperchio dei connettori sul retro della stampante e collegare il cavo del trasformatore CA al connettore dell alimentazione Chiudere il coperchio dopo aver effettuato il collegamento Nota...

Страница 478: ...schiacciare la base del cavo 2 facendo scorrere la sezione esterna del connettore verso l alto quindi 3 inserire il connettore fino a sentire lo scatto di blocco 3 Collegare il connettore del cavo di...

Страница 479: ...Il meccanismo di blocco del connettore viene sbloccato consentendo un facile disinserimento Al contrario l estrazione forzata del cavo potrebbe danneggiare il connettore Nota Prima di scollegare il t...

Страница 480: ...ione Dopo il collegamento del trasformatore CA attivare l interruttore di alimentazione sul lato della stampante La spia POWER che si trova sul pannello di controllo si accender Pannello di controllo...

Страница 481: ...e il coperchio superiore potrebbe sembrare in posizione di blocco prima della completa apertura Assicurarsi che il coperchio sia davvero completamente aperto come illustrato nell immagine in basso Not...

Страница 482: ...di stampa facendo riferimento al paragrafo Modi speciali Vedere gli esempi 7 nella Sezione 10 2 Configurazione della stampante Nota Se la stampante utilizza carta di larghezza inferiore es 70 mm non...

Страница 483: ...ere la leva nella posizione desiderata Quindi posizionare il separatore Se necessario utilizzare la banda graduata Nota Il separatore A deve essere posizionato con un margine di circa 0 5 mm per l uti...

Страница 484: ...la parte b sul separatore A con la parte a leva premuta nella direzione indicata dalla freccia sollevare l elemento per disinnestare il blocco quindi rimuovere la sezione di supporto posteriore Sezion...

Страница 485: ...ntenendo fermo il separatore B nella posizione a sollevarlo per disinnestare il blocco Quindi rimuovere il separatore lungo la sezione di supporto posteriore Separatore B Sezione di supporto posterior...

Страница 486: ...plicare il separatore A a partire dalla sezione di supporto posteriore Nota Premere il separatore verso il basso fino a sentire un scatto quindi verificare che la parte superiore del separatore sia al...

Страница 487: ...e B a partire dalla sezione di supporto posteriore Nota Premere il separatore verso il basso fino a sentire un scatto quindi verificare che la parte superiore del separatore sia allineata orizzontalme...

Страница 488: ...di carta in maniera tale che la parte restante sia completamente priva di adesivo Eventuali rimanenze di adesivo o altro materiale colloso potrebbero aderire alla testina termica e causare problemi q...

Страница 489: ...figura in basso potrebbe causare un inceppamento della carta stampa irregolare o altri problemi di stampa Nota Se il rotolo di carta caricato poco teso come illustrato in basso necessario tenderlo be...

Страница 490: ...operchio superiore quindi far passare la carta continua attraverso la sezione di caricamento della carta sul retro della stampante Nota Tirare l estremit della carta continua fino ad estrarla dalla pa...

Страница 491: ...la carta fino a un altezza di 180 mm vedere Figura 1 Se la carta continua viene posizionata a contatto con il retro della stampante possibile creare una pila di soli 80 mm vedere Figura 2 Nota Inoltre...

Страница 492: ...sicurarsi che la carta non si inceppi non si tagli durante il trasporto e altri problemi simili Tali problemi potrebbero ridurre la durata della testina termica Nota Se il lampeggiamento della spia ER...

Страница 493: ...ella carta aperta Se la stampa uguale o inferiore a 50 mm utilizzare la stampante con la guida della carta chiusa Per lunghezze di stampa superiori a 50 mm utilizzare la stampante con la guida della c...

Страница 494: ...carta non posizionata in maniera corretta potrebbero verificarsi un inceppamento della carta o un allineamento irregolare della stampa Nota Per chiudere il coperchio superiore premerlo in posizione c...

Страница 495: ...e Le opzioni 1 e 2 sono impostazioni obbligatorie Le opzioni da 3 a 6 sono impostazioni facoltative Documenti di riferimento Il CD ROM in dotazione con la stampante contiene alcuni manuali online in f...

Страница 496: ...arta comune a segno nero o prefustellata 3 la modifica del formato della carta oppure 4 il passaggio alla carta per etichette prefustellata di formato uguale alla carta corrente ma con colore di base...

Страница 497: ...la stampante le informazioni di layout della carta descritte nella Sezione 6 1 1 Layout della carta del manuale III Creazione di carta personalizzata Creare la carta personalizzata come descritto nell...

Страница 498: ...terruttore FEED Le spie POWER ed ERROR lampeggiano alternativamente Continuare a mantenere premuto l interruttore FEED finch le spie POWER ed ERROR lampeggiano simultaneamente A questo punto rilasciar...

Страница 499: ...controllo Per registrare le informazioni di layout nella stampante seguire la procedura indicata di seguito Questa procedura spiega come creare un tipo personalizzato di carta e invia le informazioni...

Страница 500: ...cut position con il valore predefinito 3 Immettere i valori relativi ai margini sinistro destro superiore e inferiore 4 Premere il pulsante Save In questo modo nel driver della stampante vengono regi...

Страница 501: ...stente Procedura 1 Selezionare la carta desiderata che gi stata creata 2 Premere il pulsante Transfer to Printer Le informazioni di layout della carta selezionate vengono inviate alla stampante e dive...

Страница 502: ...llata a carta a segno nero Impostazione di carta con layout diverso da quello corrente Se l errore permane anche al termine dell impostazione verificare nuovamente se la carta caricata nella stampante...

Страница 503: ...l utilizzo della finestra Stampa per l impostazione delle preferenze di stampa anzich disporre di una finestra separata per l impostazione delle pagine Per ulteriori informazioni sulla finestra Stampa...

Страница 504: ...uperiore 4 Mantenere premuto l interruttore FEED Le spie POWER ed ERROR lampeggiano alternativamente Continuare a mantenere premuto l interruttore FEED finch le spie POWER ed ERROR lampeggiano simulta...

Страница 505: ...rmazioni di layout nella stampante seguire la procedura indicata di seguito Questa procedura spiega come inviare le informazioni di layout alla stampante Nelle schermate si presume l utilizzo di Windo...

Страница 506: ...sulla carta da S1 a S5 Non modificare il valore di S5 cut position con il valore predefinito 3 Immettere i valori relativi ai margini sinistro destro superiore e inferiore se necessario 4 Premere il p...

Страница 507: ...a carta corrente con la carta indicata dall impostazione del layout Sostituire la carta quindi premere il pulsante OK Se l errore permane anche al termine dell impostazione verificare nuovamente se la...

Страница 508: ...rmazioni sull inizializzazione del layout della carta vedere Inizializzazione del layout della carta nella Sezione 7 1 Pannello di controllo 6 Chiudere il coperchio superiore 7 La stampante fa avanzar...

Страница 509: ...indicata di seguito Questa procedura spiega come inviare l impostazione della larghezza della carta alla stampante Nelle schermate si presume l utilizzo di Windows XP Professional 1 Fare clic nell ord...

Страница 510: ...le istruzioni quindi premere il pulsante OK 5 Viene visualizzato un messaggio di conferma della sostituzione della carta corrente con la carta indicata dall impostazione del layout Sostituire la carta...

Страница 511: ...estremit sinistra dell area di stampa 11 0 mm per carta di 83 mm di larghezza 4 0 mm per carta di 80 mm di larghezza 3 0 mm per carta di larghezze diverse L7 larghezza dell area di stampa 80 0 mm per...

Страница 512: ...dall estremit sinistra della carta all estremit sinistra dell area di stampa 5 0 mm L7 larghezza dell area di stampa Impostazione larghezza carta L6 x 2 mm Nota I valori da L1 a L7 vengono rilevati d...

Страница 513: ...ione di taglio non specificato L5 lunghezza area di stampa non specificato L6 lunghezza dall estremit sinistra della carta all estremit sinistra dell area di stampa 1 0 mm per carta di 83 mm di larghe...

Страница 514: ...l interruttore FEED finch le spie POWER ed ERROR lampeggiano simultaneamente A questo punto rilasciare l interruttore FEED 5 Chiudere il coperchio superiore 6 La stampante fa avanzare la carta recupe...

Страница 515: ...so contrario sostituire la carta corrente con la carta corrispondente alle informazioni di layout 2 Errore durante la stampa Se si verifica un errore di layout della carta durante la stampa aprire il...

Страница 516: ...all accensione della stampante la funzione di rilevamento automatico del layout effettuer l impostazione dei valori di regolazione dei sensori Regolazione manuale dei sensori 1 possibile avviare la re...

Страница 517: ...e il driver della stampante per Windows Vedere Sezione 4 4 Scheda Graphics nella Windows Driver User s Guide 2 Mediante l utility della stampante Vedere la Sezione 3 2 5 Customize Value nella Utility...

Страница 518: ...descritto nell esempio 2 nella Sezione 10 2 Configurazione della stampante Se la velocit di stampa stata specificata mediante il driver per Windows tale valore verr utilizzato per la stampa la velocit...

Страница 519: ...ficare le impostazioni in base alle esigenze Per eseguire le modifiche possibile utilizzare uno dei metodi indicati di seguito 1 Mediante il driver della stampante per Windows Vedere Sezione 4 1 Sched...

Страница 520: ...ni come descritto nell esempio 4 nella Sezione 10 2 Configurazione della stampante 2 Mediante l utility della stampante Vedere la Sezione 3 2 4 Memory Switch settings nella Utility User s Guide 6 11 I...

Страница 521: ...care un errore Interruttore FEED Carta comune compresa carta per etichette a fogli interi Premendo una volta questo interruttore la carta avanza di una riga Mantenendo premuto questo interruttore la c...

Страница 522: ...lle informazioni di layout durante l uso dello stesso tipo di carta Procedura Mantenere premuto l interruttore FEED per alcuni secondi Le spie POWER ed ERROR cominciano a lampeggiare alternativamente...

Страница 523: ...rto POWER Sempre attivo ERROR Sempre attivo Testina calda 1 POWER Sempre attivo ERROR Sempre attivo 1 La stampa sospesa a causa dell alta temperatura della testina termica Condizione di errore LED Mod...

Страница 524: ...tensione POWER ERROR Modalit ripetuta di lampeggiamento della spia verde quattro volte e della spia ambra una volta Tensione eccessiva POWER ERROR Modalit ripetuta di lampeggiamento della spia verde c...

Страница 525: ...ppamento della carta Se si verifica un inceppamento della carta procedere alla rimozione come indicato di seguito 1 Spegnere la stampante mediante l interruttore di alimentazione 2 Premere la leva di...

Страница 526: ...nserire la carta 2 Chiudere completamente il coperchio superiore 3 Attendere finch la temperatura della testina termica sia diminuita in maniera sufficiente 9 2 Problemi relativi al taglio Sintomo Cau...

Страница 527: ...tazioni di densit e velocit di stampa in base alla carta utilizzata Vedere la Sezione 10 2 Configurazione della stampante 2 Spegnere la stampante e rivolgersi all assistenza La densit di stampa irrego...

Страница 528: ...arta terminando la stampa di prova Per terminare una stampa di prova in corso premere l interruttore FEED A questo punto la stampante taglia la carta terminando la stampa di prova Nota necessario mant...

Страница 529: ...tampante termina la stampa di prova Mantenendo premuto l interruttore FEED per almeno un secondo la stampante continua la stampa di prova di un elenco di font Per terminare la stampa dell elenco di fo...

Страница 530: ...ll utilizzo dell utility vedere la Utility User s Guide In questa sezione vengono descritte le modifiche delle impostazioni tipiche elencate dettagliamente in basso Esempio 1 Impostazione di un valore...

Страница 531: ...endo premuto l interruttore FEED sulla sinistra del coperchio superiore Nota necessario mantenere premuto l interruttore FEED fino all avvio della stampa Nota Se la voce che si desidera selezionare vi...

Страница 532: ...mantenere premuto l interruttore FEED per almeno un secondo per accettare la selezione All avvio del modo configurazione viene stampato quanto segue Setup Test Print End Sample Print Data Analysis Cle...

Страница 533: ...ttore FEED per almeno un secondo per accettare la selezione All accettazione della selezione di SETUP viene stampato quanto segue Paper Setting Return to Top Menu Others Serial Condition Customize Val...

Страница 534: ...e All accettazione della selezione di CUSTOMIZE VALUE viene stampato quanto segue Customize Value Memory Switch Paper Setting Return to Top Menu Others Serial Condition Customize Value Memory Switch P...

Страница 535: ...ne All accettazione della selezione di PRINT DENSITY viene stampato quanto segue Print Density Print Color NV Graphics Memory User NV Memory Return to Top Menu Return to Up Low Power Max Speed BK Dens...

Страница 536: ...selezione All accettazione della selezione di 100 viene stampato quanto segue 100 95 90 85 80 75 70 Lightest 130 Darkest 130 Darkest 125 120 115 110 105 100 95 90 85 80 75 70 Lightest Paper feed dire...

Страница 537: ...quanto segue 9 Selezionare la voce RETURN TO TOP MENU All accettazione della selezione di RETURN TO TOP MENU viene stampato quanto segue Return to Top Menu Return to Top Menu Others Serial Condition...

Страница 538: ...la carta ed esce dal modo configurazione Nota Spegnendo la stampante senza prima selezionare END l impostazione non verr salvata Verifica delle impostazioni Per verificare le impostazioni eseguire un...

Страница 539: ...stampante mantenendo premuto l interruttore FEED sulla sinistra del coperchio superiore Nota necessario mantenere premuto l interruttore FEED fino all avvio della stampa Nota Se la voce che si deside...

Страница 540: ...mantenere premuto l interruttore FEED per almeno un secondo per accettare la selezione All avvio del modo configurazione viene stampato quanto segue Setup Test Print End Sample Print Data Analysis Cle...

Страница 541: ...VALUE Premere rapidamente l interruttore FEED due volte fino a un secondo per volta per spostarsi su CUSTOMIZE VALUE Paper Setting Return to Top Menu Others Serial Condition Customize Value Memory Sw...

Страница 542: ...mory Return to Top Menu Return to Up Low Power Max Speed BK Density Print Density Print Color NV Graphics Memory User NV Memory Customize Value Paper feed direction Selection Item Max Speed BK Density...

Страница 543: ...emere brevemente l interruttore FEED max un secondo fino a selezionare 9th Quindi mantenere premuto l interruttore FEED per almeno un secondo per accettare la selezione 5th 9th High Speed 8th 7th 6th...

Страница 544: ...UP viene stampato quanto segue Return to Up Return to Top Menu Return to Up Sensor Auto Adjust Mark Feed with Cut Feed at Power On Layout Er Recovery Layout Er Process TearOff Adjustment Base Adjustm...

Страница 545: ...l interruttore FEED max un secondo tre volte per spostarsi su END Quindi mantenere premuto l interruttore FEED per almeno un secondo per accettare la selezione All accettazione della selezione di END...

Страница 546: ...ione non verr salvata Verifica delle impostazioni Per verificare le impostazioni eseguire una stampa di prova facendo riferimento alla Sezione 10 1 La stampa di prova contiene un elenco di impostazion...

Страница 547: ...ro della stampante mantenendo premuto l interruttore FEED sulla sinistra del coperchio superiore Nota necessario mantenere premuto l interruttore FEED fino all avvio della stampa Nota Se la voce che s...

Страница 548: ...mantenere premuto l interruttore FEED per almeno un secondo per accettare la selezione All avvio del modo configurazione viene stampato quanto segue Setup Test Print End Sample Print Data Analysis Cle...

Страница 549: ...STOMIZE VALUE Premere brevemente l interruttore FEED max un secondo due volte per spostarsi su CUSTOMIZE VALUE Paper Setting Return to Top Menu Others Serial Condition Customize Value Memory Switch Pa...

Страница 550: ...max un secondo due volte per spostarsi su PRINT COLOR User NV Memory Return to Top Menu Return to Up Low Power Max Speed BK Density Print Density Print Color NV Graphics Memory User NV Memory Customi...

Страница 551: ...ione della selezione di PRINT COLOR viene stampato quanto segue 7 Selezionare la voce 2 COLOR Premere brevemente l interruttore FEED max un secondo una volta per spostarsi su 2 COLOR Mono 2 Color Mono...

Страница 552: ...URN TO UP viene stampato quanto segue Return to Up Return to Top Menu Return to Up Sensor Auto Adjust Mark Feed with Cut Feed at Power On Layout Er Recovery Layout Er Process TearOff Adjustment Base A...

Страница 553: ...pegnendo la stampante senza prima selezionare END le impostazioni non verranno salvate Verifica delle impostazioni Per verificare le impostazioni eseguire una stampa di prova facendo riferimento alla...

Страница 554: ...penta 2 La carta stata caricata nella stampante 3 Il coperchio chiuso 2 Avviare il modo speciale Accendere l interruttore sul lato destro della stampante mantenendo premuto l interruttore FEED sulla s...

Страница 555: ...spostarsi su SETUP Test Print End Sample Print Data Analysis Cleaning Sensor Adjustment Setup Test Print Special Mode Usage Item Selection Please push the feed switch short Item Decision Please push t...

Страница 556: ...nare SETUP Mantenere premuto l interruttore FEED per almeno un secondo per accettare la selezione All accettazione della selezione di SETUP viene stampato quanto segue Setup End Default Set Setup Prin...

Страница 557: ...l accettazione della selezione di PAPER SETTING viene stampato quanto segue Paper Detection Return to Top Menu Return to Up Sensor Auto Adjust Mark Feed with Cut Feed at Power On Layout Er Recovery La...

Страница 558: ...selezione di FEED AT POWER ON viene stampato quanto segue Feed at Power On Layout Er Recovery Layout Er Process TearOff Adjustment Base Adjustment Paper Width Paper Detection Return to Top Menu Retur...

Страница 559: ...zione All accettazione della selezione di DISABLE viene stampato quanto segue Disable Enable Disable Enable Feed at Power On Paper feed direction Selection Item Return to Up Return to Top Menu Return...

Страница 560: ...TO TOP MENU Mantenere premuto l interruttore FEED per almeno un secondo per accettare la selezione All accettazione della selezione di RETURN TO TOP MENU viene stampato quanto segue Return to Top Menu...

Страница 561: ...la carta ed esce dal modo configurazione Nota Spegnendo la stampante senza prima selezionare END le impostazioni non verranno salvate Verifica delle impostazioni Per verificare le impostazioni esegui...

Страница 562: ...1 Prima di iniziare a operare su questa impostazione verificare le seguenti condizioni della stampante 1 La stampante spenta 2 La carta stata caricata nella stampante 3 Il coperchio chiuso 2 Avviare...

Страница 563: ...spostarsi su SETUP Test Print End Sample Print Data Analysis Cleaning Sensor Adjustment Setup Test Print Special Mode Usage Item Selection Please push the feed switch short Item Decision Please push t...

Страница 564: ...anto segue 4 In modo configurazione selezionare DEFAULT SET Premere rapidamente l interruttore FEED due volte fino a un secondo per volta per spostarsi su DEFAULT SET Setup End Default Set Setup Print...

Страница 565: ...la stampante senza prima selezionare END le impostazioni non verranno salvate Verifica delle impostazioni Per verificare le impostazioni eseguire una stampa di prova come descritto nella Sezione 10 1...

Страница 566: ...carta stata caricata nella stampante 3 Il coperchio chiuso 2 Avviare il modo speciale Accendere l interruttore sul lato destro della stampante mantenendo premuto l interruttore FEED sulla sinistra de...

Страница 567: ...spostarsi su SETUP Test Print End Sample Print Data Analysis Cleaning Sensor Adjustment Setup Test Print Special Mode Usage Item Selection Please push the feed switch short Item Decision Please push t...

Страница 568: ...ue 4 In modo configurazione selezionare SETUP Mantenere premuto l interruttore FEED per almeno un secondo per accettare la selezione Setup End Default Set Setup Print Setup Setup Paper feed direction...

Страница 569: ...OTHERS viene stampato quanto segue Others Serial Condition Customize Value Memory Switch Paper Setting Return to Top Menu Others Serial Condition Customize Value Memory Switch Paper Setting Setup Pape...

Страница 570: ...volta per spostarsi su PNE DETECT PNE Detect Process ID Error Serial Number USB ACK Pulse Width Return to Top Menu Return to Up Roll Paper Unit PE Roll Paper Unit Buzzer Batch OTHER IF Batch COM IF F...

Страница 571: ...a selezione di PNE DETECT viene stampato quanto segue 7 Selezionare la voce DISABLE Premere rapidamente l interruttore FEED fino a un secondo per spostarsi su DISABLE Enable Disable Enable PNE Detect...

Страница 572: ...la selezione All accettazione della selezione di RETURN TO UP viene stampato quanto segue Return to Up Return to Top Menu Return to Up Roll Paper Unit PE Roll Paper Unit Buzzer Batch OTHER IF Batch CO...

Страница 573: ...erruttore FEED tre volte fino a un secondo per volta per spostarsi su END Quindi mantenere premuto l interruttore FEED per almeno un secondo per accettare la selezione All accettazione della selezione...

Страница 574: ...zioni non verranno salvate Verifica delle impostazioni Per verificare le impostazioni eseguire una stampa di prova come descritto nella Sezione 10 1 La stampa di prova contiene un elenco di impostazio...

Страница 575: ...nte spenta 2 La carta stata caricata nella stampante 3 Il coperchio chiuso 2 Avviare il modo speciale Accendere l interruttore sul lato destro della stampante mantenendo premuto l interruttore FEED su...

Страница 576: ...spostarsi su SETUP Test Print End Sample Print Data Analysis Cleaning Sensor Adjustment Setup Test Print Special Mode Usage Item Selection Please push the feed switch short Item Decision Please push t...

Страница 577: ...ue 4 In modo configurazione selezionare SETUP Mantenere premuto l interruttore FEED per almeno un secondo per accettare la selezione Setup End Default Set Setup Print Setup Setup Paper feed direction...

Страница 578: ...secondo per accettare la selezione Paper Detection Return to Top Menu Return to Up Sensor Auto Adjust Mark Feed with Cut Feed at Power On Layout Er Recovery Layout Er Process TearOff Adjustment Base...

Страница 579: ...accettazione della selezione di PAPER WIDTH viene stampato quanto segue Paper Width Paper Detection Return to Top Menu Return to Up Sensor Auto Adjust Mark Feed with Cut Feed at Power On Layout Er Rec...

Страница 580: ...ccettazione della selezione di 80mm viene stampato quanto segue 80mm 70mm 83mm 80mm 70mm 6Xmm 5Xmm 4Xmm 3Xmm 2Xmm Paper Width Paper feed direction Selection Item Return to Up Return to Top Menu Return...

Страница 581: ...TO TOP MENU Mantenere premuto l interruttore FEED per almeno un secondo per accettare la selezione All accettazione della selezione di RETURN TO TOP MENU viene stampato quanto segue Return to Top Menu...

Страница 582: ...carta ed esce dal modo configurazione Nota Spegnendo la stampante senza prima selezionare END le impostazioni non verranno salvate Verifica delle impostazioni Per verificare le impostazioni eseguire...

Страница 583: ...La stampante spenta 2 La carta stata caricata nella stampante 3 Il coperchio chiuso 2 Avviare il modo speciale Accendere l interruttore sul lato destro della stampante mantenendo premuto l interrutto...

Страница 584: ...spostarsi su SETUP Test Print End Sample Print Data Analysis Cleaning Sensor Adjustment Setup Test Print Special Mode Usage Item Selection Please push the feed switch short Item Decision Please push t...

Страница 585: ...In modo configurazione selezionare SETUP Mantenere premuto l interruttore FEED per almeno un secondo per accettare la selezione Setup End Default Set Setup Print Setup Setup Paper feed direction Sele...

Страница 586: ...OTHERS viene stampato quanto segue Others Serial Condition Customize Value Memory Switch Paper Setting Return to Top Menu Others Serial Condition Customize Value Memory Switch Paper Setting Setup Pape...

Страница 587: ...si su BATCH OTHER IF Batch OTHER IF Batch COM IF Font B PNE Detect Process ID Error Serial Number USB ACK Pulse Width Return to Top Menu Return to Up Roll Paper Unit PE Roll Paper Unit Buzzer Batch OT...

Страница 588: ...zione di BATCH OTHER IF viene stampato quanto segue 7 Selezionare la voce ENABLE Premere rapidamente l interruttore FEED fino a un secondo per spostarsi su ENABLE Disable Disable Enable Batch OTHER IF...

Страница 589: ...la selezione All accettazione della selezione di RETURN TO UP viene stampato quanto segue Return to Up Return to Top Menu Return to Up Roll Paper Unit PE Roll Paper Unit Buzzer Batch OTHER IF Batch CO...

Страница 590: ...interruttore FEED tre volte fino a un secondo per volta per spostarsi su END Mantenere premuto l interruttore FEED per almeno un secondo per accettare la selezione All accettazione della selezione di...

Страница 591: ...zioni non verranno salvate Verifica delle impostazioni Per verificare le impostazioni eseguire una stampa di prova come descritto nella Sezione 10 1 La stampa di prova contiene un elenco di impostazio...

Страница 592: ...nfigurazione Voci di configurazione e altri dettagli 1 Paper Setting setup items Voci di configurazione delle impostazioni della carta Voce Spiegazione Voce di configurazione dettagliata 1 Paper Detec...

Страница 593: ...1 X mm 0 X mm 0 0 mm 0 X mm 1 X mm 2 X mm 3 X mm 4 X mm 5 0 mm Se selezionato 4 X mm da 4 0 a 4 9 mm Se selezionato 3 X mm da 3 0 a 3 9 mm Se selezionato 2 X mm da 2 0 a 2 9 mm Se selezionato 1 X mm...

Страница 594: ...mm 2 X mm 3 X mm 4 X mm 5 0 mm Se selezionato 4 X mm da 4 0 a 4 9 mm Se selezionato 3 X mm da 3 0 a 3 9 mm Se selezionato 2 X mm da 2 0 a 2 9 mm Se selezionato 1 X mm da 1 0 a 1 9 mm Se selezionato 0...

Страница 595: ...e viene effettuato l avanzamento della carta nella posizione iniziale Se viene specificato Disable e la testina non si trova nella posizione iniziale all accensione pu verificarsi un allineamento non...

Страница 596: ...olo per l interfaccia parallela Enable abilita Disable disabilita 6 DSR 6 Reset Specifica l operazione di ripristino mediante il segnale DSR 6 Questa voce valida solo per l interfaccia seriale Enable...

Страница 597: ...ory Capacit della memoria grafica NV None nessuna 64KByte 128KByte 192KByte 256KByte 320KByte 384KByte 3 Print Color Colori di stampa Mono 2 Color 2 colori 4 Print Density Densit di stampa 70 Lightest...

Страница 598: ...7th 7 8th 8 9th High Speed 9 velocit massima 7 Low Power Velocit di stampa massima MODO1 stampa all 80 della densit di stampa specificata MODO2 variazione dell ampiezza dell impulso strobiscopico NORM...

Страница 599: ...cifica l utilizzo del collegamento USB V COM Printer stampante 3 Serial Number Specifica il tipo di notifica del numero di serie in un collegamento USB Generalmente viene specificato ENABLE Enable abi...

Страница 600: ...calino quando si verifica un errore Se specificato Disable il cicalino pu essere attivato mediante comando questa voce valida solo per un dispositivo con indicazione di cicalino installato Enable abil...

Страница 601: ...stampante 3 Il coperchio chiuso 2 Avviare il modo speciale Accendere l interruttore sul lato destro della stampante mantenendo premuto l interruttore FEED sulla sinistra del coperchio superiore Nota...

Страница 602: ...ato SENSOR ADJUSTMENT mantenere premuto l interruttore FEED per almeno un secondo per avviare la regolazione dei sensori Test Print End Sample Print Data Analysis Cleaning Sensor Adjustment Setup Test...

Страница 603: ...ne di una voce 1 A ogni breve pressione dell interruttore FEED e successivo rilascio viene stampato quanto segue 2 Viene stampato ADJUSTMENT ADJUSTMENT PRINT END ADJUSTMENT e cos via ciclicamente in q...

Страница 604: ...tenere premuto l interruttore FEED per almeno un secondo per terminare la regolazione dei sensori 2 La stampante torna al modo di funzionamento normale ADJUSTMENT 1 Quando viene stampato ADJUSTMENT PR...

Страница 605: ...ntenere premuto l interruttore FEED per almeno un secondo per avviare la regolazione dei sensori a Vengono stampate le voci della selezione 2 Vengono stampati BM SENSOR LABEL SENSOR PNE SENSOR PE SENS...

Страница 606: ...lmeno un secondo per avviare la regolazione del sensore del segno nero 2 All avvio della regolazione del sensore del segno nero viene stampato quanto segue e tagliata la carta 3 Aprire il coperchio su...

Страница 607: ...mento della carta caricare nuovamente la carta originale Vengono stampati i risultati della regolazione 6 La stampante memorizza i risultati della regolazione quindi torna allo stato precedente di avv...

Страница 608: ...la carta 3 Aprire il coperchio superiore e caricare la carta che si desidera regolare Alla chiusura del coperchio superiore viene avviato l avanzamento della carta Nota L utilizzo di qualsiasi tipo di...

Страница 609: ...risultati della regolazione 6 La stampante memorizza i risultati della regolazione quindi torna allo stato precedente di avvio della regolazione dei sensori 7 Se l operazione di regolazione non riesc...

Страница 610: ...el sensore di carta quasi esaurita viene stampato quanto segue e tagliata la carta 3 Aprire il coperchio superiore e caricare la carta che si desidera regolare Alla chiusura del coperchio superiore vi...

Страница 611: ...memoria flash i risultati della regolazione quindi torna allo stato di avvio della regolazione dei sensori 7 La stampante memorizza i risultati della regolazione quindi torna allo stato precedente di...

Страница 612: ...1 Quando viene stampato PE SENSOR mantenere premuto l interruttore FEED per almeno un secondo per avviare la regolazione del sensore di carta esaurita 2 All avvio della regolazione del sensore di car...

Страница 613: ...camento di carta per etichette prefustellata distaccare parzialmente l etichetta dalla carta di base con la parte distaccata rivolta verso il sensore per le etichette quindi chiudere il coperchio sens...

Страница 614: ...nte la carta originale Vengono stampati i risultati della regolazione 7 La stampante memorizza i risultati della regolazione quindi torna allo stato precedente di avvio della regolazione dei sensori 8...

Страница 615: ...nella Sezione 10 1 Riaccendendo la stampante e premendo brevemente l interruttore FEED vengono stampati i dati indicati di seguito All avvio del modo speciale viene stampato quanto segue Test Print En...

Страница 616: ...i Premere brevemente l interruttore FEED max un secondo quattro volte per spostarsi su DATA ANALYSIS Data Analysis Cleaning Sensor Adjustment Setup Test Print End Sample Print Data Analysis Cleaning S...

Страница 617: ...vare il modo di stampa esadecimale In tale modo tutti i segnali inviati dal computer alla stampante vengono stampati sotto forma di codici esadecimali I dati stampati sono utilizzabili per verificare...

Страница 618: ...n tale modo tutti i segnali inviati dal computer alla stampante vengono stampati sotto forma di nomi di comandi I dati stampati sono utilizzabili per verificare l avvenuto invio dei codici di controll...

Страница 619: ...ella Sezione 10 1 Riaccendendo la stampante e premendo brevemente l interruttore FEED vengono stampati i dati indicati di seguito All avvio del modo speciale viene stampato quanto segue Test Print End...

Страница 620: ...condo cinque volte per spostarsi su SAMPLE PRINT Sample Print Data Analysis Cleaning Sensor Adjustment Setup Test Print End Sample Print Data Analysis Cleaning Sensor Adjustment Setup Test Print Paper...

Страница 621: ...ivo LABEL5 Premendo brevemente l interruttore FEED viene stampato il seguente motivo LABEL1 LABEL2 LABEL3 LABEL4 LABEL5 LABEL1 Premendo a lungo circa un secondo l interruttore FEED viene stampato lo s...

Страница 622: ...172 Risultati della stampa di prova Motivo LABEL1 Motivo LABEL2 Motivo LABEL3 Motivo LABEL4...

Страница 623: ...173 Motivo LABEL5...

Страница 624: ...ali materiali incollati al gruppo di espulsione della carta della guida potrebbe causare un errore di espulsione Mediante l utilizzo di un solvente alcolico rimuovere periodicamente il materiale adesi...

Страница 625: ...e mantenendo premuto l interruttore FEED sul pannello di controllo A questo punto vengono stampati i dati indicati di seguito Test Print End Sample Print Data Analysis Cleaning Sensor Adjustment Setup...

Страница 626: ...secondo per accettare la selezione All accettazione della selezione di CLEANING viene stampato quanto segue Cleaning Sensor Adjustment Setup Test Print End Sample Print Data Analysis Cleaning Sensor...

Страница 627: ...o quanto segue e tagliata la carta 4 Aprire il coperchio superiore e rimuovere il rotolo di carta 5 Premere l interruttore FEED per ruotare il rullo di trascinamento in una posizione che agevoli la pu...

Страница 628: ...curarsi di non ammaccare o danneggiare in alcun modo il rullo di trascinamento La presenza di un ammaccatura sul rullo di trascinamento potrebbe causare una stampa incompleta o errori di avanzamento d...

Страница 629: ...ermica Nota La testina termica soggetta a danneggiamenti Per la pulizia utilizzare un panno morbido e prestare attenzione in special modo a non danneggiare la testina Nota Immediatamente dopo la stamp...

Страница 630: ...pulire la lama periodicamente con cadenza mensile per garantire stabilit nel taglio Nota Anche se l estremit della lama della taglierina non risulta affilata come quella dei coltellini generalmente ut...

Страница 631: ...mpati i dati indicati di seguito Nota Se la voce che si desidera selezionare viene oltrepassata premere brevemente l interruttore FEED ripetutamente fino a tornare alla prima voce Test Print End Sampl...

Страница 632: ...secondo per accettare la selezione All accettazione della selezione di CLEANING viene stampato quanto segue Cleaning Sensor Adjustment Setup Test Print End Sample Print Data Analysis Cleaning Sensor...

Страница 633: ...Quindi premere l interruttore FEED per almeno un secondo per accettare la selezione Viene avviato il modo per la pulizia della taglierina All avvio di tale modo viene stampato quanto segue e tagliata...

Страница 634: ...ggiare l estremit della taglierina superiore con il coltellino o il cacciavite Assicurarsi inoltre di non ammaccare o danneggiare in alcun modo il rullo di trascinamento La presenza di un ammaccatura...

Страница 635: ...on risulta affilata come quella dei coltellini generalmente utilizzati in ufficio esiste il rischio di ferite a un dito eventualmente premuto contro la lama della taglierina 7 Al termine della pulizia...

Страница 636: ...della taglierina inferiore Nota Prestare molta attenzione a non danneggiare l estremit della taglierina inferiore con il coltellino o il cacciavite Assicurarsi inoltre di non ammaccare o danneggiare...

Страница 637: ...zati in ufficio esiste il rischio di ferite a un dito eventualmente premuto contro la lama della taglierina 5 Al termine della pulizia riposizionare il rotolo di carta e chiudere il coperchio superior...

Страница 638: ...gresso Dati in ingresso 4 N C 5 N C 6 RX Ingresso Dati in ingresso 7 N C 8 N C 2 LED N Display Descrizione 1 Connessione 10BASE T Si accende al riconoscimento della destinazione di connessione 10BASE...

Страница 639: ...ione delle informazioni di configurazione 1 Spegnere la stampante 2 Impostare l interruttore 2 su ON 3 Accendere la stampante L inizializzazione impiega circa cinque secondi 4 Spegnere la stampante 5...

Страница 640: ...zione 1 FG Messa a terra pannello 2 TXD Uscita Dati in invio 3 RXD Ingresso Dati in ricezione 4 RTS Uscita Invio richiesta 5 CTS Ingresso Invio autorizzazione 6 DSR Ingresso Dataset pronto 7 SG Messa...

Страница 641: ...pannello cassetto 2 DRD1 Uscita Segnale azionamento apertura cassetto 1 3 DRSNS1 Ingresso Segnale rilevamento cassetto 1 4 24V Uscita Alimentazione azionamento 5 DRD2 Uscita Segnale azionamento apert...

Страница 642: ...ntazione della stampante tramite il pin 4 del connettore Note La resistenza del solenoide dell apertura del cassetto deve essere di almeno 24 Se viene utilizzato un solenoide con una resistenza ridott...

Страница 643: ...Printer stampante 2 3 4 5 6 Cavo 2 4 Solenoide apertura cassetto minimo 24 Interruttore apertura chiusura cassetto 2 4 6 Solenoide apertura cassetto minimo 24 Interruttore apertura chiusura cassetto 1...

Страница 644: ...l connettore di alimentazione N pin Nome segnale 1 24 V 2 SG 3 N C Nota Utilizzare il trasformatore CA per l alimentazione Nota Il mancato utilizzo del trasformatore CA originale uso di alimentazione...

Страница 645: ...83 mm per la larghezza della carta Nota Non possibile utilizzare carta di larghezza compresa tra 71 e 79 mm 4 Velocit di stampa carta termica monocromatica Massima velocit di stampa 260 mm s Larghezza...

Страница 646: ...12x24 ANK font B Font di estensione 38 colonne 10x24 42 colonne 9x24 42 colonne 10x24 46 colonne 9x24 43 colonne 10x24 48 colonne 9x24 Corpo Per carta di 80 mm di larghezza Per carta di 83 mm di largh...

Страница 647: ...NK font B 10 x 24 9 x 24 1 25 x 3 0 1 125 x 3 0 9 x 17 9 x 17 1 125 x 2 125 1 125 x 2 125 ANK font C 8 x 16 1 0 x 2 0 8 x 13 1 0 x 1 625 Kanji font A 24 x 24 3 0 x 3 0 24 x 24 3 0 x 3 0 Kanji font B 2...

Страница 648: ...198 8 Vista dall esterno Guida per la carta aperta Guida per la carta...

Страница 649: ...icamente la pulizia della lama della taglierina per rimuovere il materiale adesivo Nota Il taglio completo pu provocare irregolarit al centro della superficie di taglio La presenza di fibra di carta i...

Страница 650: ...ta rimanente sono valori teorici Questi valori variano in base alle condizioni effettive tra cui la condizione del rotolo di carta e lo spessore della carta Nota Si suppone che il diametro del support...

Страница 651: ...201 13 4 Specifiche dell interfaccia 1 LAN IEEE802 3 10BASE T IEEE802 3U 100BASE TX 2 Doppia conforme agli standard USB 1 1 e RS 232C...

Страница 652: ...tita dal 10 al 95 di umidit relativa senza condensa stampa garantita dal 10 all 85 di umidit relativa senza condensa In inattivit dall 8 al 95 di umidit relativa senza condensa Durante il trasporto o...

Страница 653: ...essore di 75 m 500 000 tagli per carta di tipo raccomandato con spessore compreso tra 75 e 150 m Taglio per etichette 1 000 000 tagli taglio all interno dell area di base 500 000 tagli taglio di etich...

Страница 654: ...o sensore carta quasi esaurita Sensore carta quasi esaurita Collegato alla stampante Divisorio Regolare la posizione in base alla larghezza della carta Asse di supporto rotolo di carta in dotazione Co...

Страница 655: ...in dotazione Accessorio per collegamento stampante Viti per montaggio accessorio x2 Istruzioni Asse di supporto rotolo di carta Diametro 76 2 mm 3 pollici Asse di supporto rotolo di carta Diametro 25...

Страница 656: ...sterno B 32 0 5 mm rotolo di carta da un pollice Diametro interno C 76 2 0 5 mm diametro esterno B 82 0 5 mm rotolo di carta da tre pollici 5 Superficie colorazione lato esterno del rotolo di carta 6...

Страница 657: ...anente rilevabile Spessore della carta m Diametro supporto esterno B mm Diametro di rilevamento A mm Carta rimanente m 75 82 Circa 100 Da 20 a 30 150 82 Circa 100 Da 10 a 20 Nota I valori precedenti e...

Страница 658: ...azione del trasformatore CA 1 Rimuovere il coperchio dei connettori sul retro della stampante Aprire il coperchio dei connettori e flettere la copertura centrale nella direzione della freccia Quindi r...

Страница 659: ...e al connettore posto sul retro della stampante Nota Per informazioni sul collegamento del cavo del trasformatore CA vedere la Sezione 4 2 Collegamento del trasformatore CA Nota Eseguire il collegamen...

Страница 660: ...dell accessorio di collegamento della stampante nelle sporgenze sinistra e destra presenti sul connettore dell unit rotolo di carta per eseguire il collegamento Fori sinistro e destro della staffa di...

Страница 661: ...rno dell unit rotolo di carta come illustrato nello schema in basso Cavo sensori Cavo interfaccia Cavo trasformatore CA Morsetti dei cavi Aprire il morsetto del cavo flettendo la parte A nella direzio...

Страница 662: ...e il cavo dei sensori tra l unit rotolo di carta e la stampante assicurando la lunghezza eccessiva mediante un morsetto per cavi come illustrato nello schema in basso Cavo sensori Assicurato mediante...

Страница 663: ...e e fissare la vite 1 la posizione predefinita la tabella seguente indica la posizione in cui impostato il tubo di carta di un pollice di diametro 1 Posizione per supporti di 1 0 pollici di dimensione...

Страница 664: ...vite 1 la posizione predefinita la tabella seguente indica la posizione in cui impostato il supporto di un pollice di diametro 1 Posizione per supporti di 1 0 pollici di dimensione 1 5 Posizione per s...

Страница 665: ...Per tale motivo necessario rimuovere circa un giro del rotolo di carta a partire dall inizio Eventuale materiale adesivo o altro materiale residuo della colla potrebbe aderire alla testina termica e p...

Страница 666: ...ta stampa irregolare o altri problemi di stampa Nota Se il rotolo di carta caricato poco teso come illustrato in basso necessario tenderlo bene prima di eseguire una stampa La stampa su rotoli di cart...

Страница 667: ...il divisorio lasciando un leggero spazio come illustrato nello schema Fronte lasciare uno spazio di un unit sulla banda graduata tra il divisorio e il rotolo di carta quindi stringere i pomelli front...

Страница 668: ...igura b in basso la carta potrebbe non riuscire a passare Assicurarsi che la carta venga guidata sotto il rullo della guida come nella Figura a in alto Nota Se un rotolo di carta viene collocato come...

Страница 669: ...della carta dalla parte anteriore della stampante 5 Dopo aver collocato il rotolo di carta chiudere il coperchio superiore Coperchio superiore Aprire il coperchio superiore Estrarre l estremit inizial...

Страница 670: ...220 14 9 Aspetto dell unit rotolo di carta Quando collegata alla stampante...

Страница 671: ...KI Europe Ltd Ukraine Raisy Opkinoy Street 8 Building B 2nd Floor Kiev 02002 Ukraine Tel 380 44 537 5288 Website www oki ua OKI Sistem ve Yaz c z mler Tic Ltd ti Harman sok Duran Is Merkezi No 4 Kat 6...

Страница 672: ...www oki nl Oki Systems Norway AS Tevlingveien 23 N 1081 Oslo Website www oki no Var v nlig kontakta din terf rs ljare i f rsta hand f r konsultation I andra hand kontakta Oki Systems Sweden AB Borgafj...

Страница 673: ...LD670 Benutzerhandbuch...

Страница 674: ...tates Environmental Protection Agency Microsoft Windows Windows Server und Windows Vista sind eingetragene Warenzeichen der Microsoft Corporation Apple Macintosh Rosetta Mac und Mac OS sind eingetrage...

Страница 675: ...wenden Sie sich an Ihren H ndler vor Ort IMPORTEUR F R EU AUTORISIERTE VERTRETUNGEN OKI Europe Limited handeltreibend als OKI Printing Solutions Blays House Wick Road Egham Surrey TW20 0HJ Vereinigte...

Страница 676: ...zu schalten 3 Allgemeiner Warnhinweis Vorsichtshinweis XU GHQWL LHUXQJ HLQHV DOOJHPHLQHQ Warnhinweises Vorsichtshinweises 4 FKWXQJ KHL H 2EHU lFKH Zur Anzeige dass der markierte Gegenstand hei sein ka...

Страница 677: ...kdichte fest Siehe Beispiel 1 im Abschnitt 10 2 Einrichtung des Druckers 6 Wenn eine Papierrolle mit einem anderen Kernau endurchmesser als 32 mm verwendet wird leidet die Genauigkeit der Papierendeer...

Страница 678: ...in solch einem Fall das Papier vor dem Druckvorgang 20 bis 30 mm 12 Wenn andere als die empfohlenen Papiertypen verwendet werden k nnen die angegebene Druckqualit t und Lebensdauer des Thermodruckkop...

Страница 679: ...barkeit 2 Abh ngig von der Luftfeuchtigkeit oder anderen Umgebungsbedingungen k nnen Ausdrucke auf Etikettenpapier oder dickem Papier verschmiert sein Passen Sie die Druckgeschwindigkeit und die Druck...

Страница 680: ...sich der Host Computer selbst nach dem erneuten Anschlie en des Kabels oder dem erneuten Einschalten des Netzschalters nicht in den normalen Betriebszustand schalten l sst starten Sie den Host Compute...

Страница 681: ...er an das ffentliche Telefonnetz oder hnliches angeschlossen ist Hinweis zur Verwendung des Druckers im Spezialmodus 1 Wenn eine Papierrolle mit gro em Durchmesser verwendet wird kann sich das Papier...

Страница 682: ...ss des Schnittstellenkabels 23 4 2 Anschluss des Kassenschubladenkabels 26 4 3 Anschluss des Netzteils 27 4 4 Trennen des Netzteils 29 4 5 Einschalten 30 5 Papier zum Drucken einlegen 31 5 1 Obere Abd...

Страница 683: ...onen 70 7 Bedienfeld 71 7 1 Bedienfeld 71 7 2 Fehleranzeigen 73 8 Vermeiden und Entfernen von Papierstaus 75 8 1 Vermeiden von Papierstaus 75 8 2 Entfernen von Papierstaus 75 9 Fehlerbehebung 76 9 1 P...

Страница 684: ...le Schnittstelle 190 12 3 Kassenschubladen Anschlussbuchse 191 12 4 Daten der Stromversorgung 194 13 Technische Daten 195 13 1 Technische Daten allgemein 195 13 2 Technische Daten Messer 199 13 3 Tech...

Страница 685: ...ren Abdeckung Papierf hrung ffnen wenn die erwartete Druckl nge 50 mm berschreitet Papierf hrung Schaltet den Drucker ein und aus Obere Abdeckung Diese Abdeckung zum Auswechseln der Sorten ffnen und s...

Страница 686: ...12 Lieferumfang Thermopapier CD HANDBUCH DRUCKERTREIBER DIENSTPROGRAMM Anleitung Sicherheitsgarantie Netzteil Netzkabel...

Страница 687: ...g KA02951 0120 Eingang 100 240 V Wechselstrom 50 60 Hz Ausgang 24 V Gleichstrom 5 1 5 A Vorsicht Verwenden Sie nur zugelassene Netzteile Vorsicht Verwenden Sie das im Lieferumfang enthaltene Netzteil...

Страница 688: ...enn eine Einheit f r Papierrollen mit gro em Durchmesser Option installiert ist kann der Drucker Rollen mit einem Au endurchmesser von bis zu 200 mm aufnehmen Kernabmessungen Innendurchmesser von 1 Zo...

Страница 689: ...15 2 Endlospapier Maximale Stapelh he 180 mm oder weniger Falzl nge 76 2 bis 203 2 0 5 mm 3 bis 8 Zoll Perforation 3 Schnitte 1 Steg...

Страница 690: ...vor dem Drucken Informationen zur Papieranordnung darunter Papiertyp und gr e mitgeteilt werden Bei Verwendung des Druckers ohne diese Einstellungen kann es zu Fehlern in der Papieranordnung oder zu...

Страница 691: ...schwarzen Markierungen m ssen die Druckposition und Schnittposition mit Vorsicht gew hlt werden Drucken auf Tr gerpapier das nicht mit Etiketten bedeckt ist kann den Thermodruckkopf besch digen Hinwe...

Страница 692: ...ten bleiben verwenden Sie Etikettenpapier dessen R nder wie unten gezeigt entfernt wurden Entfernung der R nder bedeutet dass die R nder bei der Herstellung abgeschnitten werden Schlitze auf beiden Se...

Страница 693: ...uf dem Papier muss den unten in der Tabelle angegebenen Werten entsprechen Reflexionsgrad A Bereich mit schwarzen Markierungen 8 B R nder ber oder unter den schwarzen Markierungen 75 Hinweis Die Werte...

Страница 694: ...hwarzen Markierungen verwenden stellen Sie sicher dass die Bedingungen unter 3 4 2 Bedingungen f r die Verwendung von Papier mit schwarzen Markierungen ebenfalls erf llt sind Hinweis Die Opazit t des...

Страница 695: ...m 130 Hinweis Es muss ein empfohlener Papiertyp verwendet werden Wenn andere als die empfohlenen Papiertypen verwendet werden kann es zur Besch digung des Druckkopfes Druckfehlern oder hnlichen Probl...

Страница 696: ...htung des Druckers Beachten Sie dass die Genauigkeit der Papiertransportvorrichtung m glicherweise beeintr chtigt wird wenn ein Strichcode im oberen Randbereich bei Beginn des Papiertransports oder im...

Страница 697: ...cht in der Steckdose steckt 4 1 Anschluss des Schnittstellenkabels ffnen Sie die Anschlussabdeckung auf der R ckseite des Druckers indem Sie sie nach oben ziehen und schlie en Sie das Schnittstellenka...

Страница 698: ...lter nicht w hrend des laufenden Betriebs Anderenfalls kann dies die Netzwerkeinstellungen ver ndern sodass der Drucker nicht mehr wie gewohnt angesprochen werden kann Vorsicht Bei senkrechter Aufstel...

Страница 699: ...nach dem Verbinden mit den Schrauben USB Kabel Steckertyp B Schlie en Sie den Drucker mithilfe dieses Steckers an einen Computer an Schnittstellenanschluss serielle Schnittstelle Schnittstellenanschlu...

Страница 700: ...nach dem Anschluss des Kabels die Abdeckung Hinweis Wenn das Kabel auf der R ckseite austritt entfernen Sie die Eins tze in der Anschlussabdeckung mit einer Zange oder einem hnlichen Werkzeug Wenn di...

Страница 701: ...n Sie die Anschlussabdeckung auf der R ckseite des Druckers indem Sie sie nach oben ziehen und schlie en Sie das Netzkabel an die Steckdose an Schlie en Sie nach dem Anschluss des Kabels die Abdeckung...

Страница 702: ...ken Sie beim Einsetzen das Kabelende 2 w hrend Sie den Steckermantel nach oben schieben 3 und setzen Sie den Stecker ein bis er h rbar einrastet 3 Schlie en Sie den Stecker des Netzkabels an die Netzb...

Страница 703: ...eraus Die Verriegelung des Steckers l st sich und das Kabel l sst sich leicht herausziehen Gewaltsames Ziehen am Kabel selbst kann den Stecker besch digen Hinweis Schalten Sie vor dem Trennen des Netz...

Страница 704: ...30 4 5 Einschalten Schalten Sie nach Anschluss des Netzteils das Ger t am Netzschalter an der Seite des Druckers ein Die POWER Anzeige auf dem Bedienfeld leuchtet Bedienfeld Netzschalter...

Страница 705: ...dhabung der oberen Abdeckung dass die Abdeckung einzurasten scheint bevor sie vollst ndig ge ffnet ist Achten Sie darauf dass die Abdeckung wirklich vollst ndig ge ffnet ist wie in der folgenden Abbil...

Страница 706: ...ndshalters Papier mit einer dem Druckbereich entsprechenden Breite ein siehe Spezialmodi Siehe Beispiel 7 im Abschnitt 10 2 Einrichtung des Druckers Hinweis Wenn der Drucker auf schmales Papier einges...

Страница 707: ...b und schieben Sie dann den Hebel auf die gew nschte Position Setzen Sie dann den Abstandshalter ein Verwenden Sie bei Bedarf die Skala Hinweis Der Abstandshalter A muss mit einem Abstand von ca 0 5 m...

Страница 708: ...e Punkt b am Abstandshalter A mit Punkt a Hebel in Pfeilrichtung gedr ckt und heben Sie den Abstandshalter heraus um die Verriegelung zu l sen und den hinteren Auflagebereich zu entfernen Hinterer Auf...

Страница 709: ...ie den Abstandshalter B am Punkt a und heben Sie den Abstandshalter um die Verriegelung zu l sen Entfernen Sie dann den Abstandshalter am hinteren Auflagebereich Abstandshalter B Hinterer Auflageberei...

Страница 710: ...Abstandshalter A mit dem hinteren Auflagebereich zuerst ein Hinweis Dr cken Sie den Abstandshalter nach unten bis er h rbar einrastet und vergewissern Sie sich dass die Oberkante des Abstandshalters...

Страница 711: ...it dem hinteren Auflagebereich zuerst ein Hinweis Dr cken Sie den Abstandshalter nach unten bis er h rbar einrastet und vergewissern Sie sich dass die Oberkante des Abstandshalters horizontal ausgeric...

Страница 712: ...eim mehr am Papier vorhanden ist Verbleibender Klebstoff oder sonstige Materialreste k nnen sich am Thermodruckkopf festsetzen und den Druck beeintr chtigen z B wei e Fl chen auf Ausdrucken Achten Sie...

Страница 713: ...bgebildet kann zu Papierstau ungleichm igem Druck oder anderen Druckproblemen f hren Hinweis Wenn die eingelegte Papierrolle zu locker gewickelt ist siehe nachstehende Abbildung wickeln Sie das Papier...

Страница 714: ...ffnen Sie die obere Abdeckung und f hren Sie das Endlospapier durch den Papiereinzug an der R ckseite des Druckers Hinweis Ziehen Sie das Ende des Endlospapiers so weit heraus dass es ber die Vorderse...

Страница 715: ...och gestapelt werden siehe Abbildung 1 Wenn Endlospapier direkt an der R ckseite des Druckers abgelegt wird kann das Papier nur bis zu einer H he von 80 mm gestapelt werden siehe Abbildung 2 Hinweis A...

Страница 716: ...darauf dass das Papier nicht eingeklemmt wird Papierstaus auftreten Papier w hrend des Vorschubs geschnitten wird und andere Fehler dieser Art Solche Fehler k nnen die Lebensdauer des Thermodruckkopfe...

Страница 717: ...Verwendung des Druckers ge ffnet Wenn sie 50 mm oder weniger betr gt lassen Sie die Papierf hrung geschlossen Bei einer Druckl nger von mehr als 50 mm Verwenden Sie den Drucker mit ge ffneter Papierf...

Страница 718: ...htung ein Wenn die obere Abdeckung geschlossen wird und das Papier nicht richtig ausgerichtet ist kann es zu Papierstau oder schiefem Druck kommen Hinweis Dr cken Sie zum Schlie en der Abdeckung auf d...

Страница 719: ...Die Einstellungen 1 2 sind erforderlich Die Einstellungen 3 bis 6 sind optional Referenzdokumente Die CD ROM im Lieferumfang des Druckers enth lt einige Online Handb cher im PDF Format Informationen...

Страница 720: ...rn Normalpapier Papier mit schwarzen Markierungen oder gestanztes Etikettenpapier 3 die Papiergr e ndern oder 4 zu gestanztem Etikettenpapier derselben Gr e wie das aktuelle Papier allerdings mit eine...

Страница 721: ...nordnung an den Drucker wie im Handbuch Abschnitt 6 1 1 Papieranordnung beschrieben III Erstellung von Standardpapier Erstellen Sie das Standardpapier wie im Handbuch Abschnitt 6 1 2 Standardpapier be...

Страница 722: ...alten Sie ihn gedr ckt Die POWER und ERROR Anzeigen blinken abwechselnd Halten Sie den FEED Knopf weiter gedr ckt bis die POWER und ERROR Anzeigen gleichzeitig blinken Lassen Sie dann den FEED Knopf l...

Страница 723: ...hren Sie das Verfahren unten aus um Anordnungsinformationen im Drucker zu registrieren Mit diesem Verfahren k nnen Sie einen Standardpapiertyp erstellen und die entsprechenden Einstellungen an den Dr...

Страница 724: ...5 ndern Sie nicht S5 cut position mit seinem Standardwert 3 Geben Sie die R nder links rechts oben und unten ein 4 Klicken Sie auf die Taste Save Damit werden die Einstellungen f r das Standardpapier...

Страница 725: ...s Verfahren 1 W hlen Sie ein gew nschtes Papier das bereits erstellt wurde 2 Klicken Sie auf die Taste Transfer to Printer Die ausgew hlten Papieranordnungsinformationen werden an den Drucker gesendet...

Страница 726: ...t schwarzen Markierungen Wechsel zu Papier mit einer anderen Papieranordnung Wenn der Fehler auch nach Abschluss der Einstellung bestehen bleibt vergewissern Sie sich dass das im Drucker eingelegte Pa...

Страница 727: ...m Konfigurieren der Druckereinstellungen verwendet anstelle eines separaten Fensters zum Einrichten der Seite Informationen zum Drucken Fenster finden Sie in der Beschreibung im Schritt 10 unten 5 Das...

Страница 728: ...r cken Sie den FEED Knopf und halten Sie ihn gedr ckt Die POWER und ERROR Anzeigen blinken abwechselnd Halten Sie den FEED Knopf weiter gedr ckt bis die POWER und ERROR Anzeigen gleichzeitig blinken L...

Страница 729: ...Anordnungsinformationen im Drucker zu registrieren Das Verfahren beschreibt das Senden von Anordnungsinformationen an den Drucker Die Screenshots wurden unter Windows XP Professional erstellt 1 Klick...

Страница 730: ...ie geeignete Papierinformationen ein S1 bis S5 ndern Sie nicht S5 cut position mit seinem Standardwert 3 Geben Sie bei Bedarf die R nder links rechts oben und unten ein 4 Klicken Sie auf die Taste Set...

Страница 731: ...f r das Papier in der Anordnungseinstellung aufgefordert werden Tauschen Sie das Papier aus und klicken Sie auf die Taste OK Wenn der Fehler auch nach Abschluss der Einstellung bestehen bleibt vergew...

Страница 732: ...Knopf los Informationen zur Initialisierung der Papieranordnung finden Sie unter Initialisierung der Papieranordnung im Abschnitt 7 1 Bedienfeld 6 Schlie en Sie die obere Abdeckung 7 Der Drucker trans...

Страница 733: ...s Verfahren beschreibt das Senden einer Papierbreiteneinstellung an den Drucker Die Screenshots wurden unter Windows XP Professional erstellt 1 Klicken Sie in dieser Reihenfolge auf Start Alle Program...

Страница 734: ...e OK 5 Es wird eine Meldung angezeigt in der Sie zum Austauschen des Papiers entsprechend der Einstellung f r das Papier in der Anordnungseinstellung aufgefordert werden Tauschen Sie das Papier aus un...

Страница 735: ...11 0 mm f r eine Papierbreite von 83 mm 4 0 mm f r eine Papierbreite von 80 mm 3 0 mm f r andere Papierbreiten L7 Breite des Druckbereichs 80 0 mm f r eine Papierbreite von 83 mm Papierbreite L6 x 2...

Страница 736: ...m linken Ende des Druckbereichs 5 0 mm L7 Breite des Druckbereichs Papierbreite L6 x 2 mm Hinweis Die Werte L1 bis L7 oben werden vom Druckersensor erkannt Diese Werte sind nicht identisch mit den Par...

Страница 737: ...t festgelegt L5 L nge des Druckbereichs Nicht festgelegt L6 L nge von der linken Papierkante zum linken Ende des Druckbereichs 1 0 mm f r eine Papierbreite von 83 mm 4 0 mm f r eine Papierbreite von 8...

Страница 738: ...EED Knopf weiter gedr ckt bis die POWER und ERROR Anzeigen gleichzeitig blinken Lassen Sie dann den FEED Knopf los 5 Schlie en Sie die obere Abdeckung 6 Der Drucker transportiert das Papier ruft autom...

Страница 739: ...nfalls gegen ein Papier aus das mit den Papieranordnungsinformationen bereinstimmt 2 Fehler beim Drucken Wenn w hrend des Druckens ein Papieranordnungsfehler auftritt ffnen Sie die obere Abdeckung ber...

Страница 740: ...er in den Drucker einlegen und ihn dann einschalten werden die Werte zur Sensoreinrichtung durch die automatische Anordnungserkennung festgelegt Manuelle Sensoreinrichtung 1 Sie k nnen die manuelle Ei...

Страница 741: ...uckertreiber von Windows Siehe Abschnitt 4 4 Registerkarte Graphics in Windows Driver User s Guide 2 ber das Druckerdienstprogramm Siehe Abschnitt 3 2 5 Customize Value in Utility User s Guide 3 Einri...

Страница 742: ...ung des Druckers beschrieben Wenn Sie eine Druckgeschwindigkeit ber den Windows Treiber festgelegt haben wird die Druckgeschwindigkeit zum Drucken verwendet die vom Treiber festgelegt wird Die Festleg...

Страница 743: ...n korrigieren nach oben oder nach unten ndern Sie bei Bedarf die Einstellung Sie k nnen die Einstellung wie folgt ndern 1 ber den Druckertreiber von Windows Siehe Abschnitt 4 1 Registerkarte Custom Pa...

Страница 744: ...ie die Einstellung wie in Beispiel 4 im Abschnitt 10 2 Einrichtung des Druckers beschrieben 2 ber das Druckerdienstprogramm Siehe Abschnitt 3 2 4 Memory Switch settings in Utility User s Guide 6 11 In...

Страница 745: ...apier einschlie lich vollfl chiges Etikettenpapier Durch einmaliges Dr cken dieses Knopfes wird das Papier um eine Zeile nach vorn transportiert Durch anhaltendes Dr cken dieses Knopfes wird das Papie...

Страница 746: ...sierung die Anordnungsinformationen ndern w hrend der gleiche Papiertyp beibehalten wird Verfahren Dr cken Sie den FEED Knopf und halten Sie ihn eine Weile gedr ckt Die POWER und ERROR Anzeigen beginn...

Страница 747: ...uerhaft ERROR Leuchtet dauerhaft Druckkopf berhitzt 1 POWER Leuchtet dauerhaft ERROR Leuchtet dauerhaft 1 Das Drucken wird wegen zu hoher Temperatur der Thermodruckkopfes unterbrochen Fehlerzustand LE...

Страница 748: ...einmal Unterspannung POWER ERROR Wiederholtes Muster bei dem die gr ne Anzeige viermal blinkt und die orange Anzeige einmal berspannung POWER ERROR Wiederholtes Muster bei dem die gr ne Anzeige f nfma...

Страница 749: ...Entfernen Sie bei einem Papierstau das gestaute Papier wie folgt 1 Schalten Sie den Drucker am Druckerschalter aus 2 Dr cken Sie den Hebel zum ffnen der oberen Abdeckung nach unten und ffnen Sie die o...

Страница 750: ...3 Der Thermodruckkopf ist berhitzt 1 Legen Sie Papier ein 2 Schlie en Sie die obere Abdeckung vollst ndig 3 Warten Sie bis sich der Thermodruckkopf ausreichend abgek hlt hat 9 2 Probleme mit dem Messe...

Страница 751: ...die Druckdichte und die Druckgeschwindigkeit des Druckers an das Papier an Siehe 10 2 Einrichtung des Druckers 2 Schalten Sie den Drucker aus und wenden Sie sich an den Reparaturservice Die Druckdicht...

Страница 752: ...der Probedruck beendet Um den laufenden Probedruck abzubrechen dr cken Sie den FEED Knopf Anschlie end schneidet der Drucker das Papier ab und bricht den Probedruck ab Hinweis Sie m ssen den FEED Kno...

Страница 753: ...druck Wenn Sie den FEED Knopf dr cken und mindestens eine Sekunde lang gedr ckt halten wird der Probedruck fortgesetzt und eine Liste der Schriftarten gedruckt Um den laufenden Druck der Schriftartenl...

Страница 754: ...zu den Funktionen des Dienstprogramms und zu seiner Verwendung finden Sie in Utility User s Guide Dieser Abschnitt beschreibt ausf hrlich die unten aufgef hrten typischen Einstellungs nderungen Beisp...

Страница 755: ...Knopf an der linken Seite der oberen Abdeckung gedr ckt halten Hinweis Sie m ssen den FEED Knopf gedr ckt halten bis der Druckvorgang beginnt Hinweis Wenn Sie die Position die Sie ausw hlen m chten b...

Страница 756: ...pf und halten Sie ihn mindestens eine Sekunde lang gedr ckt um die Auswahl zu bernehmen Nachdem der Drucker in den Einrichtungsmodus gewechselt hat wird Folgendes ausgedruckt Setup Test Print End Samp...

Страница 757: ...ie ihn mindestens eine Sekunde lang gedr ckt um die Auswahl zu bernehmen Nachdem Sie die Auswahl von SETUP bernommen haben wird Folgendes ausgedruckt Paper Setting Return to Top Menu Others Serial Con...

Страница 758: ...bernehmen Nachdem Sie die Auswahl von CUSTOMIZE VALUE bernommen haben wird Folgendes ausgedruckt Customize Value Memory Switch Paper Setting Return to Top Menu Others Serial Condition Customize Value...

Страница 759: ...ahl zu bernehmen Nachdem Sie die Auswahl von PRINT DENSITY bernommen haben wird Folgendes ausgedruckt Print Density Print Color NV Graphics Memory User NV Memory Return to Top Menu Return to Up Low Po...

Страница 760: ...Auswahl zu bernehmen Nachdem Sie die Auswahl von 100 bernommen haben wird Folgendes ausgedruckt 100 95 90 85 80 75 70 Lightest 130 Darkest 130 Darkest 125 120 115 110 105 100 95 90 85 80 75 70 Lighte...

Страница 761: ...wird Folgendes ausgedruckt 9 W hlen Sie die Option RETURN TO TOP MENU Nachdem Sie die Auswahl von RETURN TO TOP MENU bernommen haben wird Folgendes ausgedruckt Return to Top Menu Return to Top Menu Ot...

Страница 762: ...beendet den Einrichtungsmodus Hinweis Wenn Sie den Netzschalter des Druckers ausschalten ohne zuerst die Option END zu w hlen geht die Einstellung verloren berpr fen der Einstellung Um die vorgenommen...

Страница 763: ...hrend Sie den FEED Knopf an der linken Seite der oberen Abdeckung gedr ckt halten Hinweis Sie m ssen den FEED Knopf gedr ckt halten bis der Druckvorgang beginnt Hinweis Wenn Sie die Position die Sie a...

Страница 764: ...pf und halten Sie ihn mindestens eine Sekunde lang gedr ckt um die Auswahl zu bernehmen Nachdem der Drucker in den Einrichtungsmodus gewechselt hat wird Folgendes ausgedruckt Setup Test Print End Samp...

Страница 765: ...e die Option CUSTOMIZE VALUE Dr cken Sie zweimal kurz je bis zu eine Sekunde lang den FEED Knopf um zur Option CUSTOMIZE VALUE zu gelangen Paper Setting Return to Top Menu Others Serial Condition Cust...

Страница 766: ...er NV Memory Return to Top Menu Return to Up Low Power Max Speed BK Density Print Density Print Color NV Graphics Memory User NV Memory Customize Value Paper feed direction Selection Item Max Speed BK...

Страница 767: ...ken Sie kurz eine Sekunde oder k rzer den FEED Knopf bis die Option 9th erreicht ist Dr cken Sie dann den FEED Knopf und halten Sie ihn mindestens eine Sekunde lang gedr ckt um die Auswahl zu bernehme...

Страница 768: ...URN TO UP bernommen haben wird Folgendes ausgedruckt Return to Up Return to Top Menu Return to Up Sensor Auto Adjust Mark Feed with Cut Feed at Power On Layout Er Recovery Layout Er Process TearOff Ad...

Страница 769: ...ine Sekunde oder k rzer den FEED Knopf um zur Option END zu gelangen Dr cken Sie dann den FEED Knopf und halten Sie ihn mindestens eine Sekunde lang gedr ckt um die Auswahl zu bernehmen Nachdem Sie di...

Страница 770: ...die Einstellung verloren berpr fen der Einstellung Um die vorgenommene Einstellung zu berpr fen f hren Sie einen Probedruck durch siehe Abschnitt 10 1 Beim Probedruck wird eine Liste der Druckereinste...

Страница 771: ...w hrend Sie den FEED Knopf an der linken Seite der oberen Abdeckung gedr ckt halten Hinweis Sie m ssen den FEED Knopf gedr ckt halten bis der Druckvorgang beginnt Hinweis Wenn Sie die Position die Si...

Страница 772: ...pf und halten Sie ihn mindestens eine Sekunde lang gedr ckt um die Auswahl zu bernehmen Nachdem der Drucker in den Einrichtungsmodus gewechselt hat wird Folgendes ausgedruckt Setup Test Print End Samp...

Страница 773: ...ie die Option CUSTOMIZE VALUE Dr cken Sie zweimal kurz eine Sekunde oder k rzer den FEED Knopf um zur Option CUSTOMIZE VALUE zu gelangen Paper Setting Return to Top Menu Others Serial Condition Custom...

Страница 774: ...ne Sekunde oder k rzer den FEED Knopf um zur Option PRINT COLOR zu gelangen User NV Memory Return to Top Menu Return to Up Low Power Max Speed BK Density Print Density Print Color NV Graphics Memory U...

Страница 775: ...e die Auswahl von PRINT COLOR bernommen haben wird Folgendes ausgedruckt 7 W hlen Sie die Option 2 COLOR Dr cken Sie einmal kurz eine Sekunde oder k rzer den FEED Knopf um zur Option 2 COLOR zu gelang...

Страница 776: ...on RETURN TO UP bernommen haben wird Folgendes ausgedruckt Return to Up Return to Top Menu Return to Up Sensor Auto Adjust Mark Feed with Cut Feed at Power On Layout Er Recovery Layout Er Process Tear...

Страница 777: ...den Netzschalter des Druckers ausschalten ohne zuerst die Option END zu w hlen gehen die Einstellungen verloren berpr fen der Einstellung Um die vorgenommene Einstellung zu berpr fen f hren Sie einen...

Страница 778: ...Papier eingelegt 3 Die Abdeckung ist geschlossen 2 Wechseln Sie in den Spezialmodus Schalten Sie den Netzschalter an der rechten Seite des Druckers ein w hrend Sie den FEED Knopf an der linken Seite...

Страница 779: ...f um zur Option SETUP zu gelangen Test Print End Sample Print Data Analysis Cleaning Sensor Adjustment Setup Test Print Special Mode Usage Item Selection Please push the feed switch short Item Decisio...

Страница 780: ...modus die Option SETUP Dr cken Sie den FEED Knopf und halten Sie ihn mindestens eine Sekunde lang gedr ckt um die Auswahl zu bernehmen Nachdem Sie die Auswahl von SETUP bernommen haben wird Folgendes...

Страница 781: ...rnehmen Nachdem Sie die Auswahl von PAPER SETTING bernommen haben wird Folgendes ausgedruckt Paper Detection Return to Top Menu Return to Up Sensor Auto Adjust Mark Feed with Cut Feed at Power On Layo...

Страница 782: ...Auswahl von FEED AT POWER ON bernommen haben wird Folgendes ausgedruckt Feed at Power On Layout Er Recovery Layout Er Process TearOff Adjustment Base Adjustment Paper Width Paper Detection Return to...

Страница 783: ...swahl zu bernehmen Nachdem Sie die Auswahl von DISABLE bernommen haben wird Folgendes ausgedruckt Disable Enable Disable Enable Feed at Power On Paper feed direction Selection Item Return to Up Return...

Страница 784: ...N TO TOP MENU Dr cken Sie den FEED Knopf und halten Sie ihn mindestens eine Sekunde lang gedr ckt um die Auswahl zu bernehmen Nachdem Sie die Auswahl von RETURN TO TOP MENU bernommen haben wird Folgen...

Страница 785: ...n Einrichtungsmodus Hinweis Wenn Sie den Netzschalter des Druckers ausschalten ohne zuerst die Option END zu w hlen gehen die Einstellungen verloren berpr fen der Einstellungen Um die vorgenommenen Ei...

Страница 786: ...sich dass sich der Drucker im folgenden Zustand befindet 1 Der Drucker ist ausgeschaltet 2 Im Drucker ist Papier eingelegt 3 Die Abdeckung ist geschlossen 2 Wechseln Sie in den Spezialmodus Schalten S...

Страница 787: ...f um zur Option SETUP zu gelangen Test Print End Sample Print Data Analysis Cleaning Sensor Adjustment Setup Test Print Special Mode Usage Item Selection Please push the feed switch short Item Decisio...

Страница 788: ...t wird Folgendes ausgedruckt 4 W hlen Sie im Einrichtungsmodus die Option DEFAULT SET Dr cken Sie zweimal kurz jeweils bis zu eine Sekunde lang den FEED Knopf um zur Option DEFAULT SET zu gelangen Set...

Страница 789: ...kers ausschalten ohne zuerst die Option END zu w hlen gehen die Einstellungen verloren berpr fen der Einstellungen Um die vorgenommenen Einstellungen zu berpr fen f hren Sie einen Probedruck durch wie...

Страница 790: ...3 Die Abdeckung ist geschlossen 2 Wechseln Sie in den Spezialmodus Schalten Sie den Netzschalter an der rechten Seite des Druckers ein w hrend Sie den FEED Knopf an der linken Seite der oberen Abdeck...

Страница 791: ...f um zur Option SETUP zu gelangen Test Print End Sample Print Data Analysis Cleaning Sensor Adjustment Setup Test Print Special Mode Usage Item Selection Please push the feed switch short Item Decisio...

Страница 792: ...sgedruckt 4 W hlen Sie im Einrichtungsmodus die Option SETUP Dr cken Sie den FEED Knopf und halten Sie ihn mindestens eine Sekunde lang gedr ckt um die Auswahl zu bernehmen Setup End Default Set Setup...

Страница 793: ...wahl von OTHERS bernommen haben wird Folgendes ausgedruckt Others Serial Condition Customize Value Memory Switch Paper Setting Return to Top Menu Others Serial Condition Customize Value Memory Switch...

Страница 794: ...um zur Option PNE DETECT zu gelangen PNE Detect Process ID Error Serial Number USB ACK Pulse Width Return to Top Menu Return to Up Roll Paper Unit PE Roll Paper Unit Buzzer Batch OTHER IF Batch COM IF...

Страница 795: ...uswahl von PNE DETECT bernommen haben wird Folgendes ausgedruckt 7 W hlen Sie die Option DISABLE Dr cken Sie kurz bis zu eine Sekunde lang den FEED Knopf um zur Option DISABLE zu gelangen Enable Disab...

Страница 796: ...g gedr ckt um die Auswahl zu bernehmen Nachdem Sie die Auswahl von RETURN TO UP bernommen haben wird Folgendes ausgedruckt Return to Up Return to Top Menu Return to Up Roll Paper Unit PE Roll Paper Un...

Страница 797: ...ils bis zu eine Sekunde lang den FEED Knopf um zur Option END zu gelangen Dr cken Sie dann den FEED Knopf und halten Sie ihn mindestens eine Sekunde lang gedr ckt um die Auswahl zu bernehmen Nachdem S...

Страница 798: ...llungen verloren berpr fen der Einstellungen Um die vorgenommenen Einstellungen zu berpr fen f hren Sie einen Probedruck durch wie im Abschnitt 10 1 beschrieben Beim Probedruck wird eine Liste der Dru...

Страница 799: ...eingelegt 3 Die Abdeckung ist geschlossen 2 Wechseln Sie in den Spezialmodus Schalten Sie den Netzschalter an der rechten Seite des Druckers ein w hrend Sie den FEED Knopf an der linken Seite der ober...

Страница 800: ...f um zur Option SETUP zu gelangen Test Print End Sample Print Data Analysis Cleaning Sensor Adjustment Setup Test Print Special Mode Usage Item Selection Please push the feed switch short Item Decisio...

Страница 801: ...sgedruckt 4 W hlen Sie im Einrichtungsmodus die Option SETUP Dr cken Sie den FEED Knopf und halten Sie ihn mindestens eine Sekunde lang gedr ckt um die Auswahl zu bernehmen Setup End Default Set Setup...

Страница 802: ...Sekunde lang gedr ckt um die Auswahl zu bernehmen Paper Detection Return to Top Menu Return to Up Sensor Auto Adjust Mark Feed with Cut Feed at Power On Layout Er Recovery Layout Er Process TearOff Ad...

Страница 803: ...bernehmen Nachdem Sie die Auswahl von PAPER WIDTH bernommen haben wird Folgendes ausgedruckt Paper Width Paper Detection Return to Top Menu Return to Up Sensor Auto Adjust Mark Feed with Cut Feed at P...

Страница 804: ...ernehmen Nachdem Sie die Auswahl von 80mm bernommen haben wird Folgendes ausgedruckt 80mm 70mm 83mm 80mm 70mm 6Xmm 5Xmm 4Xmm 3Xmm 2Xmm Paper Width Paper feed direction Selection Item Return to Up Retu...

Страница 805: ...N TO TOP MENU Dr cken Sie den FEED Knopf und halten Sie ihn mindestens eine Sekunde lang gedr ckt um die Auswahl zu bernehmen Nachdem Sie die Auswahl von RETURN TO TOP MENU bernommen haben wird Folgen...

Страница 806: ...t den Einrichtungsmodus Hinweis Wenn Sie den Netzschalter des Druckers ausschalten ohne zuerst die Option END zu w hlen gehen die Einstellungen verloren berpr fen der Einstellungen Um die vorgenommene...

Страница 807: ...Papier eingelegt 3 Die Abdeckung ist geschlossen 2 Wechseln Sie in den Spezialmodus Schalten Sie den Netzschalter an der rechten Seite des Druckers ein w hrend Sie den FEED Knopf an der linken Seite...

Страница 808: ...f um zur Option SETUP zu gelangen Test Print End Sample Print Data Analysis Cleaning Sensor Adjustment Setup Test Print Special Mode Usage Item Selection Please push the feed switch short Item Decisio...

Страница 809: ...s ausgedruckt 4 W hlen Sie im Einrichtungsmodus die Option SETUP Dr cken Sie den FEED Knopf und halten Sie ihn mindestens eine Sekunde lang gedr ckt um die Auswahl zu bernehmen Setup End Default Set S...

Страница 810: ...wahl von OTHERS bernommen haben wird Folgendes ausgedruckt Others Serial Condition Customize Value Memory Switch Paper Setting Return to Top Menu Others Serial Condition Customize Value Memory Switch...

Страница 811: ...H OTHER IF zu gelangen Batch OTHER IF Batch COM IF Font B PNE Detect Process ID Error Serial Number USB ACK Pulse Width Return to Top Menu Return to Up Roll Paper Unit PE Roll Paper Unit Buzzer Batch...

Страница 812: ...von BATCH OTHER IF bernommen haben wird Folgendes ausgedruckt 7 W hlen Sie die Option ENABLE Dr cken Sie kurz bis zu eine Sekunde lang den FEED Knopf um zur Option ENABLE zu gelangen Disable Disable...

Страница 813: ...g gedr ckt um die Auswahl zu bernehmen Nachdem Sie die Auswahl von RETURN TO UP bernommen haben wird Folgendes ausgedruckt Return to Up Return to Top Menu Return to Up Roll Paper Unit PE Roll Paper Un...

Страница 814: ...bis zu eine Sekunde lang den FEED Knopf um zur Option END zu gelangen Dr cken Sie anschlie end den FEED Knopf und halten Sie ihn mindestens eine Sekunde lang gedr ckt um die Auswahl zu bernehmen Nachd...

Страница 815: ...llungen verloren berpr fen der Einstellungen Um die vorgenommenen Einstellungen zu berpr fen f hren Sie einen Probedruck durch wie im Abschnitt 10 1 beschrieben Beim Probedruck wird eine Liste der Dru...

Страница 816: ...ur ck Detaillierte Beschreibung der Einzeloptionen 1 Paper Setting setup items Optionen der Einrichtungsgruppe Papiereinstellungen Option Beschreibung Einzeloption 1 Paper Detection Legt fest welcher...

Страница 817: ...mm 4 X mm 5 0 mm Wenn 4 X mm ausgew hlt wurde 4 0 bis 4 9 mm Wenn 3 X mm ausgew hlt wurde 3 0 bis 3 9 mm Wenn 2 X mm ausgew hlt wurde 2 0 bis 2 9 mm Wenn 1 X mm ausgew hlt wurde 1 0 bis 1 9 mm Wenn 0...

Страница 818: ...mm ausgew hlt wurde 4 0 bis 4 9 mm Wenn 3 X mm ausgew hlt wurde 3 0 bis 3 9 mm Wenn 2 X mm ausgew hlt wurde 2 0 bis 2 9 mm Wenn 1 X mm ausgew hlt wurde 1 0 bis 1 9 mm Wenn 0 X mm ausgew hlt wurde 0 0...

Страница 819: ...est ob beim Einschalten Papier zur Startposition transportiert werden soll Wenn Disable ausgew hlt ist und der Druckkopf sich beim Einschalten nicht in der Startposition befindet kann dies zu einer Dr...

Страница 820: ...e parallele Schnittstelle Enable Aktivieren Disable Deaktivieren 6 DSR 6 Reset Legt fest ob der Empfang eines DSR Signals 6 einen Reset ausl st Diese Option gilt nur f r die serielle Schnittstelle Ena...

Страница 821: ...r NV Grafikspeichers None 64KByte 128KByte 192KByte 256KByte 320KByte 384KByte 3 Print Color Druckfarben Mono 2 Color 2 Farben 4 Print Density Print density Druckdichte 70 Lightest Die hellste 75 80 8...

Страница 822: ...60 mm s 1st Low Speed 2nd 3rd 4th 5th 6th 7th 8th 9th High Speed 7 Low Power Druckgeschwindigkeit maximal Mode1 Druck mit 80 der gew hlten Druckdichte Mode2 Variierende Strobe Impulsbreite Normal Mode...

Страница 823: ...ck 5 Others setup items Optionen der Einrichtungsgruppe Weitere Option Beschreibung Einzeloption 1 ACK Pulse Width Legt die ACK Impulsbreite fest 1 s 8 s 2 USB Legt die Verwendung der USB Verbindung...

Страница 824: ...stelle Enable Aktivieren Disable Deaktivieren 10 Buzzer Legt fest ob bei Auftreten eines Fehlers der Summer ert nt Der Summer kann per Befehl ert nen auch wenn Disable gew hlt ist Diese Option gilt nu...

Страница 825: ...geschlossen 2 Wechseln Sie in den Spezialmodus Schalten Sie den Netzschalter an der rechten Seite des Druckers ein w hrend Sie gleichzeitig den FEED Knopf links an der oberen Abdeckung gedr ckt halte...

Страница 826: ...MENT gedruckt wird dr cken Sie den FEED Knopf und halten Sie ihn mindestens eine Sekunde lang gedr ckt um die Sensoreinrichtung zu starten Test Print End Sample Print Data Analysis Cleaning Sensor Adj...

Страница 827: ...r Option 1 Jedes Mal wenn Sie den FEED Knopf kurz dr cken und wieder loslassen arbeitet der Drucker wie folgt 2 Der Drucker druckt ADJUSTMENT ADJUSTMENT PRINT END ADJUSTMENT und zyklisch in dieser Rei...

Страница 828: ...Knopf mindestens eine Sekunde lang gedr ckt um die Sensoreinrichtung zu beenden 2 Der Drucker kehrt in den normalen Betriebszustand zur ck ADJUSTMENT 1 Wenn ADJUSTMENT PRINT gedruckt wird dr cken Sie...

Страница 829: ...FEED Knopf und halten Sie ihn mindestens eine Sekunde lang gedr ckt um die Sensoreinrichtung zu starten a Der Drucker druckt die Men optionen aus 2 Der Drucker druckt BM SENSOR LABEL SENSOR PNE SENSOR...

Страница 830: ...ns eine Sekunde lang gedr ckt um die BM Sensoreinrichtung zu starten 2 Nachdem die BM Sensoreinrichtung begonnen hat wird Folgendes ausgedruckt und das Papier abgeschnitten 3 ffnen Sie die obere Abdec...

Страница 831: ...nach Ende des Papiertransports wieder das urspr ngliche Papier ein Der Drucker druckt das Einrichtungsergebnis 6 Der Drucker schreibt das Einrichtungsergebnis in den Speicher und kehrt zum Zustand vo...

Страница 832: ...en Sie die obere Abdeckung und legen Sie das Papier das eingerichtet werden soll ein Nachdem Sie die obere Abdeckung geschlossen haben transportiert der Drucker das Papier Hinweis Die Verwendung von P...

Страница 833: ...ckt das Einrichtungsergebnis 6 Der Drucker schreibt das Einrichtungsergebnis in den Speicher und kehrt zum Zustand vor Beginn der Sensoreinrichtung zur ck 7 Wenn die Einrichtung fehlgeschlagen ist dru...

Страница 834: ...onnen hat wird Folgendes ausgedruckt und das Papier abgeschnitten 3 ffnen Sie die obere Abdeckung und legen Sie das Papier das eingerichtet werden soll ein Nachdem Sie die obere Abdeckung geschlossen...

Страница 835: ...richtungsergebnis in den Flash Speicher und kehrt in den Zustand vor Beginn der Sensoreinrichtung zur ck 7 Der Drucker schreibt das Einrichtungsergebnis in den Speicher und kehrt in den Zustand vor Be...

Страница 836: ...gedruckt wird dr cken Sie den FEED Knopf und halten Sie ihn mindestens eine Sekunde lang gedr ckt um die PE Sensoreinrichtung zu starten 2 Nachdem die PE Sensoreinrichtung begonnen hat wird Folgendes...

Страница 837: ...weis Ziehen Sie beim Einlegen von gestanztem Etikettenpapier das Etikett teilweise vom Tr gerpapier ab wobei der abgezogene Teil zum Etikettensensor zeigt und schlie en Sie dann die Abdeckung Etikette...

Страница 838: ...as urspr ngliche Papier ein Der Drucker druckt das Einrichtungsergebnis 7 Der Drucker schreibt das Einrichtungsergebnis in den Speicher und kehrt zum Zustand vor Beginn der Sensoreinrichtung zur ck 8...

Страница 839: ...sgedruckt Wenn Sie den Schalter wieder einschalten und den FEED Knopf kurz dr cken werden die unten gezeigten Daten ausgedruckt Nachdem der Drucker in den Spezialmodus gewechselt hat wird Folgendes au...

Страница 840: ...n Daten Dr cken Sie viermal kurz eine Sekunde oder k rzer den FEED Knopf um zur Option DATA ANALYSIS zu gelangen Data Analysis Cleaning Sensor Adjustment Setup Test Print End Sample Print Data Analysi...

Страница 841: ...mindestens eine Sekunde lang gedr ckt um in den Hex Dump Modus zu wechseln Im Hex Dump Modus werden alle Signale vom Host Computer an den Drucker als Hexadezimalcodes gedruckt Mit den gedruckten Daten...

Страница 842: ...wahl zu bernehmen Im Befehlsprotokollmodus werden alle Daten die vom Host Computer an den Drucker gesendet werden als Befehlsnamen ausgedruckt Mit den gedruckten Daten kann berpr ft werden ob die rich...

Страница 843: ...usgedruckt Wenn Sie den Schalter wieder einschalten und den FEED Knopf kurz dr cken werden die unten gezeigten Daten ausgedruckt Nachdem der Drucker in den Spezialmodus gewechselt hat wird Folgendes a...

Страница 844: ...rzer den FEED Knopf um zur Option SAMPLE PRINT zu gelangen Sample Print Data Analysis Cleaning Sensor Adjustment Setup Test Print End Sample Print Data Analysis Cleaning Sensor Adjustment Setup Test P...

Страница 845: ...Muster Bei kurzem Dr cken des FEED Knopfes werden die Muster in der folgenden Reihenfolge ausgedruckt LABEL1 LABEL2 LABEL3 LABEL4 LABEL5 LABEL1 Bei langem Dr cken etwa eine Sekunde des FEED Knopfes w...

Страница 846: ...172 Ergebnis Musterausdruck LABEL1 Muster LABEL2 Muster LABEL3 Muster LABEL4 Muster...

Страница 847: ...173 LABEL5 Muster...

Страница 848: ...klebrige R ckst nde die an der Ausgabeseite der Papierf hrung haften zu St rungen bei der Papierausgabe f hren Entfernen Sie mit einem L sungsmittel auf Alkoholbasis regelm ig die klebrigen R ckst nde...

Страница 849: ...den FEED Knopf auf dem Bedienfeld gedr ckt halten wieder ein Anschlie end werden die unten gezeigten Daten ausgedruckt Test Print End Sample Print Data Analysis Cleaning Sensor Adjustment Setup Test P...

Страница 850: ...Sekunde lang gedr ckt um die Auswahl zu bernehmen Nachdem Sie die Auswahl von CLEANING bernommen haben wird Folgendes ausgedruckt Cleaning Sensor Adjustment Setup Test Print End Sample Print Data Ana...

Страница 851: ...gewechselt hat wird Folgendes ausgedruckt und das Papier abgeschnitten 4 ffnen Sie die obere Abdeckung und nehmen Sie die Papierrolle heraus 5 Dr cken Sie den FEED Knopf um die Druckwalze in eine Pos...

Страница 852: ...n Sie die obere Abdeckung Hinweis Achten Sie darauf die Druckwalze nicht zu verformen oder auf andere Weise zu besch digen Dellen auf der Druckwalze f hren zu L cken beim Drucken oder zu Papiervorschu...

Страница 853: ...is Der Thermodruckkopf kann leicht besch digt werden Verwenden Sie zur Reinigung ein weiches Tuch und gehen Sie mit gro er Vorsicht vor um den Druckkopf nicht zu besch digen Hinweis Direkt nach dem Dr...

Страница 854: ...um die Stabilit t des Schneidvorgangs sicherzustellen Hinweis Auch wenn die Schneide der Klinge nicht so scharf ist wie die eines blicherweise in B ros verwendeten Cutters besteht trotzdem Verletzungs...

Страница 855: ...n ausgedruckt Hinweis Wenn Sie die Position die Sie ausw hlen m chten bereits bergangen habe dr cken Sie wiederholt kurz auf den FEED Knopf bis Sie wieder bei der ersten Position angelangt sind Test P...

Страница 856: ...Sekunde lang gedr ckt um die Auswahl zu bernehmen Nachdem Sie die Auswahl von CLEANING bernommen haben wird Folgendes ausgedruckt Cleaning Sensor Adjustment Setup Test Print End Sample Print Data Ana...

Страница 857: ...indestens eine Sekunde lang gedr ckt um die Auswahl zu bernehmen Der Drucker wechselt in den Klingen Reinigungsmodus Nachdem der Drucker in den Klingen Reinigungsmodus gewechselt hat wird Folgendes au...

Страница 858: ...e vorsichtig mit dem Cutter bzw Schraubendreher um die Schneide des oberen Messers nicht zu besch digen Achten Sie auch darauf die Druckwalze nicht zu verformen oder auf andere Weise zu besch digen De...

Страница 859: ...ise in B ros verwendeten Cutters besteht trotzdem Verletzungsgefahr f r den Finger wenn man ihn entlang der Schneide des Messers bewegt und dabei gegen die Schneide dr ckt 7 Bringen Sie nach der Reini...

Страница 860: ...und Schneide des unteren Messers anhaften Hinweis Arbeiten Sie vorsichtig mit dem Cutter bzw Schraubendreher um die Schneide des unteren Messers nicht zu besch digen Achten Sie auch darauf die Druckwa...

Страница 861: ...en Finger wenn man ihn entlang der Schneide des Messers bewegt und dabei gegen die Schneide dr ckt 5 Bringen Sie nach der Reinigung die Papierrolle wieder in ihre urspr ngliche Position und schlie en...

Страница 862: ...g Ausgangsdaten 3 RX Eingang Eingangsdaten 4 N C 5 N C 6 RX Eingang Eingangsdaten 7 N C 8 N C 2 LEDs Nr Anzeige Beschreibung 1 10BASE T link Leuchtet auf wenn der Drucker das Verbindungsziel erkennt a...

Страница 863: ...gsinformationen 1 Schalten Sie das Ger t aus 2 Stellen Sie Schalter 2 auf EIN 3 Schalten Sie den Drucker ein Die Initialisierung dauert etwa f nf Sekunden 4 Schalten Sie das Ger t aus 5 Stellen Sie Sc...

Страница 864: ...RXD Eingang Daten empfangen 4 RTS Ausgang Request to Send Sendeanforderung 5 CTS Eingang Clear to Send Sendeerlaubnis 6 DSR Eingang Data Set Ready Einsatzbereitschaft der Gegenstelle 7 SG Signal Grou...

Страница 865: ...nschubladen Geh usemasse 2 DRD1 Ausgang Antrieb Kassenschublade Signal 1 3 DRSNS1 Eingang Erkennung Kassenschublade Signal 1 4 24 V Ausgang Stromversorgung f r Antrieb 5 DRD2 Ausgang Antrieb Kassensch...

Страница 866: ...de muss immer von der Drucker Stromversorgungseinheit bereitgestellt werden ber Pin 4 des Steckers Hinweis Der Widerstand des Schubladen Magneten muss mindestens 24 betragen Wenn ein Magnet mit gering...

Страница 867: ...Anschluss 2 Drucker 2 3 4 5 6 Kabel 2 4 Schubladen Magnet mind 24 ffnen Schlie en Schalter der Kassenschublade 2 4 6 Schubladen Magnet mind 24 ffnen Schlie en Schalter der Kassenschublade 1 3 6 Schub...

Страница 868: ...Netzbuchsen Pins Pin Nr Signalbezeichnung 1 24 V 2 SG 3 N C Hinweis Verwenden Sie zur Stromversorgung unser Netzteil Hinweis Wenn unser empfohlenes Netzteil nicht verwendet wird Benutzer verwendet ei...

Страница 869: ...von bis zu 83 mm w hlen Hinweis Papier mit einer Breite von 71 bis 79 mm kann nicht verwendet werden 4 Druckgeschwindigkeit einfarbiges Thermopapier Maximale Druckgeschwindigkeit 260 mm s Papierbreite...

Страница 870: ...palten 12x24 ANK Schriftart B Erweiterungsschriftart 38 Spalten 10x24 42 Spalten 9x24 42 Spalten 10x24 46 Spalten 9x24 43 Spalten 10x24 48 Spalten 9x24 F r Papier mit 80 mm Breite F r Papier mit 83 mm...

Страница 871: ...x 2 75 ANK Schriftart B 10 x 24 9 x 24 1 25 x 3 0 1 125 x 3 0 9 x 17 9 x 17 1 125 x 2 125 1 125 x 2 125 ANK Schriftart C 8 x 16 1 0 x 2 0 8 x 13 1 0 x 1 625 Kanji Schriftart A 24 x 24 3 0 x 3 0 24 x 2...

Страница 872: ...198 8 Au enansichten Papierf hrung ge ffnet Papierf hrung...

Страница 873: ...entfernen Hinweis Vollst ndiger Schnitt kann in der Mitte der Schnittfl che zu Unregelm igkeiten f hren Wenn an dieser Stelle Papierfasern zur ckbleiben kann dies m glicherweise zu unvollst ndigem Sch...

Страница 874: ...urchmesser verbleibende Papierl nge sind theoretische Werte Diese Werte h ngen von den aktuellen Bedingungen ab unter anderem vom Zustand der Papierrolle und der Papierdicke Hinweis Der Kernau endurch...

Страница 875: ...201 13 4 Technische Daten Schnittstelle 1 LAN IEEE802 3 10BASE T IEEE802 3U 100BASE TX 2 Dual entspricht USB 1 1 und RS 232C...

Страница 876: ...0 bis 95 rel Luftfeuchtigkeit keine Kondensation Betrieb gew hrleistet bei 10 bis 85 rel Luftfeuchtigkeit keine Kondensation Nicht in Betrieb 8 bis 95 rel Luftfeuchtigkeit keine Kondensation W hrend T...

Страница 877: ...fohlene Papier mit einer Dicke von 75 m 500 000 Schnitte f r das empfohlene Papier mit einer Dicke von 75 bis 150 m Etikettenschnitt 1 000 000 Schnitte Schnitt im Basisbereich 500 000 Schnitte Schnitt...

Страница 878: ...inten an den Drucker anbauen 14 2 Bezeichnung der Teile PNE Sensorkabel PNE Sensor Zum Anschluss an den Drucker Trennwand Position entsprechend der Papierbreite einstellen Papierrollenwelle enthalten...

Страница 879: ...205 Im Lieferumfang enthaltene Produkte Druckeranschluss Fitting Fitting Montageschrauben x2 Anleitung Papierrollenwelle Durchmesser drei Zoll Papierrollenwelle Durchmesser ein Zoll...

Страница 880: ...endurchmesser B 32 0 5 mm Papierrolle ein Zoll Innendurchmesser C 76 2 0 5 mm Au endurchmesser B 82 0 5 mm Papierrolle drei Zoll 5 Farbschicht Papierrolle au en 6 Auslauf Verarbeitung Fixieren Sie de...

Страница 881: ...nachfolgende Tabelle Papierdicke m Kernau endurchmesser B mm Erkennungsdurchmesser A mm Verbleibendes Papier m 75 82 Ca 100 20 bis 30 150 82 Ca 100 10 bis 20 Hinweis Die oben angegebenen Werte d h er...

Страница 882: ...us der Netzsteckdose 1 Entfernen Sie die Anschlussabdeckung an der R ckseite des Druckers ffnen Sie die Anschlussabdeckung und biegen Sie die mittlere Abdeckung in Richtung des Pfeils Entfernen Sie an...

Страница 883: ...te Papierrolleneinheit an die Buchse an der R ckseite des Druckers an Hinweis Zum Anschluss des Netzteilkabels siehe Abschnitt 4 2 Anschluss des Netzteils Hinweis Gehen Sie beim Anschluss der Kabel bi...

Страница 884: ...e en die ffnungen an der linken und rechten Seite des Druckeranschlussfittings auf den linken und rechten Vorsprung am Anschluss der breiten Papierrolleneinheit Linke und rechte ffnung an der Haltevor...

Страница 885: ...innen nach au en durch die Kabelklemmen der Papierrolleneinheit Sensorkabel Schnittstellenkabel Netzteilkabel Kabelklemmen ffnen Sie die Kabelklemmen indem Sie Teil A in Pfeilrichtung biegen wie in de...

Страница 886: ...den Durchhang des Sensorkabels zwischen Papierrolleneinheit und Drucker heraus indem Sie die bersch ssige L nge mit einer Kabelklemme befestigen wie in der Abbildung unten gezeigt Sensorkabel Befestig...

Страница 887: ...ie Klemmschraube fest 1 ist die Standardposition Die folgende Abbildung zeigt die eingestellte Position f r eine Papierrolle von 1 Zoll Kerndurchmesser 1 Position f r 1 0 Zoll Kerndurchmesser 1 5 Posi...

Страница 888: ...elschraube anschlie end fest 1 ist die Standardposition Die folgende Abbildung zeigt die eingestellte Position f r einen Kerndurchmesser von 1 Zoll Kerndurchmesser 1 Position f r 1 0 Zoll Kerndurchmes...

Страница 889: ...rsehenen Bereich des Papiers nicht bedrucken entfernen Sie daher etwa eine Wicklung Papier von der Rolle Jeglicher Klebstoff oder andere klebrige R ckst nde k nnen sich am Thermodruckkopf festsetzen u...

Страница 890: ...en Druckproblemen f hren Hinweis Wenn die eingelegte Papierrolle zu locker gewickelt ist siehe nachstehende Abbildung wickeln Sie das Papier vor dem Drucken fester Drucken mit zu locker gewickelten Pa...

Страница 891: ...den Abstandshalter lassen Sie jedoch einen kleinen Spalt frei wie in der Abbildung gezeigt Vorne Lassen Sie zwischen Abstandshalter und Papierrolle einen Spalt von einem Skalenteilstrich frei und zieh...

Страница 892: ...m glicherweise nicht sauber durch Stellen Sie sicher dass das Papier unter der F hrungsrolle hindurch eingef hrt wird wie in obiger Abbildung a dargestellt Hinweis Wenn eine Papierrolle wie in Abbild...

Страница 893: ...dere Papierende vorne aus dem Drucker heraus 5 Schlie en Sie die obere Abdeckung nachdem Sie das Einlegen des Papiers abgeschlossen haben Obere Abdeckung ffnen Sie die obere Abdeckung Ziehen Sie das v...

Страница 894: ...220 14 9 Gesamtansicht der Papierrolleneinheit an den Drucker angeschlossen...

Страница 895: ...I Europe Ltd Ukraine Raisy Opkinoy Street 8 Building B 2nd Floor Kiev 02002 Ukraine Tel 380 44 537 5288 Website www oki ua OKI Sistem ve Yaz c z mler Tic Ltd ti Harman sok Duran Is Merkezi No 4 Kat 6...

Страница 896: ...www oki nl Oki Systems Norway AS Tevlingveien 23 N 1081 Oslo Website www oki no Var v nlig kontakta din terf rs ljare i f rsta hand f r konsultation I andra hand kontakta Oki Systems Sweden AB Borgafj...

Страница 897: ...LD670...

Страница 898: ...Windows Windows Server y Windows Vista son marcas registradas de Microsoft Corporation Apple Macintosh Rosetta Mac y Mac OS son marcas registradas de Apple Inc Otros nombres de productos y marcas menc...

Страница 899: ...orte y ventas p ngase en contacto con el distribuidor local INFORMACI N MEDIOAMBIENTAL Following information is only for the province of Buenos Aires in Argentine La siguiente informaci n es solo para...

Страница 900: ...o en espera 3 Alerta precauci n general 3DUD LGHQWL FDU XQD DOHUWD SUHFDXFLyQ JHQHUDO 4 XLGDGR VXSHU FLH FDOLHQWH Para indicar que el punto indicado puede estar caliente y no se debe tocar sin prestar...

Страница 901: ...el apartado 10 2 Configuraci n de la impresora 5 La impresora viene configurada de f brica con la densidad de impresi n m s oscura 130 Si este ajuste no es adecuado especifique una densidad de impresi...

Страница 902: ...adhesivas de forma peri dica normalmente una vez al mes 11 Si se deja papel dentro de la impresora durante un periodo de tiempo prolongado puede deformarse y los caracteres impresos pueden mostrarse t...

Страница 903: ...2 En funci n de la humedad y otras condiciones ambientales las impresiones en papel para etiquetas o papel grueso pueden ser borrosas Ajuste la velocidad y la densidad de impresi n adecuadas para el...

Страница 904: ...ci n de la impresora Si el ordenador del host o la impresora siguen sin funcionar despu s de volver a conectar el cable o de apagar y encender el interruptor de alimentaci n reinicie el ordenador del...

Страница 905: ...e El conector no se debe conectar a conexiones de l neas conmutadas p blicas o de tipo parecido Nota acerca del uso de la impresora en modo especial 1 Si se utiliza un rollo de di metro grande el pape...

Страница 906: ...i n del adaptador de CA 27 4 4 Desconexi n del adaptador de CA 29 4 5 Encendido 30 5 Colocaci n del papel para imprimir 31 5 1 Apertura de la cubierta superior 31 5 2 Configuraci n del ancho del papel...

Страница 907: ...evenci n y eliminaci n de atascos de papel 75 8 1 Prevenci n de atascos de papel 75 8 2 Eliminaci n de atascos de papel 75 9 Soluci n de problemas 76 9 1 Problemas y errores en el encendido 76 9 2 Pro...

Страница 908: ...fuente de alimentaci n 194 13 Especificaciones 195 13 1 Especificaciones generales 195 13 2 Especificaciones de la cuchilla 199 13 3 Especificaciones de suministro del papel 200 13 4 Especificaciones...

Страница 909: ...ol Gu a del papel Abra la gu a del papel cuando la longitud de impresi n prevista sea superior a 50 mm Tire de la palanca de liberaci n para abrir la cubierta superior Palanca de liberaci n Este inter...

Страница 910: ...Art culos incluidos Papel t rmico CD MANUAL DRIVER DE LA IMPRESORA PROGRAMA DE UTILIDAD Hoja de instrucciones Hoja de garant a de seguridad Adaptador de CA Cable de alimentaci n 12...

Страница 911: ...nuaci n Nombre del modelo KA02951 0120 Entrada De 100 a 240 V CA 50 60 Hz Salida 24 V CC 5 1 5 A Precauci n Utilice nicamente adaptadores de CA autorizados Precauci n No utilice el adaptador de CA ni...

Страница 912: ...s Si se instala la unidad de rollos de papel de di metro grande opcional la impresora puede utilizar rollos con un di metro externo de hasta 200 mm Tama o de la base Di metro interno de 1 pulgada di m...

Страница 913: ...15 2 Papel continuo Altura m xima de la pila 180 mm o menos Longitud del pliegue de 76 2 a 203 2 0 5 mm de 3 a 8 pulgadas Especificaciones de perforaci n 3 cortes 1 uni n...

Страница 914: ...rmaci n de dise o del papel incluidos el tipo y el tama o del papel Si se imprime sin configurar estos ajustes se puede producir un error de dise o del papel o una anomal a en la impresi n Por lo tant...

Страница 915: ...mprimir en papel troquelado para etiquetas con marcas negras preste atenci n a la posici n de la impresi n y a la posici n del corte Si se imprime en papel base que no va cubierto con la hoja de etiqu...

Страница 916: ...la gu a del papel utilice papel para etiquetas al que se hayan extra do los m rgenes como se muestra en la imagen siguiente Los m rgenes se cortan durante la fabricaci n 18 Cortes longitudinales a am...

Страница 917: ...resultado de la combinaci n de los valores especificados en la tabla siguiente Factor de reflexi n A rea de marcas negras 8 B M rgenes superiores o inferiores a las marcas negras 75 Nota Los valores d...

Страница 918: ...tas con marcas negras confirme tambi n que se cumplan las condiciones del apartado 3 4 2 Condiciones de uso del papel con marcas negras 20 rea de impresi n 4 5 mm o m s Cara imprimible del papel 4 5 m...

Страница 919: ...ervaci n de alta calidad 150 m 130 Nota Solo se deben utilizar los tipos de papel recomendados Si se utilizan otros tipos de papel se pueden producir da os en el cabezal impresiones an malas u otros p...

Страница 920: ...esora Tenga en cuenta especialmente que la precisi n en el recorrido del papel puede verse afectada negativamente al imprimir un c digo de barras en el margen superior al inicio del recorrido del pape...

Страница 921: ...adaptador de CA se ha desconectado de la toma 4 1 Conexi n del cable de interfaz Tire de la tapa del conector en la parte posterior de la impresora para abrirla y conecte el cable de interfaz a la tom...

Страница 922: ...onector de interfaz LAN LED Precauci n No toque los interruptores DIP durante el uso normal Esto puede cambiar la configuraci n de red y deshabilitar la impresi n normal Precauci n Si el dispositivo e...

Страница 923: ...da la conexi n sujete el conector con tornillos Cable de interfaz USB Tipo B Conecte la impresora a un PC a trav s de este conector Conector de alimentaci n Conector de expulsi n del caj n Conector de...

Страница 924: ...el cable se alarga desde la parte posterior extraiga las piezas postizas de la tapa del conector con unos alicates u otra herramienta de este tipo En este caso es necesario extraer las piezas postiza...

Страница 925: ...alimentaci n especificados 2 Tire de la tapa del conector en la parte posterior de la impresora para abrirla y conecte el cable del adaptador de CA a la toma de alimentaci n Una vez conectado el cabl...

Страница 926: ...te la base del cable 2 deslizando hacia arriba la parte exterior del conector 3 e inserte el conector hasta que haga clic y quede bien anclado Base del cable 28 1 2 3 Parte exterior del conector 3 Ins...

Страница 927: ...mecanismo de bloqueo del conector se desbloquear y el cable se podr desenchufar con facilidad Evite tirar del cable con fuerza puesto que puede da ar el conector Nota Antes de desconectar el adaptado...

Страница 928: ...dido Una vez conectado el adaptador de CA encienda el interruptor de alimentaci n en el lateral de la impresora Se iluminar el testigo POWER del panel de control Interruptor de alimentaci n Panel de c...

Страница 929: ...perior Parte inferior de la palanca de liberaci n de la cubierta 2 Al abrir la cubierta superior puede parecer que queda fija en la posici n de apertura sin estar totalmente abierta Aseg rese de que e...

Страница 930: ...de impresi n Para ello consulte Modos especiales Consulte el ejemplo 7 del apartado 10 2 Configuraci n de la impresora Nota Si la impresora est utilizando papel estrecho por ejemplo de 70 mm no lo su...

Страница 931: ...lanca y b deslice la palanca hasta la posici n deseada A continuaci n instale el separador sirvi ndose de la regla en caso necesario Nota El separador A se debe instalar con un margen de unos 0 5 mm p...

Страница 932: ...jetando la parte b del separador A mantenga pulsada la parte a palanca en la direcci n que indica la flecha y lev ntela para desbloquearla A continuaci n retire la secci n de soporte posterior Bloqueo...

Страница 933: ...eparador B Sujetando el separador B en el punto a lev ntelo para desbloquearlo A continuaci n retire el separador por la secci n de soporte posterior 35 Separador B Secci n de s posterior oporte Punto...

Страница 934: ...rador A Instale el separador A por la secci n de soporte posterior Alineaci n horizontal Gancho posterior del eje Nota Presione el separador hacia abajo hasta que encaje con un clic y compruebe que la...

Страница 935: ...parador B por la secci n de soporte posterior Gancho posterior del eje Alineaci n horizontal Nota Presione el separador hacia abajo hasta que encaje con un clic y compruebe que la parte superior del s...

Страница 936: ...del rollo de papel para garantizar que no quede pegamento El adhesivo u otros restos de cola pueden adherirse al cabezal t rmico y causar un problema como espacios vac os en las impresiones Por lo ta...

Страница 937: ...sentar deformidades Si se utilizan rollos de papel como los que se muestran en la figura siguiente se pueden producir atascos de papel impresiones irregulares u otros problemas de impresi n Nota Si el...

Страница 938: ...bra la cubierta superior pase el papel continuo a trav s de la unidad de avance del papel en la parte posterior de la impresora Coloque el papel con la cara termosensible hacia arriba Unidad de avance...

Страница 939: ...osterior de la impresora De este modo se puede apilar hasta 180 mm de papel consulte la figura 1 Si la pila de papel continuo se coloca junto a la parte posterior de la impresora solo se puede apilar...

Страница 940: ...do debe evitar que el papel se enganche se atasque o se corte durante el avance entre otros problemas que pueden acortar la vida til del cabezal t rmico rea de 0 a 15 mm anterior a las perforaciones n...

Страница 941: ...del papel abierta En caso de que sea igual o inferior a 50 mm utilice la impresora con la gu a del papel cerrada Gu a del papel Para una longitud de impresi n superior a 50 mm Utilice la impresora co...

Страница 942: ...la orientaci n correcta Si se cierra la cubierta superior con el papel mal colocado se puede producir un atasco de papel o una impresi n mal alineada Nota Para cerrar la cubierta superior presi nela...

Страница 943: ...s elementos 1 y 2 se deben configurar obligatoriamente Los elementos del 3 al 6 se pueden configurar si se desea Documentaci n de consulta En el CD ROM que se suministra con la impresora encontrar alg...

Страница 944: ...al papel con marcas negras o papel troquelado para etiquetas 3 cuando cambie el tama o del papel 4 cuando utilice un papel troquelado para etiquetas del mismo tama o que el papel que estaba usando per...

Страница 945: ...esora la informaci n de dise o del papel que se describe en el apartado 6 1 1 Dise o del papel del manual III Creaci n de papel personalizado Cree el papel personalizado tal como se describe en el apa...

Страница 946: ...tigos POWER y ERROR parpadean alternativamente Mantenga pulsado el bot n FEED hasta que los testigos POWER y ERROR parpadeen al mismo tiempo Cuando esto ocurra deje de pulsar el bot n FEED Para obtene...

Страница 947: ...miento que se muestra a continuaci n para guardar la informaci n del dise o en la impresora Este procedimiento indica c mo crear un tipo de papel personalizado y enviar la informaci n resultante a la...

Страница 948: ...ente de S1 a S5 No cambie S5 cut position con su valor predeterminado 3 Especifique los m rgenes izquierdo derecho superior e inferior 4 Haga clic en el bot n Save La configuraci n del papel personali...

Страница 949: ...de papel existente Procedimiento 1 Seleccione un papel que ya se haya creado 2 Haga clic en el bot n Transfer to Printer La informaci n de dise o del papel seleccionado se env a a la impresora y se a...

Страница 950: ...arcas negras Cambio a un papel con un dise o del papel distinto Si el error no desaparece una vez terminada la configuraci n compruebe que el papel colocado en la impresora coincida con el ajuste de p...

Страница 951: ...e una ventana espec fica de configuraci n de la p gina sino que las preferencias de impresi n se configuran en la ventana Imprimir Para obtener m s informaci n sobre la ventana Imprimir consulte la de...

Страница 952: ...enga pulsado el bot n FEED Los testigos POWER y ERROR parpadean alternativamente Mantenga pulsado el bot n FEED hasta que los testigos POWER y ERROR parpadeen al mismo tiempo Cuando esto ocurra deje d...

Страница 953: ...ontinuaci n para guardar la informaci n del dise o en la impresora En este procedimiento se describe c mo enviar la informaci n del dise o a la impresora Para realizar las siguientes capturas de panta...

Страница 954: ...cifique la informaci n del papel correspondiente de S1 a S5 No cambie S5 cut position con su valor predeterminado 3 Especifique los m rgenes izquierdo derecho superior e inferior 4 Haga clic en el bot...

Страница 955: ...e haya definido en la configuraci n del dise o Sustituya el papel y haga clic en el bot n OK Si el error no desaparece una vez terminada la configuraci n compruebe que el papel colocado en la impresor...

Страница 956: ...mo inicializar el dise o del papel consulte C mo inicializar el dise o del papel en el apartado 7 1 Panel de control 6 Cierre la cubierta superior 7 La impresora hace avanzar el papel obtiene autom t...

Страница 957: ...resora En este procedimiento se describe c mo enviar la configuraci n del ancho del papel a la impresora Para realizar las siguientes capturas de pantalla se ha utilizado el sistema operativo Windows...

Страница 958: ...aga clic en el bot n OK 5 Aparece un mensaje que indica que se debe sustituir el papel por el papel que se haya definido en la configuraci n del dise o Sustituya el papel y haga clic en el bot n OK No...

Страница 959: ...do del rea de impresi n 11 0 mm para un ancho del papel de 83 mm 4 0 mm para un ancho del papel de 80 mm 3 0 mm para otros anchos del papel L7 Ancho del rea de impresi n 80 0 mm para un ancho del pape...

Страница 960: ...l papel hasta el l mite izquierdo del rea de impresi n 5 0 mm L7 Ancho del rea de impresi n Valor del ancho del papel L6 x 2 mm Nota Los valores de L1 a L7 indicados m s arriba son valores que detecta...

Страница 961: ...inar L5 Longitud del rea de impresi n Sin determinar L6 Longitud desde el borde izquierdo del papel hasta el l mite izquierdo del rea de impresi n 1 0 mm para un ancho del papel de 83 mm 4 0 mm para u...

Страница 962: ...ue los testigos POWER y ERROR parpadeen al mismo tiempo Cuando esto ocurra deje de pulsar el bot n FEED 5 Cierre la cubierta superior 6 La impresora hace avanzar el papel obtiene la informaci n del di...

Страница 963: ...la informaci n del dise o del papel en la impresora En caso contrario sustit yalo por el tipo que coincida con la informaci n del dise o del papel 2 Error durante la impresi n Si se produce un error d...

Страница 964: ...impresora y encenderla por primera vez la funci n autom tica de detecci n del dise o configura los valores de ajuste de los sensores Ajuste manual de los sensores 1 Se puede iniciar el ajuste manual...

Страница 965: ...1 Mediante el driver de la impresora de Windows Consulte el Apartado 4 4 Pesta a Graphics de la Windows Driver User s Guide 2 Mediante la utilidad de la impresora Consulte el Apartado 3 2 5 Customize...

Страница 966: ...se describe en el ejemplo 2 del apartado 10 2 Configuraci n de la impresora Si ha especificado una velocidad de impresi n con el driver de Windows esta es la velocidad que se utilizar para imprimir La...

Страница 967: ...rasgado Modifique la configuraci n para adaptarla a sus necesidades Esta configuraci n se puede modificar de distintos modos 1 Mediante el driver de la impresora de Windows Consulte el Apartado 4 1 Pe...

Страница 968: ...guraci n tal como se describe en el ejemplo 4 del apartado 10 2 Configuraci n de la impresora 2 Mediante la utilidad de la impresora Consulte el Apartado 3 2 4 Memory Switch settings de la Utility Use...

Страница 969: ...l para etiquetas de p gina completa Si se pulsa este bot n una vez el papel avanza una l nea Si se mantiene pulsado el papel avanza de forma continuada Papel normal incluido el papel para etiquetas de...

Страница 970: ...ificar la informaci n del dise o utilizando el mismo tipo de papel Procedimiento Mantenga pulsado el bot n FEED durante unos instantes Los testigos POWER y ERROR parpadear n alternativamente Cuando es...

Страница 971: ...ta ERROR Constantemente encendido POWER Constantemente encendido Cabezal caliente 1 ERROR Constantemente encendido 1 Se suspende la impresi n debido a la elevada temperatura del cabezal t rmico Tipo d...

Страница 972: ...ERROR Baja tensi n Patr n que se repite en el que el testigo verde parpadea cuatro veces y el mbar parpadea una vez POWER ERROR Sobretensi n Patr n que se repite en el que el testigo verde parpadea ci...

Страница 973: ...el Si se produce un atasco de papel retire el papel atascado del modo siguiente 1 Desconecte el interruptor de alimentaci n para apagar la impresora 2 Presione hacia abajo la palanca de apertura de la...

Страница 974: ...ratura elevada 1 Coloque el papel 2 Cierre completamente la cubierta superior 3 Espere a que la temperatura del cabezal t rmico baje lo suficiente 9 2 Problemas de la cuchilla S ntoma Causa Acci n cor...

Страница 975: ...da ado 1 Ajuste los valores de densidad de impresi n y velocidad de impresi n para que se correspondan con el papel Consulte el apartado 10 2 Configuraci n de la impresora 2 Desconecte la alimentaci...

Страница 976: ...m ticamente y finaliza la prueba Para terminar la prueba de impresi n mientras est en curso pulse el bot n FEED La impresora cortar el papel y finalizar la prueba Nota Es necesario mantener pulsada la...

Страница 977: ...rmina la prueba Si mantiene pulsado el bot n FEED durante un segundo o m s la impresora prosigue la prueba e imprime una lista de fuentes Para terminar la impresi n de la lista de fuentes mientras est...

Страница 978: ...e las funciones de la utilidad e instrucciones de uso consulte la Utility User s Guide En este apartado se describen detalladamente las modificaciones en la configuraci n m s habituales Ejemplo 1 Camb...

Страница 979: ...mismo tiempo el bot n FEED en la parte izquierda de la cubierta superior Nota Es necesario mantener pulsada la tecla FEED hasta que la impresora empieza a imprimir Nota Si se ha saltado el elemento q...

Страница 980: ...ta Analysis Cleaning Sensor Adjustment Setup Test Print Paper feed direction Selection Item A continuaci n mantenga pulsado el bot n FEED durante un segundo o m s para aceptar la selecci n Al entrar e...

Страница 981: ...durante un segundo o m s para aceptar la selecci n Al aceptar la selecci n de SETUP la impresora imprime la informaci n siguiente Paper Setting Return to Top Menu Others Serial Condition Customize Val...

Страница 982: ...Switch Paper Setting Setup Paper feed direction Selection Item A continuaci n mantenga pulsado el bot n FEED durante al menos un segundo para aceptar la selecci n Al aceptar la selecci n de CUSTOMIZE...

Страница 983: ...x Speed BK Density Print Density Print Color NV Graphics Memory User NV Memory Paper feed direction Selection Item A continuaci n mantenga pulsado el bot n FEED durante un segundo o m s para aceptar l...

Страница 984: ...0 Lightest Paper feed direction Selection Item A continuaci n mantenga pulsado el bot n FEED durante un segundo o m s para aceptar la selecci n Al aceptar la selecci n de 100 la impresora imprime la i...

Страница 985: ...iguiente Return to Top Menu Return to Top Menu Others Serial Condition Customize Value Memory Switch Paper Setting Return to Up Paper feed direction Selection Item 9 Seleccione la opci n RETURN TO TOP...

Страница 986: ...ptar la selecci n Al aceptar la selecci n de END la impresora corta el papel y sale del modo de configuraci n Nota Si apaga el interruptor de alimentaci n de la impresora antes de seleccionar END el a...

Страница 987: ...pulsado al mismo tiempo el bot n FEED en la parte izquierda de la cubierta superior Nota Es necesario mantener pulsada la tecla FEED hasta que la impresora empieza a imprimir Nota Si se ha saltado el...

Страница 988: ...ta Analysis Cleaning Sensor Adjustment Setup Test Print Paper feed direction Selection Item A continuaci n mantenga pulsado el bot n FEED durante un segundo o m s para aceptar la selecci n Al entrar e...

Страница 989: ...Top Menu Others Serial Condition Customize Value Memory Switch Paper Setting Setup Paper feed direction Selection Item 5 Seleccione la opci n CUSTOMIZE VALUE Pulse el bot n FEED dos veces brevemente u...

Страница 990: ...V Memory Customize Value Paper feed direction Selection Item 6 Seleccione la opci n MAX SPEED Pulse el bot n FEED brevemente un segundo o menos cinco veces para ir a MAX SPEED Max Speed BK Density Pri...

Страница 991: ...th 5th 4th 3rd 2nd 1st Low Speed Max Speed Paper feed direction Selection Item 7 Seleccione la opci n 9th Pulse el bot n FEED brevemente un segundo o menos hasta que se seleccione 9th A continuaci n m...

Страница 992: ...ent Paper Width Paper Detection 9th High Speed Paper feed direction Selection Item 8 Seleccione la opci n RETURN TO UP Mantenga pulsado el bot n FEED durante un segundo o m s para aceptar la selecci n...

Страница 993: ...Return to Top Menu Paper feed direction Selection Item 10 Seleccione la opci n END Pulse el bot n FEED brevemente un segundo o menos tres veces para ir a END End Default Set Setup Print Setup End Def...

Страница 994: ...juste se perder Verificaci n de la configuraci n Para verificar la configuraci n realice una prueba de impresi n tal como se describe en el apartado 10 1 En la prueba de impresi n se imprime una lista...

Страница 995: ...manteniendo pulsado al mismo tiempo el bot n FEED en la parte izquierda de la cubierta superior Nota Es necesario mantener pulsada la tecla FEED hasta que la impresora empieza a imprimir Nota Si se ha...

Страница 996: ...ta Analysis Cleaning Sensor Adjustment Setup Test Print Paper feed direction Selection Item A continuaci n mantenga pulsado el bot n FEED durante un segundo o m s para aceptar la selecci n Al entrar e...

Страница 997: ...n to Top Menu Others Serial Condition Customize Value Memory Switch Paper Setting Setup Paper feed direction Selection Item 5 Seleccione la opci n CUSTOMIZE VALUE Pulse el bot n FEED brevemente un seg...

Страница 998: ...d BK Density Print Density Print Color NV Graphics Memory User NV Memory Customize Value Paper feed direction Selection Item 6 Seleccione la opci n PRINT COLOR Pulse el bot n FEED brevemente un segund...

Страница 999: ...r la selecci n de PRINT COLOR la impresora imprime la informaci n siguiente Mono 2 Color Mono Print Color Paper feed direction Selection Item 7 Seleccione la opci n 2 COLOR Pulse el bot n FEED breveme...

Страница 1000: ...justment Paper Width Paper Detection 2 Color Paper feed direction Selection Item 8 Seleccione la opci n RETURN TO UP Mantenga pulsado el bot n FEED durante un segundo o m s para aceptar la selecci n A...

Страница 1001: ...n FEED brevemente un segundo o menos tres veces para ir a END End Default Set Setup Print Setup End Default Set Setup Print Setup Paper feed direction Selection Item Nota Si apaga el interruptor de al...

Страница 1002: ...sora 3 La cubierta est cerrada 2 Entre en el modo especial Encienda el interruptor de alimentaci n situado en el lateral derecho de la impresora manteniendo pulsado al mismo tiempo el bot n FEED en la...

Страница 1003: ...em Selection Please push the feed switch short Item Decision Please push the feed switch long Paper feed direction Selection Item 3 Entre en modo de configuraci n desde el modo especial Pulse el bot n...

Страница 1004: ...Setup Setup Paper feed direction Selection Item 4 En modo de configuraci n seleccione SETUP A continuaci n mantenga pulsado el bot n FEED durante al menos un segundo para aceptar la selecci n Al acept...

Страница 1005: ...ar la selecci n de PAPER SETTING la impresora imprime la informaci n siguiente siguiente Paper Detection Return to Top Menu Return to Up Sensor Auto Adjust Mark Feed with Cut Feed at Power On Layout E...

Страница 1006: ...Return to Up Sensor Auto Adjust Mark Feed with Cut Feed at Power On Layout Er Recovery Layout Er Process TearOff Adjustment Base Adjustment Paper Width Paper Detection Paper feed direction Selection...

Страница 1007: ...pulsado el bot n FEED durante al menos un segundo para aceptar la selecci n Al aceptar la selecci n de DISABLE la impresora imprime la informaci n siguiente Return to Up Return to Top Menu Return to...

Страница 1008: ...Menu Others Serial Condition Customize Value Memory Switch Paper Setting Return to Up Paper feed direction Selection Item 9 Seleccione la opci n RETURN TO TOP MENU A continuaci n mantenga pulsado el b...

Страница 1009: ...tar la selecci n Al aceptar la selecci n de END la impresora corta el papel y sale del modo de configuraci n Nota Si apaga el interruptor de alimentaci n de la impresora antes de seleccionar END el aj...

Страница 1010: ...mpresora 1 Antes de realizar el ajuste compruebe el estado de la impresora 1 La alimentaci n est desconectada 2 El papel est colocado en la impresora 3 La cubierta est cerrada 2 Entre en el modo espec...

Страница 1011: ...em Selection Please push the feed switch short Item Decision Please push the feed switch long Paper feed direction Selection Item 3 Entre en modo de configuraci n desde el modo especial Pulse el bot n...

Страница 1012: ...ime la informaci n siguiente Setup End Default Set Setup Print Setup Setup Paper feed direction Selection Item 4 En modo de configuraci n seleccione DEFAULT SET Pulse el bot n FEED dos veces brevement...

Страница 1013: ...nt Setup Clear Completed Paper feed direction Selection Item Nota Si apaga el interruptor de alimentaci n de la impresora antes de seleccionar END el ajuste se perder Verificaci n de la configuraci n...

Страница 1014: ...ra 3 La cubierta est cerrada 2 Entre en el modo especial Encienda el interruptor de alimentaci n situado en el lateral derecho de la impresora manteniendo pulsado al mismo tiempo el bot n FEED en la p...

Страница 1015: ...em Selection Please push the feed switch short Item Decision Please push the feed switch long Paper feed direction Selection Item 3 Entre en modo de configuraci n desde el modo especial Pulse el bot n...

Страница 1016: ...iente Setup End Default Set Setup Print Setup Setup Paper feed direction Selection Item 4 En modo de configuraci n seleccione SETUP A continuaci n mantenga pulsado el bot n FEED durante al menos un se...

Страница 1017: ...mory Switch Paper Setting Return to Top Menu Others Serial Condition Customize Value Memory Switch Paper Setting Setup Paper feed direction Selection Item Al aceptar la selecci n de OTHERS la impresor...

Страница 1018: ...z para ir a PNE DETECT PNE Detect Process ID Error Serial Number USB ACK Pulse Width Return to Top Menu Return to Up Roll Paper Unit PE Roll Paper Unit Buzzer Batch OTHER IF Batch COM IF Font B PNE De...

Страница 1019: ...lecci n de PNE DETECT la impresora imprime la informaci n siguiente Enable Disable Enable PNE Detect Paper feed direction Selection Item 7 Seleccione la opci n DISABLE Pulse el bot n FEED brevemente u...

Страница 1020: ...Font B PNE Detect Process ID Error Serial Number USB ACK Pulse Width Disable Paper feed direction Selection Item 8 Seleccione la opci n RETURN TO UP A continuaci n mantenga pulsado el bot n FEED dura...

Страница 1021: ...tup Return to Top Menu Paper feed direction Selection Item 10 Seleccione la opci n END Pulse el bot n FEED tres veces brevemente un segundo o menos cada vez para ir a END End Default Set Setup Print S...

Страница 1022: ...uste se perder Verificaci n de la configuraci n Para verificar la configuraci n realice una prueba de impresi n tal como se describe en el apartado 10 1 En la prueba de impresi n se imprime una lista...

Страница 1023: ...3 La cubierta est cerrada 2 Entre en el modo especial Encienda el interruptor de alimentaci n situado en el lateral derecho de la impresora manteniendo pulsado al mismo tiempo el bot n FEED en la part...

Страница 1024: ...em Selection Please push the feed switch short Item Decision Please push the feed switch long Paper feed direction Selection Item 3 Entre en modo de configuraci n desde el modo especial Pulse el bot n...

Страница 1025: ...iente Setup End Default Set Setup Print Setup Setup Paper feed direction Selection Item 4 En modo de configuraci n seleccione SETUP A continuaci n mantenga pulsado el bot n FEED durante al menos un se...

Страница 1026: ...s un segundo para aceptar la selecci n Paper Detection Return to Top Menu Return to Up Sensor Auto Adjust Mark Feed with Cut Feed at Power On Layout Er Recovery Layout Er Process TearOff Adjustment Ba...

Страница 1027: ...n Layout Er Recovery Layout Er Process TearOff Adjustment Base Adjustment Paper Width Paper Detection Paper feed direction Selection Item A continuaci n mantenga pulsado el bot n FEED durante al menos...

Страница 1028: ...antenga pulsado el bot n FEED durante al menos un segundo para aceptar la selecci n Al aceptar la selecci n de 80mm la impresora imprime la informaci n siguiente Return to Up Return to Top Menu Return...

Страница 1029: ...Menu Others Serial Condition Customize Value Memory Switch Paper Setting Return to Up Paper feed direction Selection Item 9 Seleccione la opci n RETURN TO TOP MENU A continuaci n mantenga pulsado el b...

Страница 1030: ...tar la selecci n Al aceptar la selecci n de END la impresora corta el papel y sale del modo de configuraci n Nota Si apaga el interruptor de alimentaci n de la impresora antes de seleccionar END el aj...

Страница 1031: ...n la impresora 3 La cubierta est cerrada 2 Entre en el modo especial Encienda el interruptor de alimentaci n situado en el lateral derecho de la impresora manteniendo pulsado al mismo tiempo el bot n...

Страница 1032: ...em Selection Please push the feed switch short Item Decision Please push the feed switch long Paper feed direction Selection Item 3 Entre en modo de configuraci n desde el modo especial Pulse el bot n...

Страница 1033: ...iente Setup End Default Set Setup Print Setup Setup Paper feed direction Selection Item 4 En modo de configuraci n seleccione SETUP A continuaci n mantenga pulsado el bot n FEED durante al menos un se...

Страница 1034: ...Setting Setup Paper feed direction Selection Item A continuaci n mantenga pulsado el bot n FEED durante al menos un segundo para aceptar la selecci n Al aceptar la selecci n de OTHERS la impresora im...

Страница 1035: ...OTHER IF Batch OTHER IF Batch COM IF Font B PNE Detect Process ID Error Serial Number USB ACK Pulse Width Return to Top Menu Return to Up Roll Paper Unit PE Roll Paper Unit Buzzer Batch OTHER IF Batch...

Страница 1036: ...n de BATCH OTHER IF la impresora imprime la informaci n siguiente Disable Disable Enable Batch OTHER IF Paper feed direction Selection Item 7 Seleccione la opci n ENABLE Pulse el bot n FEED brevemente...

Страница 1037: ...Font B PNE Detect Process ID Error Serial Number USB ACK Pulse Width Enable Paper feed direction Selection Item 8 Seleccione la opci n RETURN TO UP A continuaci n mantenga pulsado el bot n FEED duran...

Страница 1038: ...tup Return to Top Menu Paper feed direction Selection Item 10 Seleccione la opci n END Pulse el bot n FEED tres veces brevemente un segundo o menos cada vez para ir a END End Default Set Setup Print S...

Страница 1039: ...uste se perder Verificaci n de la configuraci n Para verificar la configuraci n realice una prueba de impresi n tal como se describe en el apartado 10 1 En la prueba de impresi n se imprime una lista...

Страница 1040: ...ntos de configuraci n e informaci n relacionada 1 Paper Setting setup items Elementos de configuraci n de Paper Settings N Elemento Descripci n Ajuste del elemento de configuraci n 1 Paper Detection E...

Страница 1041: ...0 to 4 9 mm de 4 0 a 4 9 mm Si se selecciona 3 X mm 3 0 to 3 9 mm de 3 0 a 3 9 mm Si se selecciona 2 X mm 2 0 to 2 9 mm de 2 0 a 2 9 mm Si se selecciona 1 X mm 1 0 to 1 9 mm de 1 0 a 1 9 mm Si se sele...

Страница 1042: ...ciona 3 X mm 3 0 to 3 9 mm de 3 0 a 3 9 mm Si se selecciona 2 X mm 2 0 to 2 9 mm de 2 0 a 2 9 mm Si se selecciona 1 X mm 1 0 to 1 9 mm de 1 0 a 1 9 mm Si se selecciona 0 X mm 0 0 to 0 9 mm de 0 0 a 0...

Страница 1043: ...t Power On Especifica si el papel avanza hasta la posici n inicial cuando se enciende la impresora Si se especifica Disable y el cabezal no est situado en la posici n inicial al encenderse la impresor...

Страница 1044: ...ido para la interfaz paralela Enable activado Disable desactivado 6 DSR 6 Reset Especifica la operaci n de reinicio con la se al DSR 6 Este elemento solo es v lido para la interfaz serie Enable activa...

Страница 1045: ...oria gr fica no vol til None ninguna 64KByte 128KByte 192KByte 256KByte 320KByte 384KByte 3 Print Color Colores de impresi n Mono monocromo 2 Color dos colores 4 Print Density Densidad de impresi n 70...

Страница 1046: ...aja 2nd 2 3rd 3 4th 4 5th 5 6th 6 7th 7 8th 8 9th High Speed 9 alta velocidad 7 Low Power Velocidad de impresi n m xima Mode1 Impresi n al 80 de la densidad de impresi n especificada Mode2 Variaci n d...

Страница 1047: ...i n del impulso de ACK 1 s 8 s 2 USB Especifica el uso de la conexi n USB V COM Printer impresora 3 Serial Number Especifica el tipo de notificaci n de n mero de serie en una conexi n USB Por norma ge...

Страница 1048: ...produce un error El zumbido puede sonar mediante un comando aunque est configurado el valor Disable Este elemento solo es v lido para aquellos dispositivos que tengan un zumbador instalado Enable acti...

Страница 1049: ...Entre en el modo especial Encienda el interruptor de alimentaci n situado en el lateral derecho de la impresora manteniendo pulsado al mismo tiempo el bot n FEED en la parte izquierda de la cubierta...

Страница 1050: ...rint Special Mode Usage Item Selection Please push the feed switch short Item Decision Please push the feed switch long Paper feed direction Selection Item 1 Pulse el bot n FEED dos veces brevemente u...

Страница 1051: ...cionar un elemento 1 Cada vez que se pulsa brevemente el bot n FEED la impresora procede del modo siguiente 2 La impresora imprime ADJUSTMENT ADJUSTMENT PRINT END y ADJUSTMENT en este orden de forma c...

Страница 1052: ...imprima END mantenga pulsado el bot n FEED durante un segundo o m s para finalizar el ajuste de los sensores 2 La impresora vuelve al modo de funcionamiento normal ADJUSTMENT 1 Cuando se imprima ADJUS...

Страница 1053: ...tenga pulsado el bot n FEED durante un segundo o m s para iniciar el ajuste de los sensores a La impresora imprime los elementos de selecci n 2 Se imprime BM SENSOR LABEL SENSOR PNE SENSOR PE SENSOR y...

Страница 1054: ...te un segundo o m s para iniciar el ajuste del sensor de marcas negras 2 Cuando se inicia el ajuste del sensor de marcas negras la impresora imprime lo siguiente y corta el papel 3 Abra la cubierta su...

Страница 1055: ...papel vuelva a colocar el papel original La impresora imprime el resultado del ajuste 6 La impresora graba el resultado del ajuste en la memoria y vuelve al estado en el que se encontraba al iniciar e...

Страница 1056: ...e etiquetas 3 Abra la cubierta superior y coloque el papel que desee ajustar Una vez cerrada la cubierta la impresora hace avanzar el papel Nota Si se utiliza un papel que no cumple los requisitos esp...

Страница 1057: ...tado del ajuste 6 La impresora graba el resultado del ajuste en la memoria y vuelve al estado en el que se encontraba al iniciar el ajuste del sensor 7 Si no se puede realizar el ajuste la impresora i...

Страница 1058: ...ia el ajuste del sensor de papel pr ximo al final la impresora imprime lo siguiente y corta el papel 3 Abra la cubierta superior y coloque el papel que desee ajustar Una vez cerrada la cubierta la imp...

Страница 1059: ...juste en la memoria flash y vuelve al estado en el que se encontraba al iniciar el ajuste del sensor 7 La impresora graba el resultado del ajuste en la memoria y vuelve al estado en el que se encontra...

Страница 1060: ...l del papel 1 Cuando se imprima PE SENSOR mantenga pulsado el bot n FEED durante un segundo o m s para iniciar el ajuste del sensor de final del papel 2 Cuando se inicia el ajuste del sensor de final...

Страница 1061: ...colocar el papel troquelado para etiquetas desprenda parcialmente la etiqueta del papel base con la parte de la etiqueta desprendida de cara al sensor de etiquetas y cierre la cubierta Sensor de etiqu...

Страница 1062: ...nal La impresora imprime el resultado del ajuste 7 La impresora graba el resultado del ajuste en la memoria y vuelve al estado en el que se encontraba al iniciar el ajuste del sensor 8 Si no se puede...

Страница 1063: ...10 1 Si vuelve a encenderlo y pulsa el bot n FEED brevemente se imprimir n los datos que se muestran a continuaci n Al entrar en el modo especial la impresora imprime la informaci n siguiente Test Pr...

Страница 1064: ...Data Analysis Cleaning Sensor Adjustment Setup Test Print Paper feed direction Selection Item Desde el modo especial la impresora entra en el modo de an lisis de los datos recibidos Pulse el bot n FE...

Страница 1065: ...modo de volcado hexadecimal En modo de volcado hexadecimal todas las se ales enviadas desde el ordenador del host hasta la impresora se imprimen como c digos hexadecimales Los datos impresos permiten...

Страница 1066: ...seguimiento de comando todos los datos enviados desde el ordenador del host hasta la impresora se imprimen como nombres de comandos Los datos impresos permiten confirmar que se han enviado los c digos...

Страница 1067: ...o 10 1 Si vuelve a encenderlo y pulsa el bot n FEED brevemente se imprimir n los datos que se muestran a continuaci n Al entrar en el modo especial la impresora imprime la informaci n siguiente Test P...

Страница 1068: ...sor Adjustment Setup Test Print Paper feed direction Selection Item Desde el modo especial la impresora entra en el modo de prueba de impresi n Pulse el bot n FEED brevemente un segundo o menos cinco...

Страница 1069: ...Patr n LABEL5 Cuando se pulsa brevemente el bot n FEED se imprime el patr n siguiente LABEL1 LABEL2 LABEL3 LABEL4 LABEL5 LABEL1 Si se pulsa el bot n FEED durante un segundo aproximadamente se vuelve...

Страница 1070: ...Resultados impresos de la prueba de impresi n Patr n LABEL1 Patr n LABEL2 Patr n LABEL3 Patr n LABEL4 172...

Страница 1071: ...Patr n LABEL5 173...

Страница 1072: ...leto cualquier sustancia adhesiva que se pegue a la parte de expulsi n del papel de la gu a puede provocar un error cuando sale el papel Con un disolvente de alcohol elimine los residuos adhesivos de...

Страница 1073: ...y vuelva a encenderlo manteniendo pulsado el bot n FEED del panel de control Se imprimir n los datos que se muestran a continuaci n Test Print End Sample Print Data Analysis Cleaning Sensor Adjustmen...

Страница 1074: ...ta Analysis Cleaning Sensor Adjustment Setup Test Print Special Mode Usage Item Selection Please push the feed switch short Item Decision Please push the feed switch long Paper feed direction Selectio...

Страница 1075: ...de limpieza del rodillo la impresora imprime la informaci n siguiente y corta el papel 4 Abra la cubierta superior y quite el rollo de papel 5 Pulse el bot n FEED para girar el rodillo a una posici n...

Страница 1076: ...de papel y cierre la cubierta superior Nota No da e ni abolle el rodillo de la platina Las abolladuras del rodillo pueden provocar huecos en la impresi n o fallos en el avance de la l nea Nota Cada v...

Страница 1077: ...a la superficie del cabezal t rmico Cabezal t rmico Nota El cabezal t rmico puede resultar da ado con facilidad Cuando lo limpie utilice un pa o suave y tenga especial cuidado en no da arlo Nota Justo...

Страница 1078: ...vez al mes para garantizar la estabilidad en el corte Nota Aunque el filo de la cuchilla no es tan afilado como los c ters que se pueden encontrar en cualquier oficina al desplazar la mano o el dedo m...

Страница 1079: ...n los datos que se muestran a continuaci n Test Print End Sample Print Data Analysis Cleaning Sensor Adjustment Setup Test Print Special Mode Usage Item Selection Please push the feed switch short It...

Страница 1080: ...ta Analysis Cleaning Sensor Adjustment Setup Test Print Special Mode Usage Item Selection Please push the feed switch short Item Decision Please push the feed switch long Paper feed direction Selectio...

Страница 1081: ...ot n FEED durante un segundo o m s para aceptar la selecci n La impresora entra en el modo de limpieza de la cuchilla Al entrar en este modo la impresora imprime la informaci n siguiente y corta el pa...

Страница 1082: ...la superior Nota Procure no da ar el borde de la cuchilla superior al utilizar el c ter o el destornillador Tampoco debe da ar ni abollar el rodillo de la platina Las abolladuras del rodillo pueden pr...

Страница 1083: ...como los c ters que se pueden encontrar en cualquier oficina al desplazar la mano o el dedo mientras se presiona la cuchilla existe el riesgo de que se produzcan cortes 7 Una vez realizada la limpieza...

Страница 1084: ...hesivas que se hayan pegado en la superficie y el filo de la cuchilla inferior Nota Procure no da ar el borde de la cuchilla inferior al utilizar el c ter o el destornillador Tampoco debe da ar ni abo...

Страница 1085: ...ina al desplazar la mano o el dedo mientras se presiona la cuchilla existe el riesgo de que se produzcan cortes 5 Una vez realizada la limpieza vuelva a colocar el rollo de papel y cierre la cubierta...

Страница 1086: ...Entrada Datos de entrada 4 N C 5 N C 6 RX Entrada Datos de entrada 7 N C 8 N C 2 LED 1 2 3 N Visualizaci n Descripci n 1 Enlace 10BASE T Se ilumina cuando la impresora reconoce el destino de conexi n...

Страница 1087: ...zaci n de la informaci n de configuraci n 1 Apague la impresora 2 Coloque el interruptor 2 en ON 3 Encienda la impresora La inicializaci n tarda unos cinco segundos 4 Apague la impresora 5 Coloque el...

Страница 1088: ...E S Funci n 1 FG Tierra del chasis 2 TXD Salida Env o de datos 3 RXD Entrada Recepci n de datos 4 RTS Salida Env o de peticiones 5 CTS Entrada Env o de permisos 6 DSR Entrada Conjunto de datos prepara...

Страница 1089: ...erra del chasis del caj n 2 DRD1 Salida Se al 1 de la unidad de expulsi n del caj n 3 DRSNS1 Entrada Se al 1 de detecci n de caj n 4 24V Salida Tensi n del motor 5 DRD2 Salida Se al 2 de la unidad de...

Страница 1090: ...be ser el siguiente Tiempo de encendido tiempo de encendido tiempo de apagado 0 2 Nota Para suministrar energ a al caj n se debe utilizar siempre la fuente de alimentaci n de la impresora a trav s de...

Страница 1091: ...a 2 3 4 5 6 Cable 2 4 Solenoide de expulsi n del caj n m nimo de 24 Interruptor de apertura cierre del caj n 2 4 6 Solenoide de expulsi n del caj n m nimo de 24 Interruptor de apertura cierre del caj...

Страница 1092: ...el conector de alimentaci n Clavija n Nombre de la se al 1 24 V 2 SG 3 N C 3 2 1 Nota Utilice nuestro adaptador de CA para el suministro de energ a Nota Si no se utiliza nuestro adaptador de CA la fue...

Страница 1093: ...ho del papel de hasta 83 mm Nota No se puede utilizar papel con un ancho de entre 71 y 79 mm 4 Velocidad de impresi n papel t rmico monocromo M xima velocidad de impresi n 260 mm s Ancho del papel Vel...

Страница 1094: ...24 ANK Fuente B Fuente de extensi n 38 columnas 10x24 42 columnas 9x24 42 columnas 10x24 46 columnas 9x24 43 columnas 10x24 48 columnas 9x24 Estilo del cuerpo Para papel de 80 mm de ancho Para papel d...

Страница 1095: ...4 1 5 x 3 0 11 x 22 1 375 x 2 75 ANK Fuente B 10 x 24 9 x 24 1 25 x 3 0 1 125 x 3 0 9 x 17 9 x 17 1 125 x 2 125 1 125 x 2 125 ANK Fuente C 8 x 16 1 0 x 2 0 8 x 13 1 0 x 1 625 Kanji Fuente A 24 x 24 3...

Страница 1096: ...8 Vistas externas Gu a del papel abierta Gu a del papel 198...

Страница 1097: ...orma peri dica para eliminar las sustancias adhesivas Nota Si se utiliza el corte completo se pueden producir irregularidades en la parte central de la superficie de corte Si se acumula fibra de papel...

Страница 1098: ...etectado y longitud del papel restante son valores te ricos Estos valores dependen de las condiciones reales como el estado del rollo de papel y el grosor del papel Nota Se considera que el di metro e...

Страница 1099: ...201 13 4 Especificaciones de la interfaz 1 LAN IEEE802 3 10BASE T IEEE802 3U 100BASE TX 2 Dual cumple las especificaciones USB 1 1 y RS 232C...

Страница 1100: ...garantizado entre 10 y 95 de humedad relativa sin condensaci n Funcionamiento garantizado entre 10 y 85 de humedad relativa sin condensaci n Sin funcionamiento Entre 8 y 95 de humedad relativa sin co...

Страница 1101: ...ecomendado con un grosor de 75 m 500 000 cortes con el papel recomendado con un grosor de 75 a 150 m Corte de etiquetas 1 000 000 de cortes corte en el rea de base 500 000 cortes corte de etiquetas de...

Страница 1102: ...esora 14 2 Nomenclatura Ajuste la posici n en funci n del ancho del papel Partici n El eje del rollo de papel para di metros de 1 5 y 2 pulgadas es opcional y se vende por separado Eje del rollo de pa...

Страница 1103: ...oductos incluidos Accesorio del conector de la impresora Tornillos de montaje x2 Hoja de instrucciones Eje del rollo de papel di metro de una pulgada Eje del rollo de papel di metro de tres pulgadas 2...

Страница 1104: ...no C 25 4 0 5 mm di metro externo B 32 0 5 mm rollo de papel de una pulgada Di metro interno C 76 2 0 5 mm di metro externo B 82 0 5 mm rollo de papel de tres pulgadas 5 Superficie de coloraci n fuera...

Страница 1105: ...e se puede detectar Grosor del papel m Di metro externo de la base B mm Di metro de detecci n A mm Papel restante m 75 82 Aprox 100 De 20 a 30 150 82 Aprox 100 De 10 a 20 C B A Base Nota Los valores a...

Страница 1106: ...ptador de CA de la toma 1 Quite la tapa del conector de la parte posterior de la impresora Abra la tapa del conector y tire de la cubierta intermedia en la direcci n de la flecha A continuaci n extrai...

Страница 1107: ...ptador de CA de la unidad de rollos de papel al conector de la parte posterior de la impresora Cable de interfaz Cable del adaptador de CA Cable del sensor de la unidad de rollos de papel Note Para ob...

Страница 1108: ...y derecho del conector de la unidad de rollos de papel de di metro ancho en los orificios situados en la parte izquierda y derecha del accesorio del conector de la impresora Orificios izquierdo y dere...

Страница 1109: ...de la unidad de rollos de papel tal como se muestra en el diagrama siguiente Cable del adaptador de CA Mordazas de cable Abra la mordaza de cable tirando de la pieza A en la direcci n de la flecha ta...

Страница 1110: ...cable del sensor que haya quedado flojo entre la unidad de rollos de papel y la impresora con una mordaza de cable tal como se muestra en el diagrama siguiente Cable del sensor Fijado con la mordaza...

Страница 1111: ...llo de papel y fije el tornillo 1 es la posici n predeterminada En el diagrama siguiente se muestra la posici n en la que se ajusta un rollo de papel con un di metro de una pulgada 1 Posici n de la ba...

Страница 1112: ...moleteado 1 es la posici n predeterminada En el diagrama siguiente se muestra la posici n en la que se ajusta la base con un di metro de una pulgada 1 Posici n de la base de 1 pulgada 1 5 Posici n de...

Страница 1113: ...el principio del rollo Nota La impresora no puede imprimir en la parte pegada del papel por lo que es necesario extraer alrededor de una vuelta del principio del rollo El adhesivo u otros restos de co...

Страница 1114: ...mpresiones irregulares u otros problemas de impresi n Nota Si el rollo de papel colocado se suelta se afloja como se muestra a continuaci n elimine la holgura antes de imprimir Imprimir en papel flojo...

Страница 1115: ...rte delantera Deje un espacio de una gradaci n en la escala entre la partici n y el rollo de papel y apriete los tornillos de perilla frontales para fijar la partici n Parte posterior Deje un espacio...

Страница 1116: ...ndo el rollo de papel se pasa por encima del rodillo gu a tal como se indica en la figura b puede que no se consiga insertar bien el papel Aseg rese de que el papel pase por debajo del rodillo gu a ta...

Страница 1117: ...el papel por la parte frontal de la impresora Cubierta superior Rollo de papel Tire del borde delantero del rollo de papel desde la parte frontal de la impresora Abra la cubierta superior 5 Una vez co...

Страница 1118: ...14 9 Apariencia de la unidad de rollos de papel Cuando est conectada a la impresora 220...

Страница 1119: ...KI Europe Ltd Ukraine Raisy Opkinoy Street 8 Building B 2nd Floor Kiev 02002 Ukraine Tel 380 44 537 5288 Website www oki ua OKI Sistem ve Yaz c z mler Tic Ltd ti Harman sok Duran Is Merkezi No 4 Kat 6...

Страница 1120: ...www oki nl Oki Systems Norway AS Tevlingveien 23 N 1081 Oslo Website www oki no Var v nlig kontakta din terf rs ljare i f rsta hand f r konsultation I andra hand kontakta Oki Systems Sweden AB Borgafj...

Страница 1121: ...LD670...

Страница 1122: ...indows Vista s o marcas registadas de Microsoft Corporation Apple Macintosh Rosetta Mac e Mac OS s o marcas registadas de Apple Inc Outros nomes de produtos e marcas s o marcas comerciais registadas o...

Страница 1123: ...u quest es gerais contacte o seu distribuidor local IMPORTADOR PARA A UE REPRESENTANTE AUTORIZADO OKI Europe Limited operando como OKI Printing Solutions Blays House Wick Road Egham Surrey TW20 0HJ Re...

Страница 1124: ...z lo para a condi o de Espera 3 Aviso geral cuidado 3DUD LGHQWL FDU XP DYLVR JHUDO FXLGDGR 4 Cuidado superf cie quente Para indicar que o item marcado pode estar quente H QmR GHYH VHU WRFDGR VHP FXLGD...

Страница 1125: ...o mais clara Veja o exemplo 1 na Se o 10 2 Configurar a impressora 6 Se for usado um rolo de papel com um di metro externo do n cleo diferente de 32 mm a precis o da detec o de papel perto do fim fic...

Страница 1126: ...eres finos desbotados Antes de iniciar a impress o nesses casos alimente o papel em 20 a 30 mm 12 Se o tipo de papel usado for diferente do recomendado a qualidade da impress o e a vida til da cabe a...

Страница 1127: ...papel de etiquetas ou papel espesso pode conter manchas dependendo da umidade e outras condi es ambientais Ajuste a velocidade e a densidade de impress o apropriadas para o tipo de papel usado e veri...

Страница 1128: ...sora uma vez e ligue novamente a chave Se o computador host ou a impressora n o forem restaurados para a opera o remota ap s o cabo ser reconectado ou a chave de for a ser ligada novamente reinicie o...

Страница 1129: ...r conectado com um conector que leve a um linha comutada p blica ou outro destino semelhante Nota sobre o uso da impressora em modo especial 1 Se um rolo de di metro grande for usado o papel pode dobr...

Страница 1130: ...k da gaveta 26 4 3 Conectar o adaptador CA 27 4 4 Desconectar o adaptador CA 29 4 5 Ligar 30 5 Inserir papel para imprimir 31 5 1 Abrir a tampa superior 31 5 2 Definir a largura de papel 32 5 2 1 Sepa...

Страница 1131: ...papel 75 8 2 Limpar uma obstru o de papel 75 9 Solu o de problemas 76 9 1 Problemas ou erros de acionamento 76 9 2 Problemas relacionados a cortador 76 9 3 Problemas relacionados impress o 77 10 Modo...

Страница 1132: ...imenta o 194 13 Especifica es 195 13 1 Especifica es gerais 195 13 2 Especifica es do cortador 199 13 3 Especifica es de alimenta o de papel 200 13 4 Especifica es de interface 201 13 5 Especifica es...

Страница 1133: ...r do que 50 mm Alavanca de libera o Guia de papel Tampa superior Abra e feche esta tampa para substituir as formas Este painel cont m l mpadas de status e chaves operacionais Painel de controle Chave...

Страница 1134: ...Ativos conectados Papel t rmico CD MANUAL DRIVER DE IMPRESSORA UTILIT RIO DE SOFTWARE Folha de instru o Folha de garantia de seguran a Adaptador CA Cabo de for a 12...

Страница 1135: ...cificado abaixo Nome do modelo KA02951 0120 Entrada 100 a 240V AC 50 60Hz Sa da CC 24V 5 1 5A Aten o Use apenas adaptadores CA autorizados Aten o N o use o adaptador CA e o cabo de for a combinados pa...

Страница 1136: ...5 mm ou menos Com a unidade de rolo de papel de di metro grande op o conectada a impressora pode usar um rolo com um di metro externo de at 200 mm Dimens o do n cleo Di metro interno de 1 polegada di...

Страница 1137: ...15 2 Papel cont nuo Altura m xima de pilha 180 mm ou menos Comprimento por folha 76 2 a 203 2 0 5 mm 3 a 8 pol Especifica es de perfura o 3 cortes 1 amarra o...

Страница 1138: ...rne a impressora informa es sobre o layout do papel incluindo o tipo e tamanho do papel antes de impress o Uso da impressora sem essas configura es pode resultar em um erro de layout de papel ou impre...

Страница 1139: ...rimir em papel de etiqueta com corte moldado com marcas pretas tenha cuidado com a posi o da impress o e do corte A impress o no papel de base que n o est coberto com folha de etiquetas pode danificar...

Страница 1140: ...e impress o ou guia de papel use o papel de etiquetas que passou por remo o de margem como mostrado abaixo Remo o de margem significa cortar as margens durante a manufatura Corta nas duas laterais do...

Страница 1141: ...apel devem ser a combina o de valores especificados na tabela abaixo Fator de reflex o A rea de marca preta 8 B Margens acima ou abaixo das marcas pretas 75 Nota Os valores de refletividade foram medi...

Страница 1142: ...tas confirma que as condi es especificadas na Se o 3 4 2 Condi es para usar papel de marca preta tamb m tenham sido satisfeitos 20 rea de impress o 4 5 mm ou mais 2 0 5 mm Dire o de alimenta o do pape...

Страница 1143: ...HB Papel de etiqueta monocrom tico tipo de preserva o de alta qualidade 150 m 130 Nota Um tipo recomendado de papel dever ser usado Se um tipo de papel diferente do recomendado for usado um dano na ca...

Страница 1144: ...impressora Em particular observe que a precis o do transporte de papel pode ser negativamente afetada ao imprimir um c digo de barra na margem superior no in cio do transporte de papel ou na margem i...

Страница 1145: ...for a do adaptador CA foi desconectado da tomada 4 1 Conectar cabo da interface Abra a tampa do conector na parte posterior da impressora puxando a e conecte o cabo de interface ao seu soquete de cone...

Страница 1146: ...interface de LAN LEDs 24 Aten o N o toque nas chaves DIP durante o uso normal Isso pode alterar as configura es de rede desativando a impress o normal Aten o Se o dispositivo for instalado verticalme...

Страница 1147: ...rface serial Prenda o conector com parafusos ap s fazer a conex o Tipo B Conecte a impressora a um PC atrav s deste conector Conector de for a Conector kick da gaveta Conector de interface interface s...

Страница 1148: ...o Nota Se o cabo for disposto de forma que se estenda a partir da parte posterior remova as inser es na tampa do conector com pin as ou ferramentas semelhantes A menos que as inser es sejam removidas...

Страница 1149: ...bo de for a do adaptador CA especificados 2 Abra a tampa do conector na parte posterior da impressora puxando a para cima e conecte o cabo adaptador CA tomada de for a Feche a tampa ap s conectar o ca...

Страница 1150: ...serir 1 pince a base do cabo 2 ao deslizar a se o externa do conector para cima 3 e insira o conector at ele encaixar no lugar com um som de clique Base do cabo 28 2 1 3 Se o externa do conector 3 Con...

Страница 1151: ...mecanismo de bloqueio do conector ser desconectado o cabo pode ser facilmente desconectado De modo inverso puxar for a o pr prio cabo pode danificar o conector Nota Antes de desconectar o cabo de for...

Страница 1152: ...4 5 Ligar Depois que o adaptador CA for conectado ligue a chave de for a na lateral da impressora A l mpada POWER nas luzes do painel de controle Chave de for a Painel de controle 30...

Страница 1153: ...da tampa superior Parte inferior da tampa alavanca de libera o 2 Ao manipular a tampa superior observe se a tampa parece travar na posi o antes de abrir totalmente Certifique se de que a tampa esteja...

Страница 1154: ...referindo se aos Modos Especiais Vejas os exemplos 7 na Se o 10 2 Configurar a impressora Nota Se a impressora estiver usando papel estreito ex largura de 70 mm n o substitua o papel por um papel lar...

Страница 1155: ...deslize a alavanca para a posi o desejada Em seguida coloque o separador no lugar Use a balan a conforme necess rio Nota O Separador A deve ser definido no local com um espa o de cerca de 0 5 mm para...

Страница 1156: ...segurar a parte B no separador A com parte de uma alavanca empurrada na dire o indicada pela seta erga a para destravar e depois remova a se o de rolamento posterior 34 Trava Separador A Localiza o A...

Страница 1157: ...parador B Mantendo o separador B em um local erga o separador para desativar a trava Em seguida remova o separador em a se o de rolete traseiro Separador B Separador B Se o de rolete posterior Localiz...

Страница 1158: ...dor A Conecte o separador A a partir da se o de rolete posterior Gancho posterior para o eixo Alinhado horizontalmente Nota Empurre o separador at ele encaixar com um clique aud vel e confirme que o t...

Страница 1159: ...separador B a partir da se o de rolete posterior Gancho posterior para o eixo Alinhado horizontalmente Nota Empurre o separador at ele encaixar com um clique aud vel e confirme que o topo do separador...

Страница 1160: ...olo de papel a partir do in cio para que nenhuma parte do papel restante seja colado nele Qualquer adesivo ou outra subst ncia restante da cola pode aderir cabe a t rmica e provocar um problema como v...

Страница 1161: ...er deformidades Usar um papel em rolo como o mostrado na figura abaixo pode provocar obstru o de papel mesmo durante a impress o ou outros problemas de impress o Nota Se o papel em rolo carregado esti...

Страница 1162: ...ma 2 Abra a tampa superior e em seguida passe o papel cont nuo pela se o de alimenta o de papel na parte posterior da impressora Carregue o papel com seu lado termo sens vel voltado para cima Se o de...

Страница 1163: ...ssora Quando este requisito for satisfeito o papel pode ser empilhado em at 180 mm veja a Figura 1 Quando papel cont nuo colocado em contato com a parte posterior da impressora o papel s pode ser empi...

Страница 1164: ...pel perfurado evite que o papel fique preso provoque obstru es de papel seja cortado durante o transporte e outros problemas Esses problemas podem encurtar a durabilidade da cabe a t rmica rea de 0 a...

Страница 1165: ...l aberto Quando ela for igual ou inferior a 50 mm use a impressora com o guia de papel fechado Guia de papel Para um comprimento de impress o igual ou inferior a 50 mm Use a impressora com o guia de p...

Страница 1166: ...na orienta o correta Se a tampa superior for fechada enquanto o papel n o est corretamente no lugar pode ocorrer uma obstru o de papel ou um mau alinhamento da impress o Nota Para fechar a tampa super...

Страница 1167: ...ressora Itens 1 e 2 s o configura es obrigat rias Itens 3 a 6 s o configura es opcionais Documentos de refer ncia O CD ROM que acompanha a impressora cont m alguns manuais online formatados em PDF Par...

Страница 1168: ...ipo de papel papel simples papel de marca preta ou papel de etiqueta com corte 3 alterar o tamanho do papel ou 4 alternar para o papel de etiquetas com corte do mesmo tamanho que o papel atual mas com...

Страница 1169: ...sora informa es sobre layout de papel descritas na Se o 6 1 1 do Manual Layout de papel III Cria o de papel personalizado Crie seu papel personalizado como descrito na se o 6 1 2 Papel personalizado d...

Страница 1170: ...ntenha a chave FEED As luzes de POWER e ERROR piscam alternadamente Continue a pressionar a chave FEED at as luzes de POWER e ERROR piscarem ao mesmo tempo Nesse momento solte a chave FEED Para detalh...

Страница 1171: ...1 Painel de Controle Siga o procedimento abaixo para registrar informa es de layout na impressora Este procedimento indica como criar um tipo de papel personalizado e enviar informa es de resultado p...

Страница 1172: ...5 N o altere S5 cut position com seu valor padr o 3 Insira as margens esquerda direita superior e inferior 4 Clique no bot o Save Isso registra suas defini es de papel personalizado no driver de impre...

Страница 1173: ...l existente Procedimento 1 Selecione o papel desejado que j foi criado 2 Clique no bot o Transfer to Printer As informa es do layout do papel selecionado s o enviadas para a impressora e entram em vig...

Страница 1174: ...ra papel de marca preta Mudar para papel com diferente layout de papel Se o erro permanecer ap s a configura o ser conclu da verifique novamente se o papel carregado na impressora corresponde defini o...

Страница 1175: ...uindo o Word tamb m consideram o uso da janela Imprimir para configurar prefer ncias de impress o em vez de fornecer uma janela Configura o de P gina Para detalhes sobre a janela Imprimir veja a descr...

Страница 1176: ...erior aberta 4 Pressione e mantenha a chave FEED As luzes de POWER e ERROR piscam alternadamente Continue a pressionar a chave FEED at as luzes de POWER e ERROR piscarem ao mesmo tempo Nesse momento s...

Страница 1177: ...o para registrar informa es de layout na impressora Este procedimento explica como enviar informa es de layout para a impressora Considera se que o Windows XP Professional foi usado para as imagens de...

Страница 1178: ...as informa es de papel apropriadas S1 a S5 N o altere S5 cut position com seu valor padr o 3 Insira as margens esquerda direita superior e inferior conforme exigido 4 Clique no bot o Set Layout As in...

Страница 1179: ...o papel pelo papel de destino da configura o de layout Substitua o papel e clique no bot o OK Se o erro permanecer ap s a configura o ser conclu da verifique novamente se o papel carregado na impress...

Страница 1180: ...ve FEED Para detalhes sobre como inicializar o layout do papel veja Como inicializar o layout do papel na Se o 7 1 Painel de Controle 6 Feche a tampa superior 7 A impressora alimenta o papel obt m aut...

Страница 1181: ...te procedimento explica como enviar a defini o da largura do seu papel para a impressora Considera se que o Windows XP Professional foi usado para as imagens de tela 1 Clique em Iniciar Todos os progr...

Страница 1182: ...as instru es e clique no bot o OK 5 exibida uma mensagem que solicita que voc substitua o papel pelo papel de destino da configura o de layout Substitua o papel e clique no bot o OK Nota Defini o aut...

Страница 1183: ...de esquerda da rea de impress o 11 0 mm para uma largura de papel de 83 mm 4 0 mm para uma largura de papel de 80 mm 3 0 mm para outras larguras de papel L7 Tamanho da rea de impress o 80 0 mm para um...

Страница 1184: ...da extremidade esquerda do papel at a extremidade esquerda da rea de impress o 5 0 mm L7 Largura da rea de impress o Defini o de largura do papel L6 x 2 mm Nota L1 a L7 acima s o os valores detectado...

Страница 1185: ...primento da rea de impress o N o determinado L6 Comprimento da extremidade esquerda do papel at a extremidade esquerda da rea de impress o 1 0 mm para uma largura de papel de 83 mm 4 0 mm para uma lar...

Страница 1186: ...a pressionar a chave FEED at as luzes de POWER e ERROR piscarem ao mesmo tempo Nesse momento solte a chave FEED 5 Feche a tampa superior 6 A impressora alimenta o papel obt m automaticamente as inform...

Страница 1187: ...a a impressora Caso contr rio troque o papel por um papel que corresponda s informa es de layout de papel 2 Erro durante impress o Se ocorrer um erro de layout durante a impress o abra a tampa superio...

Страница 1188: ...impressora e liga a impressora pela primeira vez a fun o de detec o autom tica de layout definir os valores de ajuste de sensor Ajuste manual do sensor 1 Voc pode iniciar o ajuste manual de um sensor...

Страница 1189: ...de impressora do Windows Veja a Se o 4 4 Guia Graphics no Windows Driver User s Guide 2 Usar o utilit rio de impressora Veja a Se o 3 2 5 Customize Value no Utility User s Guide 3 Configurar a impress...

Страница 1190: ...urar a impressora Se voc tiver especificado uma velocidade de impress o usando o driver do Windows uma velocidade de impress o especificada pelo driver ser usada para impress o A velocidade de impress...

Страница 1191: ...cascamento e a posi o de rasgo Mude a defini o conforme necess rio Voc pode usar um dos seguintes m todos para alterar esta configura o 1 Usando o driver de impressora do Windows Veja a Se o 4 1 Guia...

Страница 1192: ...pressora Altere a configura o como descrito em Exemplo 4 na Se o 10 2 Configurar a impressora 2 Usar o utilit rio de impressora Veja a Se o 3 2 4 Memory Switch settings no Utility User s Guide 6 11 In...

Страница 1193: ...ez alimenta uma folha de papel Papel simples incluindo papel de etiquetas de de folha inteira Pressionar esta chave uma vez avan a o papel uma linha Manter esta chave pressionada faz o papel avan ar c...

Страница 1194: ...a o quando altera as informa es de layout enquanto usa o mesmo tipo de papel Procedimento Pressione e mantenha a chave FEED por um tempo As luzes de POWER e ERROR come aram a piscar alternadamente Nes...

Страница 1195: ...nte em Tampa aberta ERROR Constantemente em POWER Constantemente em Cabe a quente 1 ERROR Constantemente em 1 Impress o est suspensa devido a uma elevada temperatura de cabe a t rmica Condi o de erro...

Страница 1196: ...WER ERROR Baixa tens o Padr o repetido em que a l mpada verde pisca quatro vezes e a l mpada mbar pisca uma s vez POWER ERROR Tens o excedente Padr o repetido em que a l mpada verde pisca cinco vezes...

Страница 1197: ...bstru o de papel Se ocorrer uma obstru o de papel remova o papel obstru do da seguinte forma 1 Desligue a impressora desligando a chave de for a 2 Pressione para baixo a alavanca para abrir a tampa e...

Страница 1198: ...temperatura elevada 1 Insira o papel 2 Feche a tampa superior completamente 3 Aguarde at a temperatura da cabe a t rmica diminuir o suficiente 9 2 Problemas relacionados a cortador Sintoma Causa A o c...

Страница 1199: ...a t rmica est danificada 1 Ajuste a velocidade e a densidade de impress o da impressora para que elas sejam apropriadas para o papel Veja 10 2 Configurar a impressora 2 Desligue e solicite reparos A d...

Страница 1200: ...ticamente corta o papel e termina a impress o de teste Para terminar a impress o de teste em progresso pressione a chave FEED Em seguida a impressora corta o papel e encerra a impress o de teste Nota...

Страница 1201: ...impress o de teste Quando voc pressiona e mant m a chave FEED por um segundo ou mais a impressora continua a testar a impress o para imprimir uma lista de fontes Para terminar a impress o da lista de...

Страница 1202: ...bre as fun es do utilit rio e como us las veja o Utility User s Guide Esta se o descreve as mudan as de defini o t picas listadas abaixo em detalhes Exemplo 1 Alterar a densidade de impress o para um...

Страница 1203: ...o mant m pressionada a chave FEED esquerda da tampa superior Nota Voc deve pressionar a chave FEED at a impressora come ar a imprimir Nota Se voc tiver passado o item que deseja selecionar pressione r...

Страница 1204: ...rint End Sample Print Data Analysis Cleaning Sensor Adjustment Setup Test Print Paper feed direction Selection Item Em seguida pressione e mantenha a chave FEED por um segundo ou mais para aceitar a s...

Страница 1205: ...chave FEED por um segundo ou mais para aceitar a sele o A impressora imprime o seguinte quando voc aceita a sele o de SETUP Paper Setting Return to Top Menu Others Serial Condition Customize Value Me...

Страница 1206: ...Value Memory Switch Paper Setting Setup Paper feed direction Selection Item Em seguida pressione e mantenha a chave FEED por pelo menos um segundo para aceitar a sele o A impressora imprime o seguinte...

Страница 1207: ...nt Density Print Color NV Graphics Memory User NV Memory Return to Top Menu Return to Up Low Power Max Speed BK Density Print Density Print Color NV Graphics Memory User NV Memory Paper feed direction...

Страница 1208: ...5 90 85 80 75 70 Lightest Paper feed direction Selection Item Em seguida pressione e mantenha a chave FEED por um segundo ou mais para aceitar a sele o A impressora imprime o seguinte quando voc aceit...

Страница 1209: ...RETURN TO UP Return to Top Menu Return to Top Menu Others Serial Condition Customize Value Memory Switch Paper Setting Return to Up Paper feed direction Selection Item 9 Selecione RETURN TO TOP MENU c...

Страница 1210: ...por um segundo ou mais para aceitar a sele o A impressora corta o papel e sai do modo de configura o quando voc aceita a sele o de END Nota Se voc desligar a chave de for a da impressora sem primeiro...

Страница 1211: ...nquanto mant m pressionada a chave FEED esquerda da tampa superior Nota Voc deve pressionar a chave FEED at a impressora come ar a imprimir Nota Se voc tiver passado o item que deseja selecionar press...

Страница 1212: ...rint End Sample Print Data Analysis Cleaning Sensor Adjustment Setup Test Print Paper feed direction Selection Item Em seguida pressione e mantenha a chave FEED por um segundo ou mais para aceitar a s...

Страница 1213: ...Others Serial Condition Customize Value Memory Switch Paper Setting Setup Paper feed direction Selection Item 5 Selecione CUSTOMIZE VALUE como sua op o Pressione rapidamente a chave FEED duas vezes u...

Страница 1214: ...ory Customize Value Paper feed direction Selection Item 6 Selecione MAX SPEED como sua op o Pressione a chave FEED um segundo ou menos cinco vezes para ir para MAX SPEED Max Speed BK Density Print Den...

Страница 1215: ...3rd 2nd 1st Low Speed Max Speed Paper feed direction Selection Item 7 Selecione 9th como sua op o Pressione a chave FEED por pouco tempo um segundo ou menos at o item 9th ser atingido Em seguida press...

Страница 1216: ...aper Width Paper Detection 9th High Speed Paper feed direction Selection Item 8 Selecione RETURN TO UP como sua op o Em seguida pressione e mantenha a chave FEED por um segundo ou mais para aceitar a...

Страница 1217: ...Setup Return to Top Menu Paper feed direction Selection Item 10 Selecione END como sua op o Pressione a chave FEED um segundo ou menos tr s vezes para ir para END End Default Set Setup Print Setup End...

Страница 1218: ...eiro selecionar END a sua defini o ser perdida Verificar sua defini o Para verificar sua defini o execute uma impress o de testes consultando a Se o 10 1 A impress o de teste imprime uma lista de defi...

Страница 1219: ...pressora enquanto mant m pressionada a chave FEED esquerda da tampa superior Nota Voc deve pressionar a chave FEED at a impressora come ar a imprimir Nota Se voc tiver passado o item que deseja seleci...

Страница 1220: ...rint End Sample Print Data Analysis Cleaning Sensor Adjustment Setup Test Print Paper feed direction Selection Item Em seguida pressione e mantenha a chave FEED por um segundo ou mais para aceitar a s...

Страница 1221: ...Top Menu Others Serial Condition Customize Value Memory Switch Paper Setting Setup Paper feed direction Selection Item 5 Selecione CUSTOMIZE VALUE como sua op o Pressione a chave FEED um segundo ou me...

Страница 1222: ...ity Print Density Print Color NV Graphics Memory User NV Memory Customize Value Paper feed direction Selection Item 6 Selecione PRINT COLOR como sua op o Pressione a chave FEED um segundo ou menos dua...

Страница 1223: ...seguinte quando voc aceita a sele o de PRINT COLOR Mono 2 Color Mono Print Color Paper feed direction Selection Item 7 Selecione 2 COLOR como sua op o Pressione a chave FEED brevemente um segundo ou...

Страница 1224: ...ent Paper Width Paper Detection 2 Color Paper feed direction Selection Item 8 Selecione RETURN TO UP como sua op o Em seguida pressione e mantenha a chave FEED por um segundo ou mais para aceitar a se...

Страница 1225: ...ND como sua op o Pressione a chave FEED um segundo ou menos tr s vezes para ir para END 103 Nota Se voc desligar a chave de for a da impressora sem primeiro selecionar END as suas defini es ser o perd...

Страница 1226: ...est desligada 2 O papel est carregado na impressora 3 A tampa est fechada 2 Entre no modo especial Ligue a chave de for a no lado direito da impressora enquanto mant m pressionada a chave FEED esquer...

Страница 1227: ...on Please push the feed switch short Item Decision Please push the feed switch long Paper feed direction Selection Item 3 Entre no modo configura o a partir do modo especial Pressione rapidamente a ch...

Страница 1228: ...nt Setup Setup Paper feed direction Selection Item 4 No modo configura o selecione SETUP Em seguida pressione e mantenha a chave FEED por pelo menos um segundo para aceitar a sele o A impressora impri...

Страница 1229: ...o A impressora imprime o seguinte ap s a aceita o da sele o PAPER SETTING Paper Detection Return to Top Menu Return to Up Sensor Auto Adjust Mark Feed with Cut Feed at Power On Layout Er Recovery Layo...

Страница 1230: ...to Top Menu Return to Up Sensor Auto Adjust Mark Feed with Cut Feed at Power On Layout Er Recovery Layout Er Process TearOff Adjustment Base Adjustment Paper Width Paper Detection Paper feed directio...

Страница 1231: ...ida pressione e mantenha a chave FEED por pelo menos um segundo para aceitar a sele o A impressora imprime o seguinte ap s a aceita o da sele o DISABLE Return to Up Return to Top Menu Return to Up Sen...

Страница 1232: ...op Menu Others Serial Condition Customize Value Memory Switch Paper Setting Return to Up Paper feed direction Selection Item 9 Selecione RETURN TO TOP MENU como sua op o Em seguida pressione e mantenh...

Страница 1233: ...menos um segundo para aceitar a sele o Depois que voc aceitar a sele o END a impressora corta o papel e sai do modo configura o Nota Se voc desligar a chave de for a da impressora sem primeiro selecio...

Страница 1234: ...guinte 1 Antes de come ar a trabalhar com esta defini o verifique as seguintes condi es da impressora 1 A for a est desligada 2 O papel est carregado na impressora 3 A tampa est fechada 2 Entre no mod...

Страница 1235: ...on Please push the feed switch short Item Decision Please push the feed switch long Paper feed direction Selection Item 3 Entre no modo configura o a partir do modo especial Pressione rapidamente a ch...

Страница 1236: ...do de configura o Setup End Default Set Setup Print Setup Setup Paper feed direction Selection Item 4 No modo configura o selecione DEFAULT SET Pressione rapidamente a chave FEED duas vezes uma para u...

Страница 1237: ...Set Setup Print Setup Clear Completed Paper feed direction Selection Item Nota Se voc desligar a chave de for a da impressora sem primeiro selecionar END as suas defini es ser o perdidas Verificar su...

Страница 1238: ...2 O papel est carregado na impressora 3 A tampa est fechada 2 Entre no modo especial Ligue a chave de for a no lado direito da impressora enquanto mant m pressionada a chave FEED esquerda da tampa sup...

Страница 1239: ...tion Please push the feed switch short Item Decision Please push the feed switch long Paper feed direction Selection Item 3 Entre no modo configura o a partir do modo especial Pressione rapidamente a...

Страница 1240: ...o Setup End Default Set Setup Print Setup Setup Paper feed direction Selection Item 4 No modo configura o selecione SETUP Em seguida pressione e mantenha a chave FEED por pelo menos um segundo para ac...

Страница 1241: ...ue Memory Switch Paper Setting Return to Top Menu Others Serial Condition Customize Value Memory Switch Paper Setting Setup Paper feed direction Selection Item A impressora imprime o seguinte ap s a a...

Страница 1242: ...para ir para PNE DETECT PNE Detect Process ID Error Serial Number USB ACK Pulse Width Return to Top Menu Return to Up Roll Paper Unit PE Roll Paper Unit Buzzer Batch OTHER IF Batch COM IF Font B PNE D...

Страница 1243: ...ime o seguinte ap s a aceita o da sele o PNE DETECT Enable Disable Enable PNE Detect Paper feed direction Selection Item 7 Selecione DISABLE como sua op o Pressione rapidamente a chave FEED at um segu...

Страница 1244: ...Font B PNE Detect Process ID Error Serial Number USB ACK Pulse Width Disable Paper feed direction Selection Item 8 Selecione RETURN TO UP como sua op o Em seguida pressione e mantenha a chave FEED por...

Страница 1245: ...eturn to Top Menu Paper feed direction Selection Item 10 Selecione END como sua op o Pressione rapidamente a chave FEED tr s vezes at um segundo cada para ir para END End Default Set Setup Print Setup...

Страница 1246: ...lecionar END as suas defini es ser o perdidas Verificar suas defini es Para verificar sua defini o execute uma impress o de testes como descrito na Se o 10 1 A impress o de teste imprime uma lista de...

Страница 1247: ...est desligada 2 O papel est carregado na impressora 3 A tampa est fechada 2 Entre no modo especial Ligue a chave de for a no lado direito da impressora enquanto mant m pressionada a chave FEED esquer...

Страница 1248: ...on Please push the feed switch short Item Decision Please push the feed switch long Paper feed direction Selection Item 3 Entre no modo configura o a partir do modo especial Pressione rapidamente a ch...

Страница 1249: ...o Setup End Default Set Setup Print Setup Setup Paper feed direction Selection Item 4 No modo configura o selecione SETUP Em seguida pressione e mantenha a chave FEED por pelo menos um segundo para ac...

Страница 1250: ...m segundo para aceitar a sele o Paper Detection Return to Top Menu Return to Up Sensor Auto Adjust Mark Feed with Cut Feed at Power On Layout Er Recovery Layout Er Process TearOff Adjustment Base Adju...

Страница 1251: ...Feed at Power On Layout Er Recovery Layout Er Process TearOff Adjustment Base Adjustment Paper Width Paper Detection Paper feed direction Selection Item Em seguida pressione e mantenha a chave FEED p...

Страница 1252: ...Em seguida pressione e mantenha a chave FEED por pelo menos um segundo para aceitar a sele o A impressora imprime o seguinte ap s a aceita o da sele o 80mm Return to Up Return to Top Menu Return to Up...

Страница 1253: ...Menu Others Serial Condition Customize Value Memory Switch Paper Setting Return to Up Paper feed direction Selection Item 9 Selecione RETURN TO TOP MENU como sua op o Em seguida pressione e mantenha a...

Страница 1254: ...menos um segundo para aceitar a sele o Depois que voc aceitar a sele o END a impressora corta o papel e sai do modo configura o Nota Se voc desligar a chave de for a da impressora sem primeiro selecio...

Страница 1255: ...ressora 1 A for a est desligada 2 O papel est carregado na impressora 3 A tampa est fechada 2 Entre no modo especial Ligue a chave de for a no lado direito da impressora enquanto mant m pressionada a...

Страница 1256: ...on Please push the feed switch short Item Decision Please push the feed switch long Paper feed direction Selection Item 3 Entre no modo configura o a partir do modo especial Pressione rapidamente a ch...

Страница 1257: ...o Setup End Default Set Setup Print Setup Setup Paper feed direction Selection Item 4 No modo configura o selecione SETUP Em seguida pressione e mantenha a chave FEED por pelo menos um segundo para ac...

Страница 1258: ...Switch Paper Setting Setup Paper feed direction Selection Item Em seguida pressione e mantenha a chave FEED por pelo menos um segundo para aceitar a sele o A impressora imprime o seguinte ap s a aceit...

Страница 1259: ...OTHER IF Batch OTHER IF Batch COM IF Font B PNE Detect Process ID Error Serial Number USB ACK Pulse Width Return to Top Menu Return to Up Roll Paper Unit PE Roll Paper Unit Buzzer Batch OTHER IF Batc...

Страница 1260: ...seguinte ap s a aceita o da sele o BATCH OTHER IF Disable Disable Enable Batch OTHER IF Paper feed direction Selection Item 7 Selecione ENABLE como sua op o Pressione rapidamente a chave FEED at um se...

Страница 1261: ...Font B PNE Detect Process ID Error Serial Number USB ACK Pulse Width Enable Paper feed direction Selection Item 8 Selecione RETURN TO UP como sua op o Em seguida pressione e mantenha a chave FEED por...

Страница 1262: ...eturn to Top Menu Paper feed direction Selection Item 10 Selecione END como sua op o Pressione rapidamente a chave FEED tr s vezes at um segundo cada para ir para END End Default Set Setup Print Setup...

Страница 1263: ...lecionar END as suas defini es ser o perdidas Verificar suas defini es Para verificar sua defini o execute uma impress o de testes como descrito na Se o 10 1 A impress o de teste imprime uma lista de...

Страница 1264: ...orna ao menu de modo de configura o Itens de configura o e seus detalhes 1 Paper Setting setup items Itens de configura o de defini o de papel Item Explica o Item de configura o detalhada 1 Paper Dete...

Страница 1265: ...X mm 4 X mm 5 0 mm Quando 4 X mm selecionado 4 0 a 4 9 mm Quando 3 X mm selecionado 3 0 a 3 9 mm Quando 2 X mm selecionado 2 0 a 2 9 mm Quando 1 X mm selecionado 1 0 a 1 9 mm Quando 0 X mm selecionado...

Страница 1266: ...do 4 X mm selecionado 4 0 a 4 9 mm Quando 3 X mm selecionado 3 0 a 3 9 mm Quando 2 X mm selecionado 2 0 a 2 9 mm Quando 1 X mm selecionado 1 0 a 1 9 mm Quando 0 X mm selecionado 0 0 a 0 9 mm Quando 0...

Страница 1267: ...apel para a posi o iniciar no acionamento Se Desabilitar for especificado e a cabe a n o estiver posicionada na posi o de in cio no acionamento pode ocorrer um desalinhamento da impress o ou um erro d...

Страница 1268: ...o apenas para a interface paralela Enable Habilitar Disable Desabilitar 6 DSR 6 Reset Especifica a opera o de redefini o usando o sinal DSR 6 Esse item v lido apenas para a interface serial Enable Hab...

Страница 1269: ...de de mem ria NV do usu rio Nenhum 64KByte 128KByte 192KByte 256KByte 320KByte 384KByte 3 Print Color Cores da impress o Mono 2 Color Duas cores 4 Print Density Densidade de impress o 70 Lightest Mais...

Страница 1270: ...2 3 4 5 6 7 8 9th High Speed Alta Velocidade 7 Low Power Velocidade de impress o m ximo Modo1 Impress o em 80 de densidade de impress o espec fica Modo2 Varia o da largura do pulso do estrobosc pio N...

Страница 1271: ...s 8 s 2 USB Especifica o uso da conex o USB V COM Printer Impressora 3 Serial Number Especifica o tipo de notifica o de N mero de S rie em uma conex o USB Em geral especifique ENABLE Enable Habilitar...

Страница 1272: ...ique se o som da campainha deve ser emitido na ocorr ncia de erros A campainha pode ser disparada por um comando mesmo que Desabilitar esteja especificado Este item v lido apenas para um dispositivo e...

Страница 1273: ...est carregado na impressora 3 A tampa est fechada 2 Entre no modo especial Ligue a chave de for a no lado direito da impressora enquanto mant m pressionada a chave FEED esquerda da tampa superior Nota...

Страница 1274: ...ecial Mode Usage Item Selection Please push the feed switch short Item Decision Please push the feed switch long Paper feed direction Selection Item 1 Pressione rapidamente a chave FEED duas vezes at...

Страница 1275: ...um item 1 Cada vez que voc pressiona a chave FEED brevemente e a solta a impressora opera da seguinte forma 2 A impressora imprime ADJUSTMENT ADJUSTMENT PRINT END ADJUSTMENT e portanto ciclicamente n...

Страница 1276: ...presso pressione e mantenha a chave FEED por um segundo ou mais para come ar a impress o de teste 2 A impressora retorna ao modo de opera o normal ADJUSTMENT 1 Quando ADJUSTMENT PRINT impresso pressio...

Страница 1277: ...ione e mantenha a chave FEED por um segundo ou mais para come ar o ajuste do sensor a A impressora imprime os itens de sele o 2 A impressora imprime BM SENSOR LABEL SENSOR PNE ENSOR PE SENSOR BM SENSO...

Страница 1278: ...ave FEED por um segundo ou mais para come ar o ajuste do sensor BM 2 A impressora imprime o seguinte e depois corta o papel quando o ajuste de sensor BM come a 3 Abra a tampa superior e carregue o pap...

Страница 1279: ...de papel p ra carregue o papel original novamente A impressora imprime o resultado do ajuste 6 A impressora grava o resultado de ajuste na mem ria e depois retorna para o estado anterior quando o aju...

Страница 1280: ...uste do sensor inicia 3 Abra a tampa superior e carregue o papel que deseja ajustar Quando voc fecha a tampa superior a impressora come a a alimentar o papel Nota Usando qualquer papel que n o atenda...

Страница 1281: ...a imprime o resultado do ajuste 6 A impressora grava o resultado de ajuste na mem ria e depois retorna para o estado anterior quando o ajuste do sensor se iniciou 7 Se o ajuste falhar a impressora imp...

Страница 1282: ...me o seguinte e depois corta o papel quando o ajuste de sensor de PNE come a 3 Abra a tampa superior e carregue o papel que deseja ajustar Quando voc fecha a tampa superior a impressora come a a alime...

Страница 1283: ...ultado do ajuste na mem ria Flash e depois retorna ao seu estado no in cio do ajuste do sensor 7 A impressora grava o resultado do ajuste na mem ria e depois retorna ao estado anterior quando o ajuste...

Страница 1284: ...rca preta 1 Quando PE SENSOR for impresso pressione e mantenha a chave FEED por um segundo ou mais para come ar o ajuste do sensor de PE 2 A impressora imprime o seguinte e depois corta o papel quando...

Страница 1285: ...o papel de etiqueta com corte for carregado descasque parcialmente a etiqueta do papel de base com a parte descascada da etiqueta voltada para o sensor de etiquetas e depois feche a tampa sensor de et...

Страница 1286: ...pel original novamente A impressora imprime o resultado do ajuste 7 A impressora grava o resultado de ajuste na mem ria e depois retorna para o estado anterior quando o ajuste do sensor se iniciou 8 S...

Страница 1287: ...mpressos Se voc ligar a chave novamente e pressionar a chave FEED brevemente os dados exibidos abaixo ser o impressos A impressora imprime o seguinte quando entra no modo especial Test Print End Sampl...

Страница 1288: ...ple Print Data Analysis Cleaning Sensor Adjustment Setup Test Print Paper feed direction Selection Item A impressora entra no modo de an lise de dados recebidos do modo especial Pressione a chave FEED...

Страница 1289: ...o dump hexadecimal No modo de dump hexadecimal todos os sinais enviados a partir do computador host para a impressora s o impressos como c digos hexadecimais Os dados impressos podem ser usados para c...

Страница 1290: ...astreamento de comando todos os dados enviados a partir do computador host para a impressora s o impressos como nomes de comando Os dados impressos podem ser usados para confirmar que c digos de contr...

Страница 1291: ...impressos Se voc ligar a chave novamente e pressionar a chave FEED brevemente os dados exibidos abaixo ser o impressos A impressora imprime o seguinte quando entra no modo especial Test Print End Sam...

Страница 1292: ...ng Sensor Adjustment Setup Test Print Paper feed direction Selection Item A impressora entra no modo de impress o de amostra do modo especial Pressione a chave FEED um segundo ou menos cinco vezes par...

Страница 1293: ...Quando a chave FEED for pressionada por um tempo curto o seguinte padr o impresso LABEL1 LABEL2 LABEL3 LABEL4 LABEL5 LABEL1 Quando a chave FEED for pressionada por um tempo longo cerca de um segundo...

Страница 1294: ...Resultado impresso das impress es de amostra Padr o de LABEL1 Padr o de LABEL2 Padr o de LABEL3 Padr o de LABEL4 172...

Страница 1295: ...Padr o de LABEL5 173...

Страница 1296: ...ompleto qualquer material aderente que cole na parte de eje o de papel da guia de papel pode provocar erro de eje o de papel Usando o solvente base de lcool remova o material aderente periodicamente d...

Страница 1297: ...ligue a chave novamente ao pressionar a chave FEED no painel de controle Em seguida os dados mostrados abaixo s o impressos Test Print End Sample Print Data Analysis Cleaning Sensor Adjustment Setup T...

Страница 1298: ...ata Analysis Cleaning Sensor Adjustment Setup Test Print Special Mode Usage Item Selection Please push the feed switch short Item Decision Please push the feed switch long Paper feed direction Selecti...

Страница 1299: ...seguinte e corta o papel quando entra no modo de limpeza de cilindro 4 Abra a tampa superior e remova o rolo de papel 5 Pressione a chave FEED para girar o cilindro para uma posi o que facilite a limp...

Страница 1300: ...perior Nota Tenha cuidado para n o amassar ou danificar de outra forma o cilindro de impress o Um amassado no cilindro de impress o pode resultar em erros de impress o incompleta ou alimenta o de linh...

Страница 1301: ...e da cabe a t rmica deve ser removida Cabe a t rmica Nota A cabe a t rmica suscet vel a danos Ao limp la use o pano macio e seja especificamente cuidadoso para n o danificar a cabe a Nota Imediatament...

Страница 1302: ...valo de cerca de uma vez ao m s para garantir a estabilidade no corte Nota Embora a ponta da l mina do cortador n o seja t o afiada quanto as pontas dos canivetes normalmente usados nos escrit rios ex...

Страница 1303: ...da os dados mostrados abaixo s o impressos 181 Nota Se tiver passado o item que quer selecionar pressione repetidamente a chave FEED brevemente at retornar ao primeiro item Test Print End Sample Print...

Страница 1304: ...ata Analysis Cleaning Sensor Adjustment Setup Test Print Special Mode Usage Item Selection Please push the feed switch short Item Decision Please push the feed switch long Paper feed direction Selecti...

Страница 1305: ...sione a chave FEED por um segundo ou mais para aceitar a sele o A impressora entra no modo de limpeza de cortador A impressora imprime o seguinte e corta o papel quando ele entra no modo de limpeza de...

Страница 1306: ...ficar a extremidade do cortador superior ao manipular o estilete ou a chave de fenda Tenha tamb m cuidado para n o dobrar ou danificar de outra forma o cilindro de impress o Um amassado no cilindro de...

Страница 1307: ...da quanto as pontas dos canivetes normalmente usados nos escrit rios existe um risco de ferir a m o ou os dedos que se movam quando pressionados contra a extremidade do cortador 7 Depois de completar...

Страница 1308: ...dade do cortador inferior Nota Seja bem cuidadoso para n o danificar a extremidade do cortador inferior ao manipular o estilete ou a chave de fenda Tenha tamb m cuidado para n o dobrar ou danificar de...

Страница 1309: ...nte usados nos escrit rios existe um risco de ferir a m o ou os dedos que se movam quando pressionados contra a extremidade do cortador 5 Depois de terminar a limpeza reposicione o rolo de papel e fec...

Страница 1310: ...ntrada Dados de entrada 4 N C 5 N C 6 RX Entrada Dados de entrada 7 N C 8 N C 2 LEDs 1 2 3 No Exibi o Descri o 1 Link 10BASE T A luz acende quando a impressora reconhece o destino de conex o como 10BA...

Страница 1311: ...Procedimento para inicializar informa es de configura o 1 Desligue a impressora 2 Posicione o switch 2 em ON 3 Ligue a impressora Inicializa o leva aproximadamente cinco segundos 4 Desligue a impresso...

Страница 1312: ...do sinal Dire o de E S Fun o 1 FG Terra da estrutura 2 TXD Sa da Enviar dados 3 RXD Entrada Receber dados 4 RTS Sa da Enviar solicita o 5 CTS Entrada Enviar permiss o 6 DSR Entrada Data set ready 7 SG...

Страница 1313: ...l terra de estrutura de gaveta 2 DRD1 Sa da Sinal da unidade kick da gaveta 1 3 DRSNS1 Entrada Sinal de detec o de gaveta 1 4 24V Sa da For a da unidade 5 DRD2 Sa da Sinal da unidade kick da gaveta 2...

Страница 1314: ...o ON time Ligado ON time Ligado OFF time Desligado 0 2 Notas A for a da gaveta deve ser sempre fornecida a partir da fonte de alimenta o da impressora via um conector de 4 pinos Notas A resist ncia da...

Страница 1315: ...nex o gaveta 2 1 Impressora 2 3 4 5 6 Cabo 2 4 Solen ide kick de gaveta 24 m nimo Chave abrir fechar gaveta 2 4 6 Solen ide kick de gaveta 24 m nimo Chave abrir fechar gaveta 3 6 Gaveta 1 3 Gaveta 2 1...

Страница 1316: ...pinos de conector de for a No de pinos Nome do sinal 1 24 V 2 SG 3 N C 3 2 1 Nota Use nosso adaptador CA para fonte de alimenta o Nota Se nosso adaptador CA n o for usado fonte de alimenta o fornecida...

Страница 1317: ...ar uma largura de papel de at 83 mm Nota Papel com uma largura dentro da faixa de 71 a 79 mm n o pode ser usado 4 Velocidade de impress o Papel t rmico de cor nica Velocidade m xima de impress o 260 m...

Страница 1318: ...nas 12x24 ANK Fonte B Fonte de extens o 38 colunas 10x24 42 colunas 9x24 42 colunas 10x24 46 colunas 9x24 43 colunas 10x24 48 colunas 9x24 Corpo face Para papel com largura de 80 mm Para papel com lar...

Страница 1319: ...2 75 ANK Fonte B 10 x 24 9 x 24 1 25 x 3 0 1 125 x 3 0 9 x 17 9 x 17 1 125 x 2 125 1 125 x 2 125 ANK Fonte C 8 x 16 1 0 x 2 0 8 x 13 1 0 x 1 625 Kanji Fonte A 24 x 24 3 0 x 3 0 24 x 24 3 0 x 3 0 Kanji...

Страница 1320: ...8 Vistas externas Guia de papel aberta Guia de papel 198...

Страница 1321: ...te a l mina do cortador para remover o material aderente Nota O corte total pode levar a irregularidades no centro da superf cie de corte Se a fibra do papel permanecer nesses locais isso pode eventua...

Страница 1322: ...ro detectado comprimento restante do papel s o valores te ricos Esses valores variam conforme as condi es reais incluindo a condi o do rolo de papel e a espessura do papel Nota O di metro externo do n...

Страница 1323: ...201 13 4 Especifica es de interface 1 LAN IEEE802 3 10BASE T IEEE802 3U 100BASE TX 2 Dual Conformidade com USB 1 1 e RS 232C...

Страница 1324: ...10 a 95 de umidade relativa sem condensa o Impress o garantida de 10 a 85 de umidade relativa sem condensa o Quando n o for operacional 8 a 95 de umidade relativa sem condensa o Ao ser transportado ou...

Страница 1325: ...a o papel recomendado com uma espessura de 75 m 500 000 cortes para o papel recomendado com uma espessura de 75 a 150 m Corte de etiquetas 1 000 000 cortes corte na rea de base 500 000 cortes corte de...

Страница 1326: ...4 2 Nomenclatura Cabo de sensor de PNE Sensor PNE Conecte se impressora Parti o Ajustar posi o de acordo com a largura do papel Usado para grampear o cabo de interface e adaptador de CA Grampos de cab...

Страница 1327: ...dutos conectados Encaixe de conector de impressora Parafusos de montagem de encaixe x2 Folha de instru o Di metro de uma polegada Eixo de rolo de papel Eixo de rolo de papel Di metro de tr s polegadas...

Страница 1328: ...externo B 32 0 5mm rolo de papel de uma polegada Di metro interno C 76 2 0 5mm di metro externo B 82 0 5mm rolo de papel de tr s polegadas 5 Superf cie de colora o parte externa do rolo de papel 6 Pr...

Страница 1329: ...tado descrito abaixo Espessura de papel m Di metro de n cleo externo B mm Di metro de detec o A mm Papel restante m 75 82 Aprox 100 20 a 30 150 82 Aprox 100 10 a 20 C B A n cleo Nota Os valores acima...

Страница 1330: ...ara o cabo de alimenta o do adaptador de CA da tomada 1 Remove a tampa do conector na traseiro da impressora Abra a tampa do conector e vire a tampa intermedi ria na dire o da seta Em seguida remova o...

Страница 1331: ...papel largo ao conector na parte posterior da impressora Acess rio de conex o de impressora Parafusos de montagem Unidade de papel de rolo cabo do sensor cabo de interface Cabo adaptador de CA Nota P...

Страница 1332: ...esquerda e direita do acess rio de conector de impressora nas protuber ncias esquerda e direta no conector de unidade de rolo de papel largo Orif cio esquerdo e direito de suporte de conex o de impres...

Страница 1333: ...entro para fora do rolo de papel como mostrado no diagrama abaixo Grampos de cabo Abra o grampo de cabo por arqueamento da parte A na dire o da seta como mostrado na figura e fios de cabos como ilustr...

Страница 1334: ...e a folga no cabo do sensor entre a unidade de rolo de papel e impressora fixando o comprimento excedente com um grampo de cabos como mostrado no diagrama abaixo Cabo do sensor Fixado com grampo de ca...

Страница 1335: ...o parafuso 1 posi o padr o O gr fico a seguir uma posi o onde o tubo de papel de di metro de uma polegada definido 1 Posi o para tamanho de n cleo de 1 0 polegada 1 5 Posi o para tamanho de n cleo de...

Страница 1336: ...so serrilhado 1 posi o padr o O gr fico a seguir uma posi o onde o n cleo de di metro de uma polegada definido 1 Posi o para tamanho de n cleo de 1 0 polegada 1 5 Posi o para tamanho de n cleo de 1 5...

Страница 1337: ...fita e a parte com cola no in cio do rolo Nota A impressora n o pode imprimir na parte com cola do papel portanto remova aproximadamente um giro do rolo de papel do in cio Qualquer adesivo ou outro m...

Страница 1338: ...o ou outros problemas de impress o Nota Se o papel em rolo carregado estiver solto frouxo como mostrado abaixo acabe com a folga antes de imprimir no papel Imprimir no papel em rolo solto pode provoc...

Страница 1339: ...acuna como mostrado no diagrama Frontal Deixe uma lacuna de uma gradua o na escala entre a parti o e o rolo de papel e depois aperte os parafusos frontais para corrigir Posterior Deixe uma lacuna de u...

Страница 1340: ...o rolo for guiado por cima do rolete de guia como ilustrado na Figura b mostrada abaixo o papel pode n o passar Certifique se de que o papel seja guiado sob o rolete de guia como na Figura A mostrada...

Страница 1341: ...ta inicial do papel da frente da impressora Tampa superior Rolo de papel Retire a extremidade inicial do rolo de papel da frente da impressora Abra a tampa superior 5 Depois de acabar a defini o do ro...

Страница 1342: ...14 9 Apar ncia da Unidade de Rolo de Papel Quando conectado impressora 220...

Страница 1343: ...OKI Europe Ltd Ukraine Raisy Opkinoy Street 8 Building B 2nd Floor Kiev 02002 Ukraine Tel 380 44 537 5288 Website www oki ua OKI Sistem ve Yaz c z mler Tic Ltd ti Harman sok Duran Is Merkezi No 4 Kat...

Страница 1344: ...www oki nl Oki Systems Norway AS Tevlingveien 23 N 1081 Oslo Website www oki no Var v nlig kontakta din terf rs ljare i f rsta hand f r konsultation I andra hand kontakta Oki Systems Sweden AB Borgafj...

Страница 1345: ...www oki com printing Oki Data Corporation 4 11 22 Shibaura Minato ku Tokyo 108 8551 Japan April 2016 46254602EE Rev2...

Отзывы: