background image

6.5 Checking Printed Pages 

123

5.

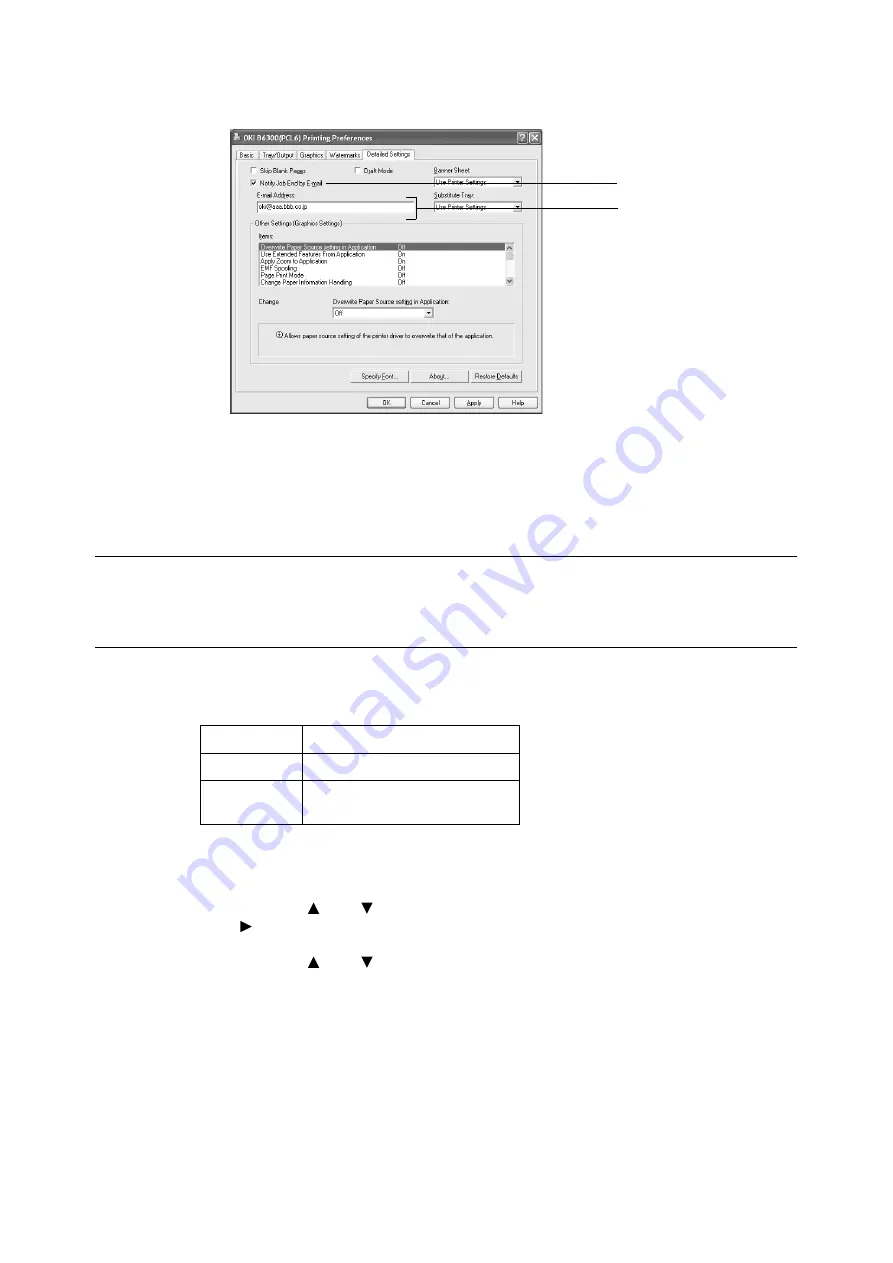
Select the [Notify Job End by E-mail] check box.

6.

Enter the e-mail address for notification in [E-mail Address].

7.

Click [OK].

6.5

Checking Printed Pages

This section explains how to check the total number of printed pages.

Checking Total Printed Pages on Meter

The total number of printed pages for different meters can be checked on the display of the 
control panel.

The meter is divided according to the color modes.

The following procedure shows how to check the meter.

1.

Press the <MENU> button to display the Menu screen.

2.

Press the <

> or <

> button until [Meter Reading] is displayed and then press the 

<

> button.

3.

Press the <

> or <

> button until the desired meter is displayed.

4.

After checking, press the <MENU> button.

Meter 1

Black/White Printing

Meter 2

Normally not used.

Meter 3

Color printing
Not available on this printer.

6

5

Содержание B6200dn

Страница 1: ......

Страница 2: ...ed in the U S and other countries Intel and Pentium are trademarks or registered trademarks of Intel Corporation or its subsidiaries in the United States and other countries UNIX is a registered trade...

Страница 3: ...kof operating your computer and network In this manual safety instructions are marked with the symbol Always read and follow these instructions before performing the required procedure This product i...

Страница 4: ...tion on operations or features Refer to Indicates reference sources 3 The following conventions are used in this guide Refer to xxx The cross reference is within this guide Refer to YYY The cross refe...

Страница 5: ...essory Configuration and Paper Tray Settings 16 2 Printing 17 2 1 Printing From the Computer 17 Useful Print Features In the Properties Dialog Box 17 2 2 Printing on Envelopes 18 Loading Envelopes 18...

Страница 6: ...per 44 Special Media 45 Unusable Paper 46 Storing and Handling Paper 47 3 2 Loading Paper 47 Loading Paper in a Paper Tray 47 Automatic Tray Selection 49 3 3 Setting Custom Paper Sizes 50 3 4 Setting...

Страница 7: ...ter Status via E mail 121 About Mail Notice Service 121 Settings for Mail Notice Service 121 Network Environment 121 Setting the E mail Environment at This Printer 122 Setting the Printer Driver Prope...

Страница 8: ...r 142 Optional Hard Disk 142 When Print Result Is Different From the Settings 142 Optional Accessories 142 Meter Count in Duplex Printing 142 TCP IP LPD 143 Printer Settings 143 Computer Settings 143...

Страница 9: ...Contents 5...

Страница 10: ...eature This product has a power saving feature which switches the machine to low power mode automatically if the machine is on and not operated for a certain period of time In this mode the machine st...

Страница 11: ...ples of items that may be illegal to copy or print in your country q Currency q Checks q Bank and government bonds and securities q Passports and identification cards q Copyright material or trademark...

Страница 12: ...6 Tray 2 250 tray is set for B6200 and 550 tray for B6300 7 Power switch Switches the power of the printer on and off Pressing the switch to the position switches it on and pressing it to the positio...

Страница 13: ...ing up Can be installed to B6300 4 Duplex unit Cover C Enables 2 sided printing When paper is jammed inside the duplex unit it is described as cover C 5 Rear output tray lever When the rear tray has b...

Страница 14: ...and the photosensitive drum 3 Cover A Open this when replacing the drum toner cartridge and removing jammed paper 4 Fuser unit Fixes the toner on the paper Do not touch this when using the printer as...

Страница 15: ...the machine is in the power saver mode 7 CANCEL button Press to cancel printing 8 ON LINE button Press to enter the offline status When in the offline status the machine cannot receive data or proces...

Страница 16: ...Print Screen The Print screen appears when the machine is printing or waiting for data The following contents are shown on the screen Menu Screen Screen for configuring settings related to the printe...

Страница 17: ...nter is ready for printing Ready to print will be displayed Important If error message is displayed refer to Message List alphabetical order P 99 on how to fix it Switching Off the Power Important Do...

Страница 18: ...and the procedure to change the settings refer to Example Changing the Low Power Sleep Mode Settings P 55 The sleep mode setting has precedence when both the low power mode and sleep mode are enabled...

Страница 19: ...d at the Computer Double click the printer icon at the bottom right of the task bar in Windows From the displayed window click the document name that you wish to delete and press the Delete key Checki...

Страница 20: ...n if you change the settings here they will not be reflected on the printer itself Note When using this feature you have to activate the SNMP port default Enable on the printer using the control panel...

Страница 21: ...hem refer to the Online Help for the printer driver Important If the paper tray information is not correct change the settings on the Options tab of the printer driver before carrying on printing For...

Страница 22: ...ed on Note For details on the procedure to load paper in a paper tray refer to Loading Paper in a Paper Tray P 47 1 Load the envelopes in the portrait orientation so that the flaps are turned to the r...

Страница 23: ...to the application software Refer to the manual of each application software 1 From the File menu select Print 2 Select this printer as the printer to be used and click Preferences 3 Click the Tray O...

Страница 24: ...20 2 Printing 7 From Output Size select the envelope size 8 If necessary set Turn Image by 180deg and then click OK 9 Click Print in the Print dialog box to start printing...

Страница 25: ...b This section explains the procedure using WordPad on Windows XP as an example Note The way to display the printer properties dialog box differs according to the application software Refer to the man...

Страница 26: ...2 Printing 6 From Paper Size select the size of the original document 7 From Output Size select the size of the transparency and then click OK 8 Click Print in the Print dialog box to start printing 7...

Страница 27: ...ad long paper in tray 1 follow the procedure below 1 Pull the paper tray out to its maximum Note Pull the extendable part out to its maximum For details on the procedure to extend the paper tray refer...

Страница 28: ...rights can only check the contents When setting the Custom Paper Size dialog box on Windows NT 4 0 Windows 2000 Windows XP settings of other printers on the computer will also be affected as the form...

Страница 29: ...paper name 8 If necessary repeat steps 5 to 7 to define another custom size 9 Click OK 10 When you have configured custom sizes for trays 1 to 4 using the control panel click Get Information from Prin...

Страница 30: ...he appropriate tray from Paper Source 5 Click the Basic tab 6 From Paper Size select the size of the original document 7 From Output Size select the registered custom size and then click OK 8 Click Pr...

Страница 31: ...e and start printing the data from the control panel You can also store the print data in the printer without attaching a password By storing frequently used data in the printer you can print the data...

Страница 32: ...ns the procedure using WordPad on Windows XP as an example The procedure is the same for other OSs Note The way to display the printer properties dialog box differs according to the application softwa...

Страница 33: ...nit Del Data P 81 1 Press the button 2 Check that Secure Print is displayed and then press the button 3 Press the or button until the required user is selected and then press the button 4 Move the cur...

Страница 34: ...re that allows you to store the print data of multiple copies in the hard disk print out only the first set to check the print result and if satisfactory print the remaining copies from the control pa...

Страница 35: ...the Computer This section explains the procedure using WordPad on Windows XP as an example Note The way to display the printer properties dialog box differs according to the application software Refe...

Страница 36: ...print and delete data stored in the printer by Proof Print 1 Press the button 2 Press the or button until Proof Print is displayed and then press the button 3 Press the or button until the required us...

Страница 37: ...the specified time the specification of time will be undone and printing will start once the power is switched on again Do not switch off the power of the printer when using the delayed print feature...

Страница 38: ...start printing Printing will start at the specified time Canceling Delayed Print Use the control panel to cancel Delayed Print or to print without waiting for the specified time 1 Press the button 2 P...

Страница 39: ...the printer driver to print them Printing PDF File Here we send the PDF file to the printer for printing using lpr command directly Printing will be done with the following items set according to the...

Страница 40: ...nt features of the PDF file in this printer refer to 2 8 Direct Printing of PDF Files P 35 For details on the format of the TIFF file supported by this printer refer to TIFF File Format P 145 Printing...

Страница 41: ...nted Note Print features that are not set here will be printed according to the following settings at the printer receiving the data TIFF file The logical printer value set at Printer Printer Config T...

Страница 42: ...as E mail Printing Important The hard disk may be damaged and erase important data saved in the hard disk We recommend you back up your data Environment Settings for E mail Printing To use the E mail...

Страница 43: ...Select ENABLE DISABLE ENABLE Network General Settings Administrator E mail Address Set the internet service administrator s e mail address Up to 128 alphanumeric characters can be entered including t...

Страница 44: ...s in the POP3 server 1 to 120 minutes 10 minutes POP User Name Set the user name for connecting to POP3 server Only 1 user can be set Up to 64 alphanumeric characters can be entered including the ASCI...

Страница 45: ...using Outlook Express as an example 1 Create mail contents using your mailing software and attach TIFF or PDF files if any Important Only text format can be used for the mail contents Set the format...

Страница 46: ...hat it only receives e mails from specific domains by using OkiWebRemote Caution on Connecting This Printer to Internet Provider and Using E mail Features In the case where a flat rate contract with t...

Страница 47: ...fferent from the paper size or paper type selected on the printer driver or loading paper into an unsuitable paper tray for printing may lead to paper jams To ensure printing is correctly done select...

Страница 48: ...b Plain Medium weight paper for internal distribution and general office use XEROX 4024 75 g m2 20 lb Plain Medium weight paper for internal distribution and general office use XEROX 4200 75 g m2 20 l...

Страница 49: ...nting P 17 Paper name Weight Paper type Paper characteristics and caution on usage Transparencies XEROX P N 3R2780 XEROX P N JE 001 XEROX P N 3R91334 3M P N CG3300 Transparency Transparency without an...

Страница 50: ...g Wrinkled folded or torn paper Wet paper Curled paper Paper with static electricity Adhesive paper Paper with special coatings Treated colored paper Paper using ink that will run at a temperature of...

Страница 51: ...ot used and store it in a cabinet or a location with low humidity Do not let the paper stand but store it in a flat location Ensure that the paper is stored properly without being bent or curled Store...

Страница 52: ...correctly If the right width guide is not in place the paper will not be properly fed and this may cause paper jams 7 Close the lid of the paper tray and push the tray completely into the printer Imp...

Страница 53: ...aper trays that match the automatic tray selection an error message prompting for replenishment of paper will be displayed You can configure the printer not to display this message but to automaticall...

Страница 54: ...when using a narrow width paper Note To return to standard paper size settings select Auto in step 6 below This printer will automatically detect the size and orientation of the loaded paper 1 Press...

Страница 55: ...that can be loaded Usable Paper P 43 Setting on the Control Panel 1 Press the MENU button to display the Menu screen 2 Press the or button until Admin Menu is displayed then press the button 3 Press t...

Страница 56: ...or all print modes The mode menu is the menu from which you can set the specific items for each print mode The common menu has the following structure Common menu Menu item Item Candidate value The fo...

Страница 57: ...tory job history font information and the total count of outputs Refer to 6 2 Printing Reports Lists P 114 Meter Reading The Meter Reading menu is used to display the printed paper counts on the contr...

Страница 58: ...he change process is completed the factory defaults will be displayed Press the FEED SELECT button to confirm the value Ready to print 1 To display the menu screen press the MENU button at the print s...

Страница 59: ...enu screen Menu Print Language 2 Press the or button until Admin Menu is displayed Menu Admin Menu 3 Press the button Admin Menu Network Port 4 Press the or button until System Settings is displayed A...

Страница 60: ...played System Settings Low Power Timer 12 Press the button Low Power Timer 5 Mins 13 Press the or button to set the transitional time to the low power mode The available setting values range from 5 to...

Страница 61: ...ble 20 Press the button to return to Sleep Mode System Settings Sleep Mode 21 Press the or button until Sleep Mode Timer is displayed System Settings Sleep Mode Timer 22 Press the button Sleep Mode Ti...

Страница 62: ...uide HPGL For the items that can be set with this menu refer to the HP GL HP GL 2 Emulation Settings Guide PDF Makes settings for printing PDF file by sending it directly to a printer Refer to 2 8 Dir...

Страница 63: ...4 size or 8 5 11 size paper The items can be set may differ depending on the countries Auto Select this to print on a paper size that is automatically determined according to the size and settings of...

Страница 64: ...x Specifies whether to perform 2 sided printing The default is Off When you select On you can select Long Edge Flip or Short Edge Flip as the binding direction Note You can set this item only when the...

Страница 65: ...e between black and white smoother to decrease jags and enhance the visual appearance The default is On HexDump Specifies whether to print the data sent from a computer in the ASCII code corresponding...

Страница 66: ...2 TIFF Select this to process the data received from a computer as the specified data type nPJL 2 refer to P 83 This printer supports PJL commands that are independent from any printer languages The P...

Страница 67: ...d from the computer and perform printing based on the detected data PCL PS ESC P HP GL 2 TIFF Select this to process the data received from the computer as the specified data type nPJL 2 refer to P 83...

Страница 68: ...ns on The default is Enable which means the LPD port is available Note To enable the LPD port the IP address must be set Important If the memory is running out when the port is enabled the port may be...

Страница 69: ...IPX SPX Note When using TCP IP both the IP addresses of a computer and the printer are required nPrint Mode 1 refer to P 83 Sets the print data process method printer language to be used Auto default...

Страница 70: ...r to P 83 Sets the print data process method printer language to be used Auto default Select this to make the printer automatically detect the printer language being used in the data received from a c...

Страница 71: ...ata received from a computer as the specified data type nPJL 2 refer to P 83 This printer supports PJL commands that are independent from any printer languages The PJL commands are used to control pri...

Страница 72: ...utomatically In this case you need to disable the port s you are not using or change the memory allocation from Allocate Memory nPJL 2 refer to P 83 This printer supports PJL commands that are indepen...

Страница 73: ...he default is Enable nAuto Eject Time 3 refer to P 83 Sets the time interval for the printer to automatically print the remaining data when no further data is received for a continuous period The time...

Страница 74: ...ct this to process the data received from a computer as the specified data type nPJL 2 refer to P 83 This printer supports PJL commands that are independent from any printer languages The PJL commands...

Страница 75: ...t may be disabled automatically In this case you need to disable the port s you are not using or change the memory allocation from Allocate Memory nTranspt Protocol Specifies the transport protocol us...

Страница 76: ...ues even if you press MENU button after setting values You cannot move to other menu items until you have set the correct values Set the address only when you have to explicitly specify the gateway ad...

Страница 77: ...this to use the Ethernet frame type Ethernet 802 3 Select this to use the IEEE802 3 frame type Ethernet 802 2 Select this to use the IEEE802 3 IEEE802 2 frame type Ethernet SNAP Select this to use the...

Страница 78: ...o display the password input screen Specify the new password Note If On is not set for Panel Lock the password cannot be changed OfflineAutoClear 3 refer to P 83 Specifies whether to automatically tur...

Страница 79: ...ether to automatically print information about the printed data that has been processed in the printer Job History Report Do not print default Select this if you do not want to print the job history r...

Страница 80: ...lay and 24 hour display nTime Zone Specify the time zone if required nDaylight Savings Start Date End Date Specify summer time if required Drum Toner Life When it is about time to replace the drum ton...

Страница 81: ...sparency and Custom 1 to Custom 5 Paper Priority Specifies the priority of the paper type loaded in the tray specified with the auto tray selection feature The names specified in Paper Name will be di...

Страница 82: ...ted per set Offset Per Job Select this to output the document with its position shifted per job Off Select this if you do not want to perform offset output Print ID Select this to print the user ID on...

Страница 83: ...isable the port s you are not using or change the memory allocation However the parallel and USB ports will not stop automatically Note The memory allocation settings except the print page buffer sett...

Страница 84: ...32 KB The default is 64 K for parallel and USB memories and 256 K for the other memories Note IPP Memory is displayed when the hard disk optional is not installed IPP Spool is displayed when the hard...

Страница 85: ...data from another computer cannot be received via the same interface Specify the IPP specific receive buffer memory capacity between 64 and 1024 KB in increments of 32 KB The default is 256K Hard Dis...

Страница 86: ...Initializing Print Meter Data P 125 Form If there are no forms registered a message saying Not registered will be displayed n ESC P Form Select this to delete the forms for ESC P emulation nDelete PC...

Страница 87: ...d in this printer is specified by PJL commands the data will be deleted 3 When you are changing the candidate values by the buttons you can press and hold down the buttons to change the display contin...

Страница 88: ...Flash Disk Only when the network function is optional indicates default value Display Close the Menu screen MENU button Switch between the menu levels button moves one level downwards or button moves...

Страница 89: ...4 3 Menu list 85 Continued from previous page Continued on next page...

Страница 90: ...86 4 Settings on the Control Panel Continued from previous page...

Страница 91: ...4 3 Menu list 87 From P 85 From P 85...

Страница 92: ...88 4 Settings on the Control Panel From P 85...

Страница 93: ...move the jammed paper If paper is torn check for any remaining torn pieces of paper CAUTION The fuser unit is hot You may get burnt if you touch it directly 1 Remove the rear tray when opening the bac...

Страница 94: ...installed close cover A first before returning the tray to its original position If you continue to print with the offset catch tray folded this may cause a paper jam Always use the printer with the t...

Страница 95: ...the Job History Report Limitations of the printer and incorrect settings at the printer computer and server corresponding to your network environment may also result in printing problems Refer to Appe...

Страница 96: ...the problem When 1200dpi is selected for Print Mode in the Graphics tab set it to 600dpi Select On for Page Print Mode in the Detailed Settings tab Increase the print page buffer Install the addition...

Страница 97: ...again to return the printer to online mode Note When a parallel USB port is used data may be transmitted in the middle of a job depending on when the ON LINE button is pressed In this case subsequent...

Страница 98: ...correctly Push the paper tray completely into the printer Is the printer placed on a flat location Place the printer on a stable surface Refer to Setup and Quick Reference Guide Safety Notes Are the...

Страница 99: ...range noise Is the printer placed on a flat location Place the printer on a stable surface Refer to Setup and Quick Reference Guide Safety Notes Is cover A open Close cover A securely Is the paper tra...

Страница 100: ...placing the Drum Toner Cartridge P 111 The Draft Mode feature is on Uncheck the Draft Mode check box on the Detailed Settings tab of the printer driver Refer to On line Help for the printer driver Lev...

Страница 101: ...Paper P 43 3 4 Setting Paper Types P 51 The paper is damp Replace with paper from a new ream Refer to 3 2 Loading Paper P 47 The paper used is not suitable Load the correct type of paper Refer to Usab...

Страница 102: ...rtridge Replace with a new drum toner cartridge Refer to 6 1 Replacing the Drum Toner Cartridge P 111 Text or images are printed at an angle The paper tray guides are not set in the correct positions...

Страница 103: ...ve any print data from the computer during processing Canceling xxxx Tray Discarding the data being printed The printer can receive print data from a computer during processing Check Tray xxxx XXXX In...

Страница 104: ...pe is XXXX into the tray Refer to Loading Paper in a Paper Tray P 47 Lower Rear OutputTray lever Since the rear tray is set as the output destination the printer cannot output to the center output tra...

Страница 105: ...ray The printer is outputting data on paper from tray Do not pull out the tray being used The printer can receive print data from a computer during processing Pull out all trays Clear jam Clear jam an...

Страница 106: ...You can still print about another 100 pages even when this message is displayed Ready to print Replace 010 420 It is about time to replace parts Contact and inform our Printer Support Desk of the erro...

Страница 107: ...re correct under Network of OkiWebRemote Also check the settings for DNS server Refer to Environment Settings for E mail Printing P 38 016 504 POP3 server name is not set correctly at POP before SMTP...

Страница 108: ...r is selected Paper Priority settings will be automatically changed to Not Selected In the case of 2 check the print data Refer to Paper priority order settings Printer Settings P 77 016 726 Printer l...

Страница 109: ...etwork of OkiWebRemote 016 797 E mail sent to this printer using E mail Print feature has a wrong address Specify the correct address and send again Refer to 2 10 Printing via Electronic Mail E mail P...

Страница 110: ...e and print again 116 748 No drawing data in HP GL and HP GL 2 print data Check the print data 116 750 Cannot print banner sheet due to failure in banner sheet feeding tray Restore the banner sheet fe...

Страница 111: ...the computer and the printer Connection cannot be established Unable to print NetworkError is displayed Ask your network system administrator to check the network for errors The printer is switched of...

Страница 112: ...of LPD Spool and compare it with the print data which was sent in the single print instruction 1 If a single file of print data has exceeded the upper limit of the memory capacity divide the file into...

Страница 113: ...pens check if the printer is working properly The Refresh button is not working Are you using the supported OS and Web browser Refer to 6 3 Checking Managing the Printer Status on the Computer P 117 t...

Страница 114: ...gs in Domain List Are the SMTP server and POP server working correctly Check with your network administrator During E mail printing the attached PDF file was not printed If the memory capacity is insu...

Страница 115: ...tings P 74 Before ordering a new drum toner cartridge check the product code listed in Appendix A 2 Product Code List P 135 Caution on Handling the Drum Toner Cartridge When handling the drum toner ca...

Страница 116: ...drum toner cartridge out of the packaging box and shake it 7 to 8 times as shown in the diagram Important If the toner is not evenly spread out the print quality may be reduced Also if you did not sh...

Страница 117: ...drum toner cartridge is firmly set After opening cover A remove any dust or stains inside the printer with a dry clean cloth 6 Close cover A securely Important If the offset catch tray is folded as i...

Страница 118: ...mation of up to the latest 50 errors that occurred in this printer Print Meter Report Prints information on the total printed pages and total number of sheets used in this printer according to differe...

Страница 119: ...on on the registered forms logos and patterns of ESC P print mode PostScript Fonts List Prints a list of PostScript fonts PostScript Logical Printers List Prints a list of logical printers created in...

Страница 120: ...displayed and press the button Press the or button until the desired list is displayed then press the button 4 Press the FEED SELECT button The selected report list will be printed Note Reports lists...

Страница 121: ...SSN is included in the CD ROM that is bundled with this printer This section explains the setting with OkiWebRemote For details on SSN refer to the Network Print Environment User Guide Settings for O...

Страница 122: ...or your web browser For OkiWebRemote to work properly the following settings must be configured on the web browser For Netscape Communicator Settings that enable Java Script are selected To compare th...

Страница 123: ...efault port number after the address The port number can be changed under Network HTTP When connecting to OkiWebRemote from the web browser after changing the port number add the port number after in...

Страница 124: ...e and click the Edit button 4 Set the IP address permitted for TCP IP connection in Permitted IP Address 5 Set the address mask in IP Mask corresponding to the registered IP address in Permitted IP Ad...

Страница 125: ...Description Job Completion Notifies the status of print jobs completed cancelled or confirm from the computer This is only used for the PCL printer driver Regular Notice Notifies the conditions leadi...

Страница 126: ...nting Preferences on the General tab The Printing Preferences dialog box will be displayed 4 Click the Detailed Settings tab Item Item to be set Description Maintenance Services Option Mail Notice Ser...

Страница 127: ...s for different meters can be checked on the display of the control panel The meter is divided according to the color modes The following procedure shows how to check the meter 1 Press the MENU button...

Страница 128: ...button to display the Menu screen 2 Press the or button until Report List is displayed then press the button 3 Press the or button until Print Meter is displayed then press the button 4 Press the FEED...

Страница 129: ...ition and print clean printouts all the time CAUTION Be sure to switch off and unplug the machine before accessing the interior of the machine for cleaning maintenance or fault clearance Access to a l...

Страница 130: ...AUTION Never touch a labelled area found on or near the heat roller You can get burnt If a sheet of paper is wrapped around the heat roller do not try to remove it by yourself to avoid injuries or bur...

Страница 131: ...explains how to clean the feed roll set in the paper tray Follow this procedure also when cleaning the feed rolls inside of the printer and the tray module Note The feed roll is a regular replacement...

Страница 132: ...t diagram down 1 widen the tab on the feed roll to loosen it 2 and then slowly remove the feed roll from the shaft of the paper tray 3 3 Wipe the rubber parts with a wet but well wrung soft cloth 4 Tu...

Страница 133: ...e persons carrying it When lifting the machine be sure to observe the following points Failure to do so may cause the machine to fall and result in injuries 2 persons one facing the front of the machi...

Страница 134: ...tant Do not touch any parts inside the printer 7 Hold the drum toner cartridge by the grip and pull it out slowly Important It is necessary to uninstall the drum toner cartridge If you move the printe...

Страница 135: ...min 2 2 sided print 16 3 sheets min 3 4 B6300 Letter print speed 35 PPM A4 print speed 34 PPM 1 sided print 34 sheets min 2 2 sided print 20 9 sheets min 3 4 1 The print speed may decrease due to pape...

Страница 136: ...aper transparencies for monochrome printing heavyweight 1 such as envelopes labels heavyweight 2 Duplex unit optional Plain paper of 60 190 g m2 16 50 lb bond recycled paper heavyweight 1 heavyweight...

Страница 137: ...work protocol TCP IP IPX SPX NetBEUI UDP IP Network service LPD SMB NetWare EtherTalk SNMP HTML HTTP DHCP WinsClient DNS IPP Port9100 Telnet Power source AC 120V 10 10A 50 60 Hz both AC 220 240 V 10A...

Страница 138: ...134 A Appendix Printable Area Top edge 4 mm Left 4 mm Bottom edge 4 mm Right 4 mm Unprintable area Printable area 4mm 0 16...

Страница 139: ...et Network function Optional 2 sided printing function Optional B6200 Printing speed 24 ppm Country Europe Voltage 220 240 V Second tray 250 sheet Output tray 250 sheet Network function Standard 2 sid...

Страница 140: ...tional B6300 Printing speed 34 ppm Country Europe Voltage 220 240 V Second tray 550 sheet Output tray 500 sheet Network function Standard 2 sided printing function Optional B6300 Printing speed 34 ppm...

Страница 141: ...paper P paper You can install up to two levels of paper trays Refer to For details about installing the Letter A4 universal tray Setup and Quick Reference Guide Installing Letter A4 Universal Tray Du...

Страница 142: ...bles and Regular Replacement Parts P 139 Handling consumables Do not store the consumables with the box standing on end Do not open the package before using the consumables and avoid storing them in t...

Страница 143: ...listed under life size is the number of pages that can be printed continuously using A4 size paper As the life span differs according to factors such as the print contents paper size paper type enviro...

Страница 144: ...cities shown in the table are factory defaults Required memory capacity differs according to the protocol activation status and receive buffer size PCL driver Memory capacity 1 sided print Unit MB Mem...

Страница 145: ...A5 64 64 64 128 Letter 8 5 11 64 64 64 128 A4 64 64 64 128 Legal 8 5 13 64 64 64 128 Legal 8 5 14 64 64 64 128 Custom 64 64 64 128 Long paper 216 900 mm 8 5 x 35 4 64 128 1200 dpi A5 128 128 128 128...

Страница 146: ...ludes the additional fonts the PCL ESC P HP GL and HP GL 2 forms and SMB folders Secure Proof Delayed Print documents and their logs will not be deleted When Print Result Is Different From the Setting...

Страница 147: ...tings such as IP address on computers under NIS Network Information Service management Switching Off the Power Take note of the following points when switching off the power of the printer When LPD Sp...

Страница 148: ...s hard disk or memory Note Depending on the type of computers the print data may be sent again immediately when the data volume exceeds the receiving capacity This means that the computer is backing u...

Страница 149: ...WhiteIsZero Uncompressed 1 G3 FAX 3 G4 FAX 4 LZW 5 PackBits 32773 BlackIsZero Uncompressed 1 G3 FAX 3 G4 FAX 4 LZW 5 PackBits 32773 4 WhiteIsZero Uncompressed 1 BlackIsZero Uncompressed 1 8 WhiteIsZer...

Страница 150: ...8 8 8 RGB 2 Uncompressed 1 LZW 5 JPEG 6 JPEG 7 PackBits 32773 YCbCr 6 Uncompressed 1 LZW 5 JPEG 6 JPEG 7 PackBits 32773 ITULAB 10 Uncompressed 1 LZW 5 JPEG 6 JPEG 7 PackBits 32773 Bit per Sample Phot...

Страница 151: ...Adobe Protocol Standard Baud rate 9600bps Stop Bit 1bit Parity Not Available Xon Xoff Control On DTR Control Fix High when the host computer is Windows nExample when printing the print job that includ...

Страница 152: ...confirm the port that is specified when installation is set then click Configure Port 5 Set each item Bit Sec Select the value of Baud rate that is set on the printer Data bit Select 8 Parity Select...

Страница 153: ...an send print data from the computer as well as send information such as print status from the printer to the computer Browser Software to display and view at your computer information on the Internet...

Страница 154: ...1 m2 sheet of paper Gradation The smoothness between colors It is expressed in gradation value by the number of steps of gradation and the greater the value the smoother it is HTTP A protocol used to...

Страница 155: ...network hard disk or printers on the computer system Ending a login session is known as log out Mode menu Consisting of ESC P emulation mode the HP GL and HP GL 2 emulation modes PCL emulation mode an...

Страница 156: ...tually processes and stores print data Printable area Area of a sheet of paper that can actually be printed on Printer driver Software that converts data created by application software to data that c...

Страница 157: ...et protocol that is used in various products from personal to large computers USB Abbreviation of Universal Serial Bus a data transmission method between the computer and peripherals It supports the H...

Страница 158: ...154 A Appendix...

Страница 159: ...inter status via E mail Mail Notice Service checking status of print data 15 checking managing printer status on the computer 117 cleaning the feed roll 127 cleaning the printer 125 configuring option...

Страница 160: ...Initialize delete data 81 IP address limit IP address IP Filter 120 limit IP address IP port limitations 73 retrieve IP address 72 set address manually 72 IPP 67 J Job History Report 114 L LCD displa...

Страница 161: ...inted image smudges when rubbed with your finger the toner is not fixed on the paper 97 printing is light faded blurred 96 spots of missing text 98 text is blurred 98 text or images are printed at an...

Страница 162: ...face 147 printing via electronic mail 38 Proof Print 30 R READY indicator 11 rear output tray 9 rear output tray lever 9 receive buffer capacity 80 regular replacement parts 139 replacing the drum ton...

Страница 163: ...f Error indicator is blinking 92 light of Error indicator is on 92 mail related troubles 110 network related troubles 107 no power 91 paper cannot be fed paper jam multiple papers are fed papers are f...

Отзывы: