background image

Printing settings in windows > 83
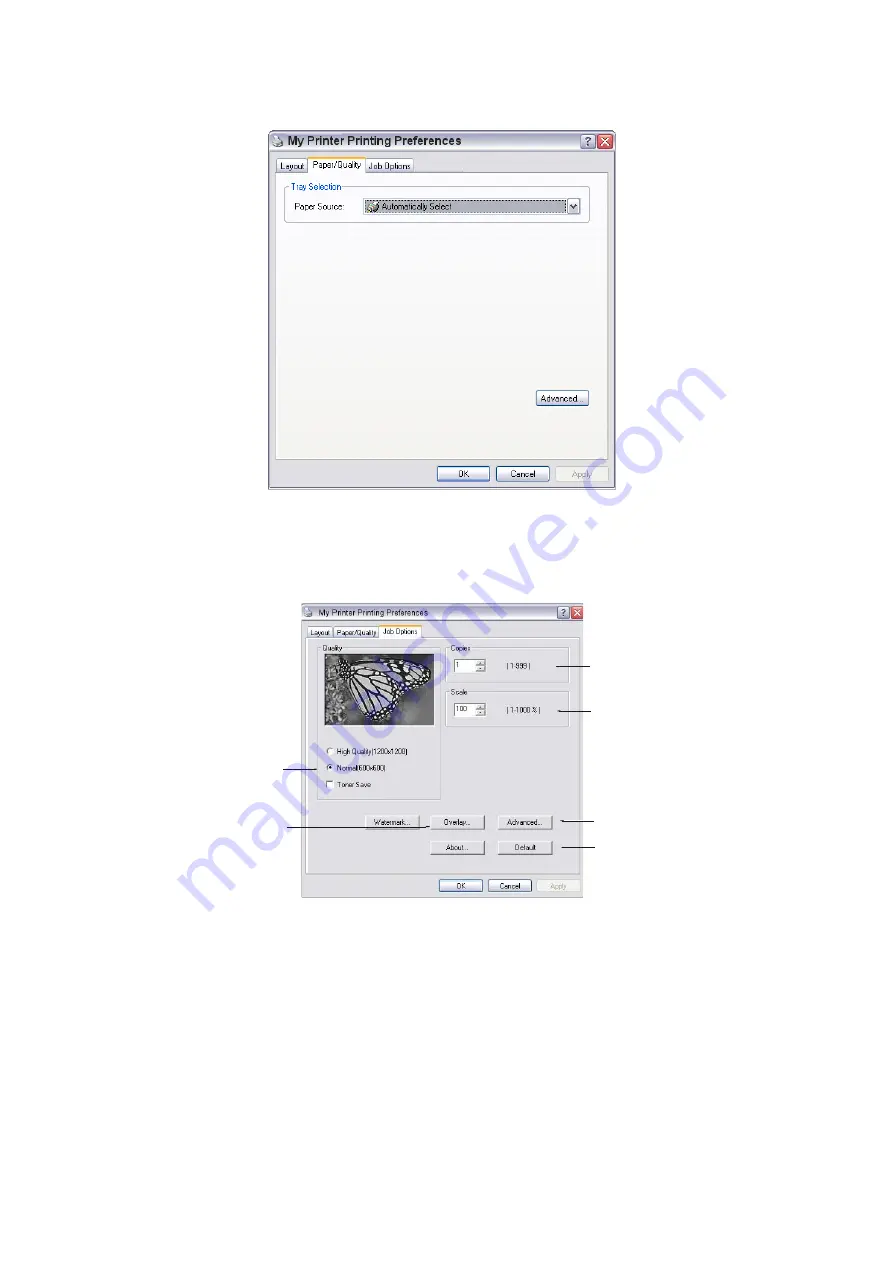
Paper/Quality tab

You can set the paper source or leave it as automatic selection and by using the Advanced 

button you have access to the same set of options as described above for the Layout Tab.

Job options tab

1.

The output resolution of the printed page can be set as follows.

>

The High Quality setting prints at 1200 x 1200dpi for MB470 and MB480 and is 

the best option for printing vector objects such as graphics and text.

>

The Normal setting prints at 600 x 600dpi and is suitable for most printing jobs. 

You can select Toner Saving to save toner for some print jobs.

1

2

3

4

5

6

Содержание 62433101

Страница 1: ...MB400 Series MB460 MB470 MB480...

Страница 2: ...Electric Industry Company Ltd Oki Printing Solutions is a trademark of Oki Data Corporation Energy Star is a trademark of the United States Environmental Protection Agency Microsoft MS DOS and Windows...

Страница 3: ...er for at least 15 minutes keeping eyelids open Seek medical attention Spillages should be treated with cold water and soap to help reduce risk of staining skin or clothing MANUFACTURER Oki Data Corpo...

Страница 4: ...es 18 Windows Twain and printer drivers 18 Mac OS X Printer Driver 20 Fax driver Windows only 21 MFP Setup tool Windows only 21 Actkey utility Windows only 22 Paper recommendations 24 Cassette trays 2...

Страница 5: ...d operation 69 Printing a fax activity report 72 Printing transmission reports 72 Sending a Fax from your PC 73 Adding fax numbers to the phone book 75 Adding new groups numbers to the phone book 75 I...

Страница 6: ...nting the macro 107 Defining overlays 107 Printing with PCL overlays 108 Maintenance 109 Replacing consumable items 109 Toner cartridge replacement 109 Image drum replacement 113 Cleaning 116 the unit...

Страница 7: ...s compatible and if it does work your product s performance and print quality may be degraded Use of non genuine products may invalidate your warranty Specifications subject to change without notice A...

Страница 8: ...that is packaged with the product User s Guide helps you become familiar with your product and make the best use of its many features Also included are guidelines for troubleshooting and maintenance t...

Страница 9: ...ck on the topic of interest to jump to the required topic If the bookmarks are not available use the Contents on page 4 In the list of bookmarks click on Index to jump to the Index If the bookmarks ar...

Страница 10: ...re removes the need for the mail server to handle large attachments Network PC Printing When connected to a Network the MFP is able to perform network or PC printing Multiple Pages Sending With the Au...

Страница 11: ...you could need to help you get the best possible results from your printer The following optional features are available Additional memory to allow printing of more complex pages One additional paper...

Страница 12: ...media MB460 Manual feeding of single sheets MB470 MB480 Holds up to 50 sheets of 75g m paper Also has an extendable paper support 5 Paper tray Standard blank paper tray MB460 MB470 Holds up to 250 she...

Страница 13: ...his is mainly used for heavy print media When used in conjunction with the multi purpose feed tray the paper path through the MFP is essentially straight This avoids bending the paper around curves in...

Страница 14: ...is selected the executing Push Scan screen is displayed When Setting up Decrements the value of the tree structure 5 Up Key When setting up or in Switching mode Moves the cursor up 6 Enter Key When i...

Страница 15: ...Fax Send MB470 MB480 Executes Fax Manual Receive MB470 MB480 Recovery from Error Warning states 9 Stop Button Stops the function being executed Stops Copy Stops Scan to E mail Memory Network PC Stops...

Страница 16: ...Danish French Dutch Italian Portuguese Spanish Polish Swedish Czech Hungarian Turkish Norwegian Russian Greek Finnish Brazilian Portuguese NOTE 1 The above list is not exhaustive or conclusive 2 See...

Страница 17: ...er consumption of the device SWITCHING OFF 1 Press the down arrow button on the control panel to highlight Menu press Enter to select 2 Press the down arrow button on the Control panel to highlight Sy...

Страница 18: ...this to Push Scanning where you start the scan by pressing a button on the MFP s front panel The TWAIN driver only works via USB connections This means it s not possible to control the scanner over th...

Страница 19: ...N scanner driver first and then the printer driver 1 Attach the printer to a USB port of your computer 2 Switch on the Printer 3 Insert the Drivers Utilities DVD If the DVD runs automatically cancel t...

Страница 20: ...aller program 2 Follow the on screen instructions to install the printer driver 3 Attach the printer to a USB port of your computer 4 Switch on the printer 5 Choose Apple Menu System Preferences Print...

Страница 21: ...om your computer Installing the fax driver This is installed as part of the Oki driver installer wizard MFP SETUP TOOL WINDOWS ONLY Installation of the MFP setup utility is optional and can be found o...

Страница 22: ...age 65 Setting up the Actkey utility 1 Install the Actkey utility from the DVD Set up will place an Actkey icon on your desktop 2 Double click this icon to open the Actkey console 3 Select Options But...

Страница 23: ...ies d Select the Events tab e Choose an event from the Select an event drop down menu f In the Actions field click Start this program and choose ActKey from the drop down menu g Click Apply h Repeat s...

Страница 24: ...in another tray the optional 2nd or the multi purpose tray you can have the MFP switch to another tray when the current tray runs out of paper When printing from Windows applications this function is...

Страница 25: ...266 7mm Legal 13 216 x 330mm Legal 13 5 216 x 343mm Legal 14 216 x 356mm Statement 139 7 x 215 9mm Com 9 Envelope 98 4 x 225 4mm Com 10 Envelope 104 7 x 241 3mm Monarch Envelope 98 4 x 190 5mm DL Env...

Страница 26: ...cover at the rear of the MFP should be opened when required for use In this condition paper will exit via this path regardless of driver settings Always use this stacker and the multi purpose feeder f...

Страница 27: ...that all sheets are properly separated then tap the edges of the stack on a flat surface to make it flush again 3 3 Load paper short edge feed SEF 1 for letter headed paper load face down with top edg...

Страница 28: ...gently Do not pull the paper tray out during printing except as described below for the 2nd tray NOTE If you have two trays optional second tray fitted and you are printing from the 1st upper tray yo...

Страница 29: ...Getting started 29 6 Replace the tray in the MFP...

Страница 30: ...or MB460 Load single sheet at a time in to the Multi purpose tray For MB470 MB480 Do not exceed the paper capacity of about 50 sheets or 10 envelopes Maximum stacking depth is 10mm Press the tray latc...

Страница 31: ...d be loaded face up with top edge to the left and short edge into the MFP Do not select duplex printing on envelopes Load transparencies face up and top edge into the MFP 4 Set the correct paper size...

Страница 32: ...that you have the relevant permission PIN numbers before commencing The factory set default passwords PIN are Administrator aaaaaa PIN 000000 Network webpage aaaaaa FAX SET UP MB470 MB480 Your MFP ha...

Страница 33: ...IP Address The Internet Protocol IP address assigned to your machine by your network administrator 3 Subnet Mask The net mask address assigned by your network administrator 4 Gateway Address The gate...

Страница 34: ...iven a unique IP address each time it connects to a network making IP address management an easier task for network administrators If the DHCP server is available from your network you do not need to...

Страница 35: ...work CONFIGURATION There are a number of configuration options available which allow you to change the scanner fax MB470 MB480 and printer settings to suit your own needs There are three methods of co...

Страница 36: ...pe the IP address of the MFP in the URL field of your browser and then press Enter The MFP web page displays For example http 10 18 207 81 NOTE The Administrative Settings are blocked by a password Re...

Страница 37: ...ss the Down arrow key 1 on the control panel until Menu is highlighted then press Enter 2 2 Press the Down arrow key 1 until Admin Setup is highlighted then press Enter 2 NOTE The Administrative Setti...

Страница 38: ...xed Photo HiRes Mixed HiRes Photo Density 0 Density of print 3 0 3 Tray1 Input Tray Selects cassette Tray or Manual feeder MB460 or Multi Purpose Tray MB470 MB480 Tray 1 Tray2 Manual Feeder MP Tray Of...

Страница 39: ...try Number LDAP Name Address Method OR AND Search Address List Subject Choose from the default subject list set by the administrator or enter a subject Subject List Screen Entry File Name A file name...

Страница 40: ...LEVEL 2 DESCRIPTION OPTIONS Email Scan to Email and save file Folder Scan to PC based folder Application Scan to Application1 Fax MB470 MB480 Scan to Facsimile and save file LEVEL 2 DESCRIPTION OPTION...

Страница 41: ...xplanatory xxxxxxxx Lot Number Self explanatory xxxxxxxxxxxxxxxxxxxx xxxxxx CU Version Self explanatory xx xx PU Version Self explanatory xx xx xx Scanner Version Self explanatory x xx xx Fax Version...

Страница 42: ...Format mm dd yyyy dd mm yyyy yyyy mm dd Report Full Print On Off Panel Contrast 10 0 10 Near Life Status Enable Disable Network Menu Network Setup TCP IP Enable Disable IP Version IPv4 IPv4 IPv6 IPv6...

Страница 43: ...None POP3S STARTTLS Authentication Method None SMTP POP SMTP User ID user defined SMTP Password user defined POP User ID user defined POP Password user defined LDAP Server Setup Server Settings LDAP...

Страница 44: ...C6 Envelope Scanner Setup Email Setup Add To Address On Off Default File Name User defined Subject List 00 01 02 03 04 Default From User defined Separation Limit 1 3 5 10 30 megabytes No limit Auto T...

Страница 45: ...Off Busy Tone Detection On Off MF Tone DP Pulse DP MF PCL Setup Font Source Resident Resident2 Downloaded Font Number I0 C1 S1 Font Pitch 0 44 10 00 99 99 CPI Symbol Set Available sets A4 Print Width...

Страница 46: ...Slashed Line Pitch 6 LPI 8 LPI White Page Skip On Off CR Function CR CR LF Line Length 80 136 column Form Length 11 11 7 12 inch TOF Position 0 0 0 1 1 0 inch Left Margin 0 0 0 1 1 0 inch Fit to Lette...

Страница 47: ...etterhead Bond Recycled Cardstock Rough Media Weight Light Medium Light Medium Medium Heavy Heavy MP Tray Config MB470 MB480 Paper Size A4 A5 A6 B5 Legal14 Legal 13 5 Legal13 Letter Executive Statemen...

Страница 48: ...ON MB470 MB480 Hex Dump Execute Darkness 2 0 2 Cleaning Execute X Adjust 2 00 0 00 2 00 millimeter Y Adjust 2 00 0 00 2 00 millimeter Duplex X Adjust 2 00 0 00 2 00 millimeter Duplex Y Adjust 2 00 0 0...

Страница 49: ...tion 100 150 200 300 dpi B W Format Grayscale On Off File Format PDF TIFF Compression Rate G3 G4 Raw Resolution 100 150 200 300 400 600 dpi Address Book Email Address 00 to 99 Group Address G00 to G19...

Страница 50: ...to confirm 8 Using the Down arrow key scroll to Basic Setup and press Enter 9 Using the Down arrow key scroll to Country Code and press Enter 10 Using the arrow keys scroll to the country in which th...

Страница 51: ...own arrow key scroll to Done and press Enter to confirm and add your entry to the phone book 12 Press the Left arrow key to exit the menu Adding a group entry to the phone book The machine can hold up...

Страница 52: ...y from the phone book To delete a group dial entry from the phone book 1 Using the Down arrow key scroll to Menu and press Enter 2 Using the Down arrow key scroll to Fax Menu and press Enter 3 Using t...

Страница 53: ...elect the required number of redial attempts between 0 and 10 then press Enter to confirm 8 Using the Down arrow key scroll to Redial Interval and press Enter 9 Using the arrow keys select the require...

Страница 54: ...G THE ADDRESS BOOK The following section describes how to add remove modify e mail addresses to from the Address Book ADDING AN EMAIL ADDRESS ENTRY TO THE ADDRESS BOOK The machine can hold up to 100 e...

Страница 55: ...ss the Left arrow key to exit the menu MODIFYING AN EMAIL ADDRESS ENTRY FROM THE ADDRESS BOOK To edit an email address entry from the address book 1 Using the Down arrow key scroll to Menu and press E...

Страница 56: ...DDRESS ENTRY FROM THE ADDRESS BOOK To delete a group address entry from the address book 1 Using the Down arrow key scroll to Menu and press Enter 2 Using the Down arrow key scroll to Scanner Menu and...

Страница 57: ...oved from the address b Press the Left arrow key to exit the list 7 If required use the Down arrow key to scroll to Group Name and press Enter Update the details a Using the keypad or arrow keys and o...

Страница 58: ...tor has enabled access control on your machine it will automatically start up in access control mode You will not be able to use it until you have provided valid login information With Access Control...

Страница 59: ...screen if Access Control is disabled If an error state occurs Operation Time out is disabled After Operation Time out the display automatically reverts to the Enter PIN screen if Access Control is en...

Страница 60: ...n size from 5 8 x 8 2 148mm x 210mm 8 5 x 14 216mm 355 6mm Document s can range in weight from 16 to 28 lbs 60 105 g m2 and 11mm sheet thickness Document s should be square or rectangular and in good...

Страница 61: ...of each page is fed in first 3 Adjust the Paper Guides 1 to centre the document in the ADF PLACING DOCUMENT S ON THE GLASS 1 Open the document cover 2 Place your document with the text face DOWN on t...

Страница 62: ...er jams if you wish to cancel the copy process press the Stop button once to stop the process and a second time to eject the paper MENU ITEM OPTIONS Copies 1 99 Reduce Enlarge A4 A5 Leg14 Let Leg13 5...

Страница 63: ...on the paper as a result of this setting are not printed The setting displayed mm or inch depends on the setting in Admin Setup System Setup Unit of Measure in Menu Mode If Edge Erase is set to other...

Страница 64: ...ss book entries Screen Entry enter directly using the keypad Number enter an address or group address number LDAP select from a Lightweight Directory Access Protocol LDAP server If prompted select Mor...

Страница 65: ...SCAN TO NETWORK PC Before sending your document to a file server profiles should be setup first to speed up the process A profile contains a list of filing parameters such as your filing protocol dire...

Страница 66: ...Complete the data on screen and send b Folder When the Folder function is selected the Actkey Utility executes PC scan in accordance with your settings for Scan to Folder The scanned image data is sav...

Страница 67: ...he PC Scan to Application1 Scan to Application2 Scan to Email Scan to Folder Scan to Fax MB470 MB480 Scan to Application2 works exactly the same as scan to Application1 simply allowing an alternative...

Страница 68: ...r from the phone book entries i Search the phone book entries refer to Searching the phone book on page 68 ii Repeat until all required entries are selected iii Press the Left arrow key to exit the li...

Страница 69: ...hine is preset to the Normal level of Density If your original document comes with a lighter or darker contrast you can improve the quality by adjusting the density setting To change density 1 Follow...

Страница 70: ...or occurs while a fax is being received fax communication related errors are displayed If an error occurs while a fax is printing error messages displayed are the same as those in print mode Manual Re...

Страница 71: ...phone calls and one for fax If the phone line is in use and there is an incoming fax the sender will receive a busy signal To set up DRD mode 1 Using the Down arrow key scroll to Menu and press Enter...

Страница 72: ...Print Information and press Enter 9 Using the Down arrow key scroll to Fax Activity Report and press Enter 10 Press Enter to execute PRINTING TRANSMISSION REPORTS 1 Using the Down arrow key scroll to...

Страница 73: ...drop down menu b Set the resolution to Fine Normal or Fast c Set the orientation to Portrait or Landscape 5 On the Cover Sheet tab a Set the cover sheet usage settings as appropriate b Select a cover...

Страница 74: ...tton to add this number to the recipient list d Repeat b and c as required to create the recipient list e If you need to remove a number from the recipient list highlight the appropriate name and then...

Страница 75: ...ber New Fax number 6 Type in the fax number destination Name 7 Type in the required FAX number 8 If required type in a Comment 9 Click the OK button to save ADDING NEW GROUPS NUMBERS TO THE PHONE BOOK...

Страница 76: ...ters 2 Right click your machine icon and select Printer Preferences 3 In the Setup tab click the Phone Book button 4 From the pull down menu click Tool Export 5 In the Export File screen enter a name...

Страница 77: ...e which you may want to change for specific applications or documents Settings you change here will usually only last for as long as the particular application program is running PCL EMULATION Setup t...

Страница 78: ...or objects such as graphics and text The Normal setting prints at 600 x 600dpi and is suitable for most printing jobs The Draft setting prints at 300 x 300dpi and is suitable for printing draft docume...

Страница 79: ...thering while Line Art determines that an array of lines is used for dithering 2 Select dithering texture by setting the size of dots used in the halftone screen 3 Set this control to print greyscale...

Страница 80: ...priority from 1 lowest to 99 highest Highest priority documents will print first 3 Specifies that documents should be spooled stored in a special print file before being printed The document is then...

Страница 81: ...r will favour larger spooling documents over shorter ones Use this option if you want to maximise printer efficiency When this option is disabled the spooler chooses documents based only on their prio...

Страница 82: ...front to back or back to front of the document 4 Set the number of pages to be printed on a single sheet You can also set it to print a booklet 5 Click the Advanced button to be able to set further do...

Страница 83: ...ve for the Layout Tab Job options tab 1 The output resolution of the printed page can be set as follows The High Quality setting prints at 1200 x 1200dpi for MB470 and MB480 and is the best option for...

Страница 84: ...d to top up the paper tray during such a long print run 4 Your printed pages can be scaled to fit larger or smaller stationery 5 Using the Advanced button gives you access to the facility to set mirro...

Страница 85: ...d printing only for Letter A4 Legal 13 13 5 and 14 and Custom paper sizes using paper stocks from 75 105g m To carry out Auto Duplex Printing 1 Select File Print and click the Properties button 2 Sele...

Страница 86: ...nsure that there is enough paper in the Paper Tray to carry out the print job 2 Select File Print and click the Properties button 3 Select the Multi Purpose Tray Manual from the Source drop down 4 In...

Страница 87: ...cker 3 and place it in the Paper Tray ensuring that the printed side is facing up and the bottom of the page facing into the machine 4 8 Close the Paper Tray and press the Start button The message win...

Страница 88: ...l or Short Edge Manual according to your printing preferences If you require further information click the Duplex Help button 7 When every second page has printed take the paper from the output stacke...

Страница 89: ...OPTIONS You can choose your printer and select options for how you want your documents to print from the Print dialog box To set your printer options 1 Open the document you want to print 2 To change...

Страница 90: ...he Print button SETTING PRINTING OPTIONS SAVING DRIVER SETTINGS You can save a set of printer driver options to use for future documents 1 Open the document you want to print 2 To change the paper siz...

Страница 91: ...Default to use the current Page Setup settings as a standard for all documents Format for Allows you to select your printer model before changing options such as Paper Size and Orientation Paper size...

Страница 92: ...y prints Pages You can select whether to print all pages of a document or just a section of it Layout Pages per sheet You can shrink multiple pages and print them on a single sheet of paper For exampl...

Страница 93: ...This option lets you choose whether to print your document immediately or defer printing until later You can also assign a priority to a print job These features are useful if you are printing large d...

Страница 94: ...cuments to fit on the size of paper in your printer For example you can take a document formatted for A3 and print it on A4 paper using an A4 printer COVER PAGE Choosing a cover page may help you iden...

Страница 95: ...s you to select the paper tray to use for your print job Print quality Use this option to select the print resolution The ProQ1200 MB460 and High Quality MB470 MB480 setting produces the best graphic...

Страница 96: ...rmines that a screen of dots is used for dithering while Line Art determines that an array of lines is used for dithering Select dithering texture by setting the size of dots used in the halftone scre...

Страница 97: ...continues printing Paper size check Select Paper Size check if you want the printer to warn you when the document paper size is different from the paper in the printer A warning message is displayed...

Страница 98: ...COPIES PAGES Refer to Copies Pages on page 92 LAYOUT Refer to Pages per sheet on page 92 The Two sided option is used for Duplex printing Long edged Binding prints pages that read like a normal book S...

Страница 99: ...atically changes to a tray that has the same type of paper and continues printing By selecting Display alert a pop up box will display on your application if there is a mismatch between the tray setti...

Страница 100: ...ess Start When this option is deselected the printer uses the paper loaded in the selected tray regardless of the document size Media Type Specify the appropriate weight and kind of paper you are usin...

Страница 101: ...ightens the print significantly Page rotate Select Page rotate to turn the text and images 180 degrees and point them across the length of the page Adjust ultra fine lines If you are printing a drawin...

Страница 102: ...printing Try to cancel printing job within software application Document is waiting in a print queue Delete print job from Print Queue You can access the print queue from the System Tray in Windows or...

Страница 103: ...o create a project file import the PRN file s and download the generated filter HST file to the printer The project file will contain one or more overlay images which are functionally related such as...

Страница 104: ...n recognise it later if you want to modify it 10 Choose Projects Send Project Files to Printer to download the project to the printer If you have a hard disk in the printer SDM will automatically down...

Страница 105: ...RLAYS Once you have defined your overlays you are ready to use them for any documents you wish The example illustrated here uses two overlays for business letters The first prints on just the top page...

Страница 106: ...SDM to discover the printer 2 Choose Projects New Project to start a new project 3 Choose Projects Filter Macro File The Filter Printer Patterns dialogue box appears Make any adjustments in the settin...

Страница 107: ...in Windows XP window via the Start menu or the Windows Control Panel 2 Right click on the Relevant PostScript printer icon and choose Printing Preferences from the pop up menu 3 On the Job Options ta...

Страница 108: ...r application s Print dialogue and choose any options you will require ensuring that the target printer is your PCL printer driver in which the overlays have been defined 3 Click the Properties button...

Страница 109: ...his is not enough use a cool damp cloth to remove any residue Do not use hot water and NEVER use solvents of any kind They will make stains permanent 1 Lift the Scanner NOTE When the on screen display...

Страница 110: ...d open the top cover b fully 3 Pull the coloured toner release lever 1 on the cartridge to be replaced fully towards the front of the MFP WARNING If the MFP has been powered on the fuser may be hot Th...

Страница 111: ...sen and distribute the toner evenly inside the cartridge 8 Remove the wrapping material and peel off the adhesive tape from the underside of the cartridge 9 Holding the cartridge by its top centre wit...

Страница 112: ...the cartridge down onto the image drum unit 11 Pressing gently down on the cartridge to ensure that it is firmly seated push the coloured lever towards the rear of the MFP This will lock the cartridg...

Страница 113: ...T 1 Lift the scanner 2 Press the cover release a and open the top cover b fully CAUTION Static sensitive devices handle with care WARNING If the MFP has been powered on the fuser will be hot This area...

Страница 114: ...and place it on the piece of paper where the old cartridge was placed Keep it the same way round as the old unit Pack the old cartridge inside the packaging material for disposal 8 Place the toner car...

Страница 115: ...cavity 11 Close the top cover and press down firmly so that the cover latches closed 12 Gently lower the scanner NOTE If you need to return or transport this product for any reason please make sure yo...

Страница 116: ...neutral detergent 3 Use a soft dry cloth to dry the unit surface 4 Turn on the MFP THE PAPER PATH IN THE ADF If marks are found on an image which has been read by the ADF or the ADF does not feed docu...

Страница 117: ...mechanism to its original position 6 Close the ADF top cover THE UNDERSIDE OF THE ADF 1 Open the document cover 2 Moisten a soft clean lint free cloth and remove any marks as shown 3 Close the docume...

Страница 118: ...y marks as shown 3 Close the document cover THE LED HEAD Clean the LED head when printing does not come out clearly has white lines or when text is blurred There is no need to switch the MFP off to cl...

Страница 119: ...th and gently wipe the LED head surface 4 Close the top cover and press down firmly so that the cover latches closed 5 Gently lower the scanner CAUTION Do not use methyl alcohol or other solvents on t...

Страница 120: ...speed up the processing of large files Second paper tray to increase your printer s paper handling capacity by 530 sheets 75g m2 INSTALLING OPTIONS ORDER NUMBERS INSTALLATION PROCEDURE To install any...

Страница 121: ...e MFP immediately stops If printing multiple pages or copies do not assume that having cleared an obvious sheet others will not also be stopped somewhere along the path These must also be removed in o...

Страница 122: ...r simply grip it and pull gently to draw it fully out If it does not remove easily do not use excessive force It can be removed from the rear later 3 Press the cover release a and open the MFP s top c...

Страница 123: ...lete assembly by its top centre lower it into place in the MFP locating the pegs at each end into their slots in the sides of the MFP cavity CAUTION The green image drum surface at the base of the car...

Страница 124: ...t is low down in this area and difficult to remove it is probably still gripped by the fuser In this case raise the top cover reach around and press down on the fuser pressure release lever 10 If you...

Страница 125: ...ve any paper from the underside of the printer Ensure that all paper is stacked properly is undamaged and that the paper guides are properly positioned against the edges of the paper stack When satisf...

Страница 126: ...ute any remaining toner If symptoms persist replace the toner cartridge The paper is not suitable for the printer unit Use recommended paper Printing is light The toner cartridge is not properly seate...

Страница 127: ...is damaged Replace the fuser unit The image drum cartridge has been exposed to light Replace the image drum cartridge if the problem is not resolved White area of paper is lightly stained Paper contai...

Страница 128: ...y require servicing Try sending a fax to another location to check the local MFP Faxing is possible but the image of the document printed by the remote machine is very poor If the faxed document has s...

Страница 129: ...the external telephone If an external telephone is connected change the MFP s ring response setting Ring Response on page 45 Faxes received sometimes look distorted If the document received is wider o...

Страница 130: ...MODEL NUMBER MB460 N22131B MB470 N22132B MB480 N22133B ITEM SPECIFICATION Dimensions MB460 MB470 MB480 447 x 432 x 500mm W x D x H 447 x 432 x 529mm W x D x H Weight MB460 MB470 MB480 approximately 17...

Страница 131: ...wing Power cord Printer cable Paper in the paper cassette 2 Lift the scanner NOTE Lock the scanner before moving the MFP WARNING This product is heavy a minimum of two people are required to lift it s...

Страница 132: ...on a flat table WARNING If the MFP has been powered on the fuser will be hot This area is clearly labelled Do not touch CAUTION The green image drum surface at the base of each cartridge is very delic...

Страница 133: ...e the top cover and press down firmly so that the cover latches closed 8 Gently lower the scanner 9 Protect the MFP with cushion pads and put it in a box NOTE It is recommended that you use the origin...

Страница 134: ...ose Tray 88 Paper Tray 86 Manual Duplex printing 86 Menus admin setup 42 copy 48 email 39 fax 40 49 network pc 40 pc 40 print information 41 printer 46 scanner 49 system shutdown 49 view information 4...

Страница 135: ...etwork PC 65 scan to PC 65 Sending a Fax from your PC 73 Separator page separating print jobs on a shared printer 81 Setting the fax facility 50 Spooling Windows settings 80 Switching off 17 U Unsatis...

Страница 136: ...www okiprintingsolutions co uk Oki Systems Ireland Limited The Square Industrial Complex Tallaght Dublin 24 Ireland Tel 353 1 4049590 Fax 353 1 4049591 http www oki ie OKI Systems Northern Ireland 40...

Страница 137: ......

Отзывы: