background image

18/01/2021 

2


 Thank you for buying this product O'jump. We advise you to read the assembly instructions 
carefully.  The  apparatus  is  presented  in  pre-assembled parts  for  a  simplified  assembly.  We 
have designed this O'jump product to bring you complete satisfaction. If you need help, the 
O'jump team is at your disposal to accompany you .   


Warning: 

This equipment must only be used by one person at a time and under the supervision of a 
qualified individual, with appropriate landing mats. 
Using this equipment for purposes other than those originally intended is prohibited. 


Risk of injury from sudden fall of apparatus. 
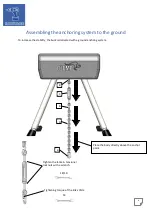
To avoid the apparatus tumble, the apparatus must fixed to the ground permanently. 


The fixations are not included because their choice depending the ground material. Use the 
appropriate fixation according the support. To get advices or fixations sets contact the 
O’JUMP department. 


Recommendations: 

- keep these instructions for subsequent reference (inspection, maintenance, etc.). 
- periodically carry out predictive maintenance. 
- depending on how much it is used, have the equipment serviced yearly or every few years. 


Footprint and weight: 

- Apparatus 80 x 60 x 100 cm (Lxlxh)   
35Kg 


Содержание 699

Страница 1: ...18 01 2021 1 UK Assembly Instructions BUCK Ref 699 N 296 ...

Страница 2: ...this equipment for purposes other than those originally intended is prohibited Risk of injury from sudden fall of apparatus To avoid the apparatus tumble the apparatus must fixed to the ground permanently The fixations are not included because their choice depending the ground material Use the appropriate fixation according the support To get advices or fixations sets contact the O JUMP department...

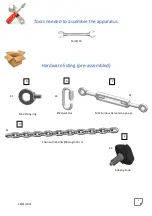
Страница 3: ...Tools needed to assemble the apparatus 14 18 19 Hardware listing pre assembled M12 lifting ring X1 Ø8 Quick link X3 M12 Turnbuckle lantern eye eye X1 Chain with 20 links Ø8 length 50 cm X1 Indexing knob X4 A B C D E ...

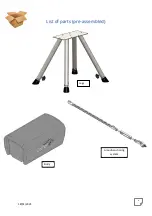
Страница 4: ...18 01 2021 4 List of parts pre assembled Legs Body Groudn anchoring system ...

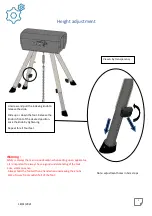
Страница 5: ...se Always hold the foot with one hand when unscrewing the knobs Risk of injury from sudden fall of the foot Height adjustment Unscrew and pull the indexing knob to release the slide Slide up or down the foot Release the knob in front of the desired position Lock the knob by tightening Repeat for all four feet View A by transparency A Note adjustment holes in 5cm steps ...

Страница 6: ... to the ground To increase the stability the buck is delivered with a ground anchring system B D B C B Place the body directly above the anchor point Tighten the lantern tensioner locknuts with a wrench 18 19 Tightening torque of the links 3Nm 14 ...

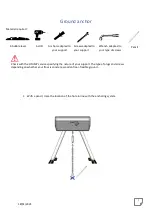
Страница 7: ... The type of plugs and screws depending on whether your floor is concrete wooden floor flexible ground 1 With a pencil trace the location of the hole in line with the anchoring system A bubble level A drill Anchors adapted to your support Screws adapted to your support Wrench adapted to your type of screws Pencil ...

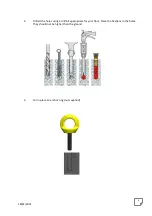
Страница 8: ...18 01 2021 8 2 Drill all the holes using a drill bit appropriate for your floor Place the fixations in the holes They should not be higher than the ground 3 Put in place an anchor ring not supplied ...

Отзывы: