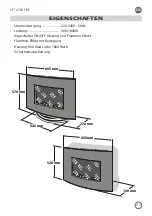
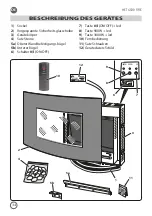
ohmex HET 4530 FIRE Скачать руководство пользователя страница 39

35

HET 4530 FIRE

DE

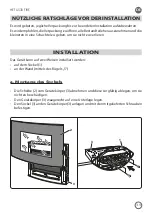
NÜTZLICHE RATSCHLÄGE VOR DER INSTALLATION

Es wird gebeten, jegliche Verpackung bis zur beendeten Installation aufzubewahren.

Es wird empfohlen, die Verpackung zu öffnen, alle Bestandteile herauszunehmen und die 

kleineren in eine Schachtel zu geben, um sie nicht zu verlieren.

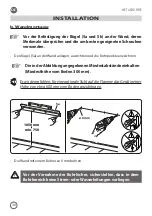
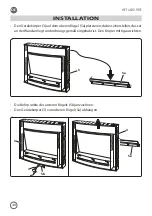
Das Gerät kann auf zwei Weisen installiert werden:

•  auf dem Sockel (1)

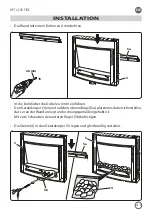
•  an der Wand (mittels des Bügels „5“)

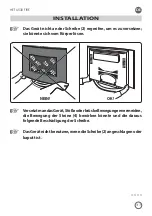
a. Montage des Sockels

-  Die Scheibe (2) vom Gerätekörper (3) abnehmen und diese sorgfältig ablegen, um sie 

nicht zu beschädigen.

-  Den Gerätekörper (3) waagerecht auf eine Unterlage legen.

-  Den Sockel (1) an den Gerätekörper (3) anlegen und mit den mitgelieferten Schrauben 

befestigen.

INSTALLATION

2

3

1

3

Содержание HET 4530 FIRE

Страница 1: ...leitung Libretto istruzioni d uso Instruction manual HET 4530 FIRE ELECTRIC FIRE PLACE WITH FLAME EFFECT Chemin e lectrique avec effet flamme Elektro Kamin Flammen Effekt Camino elettrico con effetto...

Страница 2: ......

Страница 3: ...ecke auf INDICE Istruzioni per l uso e la manutenzione Istruzioni originali Gentile Cliente Grazie per avere acquistato HET 4530 FIRE Si prega di leggere attentamente questo manuale prima di mettere i...

Страница 4: ...mato dai risultati scientifici attualmente disponibili Questo apparecchio conforme alle direttive 2014 30 EU 2014 35 EU e 2011 65 UE Konformit tserkl rung Der Hersteller erkl rt auf seine Verantwortun...

Страница 5: ...l quipement Il avertit galement l utilisateur au mode de fonctionnement incorrect Instructions relatifs la s ret indispensable premier de l usage Lire attentivement les avertissements contenus dans l...

Страница 6: ...ence insuffisantes SEULEMENTsouslasurveillanced untiersresponsable de leur s curit ou bien lorsqu ils ont re u des instructions li es l utilisation de l appareil en toute s curit etqu ilsontint gr les...

Страница 7: ...prisedecourantmunied unemise laterre L emploi de tout appareil lectrique exige le respect de quelques r gles fondamentales En particulier ne pas toucher l appareil avec les mains mouill es ou humides...

Страница 8: ...her la fiche de la prise de courant lorsque l appareil n est pas utilis Si le c ble d alimentation de l appareil pr sente des signes de d t rioration le faire uniquement remplacer dans un centre de se...

Страница 9: ...ver l appareil en le prenant depuis le panneau frontal Nepaslaisserl appareilsanssurveillancelorsqu ilestenmarche Nepasplacerl appareilenmarchesousune tag re unetable etc Laisser un espace d au moins...

Страница 10: ...tre utilis sous la pluie et il ne doit pas tre entrepos en plein air ou dans des endroits humides Nepasutiliserl appareildansdeslocauxrenfermantdesexplosifs des gaz combustibles ou des liquides inflam...

Страница 11: ...nsdespi cespetiteslorsqu elles sont occup es par des personnes qui ne sont pas capables de laisser la pi ce seule moins qu un contr le constant ne soit pr vu Lesenfantsdemoinsde3ansdoivent treencontin...

Страница 12: ...nt Recyclage professionnel Les batteries et l emballage ne doivent pas tre jet s dans les ordures m nag res Les batteries doivent tre d pos es dans un centre de collecte des batteries us es S parer le...

Страница 13: ...n 220 240V 50Hz Puissance 900 1800W Interrupteur ON OFF pour r gler la chaleur et l effet flamme Effet fl me en mouvement S lecteur de chaleur 900 Watts ou 1800 Watts Dispositif de coupure thermique d...

Страница 14: ...ucture de l appareil 4 Kit cailloux 5a trier sup rieur pour fixation murale 5b trier inf rieur 6 Interrupteur 0 I ON OFF 7 Bouton 0 I ON OFF led 8 Bouton 900W led 9 Bouton 1800W led 10 T l commande 11...

Страница 15: ...onnant les plus petits dans un conteneur en vitant de les perdre L appareil peut tre install de deux mani res diff rentes avec la base 1 murale avec l trier 5 a Montage de la base Retirer le verre 2 d...

Страница 16: ...able Placerlescailloux 4 dans la structure 3 enlesdistribuantde mani re uniforme Prendre le verre 2 et le placer sur la structure en faisant accrocher les triers 14 sur les pivots appropri s 13 S assu...

Страница 17: ...placer ilpourrait se d tacher de la structure Lorsque l appareil est d plac viter les secousses ou les mouvements brusques qui pourraient d terminer le mouvement des cailloux 4 et donc l endommagement...

Страница 18: ...er les points de per age Maintenir les distances minimales indiqu es sur la figure hauteur minimale depuis le sol 300 mm Il est conseill de placer l appareil environ 600 mm du sol pour une vision opti...

Страница 19: ...r l trier sup rieur 5a au mur en serrant les vis INSTALLATION Retirer le verre 2 de la structure 3 et le positionner soigneusement afin d viter de l endommager Fixer l trier inf rieur 5b sur la struct...

Страница 20: ...3 sur l trier sup rieur 5a en s assurant qu elle pose sur le mur et qu elle s accroche correctement La centrer dans la position d sir e Marquer les points de per age de l trier inf rieur 5b Retire la...

Страница 21: ...de 6 mm dans les trous Replacer la structure 3 sur l trier sup rieur 5a en s assurant qu elle pose sur le mur et qu elle s accroche correctement Serrer avec deux vis l trier inf rieur 5b Placer les c...

Страница 22: ...ructure en faisant accrocher les triers 14 sur les pivots appropri s 13 Il est conseill d ex cuter cette op ration deux S assurerquelesquatre triers 14 deuxdechaquec t soientcorrectement accroch s Ne...

Страница 23: ...s utilis e pendant des p riodes de temps prolong s les batteries se d chargent et la t l commande ne fonctionne pas dans ce cas remplacer les batteries par deux nouvelles Les batteries de la t l comma...

Страница 24: ...tlat l commandedepuis une distance rapproch e il faut remplacer les batteries Les batteries de la t l commande doivent tre gard es hors de la port e des enfants Si vous manipulez de mani re incorrecte...

Страница 25: ...re 3 Commande gr ce aux boutons Bouton 0 I ON OFF 7 Appuyer une fois sur le bouton pour allumer l appareil et l effet flamme la LED rouge correspondante s allume Maintenir le bouton appuy pendant 3 se...

Страница 26: ...900W 10b Appuyer une fois sur le bouton pour r gler la fonction sur la chaleur minimum 900W Appuyer une seconde fois sur le bouton pour teindre la fonction Bouton 1800W 10c Appuyer une fois sur le bou...

Страница 27: ...vantlesop rationsdenettoyage TOUJOURS d brancher la fiche de la prise de courant et attendrequel appareilsesoitcompl tement refroidi Pour le nettoyage g n ral utiliser un d tergent d licat Nettoyer le...

Страница 28: ...ent ci dessus la fin de la vie dans les centres de collecte diff renci s appropri s pour les d chets lectroniques et lectro technique ou le retourner chez le concessionnaire lors de l achatd unnouvela...

Страница 29: ...n verursachen kann Au erdem weist es den Benutzer auf falsche Betriebsart hin Vor dem Gebrauch unerl ssliche Sicherheitshinweise LesenSiedieHinweiseindiesemHandbuchaufmerksamdurch Es enth ltwichtigeIn...

Страница 30: ...an Erfahrung oder Wissen benutzt werden wenn sie von einer Person die f r ihre Sicherheit verantwortlich ist beaufsichtigt oder von ihr bez glich des sicheren GebrauchsdesGer tesunterwiesenwurdenunds...

Страница 31: ...ng DiesesProduktmussaneineSteckdosemitErdungangeschlossenwerden DerGebrauchjedesElektroger tsbringtdieBeachtungvonGrundregeln mit sich Insbesondere Das Ger t nicht mit nassen oder feuchten H nden anfa...

Страница 32: ...nicht gebraucht wird den Stecker aus der Steckdose ziehen Wenn das Stromversorgungskabel dieses Ger ts besch digt ist darf es nur von einer autorisierten Servicestelle des Herstellers ersetzt werden w...

Страница 33: ...hes Fachpersonal wenden Das Ger t nicht anheben indem es an der vorderen Verkleidung ergriffen wird DasGer tnichtunbeaufsichtigtlassen w hrendesinBetriebist WenndasGer tl uft nieunterRegale Tischeusw...

Страница 34: ...iebunterdemRegenausgelegtundesdarf nicht im Freien oder in feuchten R umen abgestellt werden Das Ger t nicht in R umen verwenden in denen Sprengstoffe Brenngaseoderfeuergef hrlicheFl ssigkeitenaufbewa...

Страница 35: ...kleinenR umenbenutzen wenndiese von Personen besetzt sind die das Zimmer nicht aus eigenen Kr ften verlassen k nnen es sei denn es ist eine st ndige Kontrolle vorgesehen Kinder unter 3 Jahren m ssen s...

Страница 36: ...ieBatterienunddieVerpackungd rfennichtindenAbfalleimer geworfenwerden DieBatteriensindineineEntsorgungsstellef r gebrauchte Batterien zu bringen Die M lltrennung der wieder verwertbaren Materialien tr...

Страница 37: ...N Stromversorgung 220 240V 50Hz Leistung 900 1800W Kippschalter ON OFF Heizung und Flammen Effekt Flammen Effekt mit Bewegung Heizung 900 Watts oder 1800 Watts Sicherheitsabschaltung 655 mm 270 mm 655...

Страница 38: ...eitsglasscheibe 3 Ger tek rper 4 Satz Steine 5a Oberer Wandbefestigungsb gel 5b Unterer B gel 6 Schalter 0 I ON OFF 7 Taste 0 I ON OFF led 8 Taste 900W led 9 Taste 1800W led 10 Fernbedienung 11 Satz S...

Страница 39: ...eine Schachtel zu geben um sie nicht zu verlieren Das Ger t kann auf zwei Weisen installiert werden auf dem Sockel 1 an der Wand mittels des B gels 5 a Montage des Sockels Die Scheibe 2 vom Ger tek rp...

Страница 40: ...Fl che stellen Die Steine 4 in den Ger tek rper 3 legen und gleichm ig verteilen Die Scheibe 2 nehmen und sie auf dem K rper platzieren wobei die B gel 14 auf den entsprechenden Stifte 13 einrasten S...

Страница 41: ...n um es zu versetzen sie k nnte sich vom K rper l sen VersetztmandasGer t St eoderbr skeBewegungenvermeiden die Bewegung der Steine 4 bewirken k nnte und die daraus folgende Besch digung der Scheibe D...

Страница 42: ...usrichten und die Bohrpunkte anzeichnen DieinderAbbildungangegebenenMindestabst ndeeinhalten Mindesth he vom Boden 300 mm Eswirdempfohlen f reineoptimaleSichtaufdieFlammedasGer tineiner H he von etwa...

Страница 43: ...5a durch Anziehen der Schrauben an der Wand befestigen INSTALLATION Die Scheibe 2 vom Ger tek rper 3 abnehmen und diese sorgf ltig ablegen um sie nicht zu besch digen Den unteren B gel 5b am Ger tek r...

Страница 44: ...auf dem oberen B gel 5a platzieren dabei sicherstellen dass er an derWand anliegt und ordnungsgem eingehakt ist Den K rper mittig ausrichten Die Bohrpunkte des unteren B gels 5b anzeichnen Den Ger tek...

Страница 45: ...el zu 6 mm einf hren Den Ger tek rper 3 erneut auf dem oberen B gel 5a platzieren dabei sicherstellen dass er an der Wand anliegt und ordnungsgem eingehakt ist Mit zwei Schrauben den unteren B gel 5b...

Страница 46: ...i die B gel 14 auf den entsprechenden Stifte 13 einrasten Es wird empfohlen diesen Arbeitsschritt zu zweit vorzunehmen Sicherstellen dass alle vier B gel 14 zwei pro Seite ordnungsgem eingerastet sind...

Страница 47: ...ie Fernbedienung f r l ngere Zeit nicht benutzt entladen sich die BatterienunddieFernbedienungfunktioniertnichtmehr indiesemFall die Batterien durch zwei neue ersetzen Die Batterien der Fernbedienung...

Страница 48: ...FunktioniertdasGer tnicht auchwenndieFernbedienungausn chster N he verwendet wird sind die Batterien auszutauschen Die Batterien der Fernbedienung sind au erhalb der Reichweite von Kindern zu halten...

Страница 49: ...mittels der Tasten Taste 0 I ON OFF 7 Ein Mal die Taste dr cken um den Flammen Effekt einzuschalten und das Ge r t die entsprechende rote Led leuchtet auf DieTaste 3 Sekunden lang gedr ckt halten um i...

Страница 50: ...Die Taste ein Mal dr cken um die Mindest Heizfunktion 900W einzuschal ten Die Taste ein zweites Mal dr cken um die Funktion abzuschalten Taste 1800W 10c Die Taste ein Mal dr cken um die H chst Heizfu...

Страница 51: ...WARTUNG ZiehenSievordemAusf hrenderReinigung IMMER den Stecker aus der Steckdose und warten Sie bis sich das Ger t vollkommen abgek hlt hat F r die allgemeine Reinigung ein sanftes Reinigungsmittel v...

Страница 52: ...Leben bei den entsprechenden differenzierten Sammelstellen f r elektronische und elektrotechnische Abfall entsorgen oder es an den H ndler zur ckgeben wenn sie ein neues Ger t kaufen Verbrauchte Batte...

Страница 53: ...oltre all utente modalit operative non corrette Avvertenze relative alla sicurezza indispensabili prima dell uso Leggere attentamente le avvertenze contenute nelle presenti istruzioniinquantoforniscon...

Страница 54: ...enza o conoscenza dello stesso SOLO se sorvegliate da una persona responsabiledellalorosicurezzaoseistruiteinmerito all utilizzosicurodell apparecchioeconsapevolidegli eventuali rischi derivanti da un...

Страница 55: ...erra L uso di qualsiasi apparecchio elettrico comporta l osservanza di alcune regole fondamentali In particolare non toccare l apparecchio con mani bagnate o umide non usare l apparecchio a piedi nudi...

Страница 56: ...recchio non utilizzato Se il cavo di alimentazione di questo apparecchio danneggiato deve essere sostituito esclusivamente da un centro assistenza tecnica autorizzato dal costruttore poich sono necess...

Страница 57: ...n sollevare l apparecchio prendendolo dal pannello frontale Non lasciare l apparecchio incustodito mentre in funzione Non posizionare l apparecchio in funzione sotto a mensole tavoli etc Lasciare uno...

Страница 58: ...to studiato per essere utilizzato sotto alla pioggia e non deve essere depositato all aperto o in luoghi umidi Non utilizzare l apparecchio in ambienti contenenti esplosivo gascombustibilioliquidiinfi...

Страница 59: ...stanze quando sono occupate da persone che non sono in grado di lasciare la stanza per conto proprio a meno che non sia previsto un controllo costante I bambini con meno di 3 anni devono essere conti...

Страница 60: ...oltocalde eprovocareustioni Particolareattenzionedeveessereprestata in presenza di bambini e persone vulnerabili Non lasciare l apparecchio a portata di mano di bambini o di persone incapaci quando in...

Страница 61: ...azione 220 240V 50Hz Potenza 900 1800W Interruttore ON OFF per il calore e l effetto fiamma Effetto fiamma in movimento Selettore di calore a 900W oppure 1800W Dispositivo di taglio termico di sicurez...

Страница 62: ...uttura apparecchio 4 Kit sassi 5a Staffa superiore per fissaggio a parete 5b Staffa inferiore 6 Interruttore 0 I ON OFF 7 Pulsante 0 I ON OFF led 8 Pulsante 900W led 9 Pulsante 1800W led 10 Telecomand...

Страница 63: ...piccoli in un contenitore evitando di perderli L apparecchio pu essere installato in due modi con la base 1 a parete con la staffa 5 a Montaggio della base Rimuovere il vetro 2 dalla struttura 3 e pos...

Страница 64: ...ato e stabile Posizionare i sassi 4 nella struttura 3 distribuendoli in modo uniforme Prendere il vetro 2 e posizionarlo sulla struttura facendo agganciare le staffe 14 sugli appositi perni 13 Assicur...

Страница 65: ...spostarlo potrebbe staccarsi dalla struttura Quando si sposta l apparecchio evitare scossoni o bruschi movimenti che potrebbero determinare il movimento dei sassi 4 ed il conseguente danneggiamento d...

Страница 66: ...5a contro alla parete livellarla e tracciare i punti di foratura Mantenereledistanzeminimeindicateinfigura altezzaminima dal pavimento 300mm Si consiglia di posizionare l apparecchio a circa 600mm da...

Страница 67: ...staffa superiore 5a alla parete serrando le viti INSTALLAZIONE Rimuovere il vetro 2 dalla struttura 3 e posizionarlo accuratamente onde evitare di danneggiarlo Fissare la staffa inferiore 5b alla str...

Страница 68: ...ra 3 sulla staffa superiore 5a assicurandosi che si appoggi alla parete e si agganci correttamente Centrarla nella posizione desiderata Segnare i punti di foratura della staffa inferiore 5b Rimuovere...

Страница 69: ...fori i tasselli da 6mm Riposizionare la struttura 3 sulla staffa superiore 5a assicurandosi che si appoggi alla parete e si agganci correttamente Serrare con due viti la staffa inferiore 5b Posizionar...

Страница 70: ...ttura facendo agganciare le staffe 14 sugli appositi perni 13 Si consiglia di eseguire questa operazione in due persone Assicurarsichetutteequattrolestaffe 14 dueperlato sianocorrettamente agganciate...

Страница 71: ...o del vano batteria Se il telecomando non viene utilizzato per periodi di tempo prolungati le batteriesiscaricanoeiltelecomandononfunziona inquestocaso sostituire le batteria con due nuove Le batterie...

Страница 72: ...apparecchiononfunzionaancheutilizzandoiltelecomandodauna distanza ravvicinata necessario sostituire le batterie Lebatteriedeltelecomandodeveesseretenutafuoridallaportata dei bambini Se maneggiate in m...

Страница 73: ...ite i pulsanti Pulsante 0 I ON OFF 7 Premere una volta il pulsante per accendere l apparecchio e l effetto fiamma il rispettivo led rosso si accende Tenere premuto il pulsante per 3 secondi per entrar...

Страница 74: ...nte 900W 10b Premere una volta il pulsante per impostare la funzione calore minimo 900W Premere una seconda volta il pulsante per spegnere la funzione Pulsante 1800W 10c Premere una volta il pulsante...

Страница 75: ...di effettuare l operazione di pulizia disinserire SEMPRE la spina dalla presa di corrente ed attendere che l apparecchio si sia completamente raffreddato Per la pulizia generale utilizzare un detergen...

Страница 76: ...giuntaafinevitaagliidoneicentridiraccoltadifferenziata dei rifiuti elettronici ed elettrotecnici oppure riconsegnarla al rivenditore al momento dell acquisto di una nuova apparecchiatura Le batterie e...

Страница 77: ...people or to the appliance Moreover it indicates incorrect operating procedures to the user Warnings related to safety essential before use Carefully read the instructions in this booklet as they prov...

Страница 78: ...safe use of the appliance and if they are aware of the risks originating from an improper use Children must not use the appliance as a toy and must not either clean or use the appliance alone unlesst...

Страница 79: ...e exposed to the weather conditions rain such etc never let children or disabled persons use the appliance unattended Turn off the appliance and do not tamper with it in any way if it becomes faulty a...

Страница 80: ...checkthisfundamentalsafetyconditionand incaseofdoubts ask for an accurate check of the system by professionally qualified personnel The manufacturer cannot be considered liable for possible damages ca...

Страница 81: ...appliance in order to prevent that someone could even inadvertently pull it toppling the appliance Burns danger Place the appliance far from sinks and taps During functioning the power outlet must be...

Страница 82: ...ents farmhouses for hotels motels and other residential environments customers bed and breakfast like environments This appliance will have to be intended for the use for which it has been expressivel...

Страница 83: ...people Do not leave the appliance within the range of children or incapable people when it s working or after use when it is still hot Batteries instruction for environment protection Professional rec...

Страница 84: ...A Power supply 220 240V 50Hz Power 900 1800W On Off switch for heat and flame effect Pebble flame motion effect Dual heat setting 900 Watts or 1800 Watts Safety thermal cut Off device 655 mm 270 mm 65...

Страница 85: ...ass 3 Appliance structure 4 Pebbles kit 5a Upper bracket for wall fixing 5b Lower bracket 6 Switch 0 I ON OFF 7 Button 0 I ON OFF led 8 Button 900W led 9 Button 1800W led 10 Remote control 11 Screws k...

Страница 86: ...a container to avoid losing them is advised The appliance can be installed in two ways with the base 1 on the wall with the bracket 5 a Assembling the base Remove the glass 2 from the structure 3 and...

Страница 87: ...stableandlevelled plane Place the pebbles 4 in the structure 3 distributing them uniformly Take the glass 2 and place it on the structure letting the brackets 14 hook on the appropriate pins 13 Make s...

Страница 88: ...rom the glass 2 to move it it may detach from the structure Avoidshockorsuddenmovementswhenmovingtheapplianceas they could cause the pebbles 4 movement and the consequent damaging of the glass Do not...

Страница 89: ...inst the wall level it and draw the drilling points Maintain the minimum distances indicate in the figure the minimum height from the floor is 300mm Toplacetheapplianceatabout600mmfromthefloorforanopt...

Страница 90: ...holes Fix the upper bracket 5a to the wall by tightening the screws INSTALLATION Remove the glass 2 from the structure 3 and place it accurately to not damage it Fixthelowerbracket 5b tothestructure 3...

Страница 91: ...ructure 3 on the upper bracket 5a making sure that it s supported by the wall and that it hooks correctly Centre it in the desired position Mark the lower bracket 5b drilling points Remove the structu...

Страница 92: ...6mm wall plugs in the holes Reposition the structure 3 on the upper bracket 5a making sure that it s supported by the wall and that it hooks correctly Fix the lower bracket 5b with two screws Place th...

Страница 93: ...n the structure making the brackets 12 hook on the appropriate pins 13 This operation should be carried out by two people Makesurethatallfourbrackets 14 twooneachside arecorrectlyhooked Do not use the...

Страница 94: ...control is not operated for prolonged periods of time the batteries will discharge and the remote control won t work in this case replace the batteries with the new ones Theremotecontrolbatteriesmustn...

Страница 95: ...ance doesn t work even when using the remote control from a close distance it is necessary to replace the batteries The remote control batteries must be kept away from the range of children If they re...

Страница 96: ...3 upper part Control through the buttons Button 0 I ON OFF 7 Press the button once to turn the appliance and the fire effect on the corre sponding red led turns on Keep the button pressed for 3 second...

Страница 97: ...urn the appliance and the fire effect off Button 900W 10b Press the button once to set the minimum heat function 900W Press the button a second time to stop the function Button 1800W 10c Press the but...

Страница 98: ...e performing cleaning operations ALWAYSdisconnecttheplugfromthemains power and wait for the appliance to be completely cooled Use a delicate detergent for the general cleaning Clean the ventilation ho...

Страница 99: ...separately from other waste The usershouldtherefore taketheproducttoanappropriaterecyclingcentreforelectricalandelectronic waste or hand it to the dealer when buying a new equipment Dead batteries mus...

Страница 100: ...OHMEX SA Route de la Longeraie 9 1110 Morges Switzerland www ohmex ch Ed 06 2017 OHMEX SA Route de la Longeraie 9 1110 Morges Switzerland www ohmex ch...

Отзывы: