background image

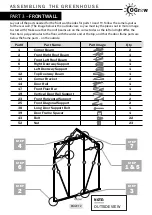
PART 3 – 

FRONT WALL

A S S E M B L I N G   T H E   G R E E N H O U S E

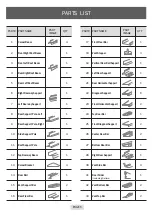
Part#

Part Name

Part Image

Qty.

1
2
3
6
7
12
13
14
17
19
23
25
38
39
43
52

2
1
1
1
1
1
2
1
1
1
2
2
1
1
22
23

Corner Beam
Front Right Roof Beam
Front Left Roof Beam
Right Doorway Support
Left Doorway Support
Top Doorway Beam
Corner Bracket
Door Rail
Front Floor Bar
Vertical Door Rail Support
Front Horizontal Support
Front Diagonal Support
Long Door Support Bolt
Door Frame Spacer
Bolt
Nut


25

06

23

01

02

07

23

25

01

12

03

17

14

19

PAGE 12

STEP


1 & 5

STEP


3

STEP


2

STEP


7

STEP


4

STEP


6

NOTE:

OUTSIDE VIEW

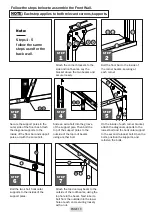
Lay out all the parts needed for the front wall, besides for parts 14 and 19. Follow the same layout as 

for the rear wall. (The image below is the outside view, so you must lay the pieces out in mirror image 

to start with.) Make sure that the roof beams are on the correct sides as the left and right differ; the 

floor bar is perpendicular to the floor, with the wider end at the top; and that the door frame parts are 

below the frame parts – on the outside.

Содержание Walk-in OGAL-666

Страница 1: ...OGrow Walk in 6 x 6 LAWN AND GARDEN GREENHOUSE MODEL OGAL 666 With Heavy Duty Aluminium Frame ...

Страница 2: ...d safety instructions in this manual If you have any questions please contact our Customer Service Department Let sGrow Together Parts List Side Walls Back Wall Front Wall Door Frame Roof and Full Structure The Door The Vents The Panels 3 4 8 10 12 14 15 17 19 21 PAGE 2 ...

Страница 3: ...upport Pole Top Doorway Beam Corner Bracket Door Rail Vent Support Bar Rear Floor Bar 17 18 19 20 21 22 23 24 25 26 27 28 30 31 32 33 PART PART NAME PART IMAGE QTY 1 4 1 1 1 6 2 1 2 2 1 1 4 1 2 2 Front Floor Bar Vent Stopper Vertical Door Rail Support Left Door Support Rear Horizontal Support Diagonal Support Front Horizontal Support Top Door Bar Front Diagonal Support Center Door Bar Bottom Door ...

Страница 4: ...Top Roof Bar Gutter Bar Long Door Support Bolt Door Frame Spacer Spanner Wrench Rubber Seal Bolt Door Screw 45 46 47 48 49 50 51 52 A I PART PART NAME PART IMAGE 12 116 8 4 1 1 2 97 23 Vent Screw Panel Clip Beam End Cap Gutter End Cap Rail End Cap Right Rail End Cap Left Vent Brace Nut Polycarbonate Panel PAGE 4 QTY ...

Страница 5: ...hen tired or when under the influence of alcohol drugs or medication 8 Build the Greenhouse on a flat and level surface A concrete foundation is recommended for a high quality installation 9 WARNING The brass bushings inside the Rollers of this product contain lead a chemical known to the State of California to cause birth defects or other reproductive harm California Health Safety Code 25249 5 et...

Страница 6: ...you are to use consult a professional It is always your responsibility to ensure that the greenhouse is properly anchored Ogrow cannot be held responsible for personal injury damage to the greenhouse or other property damage that occurs as a result of improperly anchoring the greenhouse Check with local authorities to obtain all required building permits and to familiarize yourself with any buildi...

Страница 7: ...usly If this is your first time building a greenhouse it may take a good chunk of a day to complete the construction properly Prepare the tools you will need A Drill A Screwdriver A Spanner Part 41 Lay out all the greenhouse parts around the base to ensure that nothing is missing See image below If any parts are missing contact us at once so that we can send you the missing parts right away When y...

Страница 8: ...e grooves in the support poles should be facing you The floor bar and gutter bar should be perpendicular to the floor with the wider end at the top PART 1 SIDE WALLS A S S E M B L I N G T H E G R E E N H O U S E Part Part Name Part Image Qty 10 22 34 36 43 52 Side Support Pole Diagonal Support Side Floor Bar Gutter Bar Bolt Nut 2 2 2 2 20 20 ...

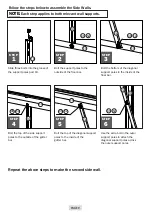
Страница 9: ... assemble the Side Walls NOTE Each step applies to both relevant wall supports Repeat the above steps to make the second side wall 43 52 43 52 43 52 10 34 34 10 22 36 PAGE 9 Bolt the top of the side support poles to the outside of the gutter bar Bolt the top of the diagonal support poles to the inside of the gutter bar Use the extra bolt in the outer support poles to attach the diagonal support po...

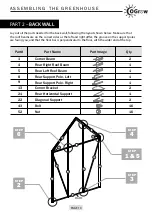
Страница 10: ... perpendicular to the floor with the wider end at the top PART 2 BACK WALL A S S E M B L I N G T H E G R E E N H O U S E 16 9 8 21 05 04 22 1 1 22 13 13 Part Part Name Part Image Qty 1 4 5 8 9 13 21 22 43 52 Corner Beam Rear Right Roof Beam Rear Left Roof Beam Rear Support Pole Left Rear Support Pole Right Corner Bracket Rear Horizontal Support Diagonal Support Bolt Nut 2 1 1 1 1 2 1 2 16 16 PAGE ...

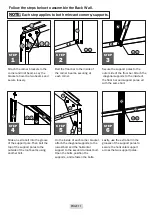
Страница 11: ...upport pole Then bolt the top of the support poles to the outside of the roof beams using another bolt STEP 4 On the inside of each corner bracket attach the diagonal supports to the lowest bolt and the horizontal support to the second to lowest bolt Open the bolts position the supports and refasten the bolts STEP 5 Lastly use the extra bolt in the grooves of the support poles to secure the horizo...

Страница 12: ...ng Door Support Bolt Door Frame Spacer Bolt Nut 25 06 23 01 02 07 23 25 01 12 03 17 14 19 PAGE 12 STEP 1 5 STEP 3 STEP 2 STEP 7 STEP 4 STEP 6 NOTE OUTSIDE VIEW Lay out all the parts needed for the front wall besides for parts 14 and 19 Follow the same layout as for the rear wall The image below is the outside view so you must lay the pieces out in mirror image to start with Make sure that the roof...

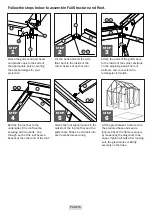
Страница 13: ... each corner bracket attach the diagonal supports to the lowest bolt and the horizontal support to the second to lowest bolt Open the bolts position the supports and refasten the bolts STEP 5 Bolt the two short horizontal supports to the insides of the support poles STEP 6 Attach the top doorway beam to the outside of the roof beams using the top hole in the beam Next insert a bolt from the outsid...

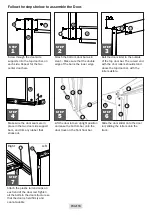
Страница 14: ...Attach the vertical door rail support to the end of the door rail that is jutting out of the structure STEP 3 Secure the bottom of the vertical door rail support to the outside of the roof beam using the long door support bolt Slide the door spacer onto the bolt between the two poles securing the joint with a nut on the inside of the roof beam Follow the steps below to assemble the Door Frame PAGE...

Страница 15: ... Collect all the parts needed for the roof and keep on the side until necessary PART 4 FULL STRUCTURE AND ROOF A S S E M B L I N G T H E G R E E N H O U S E Part Part Name Part Image Qty 11 35 47 48 43 52 Roof Support Pole Top Roof Bar Beam End Cap Gutter End Cap Bolt Nut 4 1 8 4 28 28 PAGE 15 11 11 11 11 35 STEP 4 STEP 5 STEP 1 STEP 3 STEP 2 ...

Страница 16: ...Bolt the top roof bar to the underside of the roof beams securing with two bolts one through each of the roof beams Repeat at the other end of the roof 4 Attach the roof support poles to the outside of the top roof bar and the gutter bars Slide an extra bolt into each pole before securing Lift the greenhouse structure onto the prepared base and secure loosely Check the frame is square by measuring...

Страница 17: ...PART 5 THE DOOR A S S E M B L I N G T H E G R E E N H O U S E 20 28 24 26 26 27 Part 20 24 26 27 28 31 44 49 50 43 52 Left Door Support Top Door Bar Center Door Bar Bottom Door Bar Right Door Support Door Slider Including Rollers Door Screws Rail End Cap Right Rail End Cap Left Bolt Nut 1 1 2 1 1 1 16 1 1 2 2 Part Name Part Image Qty PAGE 17 ...

Страница 18: ... seals are in place in the two door side support bars and trim any rubber that sticks out Lift the door into an upright position and ease the bottom bar onto the door track on the front floor bar STEP 5 Slide the door slider onto the door rail sliding the rollers onto the track Attach the plastic rail end caps on each end of the door rail Tighten all the bolts in the door structure so that the doo...

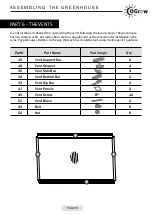
Страница 19: ...ion is the same Pay particular attention to the way that each bar should be laid using the images for guidance PART 6 THE VENTS A S S E M B L I N G T H E G R E E N H O U S E Part Part Name Part Image Qty 15 18 30 32 33 A I 45 51 43 52 Vent Support Bar Vent Stopper Vent Side Bar Vent Bottom Bar Vent Top Bar Vent Panels Vent Screw Vent Brace Bolt Nut 2 4 4 2 2 2 12 2 8 8 33 30 30 32 PAGE 19 ...

Страница 20: ...g that the diagonals are the same and then tighten the bolts in each corner Slide the completed vent into the top roof bar to the space between the two roof support poles Turn the vent over and attach the brace to the vent bottom bar screwing it into the pre drilled holes STEP 4 Attach the two vent stoppers to the vent support bar screwing into the pre drilled holes Attach the stoppers so that the...

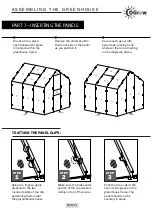
Страница 21: ... with panel clips placing a clip wherever there is a marking on the diagrams above Using two fingers apply pressure to the two rounded points of the clip positioning them under the polycarbonate panel Make sure the wide center portion of the clip remains visibly on top of the panel Push the two ends of the clip into the groove in the greenhouse frame The panel should now be securely in place STEP ...

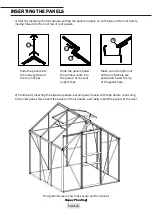
Страница 22: ...inserting the side wall panels securing each panel with clips before continuing to the next panel Next insert the back and front panels and lastly insert the panels of the door Slide the panels into the lowest groove of the top roof bar Slide the panels below the window vents into the groove of the vent support bar Make sure the bottom of all the roof panels are positioned below the lip of the gut...

Отзывы: