4
Operating Instructions and Parts Manual
24820 / 24821
BODY REPAIR KIT
8/17
2017 OEMTOOLS
™
7. The SERRATED CAP is typically used for pushing
during frame repair. It may be plugged into either
end of the Hydraulic Ram or the Extension Tubes.
8. The EXTENSION TUBES plug together in different
combinations to reach the desired length.
9. The HYDRAULIC SPREADER WEDGE is used in
restricted spaces when the Hydraulic Ram cannot
be used. Connect the wedge directly to the hose of
the pump unit.
ASSEMBLY
When assembling the Hydraulic Ram, Pump unit and
attachments, unscrew and retain the plastic end plugs
on the connections of the Ram and Hydraulic Spreader
Wedge for future use. Ensure the hydraulic hose is
tightly screwed to the connection.
1. Screw the Pump Handle into the socket in the
pump unit.
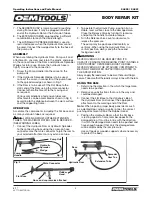
2. If the Hydraulic Spreader Wedge is to be used,
connect the screw-in connector of the pump hose
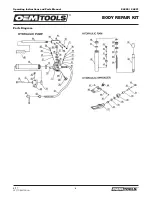
to the spreader wedge as shown in Fig 1.
3. If the Ram is to be used, fit the Flat Base to the
static end of the Ram using the male connector.
Connect other attachments to the moving end
as required.
4.
Various combinations of extension tubes and
attachments can be assembled as shown in Fig 2,
according to the distance between the work surface
and the supporting frame.
OPERATION
Assemble the components including the flat base and
as many extension tubes as required.
Note:
WHEN ADDING FURTHER EXTENSION
TUBES, THE MAXIMUM RATED LOAD IS REDUCED.
(SEE WARNING LABEL)
1. Connect the Hydraulic Ram or Hydraulic Spreader
to the connecting hose using the screw-on hose
connector. Use the male connector to join the ram to
your selected attachment or any extension tube.
2. To operate the Hydraulic Pump, position it on a
stable, level surface close to the damaged area.
Close the Release Valve by turning it clockwise
and pump the handle to create pressure.
3. Turn the Release Valve counter-clockwise to
release the pressure.
4.
The pump may be positioned horizontally or
vertically. When using the Hydraulic Ram in a
vertical position, always keep the hose end
facing downward.
WARNING
NEVER OVERLOAD THE RAM BEYOND ITS
CAPACITY. ENSURE THE BEARING POINT IS STABLE
AND PROPERLY CENTERED ABOVE THE RAM.
NEVER OVERLOAD THE ATTACHED COMPONENTS
BEYOND THEIR RATED CAPACITIES AS STATED IN
THE SPECIFICATION.
Always apply the load slowly to be sure that everything is
secure. Take care that the load is always in line with the ram.
USING THE RAM
1. Determine the direction in the which the target area
needs to be pushed.
2. Remove any obstructions that are in the way and
could be damaged.
3. Connect the Flat Base to the stationary side of
the Hydraulic Ram and connect the appropriate
attachment to the working end of the Ram.
Note: When repairing larger body panel dents such
as a dented door, wing or quarter panel, the correct
pushing attachment will be the Rubber Head.
4. Position the Hydraulic Ram so that the flat base
is resting against a frame member opposite the
damaged area. It must be in line with the direction
in which the damaged area needs to be pushed and
have enough support that only the damaged area
will be displaced by the ram pressure.
5.
Use soft pads or wooden supports where necessary
to protect the body.
Pump Unit
Hydraulic
Spreader
Wedg e
Fig 1
Pump
Handle
Base
Hydraulic Ram
Extension Tube
Spreader
Ram Toe
Fig 2
Male Connector
Flat Base
Rubber
Head
Hose end cap remains attached
Pump Unit
Fig. 1
Fig. 2
Male Connector
Flat Base
Hose end cap remains attached
Rubber
Head
Hydraulic Ram
Extension Tube
Spreader
Ram Toe
Base
Hydraulic
Spreader
Wedge
Pump
Handle


