Odyssey Stellar NX Скачать руководство пользователя страница 5

Stellar NX VIDEO DRONE • ADVANCED FEATURES

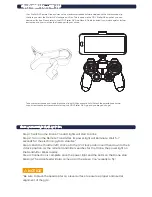
To initiate this mode, hold down the SmartFly 
button on the left front of the Remote 
Transmitter until the drone’s 4 LED lights 
begin to flash. To terminate the mode, press 
the button again until the light turns off.

TIP: Before entering SmartFly Tech Headless 
Flight, please place on a level surface and 
confirm that the cockpit at the front of your 
drone is facing forward in flight.

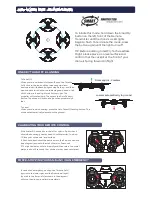
CALIBRATING YOUR REMOTE CONTROL

ONE KEY TAKE-OFF & LANDING

Rises approx. 2 meters

Lowers automatically to ground

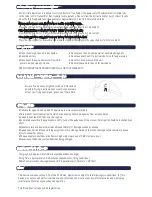
FORCE-STOPPING YOUR Stellar NX IN AN EMERGENCY

If the Stellar NX drone tilts to the left or right in flight when it 
should be hovering, you may need to calibrate trim. To do so:
1. Place your drone on a level surface.
2. Push both joysticks at the same time to the 5 o'clock position 
(see diagram) and hold the sticks there for 3 seconds. 
3.The light indicator will blink rapidly and then return to normal 
status in about 5 seconds.Your drone trim has been calibrated.
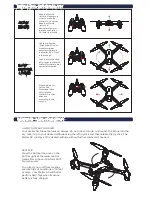
To Take Off:
When your drone is ready for takeoff, push the Throttle 
(left) stick to the top and then release upward and 
downward until the flashing lights stop flashing, and then 
position both sticks in their outside diagonal position- left 
stick bottom left, and right stick bottom right, The 
propeller will rotate slowly. Then press the Auto Takeoff 
button. The drone will rise to a height of approximately 6 
feet.

To Land:
When your drone is hovering, press the Auto Takeoff/Landing button. The 
drone will automatically descend to the ground.

In case of an emergency, pushing the Throttle (left) 
joystick to the lower right and the Directional (right) 
joy stick to the lower left (as shown in the diagram) 
will stop the drone propellers immediately.

Содержание Stellar NX

Страница 1: ...PRESS HEADLESS MODE SHORT PRESS CAPTURE PHOTO LONG PRESS CAPTURE VIDEO LEFT JOYSTICK CONTROLS ALTITUDE ROTATION RIGHT JOYSTICK CONTROLS YAW DIRECTION FLIPS AUTO TAKE OFF AUTO LANDING TRIM ADJUSTMENTS...

Страница 2: ...om unit Slide out the battery Connect the USB charging cable and the battery Insert the USB connection of the charging cable into a powered USB computer port Please note Not all USB ports provide powe...

Страница 3: ...one stop blinking The video feed will also come up on the screen You re ready to y Your Stellar NX Camera Drone comes with a plastic smartphone holder equipped with a compression clip that lets you vi...

Страница 4: ...lar direction Pressing Right or Left on the Directional stick will strafe the Stellar NX in that direction according to the cockpit 360 FLIP Press the 360 button once on the bottom right of the radio...

Страница 5: ...cks at the same time to the 5 o clock position see diagram and hold the sticks there for 3 seconds 3 The light indicator will blink rapidly and then return to normal status in about 5 seconds Your dro...

Страница 6: ...e with new and fresh batteries If your Drone can t be controlled accurately Make sure the radio control transmitter is set to the ON position Make sure the battery on the vehicle is installed correctl...

Страница 7: ...error and erratic free flying of the quadcopter The adjustment is simple to do on the radio control transmitter but it requires some patience Please follow the instructions precisely For best results...

Страница 8: ...please email Care OdysseyToys com Please note the unit s model number and name in your email Extra Parts Available Visit Odyssey online to order www OdysseyToys com Extra Batteries New Rotor blades X...

Отзывы: