background image

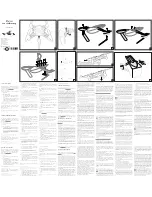
1. Before flying, insert each protecting
    guard on the bottom of a rotor housing 
    as shown and push the guard up  
    until the clips at its top secure the guard.

2. If you wish to remove the guards for storage, 
    gently pull apart the clips at the top of each
    guard and pull down the base until the guard   
    is removed.

Connect the battery wire plug with the power 
supply wire plug and insert the battery into 
the battery compartment.

How to Charge the Drone Battery 

Reinstall the Drone Battery

Installing and Removing the Protective Guards 

Pic.1

Pic. 2

Pic.3

Disconnect the battery wire plug from 
the power supply wire plug . Pull on the 
silver foil to remove the battery from the 
Drone. Then connect the battery wire 
plug with the USB charging cable plug, 
and insert the USB interface to any USB 
charging outlet to charge the battery. 
The USB indicator light illuminates while 
charging is proceeding and turns off 
once the battery is fully charged. Full 
charging time is around 70 minutes.

6

Содержание INFINITY NX

Страница 1: ...ING VIDEO DRONE FORAGES INSTRUCTION REFERENCE MANUAL Model no ODY 1715 14 Thank you for your purchase of the Infinity NX Live Streaming Video Drone You re just moments away from creating stunning aerial acrobatics ...

Страница 2: ...ision Do not modify the product modification may cause malfunction or accident Fly the model within your line of sight to control it safely Children require adult supervision when using this product Remove rechargeable batteries before charging them Recharge rechargeable batteries only under adult supervision Remove exhausted batteries from the controller Do not short circuit the supply terminals ...

Страница 3: ...nter Clockwise Motor Power on the model and make sure that the propellers are installed in the right position Propeller A at the left front and the right rear corner should spin clockwise Propeller B at the right front and the left rear corner should spin counterclockwise Propeller B Counter Clockwise Motor Left Right Propeller A Clockwise Motor Tail of the model 3 ...

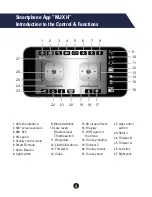
Страница 4: ...ts 16 16 File play 23 23 Return 17 17 WIFI signal of the drone 3 3 360 Roll 8 8 Light switch 7 7 Home Beacon 6 6 Smart Fly mode 12 12 Link Unlink drone 14 14 Video 2 2 180 screen eversion 1 1 Hide the interface 19 19 Trimmer C 13 13 Trimmer D 24 24 Trimmer B 25 25 Trimmer A 26 26 Left stick 27 27 Right stick 5 5 Gravity control mode 9 9 Mode Switches 10 10 Low level Medium level Throttle switch 4 ...

Страница 5: ...Left Right Trim Setting Trim B Strafe Left Right Trim Setting Light Button Photo Button Left Control Stick Directional Stick Press down to enter SmartFly Mode Trim C Forward Trim Setting Trim D Reverse Trim Setting Video Shooting Manual Flip Roll Button Use a small screwdriver to remove the screw securing the battery cover on the back of the remote control Then install 6 x AA batteries not include...

Страница 6: ...tery into the battery compartment How to Charge the Drone Battery Reinstall the Drone Battery Installing and Removing the Protective Guards Pic 1 Pic 2 Pic 3 Disconnect the battery wire plug from the power supply wire plug Pull on the silver foil to remove the battery from the Drone Then connect the battery wire plug with the USB charging cable plug and insert the USB interface to any USB charging...

Страница 7: ...RED which means that your mobile phone has successfully connected with the drone When connected the indicator light on your drone will stay on Touch and the rotor blades will rotate slowly Then push up the throttle control stick and the drone will take off If you want to use the remote control instead of the mobile device to control your Inifinity turn on your remote control and link it to your dr...

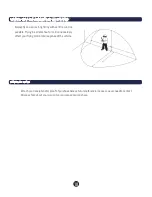
Страница 8: ...form calibration for the first flight or when the flight performance is poor Poor flight performance except vibration created by camera mount or even complete failure may result from out of date calibration To calibrate your unit whether using the controller or smart phone app 1 Put the model on the ground or any flat still surface 2 Pull down both of the control sticks to the bottom right corner ...

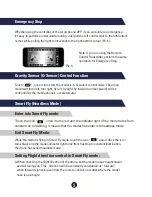
Страница 9: ...asy to perform an immediate landing Just pull the left control stick to the left bottom corner while pulling the right control stick to the right bottom corner Pic 5 Touch the icon once it turns red and the indicator light of the model turns from constant on to flashing it means that the model has enter into headless mode Enter into Smart Fly mode Exit Smart Fly Mode Setting Flight direction contr...

Страница 10: ...will fly backward toward you Push up the forward backward control stick the model will fly forward away from you When the model is flying in Smart Fly Headless mode you should keep facing the forward direction Otherwise the model will be difficult to control The model control is shown as below Remarks Flight direction proof is needed when the model is going to fly in Smart Fly mode When checking o...

Страница 11: ...rd Backward control Foward Backward trimmer Upward Downward control Left Right turning trimmer Left Right turning control Leftward Rightward control Left Right sideward flight trimmer MODE 2 Forward Backward control Foward Backward trimmer Upward Downward control Left Right turning trimmer Left Right turning control Leftward Rightward control Left Right sideward flight trimmer Touch to choose the ...

Страница 12: ...m proportion is 1 1 Player can choose different proportion to regulate the flight route range Waypoints Setting up your Flight Plan Medium Low Throttle Control Switch Pic 6 In the flight plan interface the movements forward backward and sideways can be achieved through the flight route drawn by the pilot Use the diagrams below for reference Forward Draw the route upward the model will fly forward ...

Страница 13: ...kward Draw the route to the left and the drone will fly left Draw the route to the right the drone will fly right 1 If the model keeps moving forward backward even there is no control signal given adjust the forward backward trimmer in the app control interface or the remote control to keep the model balanced 13 ...

Страница 14: ...mmer 3 If the drone spins even when there is no control signal given adjust the left right turning trimmer Whether using the smartphone app or the included remote control the controls are similar Upward Push up the throttle control stick the rotation speeds of the rotors will increase and the drone will climb accordingly 14 ...

Страница 15: ...the right side and the model will fly rightward Downward Turn left Turn right Turn the left right turning control stick to the left and the drone will turn left Turn the left right turning control stick to the right and the drone will turn right Push down the throttle control stick rotation speeds of the rotors will decrease and the drone will descend accordingly Forward When the drone is flying p...

Страница 16: ...tor light repeats flashing twice and turns off The drone cannot be activated The model is not connected with the mobile phone or controller 1 Open MJX H APP and press the remote control power button 2 Exit MJX H close the running grogram of the mobile phone and re open the MJX H APP to operate 3 Or switch to the controller to operate the drone The drone is powered on and the indicator light is fla...

Страница 17: ...talled and used in accordance with the instructions may cause harmful interference to radio communications However there is no guarantee that interference will not occur in a particular installation If this equipment does cause harmful interference to radio or television reception which can be determined by turning the equipment off and on the user is encouraged to try to correct the interference ...

Страница 18: ...ht day with as little wind as possible Flying in extreme heat or cold can adversely affect your flying control and response of the vehicle Attach your receipt and or proof of purchase here as future reference in case you ever need to contact Odyssey Toys about your warranty or any issues you may have 18 ...

Страница 19: ...IONS WARNINGS NOTICES Charging Time Approximately 70 minutes dependent on usage Flying Time Approximately above 6 9 minutes dependent on flying conditions Radio Control monitor viewing distance limit approx 50 meters Suitable for ages 14 and up Adult supervision is always recommended This product contains small parts which are a choking hazard Keep away from small children Keep Quadcopter at least...

Страница 20: ...or Customer Service please email Care OdysseyToys com Please note the units model number and name in your email Extra Parts Available Visit Odyssey online to order Extra Batteries New rotor blades X Guard components Model no ODY 1715 Infinity NX Live Streamin Video Drone Follow us at ...

Отзывы: