background image


GB


3 Getting started 

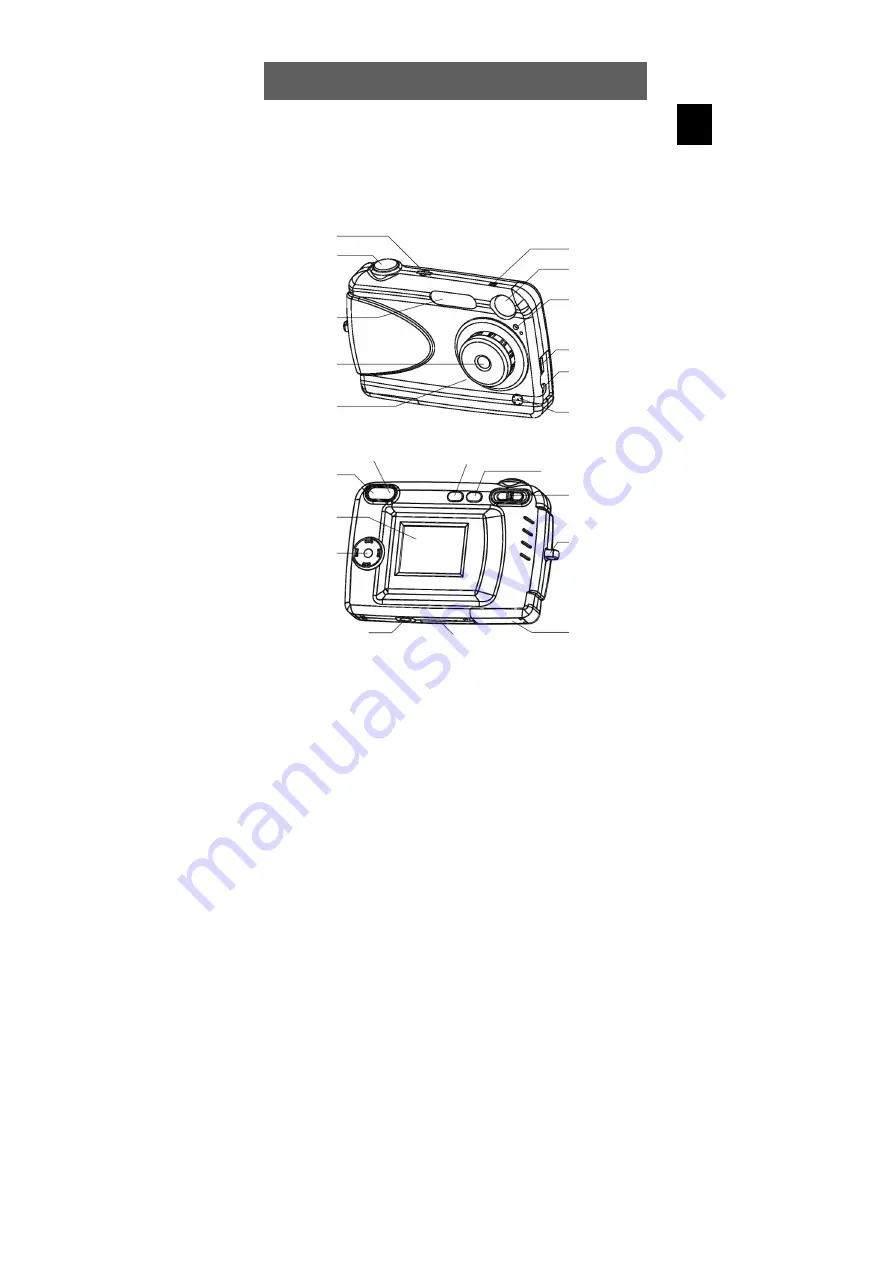
3.1  Parts of your camera 

Familiarise yourself with the parts of your camera before use.  
That makes it easier to operate the camera. 


Operating status indicator


Direction buttons 

and OK 

Strap eye 

LCD display 

Display button 

Mode switch 

Tripod connector 

SD/MMC


card slot 

Battery  
compartment


Macro 
switch


Shutter release 

On/off button 

Flash 

Indicator for 
Self-Timer 

Lens 

Viewfinder 

TV/Audio 
output 

USB terminal 

Microphone 

Loudspeaker 

Menu button 

Viewfinder 

Содержание PocketCam 5200

Страница 1: ...DE GB ES IT PT Digitalkamera ODYS PocketCam 5200 ODYS PocketCam 5200 Digital Camera BENUTZERHANDBUCH USER MANUAL...

Страница 2: ...2 DE...

Страница 3: ...13 4 Bedienung 14 4 1 Beschreibung der LCD Anzeige 14 4 2 Ein und Ausschalten 15 4 3 Verwenden des Aufnahme Modus 15 4 4 Fotos machen 16 4 4 1 Einzelbilder 16 4 4 2 Serienbilder 17 4 4 3 Selbstausl se...

Страница 4: ...4 13 Anschlu an den Fernseher 25 4 14 Systemeinstellungen 25 5 Technische Daten 27 6 Fehlerbehebung 28 7 Weitere Informationen 29 7 1 Sicherheitshinweise 29 7 2 Wartung und Pflege 29 7 3 Fototipps 30...

Страница 5: ...fang Bitte berpr fen Sie den Karton auf folgenden Inhalt Digitalkamera ODYS PocketCam 5200 Trageriemen TV Kabel Tragetasche CD ROM Treiber Anwendungssoftware Benutzerhandbuch Garantiekarte 2 AAA Batte...

Страница 6: ...oder es als WebCam verwenden Achtung Lesen Sie bitte vor dem Gebrauch der Kamera die allgemeinen Sicherheitshinweise in Kap 7 1 Beachten Sie auch insbesondere die Hinweise zur sicheren Beendung des D...

Страница 7: ...g der Kamera Betriebsstatus Anzeige Richtungstasten und OK Taste Riemenhalterung LCD Anzeige Display Taste Modus Schalter Stativbuchse SD MMC Kartenfach Batteriefach Makro Schalter Ausl ser Ein Aus Ta...

Страница 8: ...mera WebCam oder Massen speicher Au erdem ist sie ein Gleichspannungseingang f r einen PC oder AC Adapter TV Audio Ausgang Video Audio Verbindung der Kamera mit einem TV Auch ein Kopfh rer kann angesc...

Страница 9: ...erie fachdeckel indem Sie ihn zu klappen und zur ckschieben Lesen Sie bitte au erdem die Batteriehinweise in Kap 7 4 3 3 Einlegen und Entfernen der SD MMC Karte Zur Erh hung der Speicherkapazit t k nn...

Страница 10: ...n um sie zu entriegeln Nach dem Entfernen der Karte stecken Sie die Blind Karte wieder ins Kartenfach Lesen Sie bitte au erdem die Hinweise zur Benutzung von Speicherkarten in Kap 7 5 3 4 Anbringen de...

Страница 11: ...eiber im CD ROM Laufwerk verwiesen werden Die Kamera besitzt zwei USB Treibermodi Massenspeicher und PC Kamera Nachfolgend wird die Treiberinstallation f r jeden der beiden Modi beschrieben 3 5 1 Trei...

Страница 12: ...nkt Specify a location Geben Sie eine Position an Verweisen Sie auf die Treiber CD im Laufwerk X X DSC Drivers Mass storage 4 Klicken Sie nun auf Next Weiter Das System installiert den Treiber und fol...

Страница 13: ...rs PC Camera Win98_2k 3 Bei Windows 2000 kann eine Anfrage wegen der digitalen Signatur des Treibers erscheinen Klicken Sie auf Yes Ja um den Treiber zu installieren 4 Bei der Treiberinstallation unte...

Страница 14: ...Datum und Zeit 9 Bildqualit t Fine Normal Basic 10 Bildgr e 2560x1920 Pixel 2048x1536 Pixel 1600x1200 Pixel 1024x768 Pixel 800x600 Pixel Videodauer s 11 Aufnahme Modus Einzelbild Serienbild 4 Bilder V...

Страница 15: ...wird die Kamera automatisch ausgeschaltet um Batteriestrom zu sparen Um die Kamera wieder einzuschalten dr cken Sie die Ein Aus Taste 4 3 Verwenden des Aufnahme Modus Schieben Sie den Modus Schalter a...

Страница 16: ...ngefrorenes Bild Herausschieben Blitz Modus Auto Rote Augen Reduktion Blitz aus Messung CW Durchschnitt zentral gewichtet Spot 4 4 Fotos machen 4 4 1 Einzelbilder Aufnahme eines einzelnen Bildes beim...

Страница 17: ...n Richtungstasten oder k nnen Sie ein und auszoomen Dr cken Sie den Ausl ser um ein Serienbild aufzunehmen 4 4 3 Selbstausl ser Aktivierung des Verschlusses 10 Sekunden nach dem Dr cken des Ausl sers...

Страница 18: ...fnahme Modus und best tigen Sie mit der OK Taste 2 W hlen Sie mit oder den Video Modus und dr cken Sie die OK Taste Dr cken Sie den Ausl ser um die Videoaufnahme zu starten Ein erneutes Dr cken des Au...

Страница 19: ...ild anzuzeigen 2 Mit den Richtungstasten oder k nnen Sie ein und auszoomen Miniaturansicht 1 Dr cken Sie die Men Taste W hlen Sie mit den Tasten und Picture View und best tigen Sie mit der OK Taste 2...

Страница 20: ...n Sie wie im Wiedergabe Modus mit den Richtungstasten und das zu kommentierende Bild aus 2 Dr cken Sie den Ausl ser um die Aufnahme der Sprachanmerkung zu starten Ein erneutes Dr cken des Ausl sers be...

Страница 21: ...tuelle Datei wird gel scht Ton l schen Die Sprachanmerkung des aktuellen Bildes l schen Alle Dateien l schen Alle Dateien werden gel scht au er gesch tzte Formatieren Formatiert den Speicher 4 10 2 Da...

Страница 22: ...abe Modus kann mit der Richtungstaste zwischen LOCK und UNLOCK gewechselt werden 4 11 PC Kamera PC Kamera bedeutet hier dass die mit dem PC ber die USB Schnitt stelle verbundene Kamera als peripheres...

Страница 23: ...C und das andere Ende des USB Kabels in die USB Buchse der Kamera einstecken Der PC erkennt ein neues Hardware Ger t und installiert die entsprechenden Treiber automatisch F r die Betriebsart PC Kamer...

Страница 24: ...mera zuzugreifen Sie k nnen Bilder und Video dateien kopieren bewegen und l schen Achtung Melden Sie die Digitalkamera mit der Option Hardware sicher entfernen wieder korrekt vom Betriebssystem ab and...

Страница 25: ...Kabelverbindung und das Videosignal System 4 14 Systemeinstellungen Zu den Systemeinstellungen kann sowohl aus dem Aufnahme Modus als auch aus dem Wiedergabe Modus gewechselt werden 1 Rufen Sie im Auf...

Страница 26: ...MC Karte Speicherauswahl intern SD MMC Karte LCD Power Off 15 s 30 s niemals Kamera Power Off 60 s 120 s niemals Sprache Englisch Franz sisch Deutsch Italienisch Chinesisch und Spanisch TV System NTSC...

Страница 27: ...ch Auto Tageslicht bew lkt Fluoreszenz und Tungsten Ausl ser Folge 1 sec Serienbild vier Bilder in Reihe Wiedergabe Verz gerung 3 sec Selbstausl ser 10 Sekunden Zeit f r Blitzladung 8 sec bei Raumtemp...

Страница 28: ...asteneingabeton L sung Tasteneingabeton aktivieren Ursache Die Lichtst rke ist nicht ausreichend Kamera macht keine Fotos L sung Blickwinkel der Kamera ndern um mehr Licht aufzufangen oder automatisch...

Страница 29: ...d auch zu Unf llen f hren Achtung Bei Verwendung des Blitzlichtes nicht direkt in den Blitz schauen da dies die Augen sch digen kann 7 2 Wartung und Pflege Bitte reinigen Sie Geh use Objektiv und LCD...

Страница 30: ...lecken hei werden oder platzen lassen Beachten Sie folgende Sicherheitshinweise Batterien nicht erhitzen oder ins Feuer werfen Batterien nicht zusammen mit Metallobjekten transportieren da diese mit...

Страница 31: ...rkarte Secure Digital MMC Speicherkarte MultiMedia Card Schalten Sie die Kamera aus bevor Sie die Speicherkarte einlegen oder entnehmen W hrend des Kamerabetriebs Aufzeichnen Wiedergabe Datei ber trag...

Страница 32: ...iver in Mass Storage Mode 9 3 5 2 Installing the driver in PC Camera Mode 11 4 Operation 12 4 1 LCD descriptions display 12 4 2 Switching on and off 13 4 3 Using the Recording Mode 13 4 4 Taking photo...

Страница 33: ...4 11 PC Camera 20 4 12 Transferring files between camera and PC 21 4 13 Connecting to the TV 23 4 14 System settings 23 5 Specifications 25 6 Troubleshooting 26 7 Further information 27 7 1 Safety ins...

Страница 34: ...e Please ensure that the following items are included in the box ODYS PocketCam 5200 digital camera wrist strap TV cable carrying case CD ROM driver and application software user manual Warranty card...

Страница 35: ...lease read the general safety instructions in chapter 7 1 before using the camera Pay particular attention to the instructions on safely concluding the digital transfer between the camera and computer...

Страница 36: ...erate the camera Operating status indicator Direction buttons and OK Strap eye LCD display Display button Mode switch Tripod connector SD MMC card slot Battery compartment Macro switch Shutter release...

Страница 37: ...PC camera WebCam or mass storage via the interface it is also a DC input for a PC or AC adapter TV Audio output Establishes a video audio connection between the camera and a TV Headphones can also be...

Страница 38: ...he cover of the battery compartment by closing it over and pushing it back into place Please also read the battery tips in chap 7 4 3 3 Inserting and removing the SD MMC card You can use SD or MMC car...

Страница 39: ...ds briefly to unlock it Once the card is removed reinsert the blank card into the card slot Please also read the instructions on using the memory cards in chap 7 5 3 4 Attaching the carrying strap Att...

Страница 40: ...fying the path you must simply select the driver in the CD ROM drive The camera has two USB driver modes Mass Storage Mode and PC Camera Mode The procedure for installing the drivers for each of the t...

Страница 41: ...ocation and click Browse Specify the driver CD in your drive X X DSC Drivers Mass storage 4 Now click Next The system installs the driver and the following window appears 5 Click Finish to complete in...

Страница 42: ...for Mass Storage Mode Location of the drivers on the CD X DSC Drivers PC Camera Win98_2k 3 Under Windows 2000 you may be asked about the digital signature of the driver Click Yes to install the drive...

Страница 43: ...Image Quality Fine Normal Basic 10 Resolution 2560x1920 pixel 2048x1536 pixel 1600x1200 pixel 1024x768 pixel 800x600 pixel Video length s 11 Recording Mode Single shot Sequence 4 images Video 12 Meas...

Страница 44: ...tomatically after it has been idle for a specific time period set under Auto Power Off Press the On Off button to switch the camera on again 4 3 Using the Recording Mode Switch the mode switch to the...

Страница 45: ...oth Colourful Animation Still image Move Flash Mode Auto Red eye reduction Flash off Measurement CW average central weighted Spotlight 4 4 Taking photographs 4 4 1 Single shot When the shutter release...

Страница 46: ...press OK Use the or direction buttons to zoom in and out Press the shutter release to take a sequence 4 4 3 Self Timer The photograph is taken 10 seconds after the release is pressed 4 4 4 Time contro...

Страница 47: ...ress OK to confirm 2 Press or to select the Video Mode and press OK to confirm Press the shutter release to start recording a video Press the shutter release again to stop recording The video is recor...

Страница 48: ...ext picture 2 Use the or direction buttons to zoom in and out Thumbnail view 1 Press the menu button Press or to select Picture View and press OK to confirm 2 Select the desired thumbnail view 1x1 2x2...

Страница 49: ...otes 1 Select the picture to be commented on as required using the and direction buttons in playback mode 2 Press the shutter release to start recording the voice notes Press the shutter release again...

Страница 50: ...lete current file The current file is deleted Delete sound The voice notes of the current picture are deleted Delete all files All files are deleted except for protected files Format Formats the memor...

Страница 51: ...can switch between the LOCK and UNLOCK using the direction button 4 11 PC Camera In this case PC camera means that camera connected to your PC using the USB interface is used as a peripheral video dev...

Страница 52: ...r end of the USB cable to the USB terminal of your camera The PC recognizes a new hardware device and automatically installs the corresponding driver To use the PocketCam 5200 as a PC camera the drive...

Страница 53: ...ess the contents of the camera memory You can copy move and delete image and video files Note Disable the digital camera from the operating system correctly using the Remove Hardware Safely option oth...

Страница 54: ...video and audio signals check the cable connection and the video signal system 4 14 System settings You can access the system settings both from recording mode and playback mode 1 In recording or pla...

Страница 55: ...mat intern SD MMC card Select memory intern SD MMC card LCD Power Off 15 s 30 s never Camera Power Off 60 s 120 s never Language English French German Italian Chinese and Spanish TV system NTSC PAL St...

Страница 56: ...d Tungsten Shutter release in succession 1 sec Sequence series of four photographs Playback delay 3 sec Self Timer 10 sec Flash charge time 8 sec at room temperature and with full batteries Flash rang...

Страница 57: ...ion Activate the key tones Cause Not enough light Camera does not take photos Solution Change angle of camera to include more light or use automatic flash Cause Weak batteries Photos disappear from th...

Страница 58: ...era This can cause short circuits and accidents Note When using the flash do not look directly into it as this can damage the eyes 7 2 Maintenance and care Please clean the body lens and LCD as follow...

Страница 59: ...e them to leak become hot or explode Observe the following safety instructions Do not heat batteries or dispose of them in fires Do not transport batteries with metallic objects as they can come into...

Страница 60: ...the card or switch off the camera while operating the camera recording playback file transfer etc This could damage the card Do not subject the card to discharges of static electricity Do not dismantl...

Страница 61: ......

Отзывы: