background image


68 

products  (no cables, CD's, memo ry  cards, manuals, etc.), 

unless the AXDIA Service Centre specifies otherwise. 

2. Mark  the RMA number on th e  outside of the package in 

such a way that it is visible and clearly legible. 

3. You  must enclose a copy of   the sales slip as proof of 

purchase. 

4. Once  AXDIA has received the product, it will meet its 

warranty  obligations  in a ccordance  with  the warranty 

conditions  and will return t he  product to the sender   with 

carriage and insurance paid.   

Service outside of warranty 

AXDIA can refuse any service claim made that is not covered by 

the warranty. If AXDIA agrees to provide a service outside the 

warranty, the customer will be invoiced for all repair and transport 

costs.   

AXDIA will not accept any packages that have not first been 

approved by AXDIA by means of an RMA (Return Material 

Authorization). 

Содержание IEOS NEXT 10 OFFICE EDITION

Страница 1: ......

Страница 2: ...ry Card 14 Connect via USB 15 Transferring Files 16 Turning On Off 17 Screen Lock 17 Home Screen 18 Using the Touch Screen 23 Bluetooth Connection 25 Access Internet Wifi 26 Virtual Keyboard 34 Using the Web Browser 35 Sending Receiving E Mails 37 Playing Music 41 Photo Playback 44 Camera usage 46 ES File Explorer 49 Manage Third party Applications 54 System Settings 56 Troubleshooting 59 Specific...

Страница 3: ...he battery at leas t once per month to maint ain battery life z Charge the battery if a The battery level icon displays An empty battery b The device powers off automatically when restarted c There is no response when pressing keys with keys unlocked and battery full z When the device is being formatt ed or transferring a file do not interrupt the connection Otherwise dat a may be corrupted of los...

Страница 4: ...at may be of sufficient magnitude to constitute a risk of electric shock To reduce the risk of electric shock do not remove the cover or back as there ar e no user serviceable p arts inside Refer servicing to qualified personnel The exclamation point withi n an equilateral triangle is intended to alert the user to the presence of import ant operating and maintenance instru ctions in the literature...

Страница 5: ... www odys de Disposal Correct Disposal of this product This marking indicates that this product should not be disposed of with other household waste in the EU To prevent possible harm to the environment or human health from uncontrolled waste disposal recycle it responsibly to promote the sustainable reuse of material resources To dispose of your used device please use the return and collection sy...

Страница 6: ...wing link www odys de Service Downloads http www odys de web downloads_de html This device uses a non harmonized frequency and is suit able for operation in the following European countries Germany Belgium Netherlands Luxembourg Austria Switzerland France Spain Portugal Italy Greece Norway Sweden Finland Denmark Liechtenstein Within the European Union operation of the WLAN Bluetooth function in bu...

Страница 7: ...tablish a safe volume level Set your volume control at a low setting Slowly inc rease the sound until you can hear it comfortably and clearly without distortion Listen for reasonable periods of time prol onged exposure to sound even at normally safe levels can also cause hearing loss Be sure to use your equipm ent reasonably an d take appropriate breaks Be sure to observe the following guidelines ...

Страница 8: ...our website For questions or problems read our FAQs on our website or contact our after sales service The product includes software components licensed under GNU General Public License GPL If you would like to receive more information about the appropriate source code please refer to our Service Center Manufacturer Axdia International GmbH Formerweg 9 D 47877 Willich Germany Tel 49 0 2154 8826 0 F...

Страница 9: ...in the safety instructions Any other usage is considered to be improper and may lead to material damages and even personal injuries Moreover it w ill result in the immediate loss of guarantee The manufacturer does not bear any liability for damages caused due to improper use This manual may not reflect your actual device s operation All information is subject to change without prior notification P...

Страница 10: ...evice Select if you would like to update manually or if the system update should be done automatically Please note that updates improve the capability oft that device Therefore updates are highly recommended Settings und saved Data will not be influenced by a successful update However it is highly recommended to save your data before making an update Note Take care to save your data regularly in a...

Страница 11: ...Application Support With the built in Android TM OS you can inst all a large number of third party applications in this device Please note that you need to insert a Micro SD Card for it Built in G sensor The screen changes to landscape or portrait automatically when the device rotates Entertainment You can enjoy music movies pictures and e books with the Mobile Tablet Accessories z USB Cable z Pow...

Страница 12: ... off the device if it freezes or behaves otherwise abnormally Reset 4 Volume key Press briefly to increase decrease the volume level 5 Front camera Front facing camera for t aking avatar pictures 6 Micro SD slot For use with st andard Micro SD SDHC memory card 7 Micro USB Support for USB stick Surf stick Keyboards and Mouse Note An OTG supporting adapter cable is required optional Charge and power...

Страница 13: ...hones Note The integrated speaker is automatically disabled when headphones are connected to the device 9 Microphone Hint Simultaneously press the On Of f key and the V olume Minus Key together for 2 seconds to take a screenshot of the current view 12 ...

Страница 14: ...t for extended battery life it is suggested NOT to use the device when it is charging c It is recommended to charge the battery before you use the device for the first time d For maximum performance lithium ion batteries need to be used often If you don t use the device often be sure to recharge the battery at least once per month e Should the rechargeable battery of the device discharge completel...

Страница 15: ...he memory card enter the Explorer mode by tapping the Explorer icon and select the SD Card directory To remove Micro SD card push the card once again until it clicks Note We recommend using only Micro SD or SDHC cards up to 32GB capacity When a Micro SD card is inserted in or ejected from the device it may take few seconds for the device to update the content Please avoid inserting or ejecting Mic...

Страница 16: ...e to plug and socket On the side of the plug there are usually small sizes of hooks that secure the fixation Pay special attention on the posi tion of the hooks they sho w upward when connecting cables while the screen is above Establish a USB connection The device will b e recognized as a media device from your computer Note While connected to USB the USB Symbol is shown at the top left corner of...

Страница 17: ...omputer Containing the internal memory of the device and the memory card inserted into the device Now you can copy files from or to these disk drives just as you would on your hard drive 3 Disconnect the device from the PC safely Note The pre installed applications and Android OS occupy a considerable part of capacity nearly more than 1GB it is normal that you see huge difference between available...

Страница 18: ...ower button until you see the option P ower Off tap on Power Of f and then t ap on OK Tip This device will sleep with the screen off if it stays inactive for a few seconds You can briefly press the Power button to turn on the screen and wake it up Screen Lock The screen automati cally turns of f and locks it self after a set period of time When the screen turned of f press the Power button to ligh...

Страница 19: ...m settings c Google Search Bar d Google Voice Search e Camera To open the camera app f eManual Manual in ebook format g OneDrive To open the cloud app h ES File Explorer To open the File Explorer i Browser Tap to launch the Browser to visit your favorite websites j E Mail To open the mail client k Word To open the word processing 18 ...

Страница 20: ...rogram n Skype To open the messenger program o System Settings p Back soft key Tap to return to the previous screen If the keyboard is on the screen tap to close the keyboard q Home soft key Tap to return to the home screen r Running apps Show apps which are currently running in background Menu soft Key Tap to view the option menu Note When you Tap the Menu key from within an application you will ...

Страница 21: ...t the top of the screen is divided into two areas 1 System hints Wipe from the upper edge towards the centre to open the bar Here status information and system messages are diplayed Clear list Current notification s and indications 20 ...

Страница 22: ... may vary and could show different or less elements at your device Current user information Wifi status Battery status System settings Airplan mode Note All wireless connections will be canceled Turn off on automatic screen rotation Brightness setting Wireless screen transmission Miracast Status of mobile phone network 3G Set Volume GPS positioning on or off Turn Bluetooth on or off Mobile data co...

Страница 23: ... applications installed on your device tap the Application Tab Refer to the figure below Note Installed on this unit are various third party applications Apps whose author is not Axdia International All rights and obligations remain the sole responsibility of the author of these applications Axdia accepts no liability for any malfunction of third party apps For support or license inquiries please ...

Страница 24: ...e by tapping on the Back icon see below center of the screen Wherever you are in the interface you can go back directly to the Home Screen by tapping on the Home icon see below center of the screen Tap on to display the recent opened applications Wipe the bar upwards or downwards to search for running programs Tap the program to open it Note The shown applications run in the background Thereby sys...

Страница 25: ...wsers File Music Video Photo etc you can drag your finger up and down to scroll the file list up and down y In the Web browser you can scroll up and down by tapping on the page and dragging it up or down be careful not to tap a link until you are ready y Tap the link to open the page Note DON T use a pen or pencil or other sharp items to tap on the screen This may damage the screen DON T place hea...

Страница 26: ...y have typed on both or only one of the devices for a PIN code Please note The device is only visible as long as the Bluetooth settings are active When exiting the men the visibility is disabled Depending on the device another procedure code can be applied For some devices you will find a four digit pin number in the manual of this device Newer devices will be shown the code to be used on one or b...

Страница 27: ...onnect to it Every time Your Tablet is in range of a network that you have already configured once it will attempt to make a connection Note In order to establish a Wi Fi connection it is required to know the encryption password of the desired Wi Fi network Be sure that you are allowed to use this network and that no other settings of this network like MAC address filter will deny the connection T...

Страница 28: ...outer Note Consult the user manual of t he router and learn how to add a WPS device to the router Please use the manual setup if WPS does not work 1 Press the WPS button on the wireless router Note Some router use the WLAN key also for WPS Connections Please press the WLAN Key of your Router for 6 Seconds in these cases 2 In the Home screen tap on the Settings icon 27 ...

Страница 29: ...3 Tap on Wi Fi 4 Activate the function by tapping on OFF if necessary Wi Fi ON is displayed 28 ...

Страница 30: ...5 Open the Advanced Wi Fi Settings by tapping on at the right hand at the top 6 Push the WPS Push Button 7 Please wait until the pairing is completed 29 ...

Страница 31: ...Manual WIFI Configuring 1 In the Home screen tap on the Settings icon 2 Tap on Wi Fi 30 ...

Страница 32: ...e The available network list is constantly refreshed automatically When the Wi Fi is enabled Your Tablet will connect automatically to your configured networks when they are in range If Your Tablet finds a network that has never been configured it will display a notification icon 31 ...

Страница 33: ... network parameters you entered If the connection is successful the message Connected to XXX will appear under the WIFI setting c d Advanced Connection To manually scan for available Wi Fi networks in the WIRELESS NETWORKS screen tap the SCAN ic on at top right corner If the Wi Fi network you want to connect does not appear in the list then tap ADD NETWORK Enter the required settings then tap Save...

Страница 34: ...are already connected to a network the W eb browser will simply open and you can st art browsing the W eb To access a new website tap the Menu icon to display the menu and input another address Note Not all wireless networks offer access to the Internet Some Wi Fi networks only link several computers together without any Internet connection 33 ...

Страница 35: ...cons h Close keyboard Special character Some or the keys provide the possibility to enter special character 1 Press the corresponding key and keep pressing 2 While pressing move your finger to the desired character 3 Release to write the selected symbol Select Input Method Open the Android keyboard settings and select the input method if more than one input method is installed Please note The keyb...

Страница 36: ...p in the field then use the virtual keyboard to type in the required text y You can tap on the screen to enlarge or diminish the page Web browser options While a Web page is prompted press the menu key at the top right corner to open the browser settings Refresh Stop Refresh the current page after it was fully loaded Stops refreshing Forward To open the next page if existing NewTab Open a new tab ...

Страница 37: ...owser settings General Select start up page and auto fill text functions Privacy security To manage formulary data cache cookies and history Accessibility Text settings and contrast Advanced Advanced browser settings Bandwidth management Settings for data transfer Labs Experimental functions 36 ...

Страница 38: ...receive emails via the Internet Make sure that you have an Internet connection before using the email service In the Home screen tap the email icon to access the email app alternatively tap on the app shortcut to display all apps and then tap on the email icon to launch the email app 37 ...

Страница 39: ...ver Contact your service provider network administrator or search for information on the Internet 4 The device verifies the settings After Your account is set up and email is on its way is displayed your account is set up successfully 5 Enter your name to be displayed on emails and tap on Done to finish Please note If you have more than one account every time when you start up the email app you en...

Страница 40: ...he menu items Select Accounts 3 In the top right corner tap on Add Account 4 Follow the steps to set up an email account Delete Email Account 1 Launch the email app press the Menu icon and tap on Settings in the top right corner to display the menu items Select Accounts 2 Select the account to be deleted and navigate in the settings list for this account all the way to the bottom 3 Tap on Remove A...

Страница 41: ...View Emails Access your mailbox when you start up the email app y In the mailbox wipe with your finger up and down to scroll through the email list y Tap on an email to open it 40 ...

Страница 42: ... by cat egories Artist Album Title Genre etc if your music files contain these song information tags If some of your music files do not contain information tags they will be classified as Unknown in the Music Library When new music is copied to the device the Music Library will be updated automatically y You can drag your finger up and down on the file list to scroll through the list y Tap a track...

Страница 43: ...ndom playback on off d Change replay mode e Search for tracks f Menu button Further functions g Back to Music Library h CD cover if any i ID3 informations Performer Album j Short press Previous track Keep pressing Fast rewind k Play Pause l Short press Next track Keep pressing Fast forward m Progress bar l 42 ...

Страница 44: ...o a different location in the song You can also drag the cursor in the progression bar to another location in the song y Tapping continuously on the ID3 information tag will search for the information about the track from the Internet y To go back to the music library tap on y To go back directly to the Home screen tap on the Home icon or Return icon 43 ...

Страница 45: ...er Thumbnails The first screen in photo mode shows all photos videos and sub folders in the device or on memory card as thumbnails Tap on a photo thumbnail to view the photo in full screen mode Open the sub folder if the photo is stored in a sub folder to display the photo video contents as thumbnails 44 ...

Страница 46: ... y Tap on the screen again to end the slide show y Wipe with your finger to the left or right over the image to display the previous next photo y To zoom in or out tap with two fingers on the display and pinch the image between thumb and pointer finger y Tap on and then Rotate Left or Rotate Right to rotate the image 90 left or right y Tap on again and then on Details to show image details y Tap o...

Страница 47: ...on HDR capture Switch Camera Live Photo mode Normal mode Shutter Settings Video recording Face beauty mode Image settings Panorama mode Exposure White balance Szenen mode Color effect Zoom Simultaneously tap with two fingers at the screen Drag the fingers together or apart to zoom out or in Zoom out Zoom in 46 ...

Страница 48: ...gs for sharpness colour and saturation high middle low Anti Flicker Ein Aus Restore defaults Setting Value ZSD ON OFF Voice Capture ON OFF Face Detection ON OFF Self Timer OFF 2 sec 10 sec Continuous shot 40 shots 99 shots Picture size Resolution according to the used camera Preview size Standard 4 3 Full screen Please note The Picture size may not be set to all possible values if the preview size...

Страница 49: ...Setting Value Noise reduction ON OFF EIS ON OFF Microphone ON OFF Audio Mode Normal Time lapse interval OFF 1 sec 1 5 sec or 2 sec Video quality Medium Low high 48 ...

Страница 50: ...ccess Quick Access hidden App configuration Menu bar Quick Access The main elements and places of memory are accessible directly from the rapid access at the left edge Favorites Access memory locations marked as favorites Local Navigate to the location of local memories Library Media library Network Access to network elements Tools Aditional features By pressing the toolbar bar will be hidden 49 ...

Страница 51: ...other location Note If you reached already the lowest level of the file the left side is no longer present Window management If a new item is opened via a quick access it will be opened in a new window The open windows are displayed in the upper part of the screen between the windows you can change by wiping the left or right Press to close the current window Opened window Close this window 50 ...

Страница 52: ...ith your finger up and down to scroll through the file list y To open a file or folder tap the file folder y Go back one level in the directory by pressing the left side of the path y Tap on the Return or Home button anywhere in the app to return to the Home screen y Touch to navigate local in the fast access and Home directly in the directory Menu Bar You can use the toolbar to navigate in the in...

Страница 53: ...y Move Files and Folders 1 In the file list scroll up and down by wiping with your finger to select the file folder to be copied or moved 2 Hold your finger on the selected file folder until a pop up menu appears 3 Select Copy or Move from the pop up menu Navigate to the location where you wish to copy or move the file folder to 4 Press on to add into it the file or data 5 You may open the field a...

Страница 54: ...Delete to confirm or Cancel to cancel deleting Rename Files and Folders 1 In the file list scroll up and down by wiping with your finger to select the file folder to be renamed 2 Hold your finger on the selected file folder until a pop up menu appears 3 Select Rename from the pop up menu 4 Tap on the input field to display the virtual keyboard then enter the letters from the virtual keyboard to re...

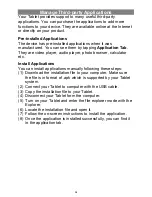
Страница 55: ...lculator etc Install Applications You can install applications manually following these steps 1 Download the installation file to your computer Make sure the file is in format of apk which is supported by your Tablet system 2 Connect your Tablet to computer with the USB cable 3 Copy the installation file to your Tablet 4 Disconnect your Tablet form the computer 5 Turn on your Tablet and enter the ...

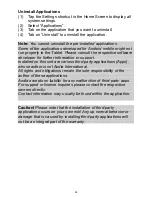
Страница 56: ...n or support Installed on this unit are various third party applications Apps whose author is not Axdia International All rights and obligations remain the sole responsibility of the author of these applications Axdia accepts no liability for any malfunction of third party apps For support or license inquiries please contact the respective owners directly Contact information may usually be found w...

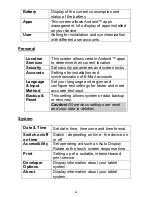
Страница 57: ...on the icon to return to the setting menu or tap on the icon to return to the Home screen Your changes are saved Wireless Networks Wi Fi Tap to enable disable the Wi Fi connection Press the menu button or tap on the icon in the top right corner and then on Advanced in the top right corner to manually set up and manage your Wi Fi networks Bluetooth Tap to activate deactivate the Bluetooth function ...

Страница 58: ...iour of the device when rotating Display Coordinate system of the acceleration sensor Predefined profiles Choose a predefined profile and set the volume for music videos notifications and button tones With the volume keys at the right side of your device you can modify volume levels Sound and notifications Notifications and other Further settings for sound and notfications Storage This setting all...

Страница 59: ... Mail accounts Language Input Method Set your language and region and configure text settings for faster and more accurate text input Backup Reset This setting allows system or data backup or recovery Caution All previous settings are reset and your data is deleted System Date Time Set date time time zone and time format Switch on off on time Switch depending on time the device on or off Accessibi...

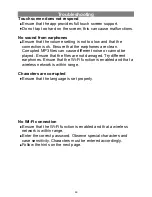
Страница 60: ... can cause different noise or cannot be played Ensure that the files are not damaged Try different earphones Ensure that the Wi Fi function is enabled and that a wireless network is within range Characters are corrupted y Ensure that the language is set properly No Wi Fi connection y Ensure that the Wi Fi function is enabled and that a wireless network is within range y Enter the correct password ...

Страница 61: ...n router configuration Decrease distance to router Firmware update or change channel No Internet Connecting Not connected MAC filter active Deactivate filter in router configuration No Internet Connecting Authenticatio n Not connected Password wrong or wrong spelling Check and re enter password No Internet Connecting Authenticati on Retrieving IP address Not connected Router configurat ion faulty ...

Страница 62: ...the connection of earphone is ok Please confirm the earphone is clean The broken MP3 will produce noise with different grades even cannot play music Please confirm the complete files Try another pair of headphones Take care that Wifi is enabled and a wireless network is in range The character on the display screen is in abnormal shape y Please confirm the language that you selected is correct No U...

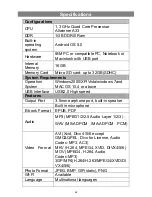
Страница 63: ... Vista windows 7and MAC OS 10 4 or above USB Interface USB2 0 High speed Features Output Port 3 5mm earphone port built in speaker Built in microphone E book Format EPUB PDF Audio MP3 MPEG1 2 2 5 Audio Layer 1 2 3 WAV MS ADPCM IMA ADPCM PCM Video For mat AVI Xvid Divx 4 5 6 except GMC QPEL Divx for License Audio Codec MP3 AC3 MKV H 264 MPEG4 XVID DIVX4 5 6 MOV MPEG4 H 264 Audio Codec MP3 3GP MP4 H...

Страница 64: ...8 9 10 Max 2Mbps Sorenson H 263 Photo Resolution JPEG Baseline Max 8000 8000 GIF Static Max 1000 1000 Network Connection Media Wi Fi 802 11 b g n GSM GPRS EDGE 900 1800 1900 MHz WCDMA HSDPA HSUPA 900 2100 MHz Battery Charge Time About 6 Hours Battery Life About 6 hours Display 10 1 TFT IPS LED Touchpad capacitive touch pad 1024 x 600 pixels SNR 65dB above Frequency Response Range 20Hz 20KHz Power ...

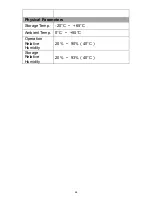
Страница 65: ...Physical Parameters Storage Temp 20 C 65 C Ambient Temp 0 C 50 C Operation Relative Humidity 20 90 40 C Storage Relative Humidity 20 93 40 C 64 ...

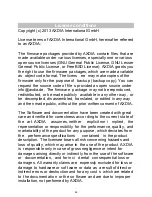
Страница 66: ...c without the prior written consent of AXDIA The Software and documentation have been created with great care and verified for correctness acco rding to the current state of the art AXDIA assumes neither explicit nor i mplied the representation or responsibility for the performance quality and marketability of the product for any purpose which deviates from the performance specifications contained...

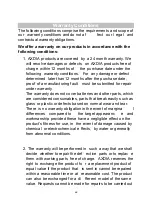
Страница 67: ...umables parts that break easily such as glass or plastic or defects based on normal wear and tear There is no warranty obligation in the event of margina l differences compared to the target appearanc e and workmanship provided these have a negligible effect on the product s fitness for use in the event of damage caused by chemical or electrochemical e ffects by water or generally from abnormal co...

Страница 68: ...fore accept no liability fo r accidental indirect or other consequential damage of any ki nd which leads to usage restrictions data loss loss of earnings or interruption to business Asserting a warranty claim 1 To make use of the w arranty service you must contact the AXDIA Service Center by e mail fax or phone see below for contact details You can also use the service form on our website or on th...

Страница 69: ...t it will meet its warranty obligations in a ccordance with the warranty conditions and will return t he product to the sender with carriage and insurance paid Service outside of warranty AXDIA can refuse any service claim made that is not covered by the warranty If AXDIA agrees to provide a service outside the warranty the customer will be invoiced for all repair and transport costs AXDIA will no...

Отзывы: