OCULUS Go Скачать руководство пользователя страница 3

Version 2 


3. Before use 


1) Ensure the headset is charged 
2) Install the eyeglasses spacer if needed. You can try the headset on without the 

spacer first if your vision is close to perfect. 
2.1) The following link provides a step-by-step guide on installing the 
eyeglasses spaser: 

https://youtu.be/YA5U8MbkUrE


3) Wipe the lenses with provided lens cloth. 
4) Ensure the controller contains the AA battery and the lanyard is attached.  


4. Operation 


1) Put the headset on adjusting the straps as necessary – it should fit comfortably 

and shouldn’t apply too much pressure on your face and head. 

2) Press the power button until the Oculus appear on the screen. 
3) If prompted, long-press the oculus/menu button on the controller to recenter the 

screen. (The system can give a warning of low controller battery charge in 
which case the AA battery should be replaced). 
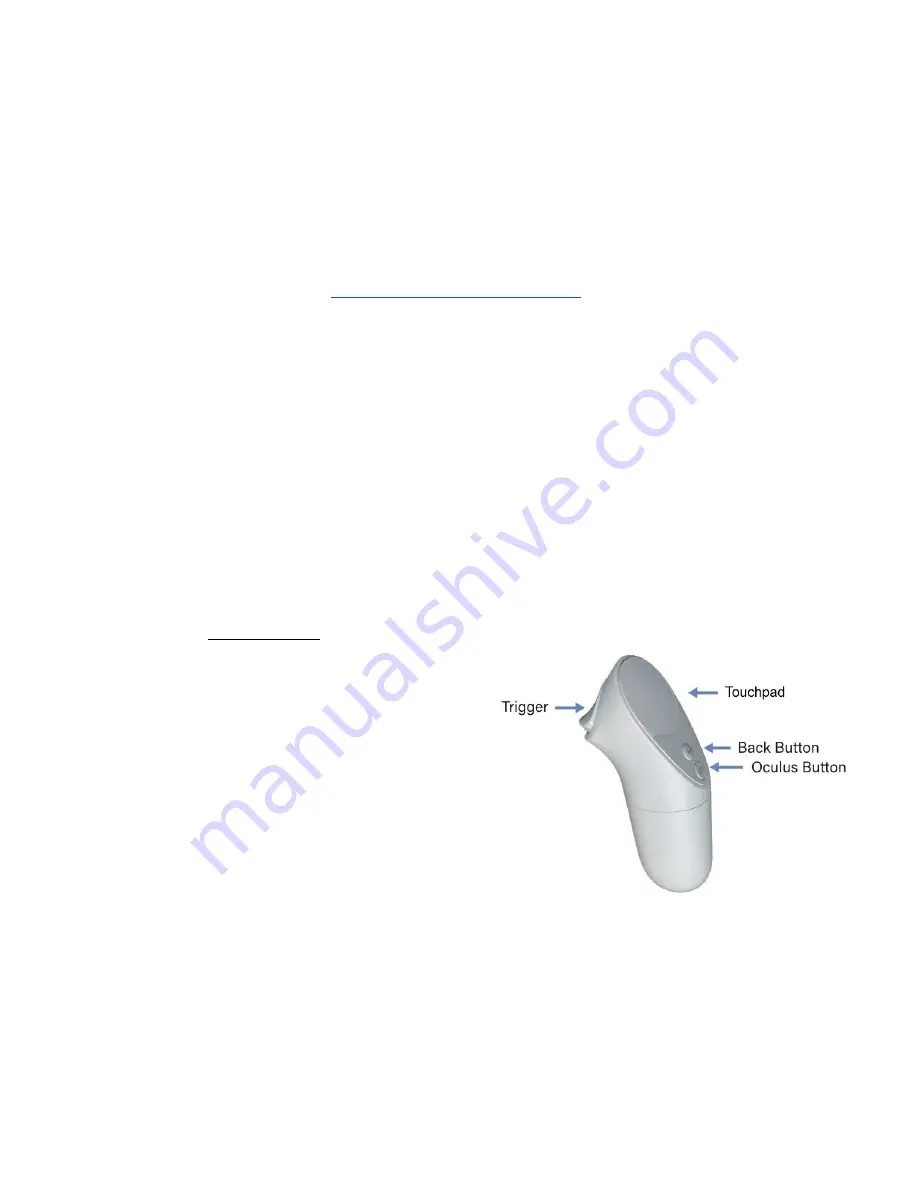
3.1) 

Controller use


Oculus/menu button

 - short 

press brings up the menu bar, 
long press recenters the menu 
in the direction the controller is 
pointing to 

Back button

 - returns to the 

previous menu 

Trigger button

 - equivalent to 

ok/enter command (eg. press 
a button in program) 

Touchpad

 - used for scrolling 

(up/down/left/right) 
 

4) Once at the home screen, adjust your view by slowly moving the headset 

up/down and left/right until the image is clear. 

5) The headset display can go to sleep (if taken off for example) – short press the 

power button to turn the display back on. Alternatively a sensor inside the 
headset reactives it every time it's put on. 

Содержание Go

Страница 1: ...Version 2 Oculus Go operation manual 1...

Страница 2: ...ckage contents and controls overview 2 Charging 1 Plug in the supplied micro USB cable and connect to a computer or USB charger 2 Refer to the below table to get the battery status while the headset i...

Страница 3: ...3 If prompted long press the oculus menu button on the controller to recenter the screen The system can give a warning of low controller battery charge in which case the AA battery should be replaced...

Страница 4: ...ted on the top of the headset 7 Headphones can be used if needed the headphone jack inlet is located next to the micro USB port 4 1 Light indicator meanings while in operation 5 Connecting to Wi Fi Wi...

Страница 5: ...name excluding my yorku ca Anonymous identity skip Password your yorku password Advanced skip 6 360 video file transfer 1 File transfer is only available on Windows machines 2 When powered on plug th...

Страница 6: ...files to the directory 7 The files are now available for viewing on the headset 7 Watching 360 video 1 Select Library on the menu bar on the bottom you can access the menu bar from any place in the sy...

Страница 7: ...Version 2 3 Select Internal Storage to open device s media file storage 7...

Страница 8: ...videos are shown here Click on a video to start playback 5 The video will start 5 1 Optional Sometimes the video can be presented in 2D flat screen format press the 2D button on the playback menu bar...

Страница 9: ...Version 2 8 Safety instructions from the manufacturer The full list of health and safety instructions can be found at https www oculus com legal health and safety warnings locale en_US 9...

Отзывы: