Octava UHD44MX-IP Скачать руководство пользователя страница 20


6. TCP/IP Control 

6.1 

Control Modes 

TCP/IP default settings: IP is 192.168.0.178, Gateway is 192.168.0.1, and Serial Port is 
4001. IP can be changed as you need, Serial Port cannot be changed. 


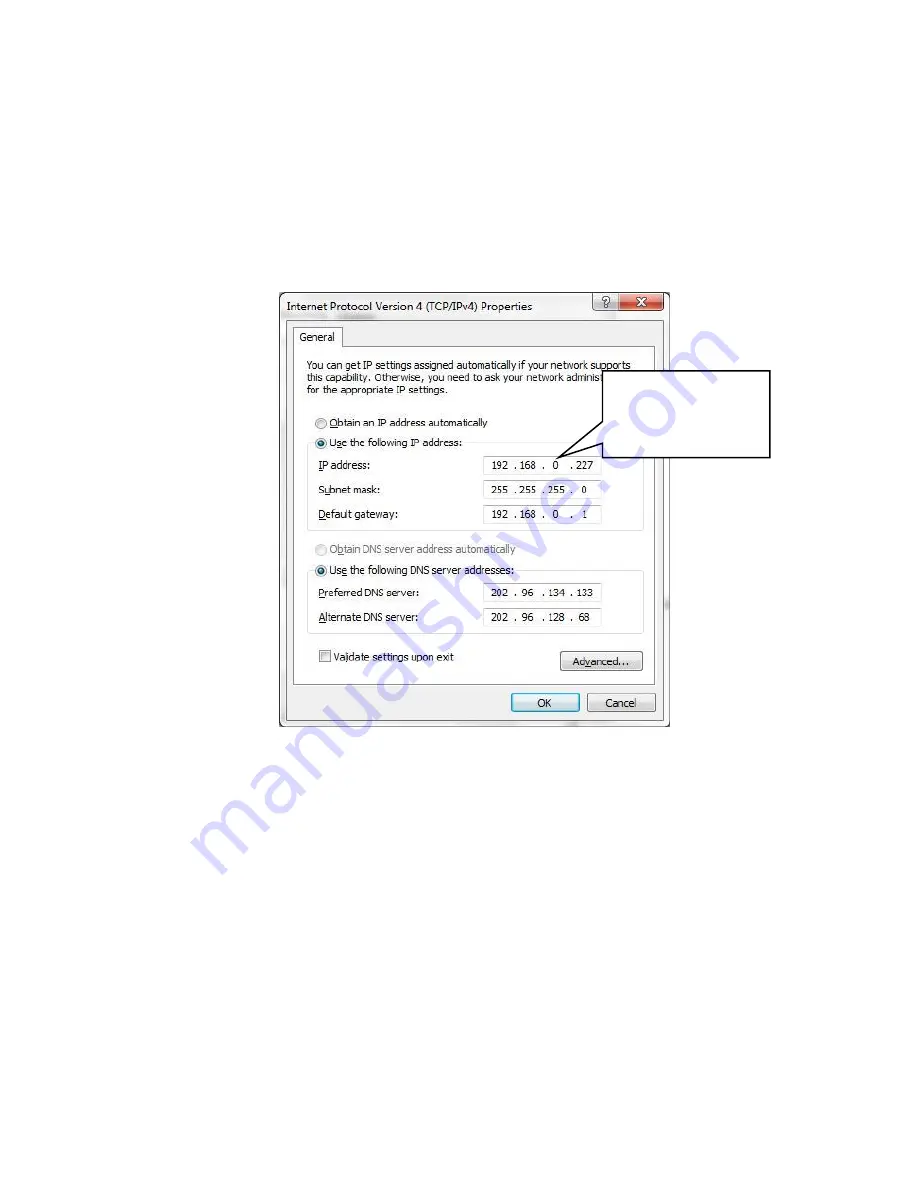
Controlled by single PC 

Connect a computer to the TCP/IP port of the UHD44MX-IP, and set its network 
segment to the same as the default IP of the UHD44MX-IP (192.168.0.178). 


Figure 7- 1 Modify the IP of PC 


Controlled by PC(s) in LAN 

The UHD44MX-IP can be connected with a router to make up a LAN with the PC(s), 
this make it able to be controlled in a LAN. When control, just make sure the 
UHD44MX-IP’s network segment is the same with the router. Please connect as the 
following figure for LAN control. 

Same network 
segment as the 
switcher 


Содержание UHD44MX-IP

Страница 1: ...UHD44MX IP 4x4 HDMI2 0 Matrix Switcher ...

Страница 2: ...e with the instructions may cause harmful interference to radio communications It has been tested and found to comply with the limits for a Class B digital device pursuant to part 15 of the FCC Rules These limits are designed to provide reasonable protection against harmful interference in a commercial installation Operation of this equipment in a residential area is likely to cause interference i...

Страница 3: ...y become wet Unplug the power supplies and the AC power cord before cleaning or removing any panels for servicing When adding or removing devices to or from the product disconnect all power cables from the existing product before you add a device Operation safety Install the product in a well ventilated location Keep ventilation opening free of obstructions Don t block any ventilation openings on ...

Страница 4: ...www octavainc com info octavainc com 770 825 0388 ...

Страница 5: ...I O connection switching 5 4 2 EDID Configuration 5 4 3 I O connection Inquiry 6 5 IR Control 7 6 RS232 Control 8 6 1 Installation uninstallation of RS232 Control Software 8 6 2 Basic Settings 8 6 3 RS232 Communication Commands 9 6 3 1 System Commands 9 6 3 2 Lock unlock Commands 10 6 3 3 Switching Commands 10 6 3 4 Scene Commands 11 6 3 5 HDCP Compliance 11 6 3 6 EDID Configuration 11 6 3 7 Enabl...

Страница 6: ...tching 19 7 3 3 EDID Configuration 20 7 3 4 Audio Out 21 7 3 5 Status Setting 22 7 3 6 Network Configuration 23 7 3 7 Password Modification 24 7 4 TCP IP Port Configuration 25 7 5 GUI Update 25 8 Firmware Upgrade through USB port 26 9 Specification 27 10 Panel Drawing 28 11 Troubleshooting Maintenance 29 12 Customer Service 30 ...

Страница 7: ...atible and is backward compatible to the earlier versions Transmits 4Kx2K 60Hz 4 4 4 signal up to 16 4 feet 5m via HDMI port Provides powerful EDID management built in EDID can be invoked via DIP switcher on rear panel RS232 command or web based GUI Controllable via front panel button IR RS232 TCP IP or web based GUI LCD screen shows real time I O connection status Convenient firmware upgrade thro...

Страница 8: ...green in standby mode Blinks red when upgrading IR sensor Built in IR sensor receive IR signal sent from IR remote LCD Screen Displays real time operation status INPUT selector button Total 4 input selector buttons press one of buttons to switch input source OUTPUT selector button Total 4 output selector buttons press the buttons to select output channel OUTPUTS 3 1 2 4 6 3 5 ...

Страница 9: ...D 4 pin EDID DIP switchers to set EDID data 1 stands for On 0 stands for Off Refer to 4 2 EDID Configurarion for more detials RS232 Serial control port connect with control device IR IN Connects with external IR receiver for using the IR remote to control the Matrix Switcher TCP IP Connect control PC for TCP IP control DC 24V Connect with 24VDC 1 25A power adaptor Ground Connect to ground Pictures...

Страница 10: ... output ports with HDMI cables Step3 Connect audio system to the SPDIF audio outputs optional Step4 Connect the RS232 port of control device e g Central Control System PC and UHD44MX IP to enable serial control optional Step5 Insert an IR receiver to the IR IN port to control this switcher via IR Remote optional Step6 Connect the TCP IP port to network to enable TCP IP control optional Step7 Plug ...

Страница 11: ...f If the conversion failed they will be off immediately 3 5 EDID Configuration The rear panel boasts a 4 pin EDID DIP switcher to manage EDID The EDID data and its corresponding DIP switcher status are shown in the below list DIP Switcher NO Status EDID 0 0000 Pass through default 1 0001 720P 2D Pass through CH 2 0010 720P 3D Pass through CH 3 0011 1080P 2D Pass through CH 4 0100 1080P 3D Pass thr...

Страница 12: ...3 6 I O connection Inquiry Press OUTPUTS button 1 2 3 or 4 to inquiry its corresponding input and then the indicator of the input button will turn green ...

Страница 13: ...utput channel selection buttons same with the corresponding front panel buttons Menu buttons ALL EDID CLEAR and ENTER ALL Select all inputs outputs To convert an input to all outputs Example Input 1 to all Outputs Press INPUTS 1 ALL ENTER EDID management button 1 One input port learns the EDID data from one output port Example Input 2 learns EDID data from output 4 Press EDID INPUTS 2 OUTPUTS 4 EN...

Страница 14: ...44MX IP with necessary input devices and output devices Then connect it with a PC installed RS232 control software Double click the software icon to run this software Here we take the software CommWatch exe as example The icon is showed as below Figure 6 1 Icon of CommWatch The interface of the control software is showed as below Figure 6 2 Control Interface of CommWatch Parameter Configuration ar...

Страница 15: ...DID management with grey background 5 3 1 System Commands Command Function Feedback Example Type Query the model UHD44MX IP Version Query the version of firmware VX X X Demo Switch to the demo mode convert input and output in turn like1B1 1B2 4B3 4B4 1B1 and so on The switching interval is 2 seconds Demo Mode AV 01 01 AV 01 02 AV 01 03 AV 01 04 AV 02 01 Normal Mode Undo To cancel the current opera...

Страница 16: ...signals from the input channel x to the output channel x x 1 4 01 Through x Switch off the output channel x x 1 4 01 Closed x Switch on the output channel x x 1 4 02 Open All Switch on all output channels All Open x1 V x2 Switch the input channel x1 to one or several output channels x2 separate output channels with comma x1 x2 1 4 AV 02 04 Status x Query the I O connection status of output x x 1 4...

Страница 17: ...mand Y O is for output X 1 4 is the number of the port if the X ALL it means all ports Z is for HDCP compliant status the value may be 1 HDCP compliant or 0 not HDCP compliant O ALL 0 0801 Auto HDCP management activate carrier native mode 0801 9973 Query the HDCP status of the input signals In 01 02 03 04 HDCP Y N Y N 9974 Query the HDCP status of the output signals Out 01 02 03 04 HDCP Y N Y N 5 ...

Страница 18: ... EDID switching Enable input Y to learn the EDID data of output X If the EDID data is not available then set it as initialized EDID data EDIDM3B1 EDID x y Set the EDID data of input port x to built in EDID No y y 0 11 correspond to the 12 embedded EDID data separately EDID x y EDIDUpgrade x Upgrade EDID data via the RS232 port X represents the input port and x 5 represents all input ports When the...

Страница 19: ...port x X 1 2 3 4 enable the port x X 5 enable all ports DigitAudio ON with x ALL Outputs DigitAudioOFF x Disable SPDIF audio output port x X 1 2 3 4 disable the port x X 5 disable all ports DigitAudio OFF with x ALL Outputs 9977 Query the status of digital audio of output channels Out 01 02 03 04 Audio Y Y Y Y ...

Страница 20: ...HD44MX IP and set its network segment to the same as the default IP of the UHD44MX IP 192 168 0 178 Figure 7 1 Modify the IP of PC Controlled by PC s in LAN The UHD44MX IP can be connected with a router to make up a LAN with the PC s this make it able to be controlled in a LAN When control just make sure the UHD44MX IP s network segment is the same with the router Please connect as the following f...

Страница 21: ...ork segment to the original one Step5 Connect the UHD44MX IP and PC s to the router In the same LAN each PC is able to control the UHD44MX IP asynchronously Then it s able to control the device via a TCP IP communication software 6 2 TCP IP Communication Software Control Exampled by TCPUDP software 1 Connect a computer with TCPUDP software to UHD44MX IP Open the TCPUDP software or any other TCP IP...

Страница 22: ...signed area to control UHD44MX IP see as below Figure 7 4 Control interface of TCPUDP Here you will receive the feedback after a command is sent Enter your command here Commands are the same with RS232 commands listed in 6 3 RS232 Communication Commands ...

Страница 23: ... and click the icon as below PCs running Windows XP system may occur issues in finding UPnP icon follow these steps to switch on UPnP protocol 1 Add UPnP component go to Control Panel double click Add Delete Programs double click Add Delete windows component tick UPnP click Next click OK 2 Enable Windows Firewall go to Control Panel double click Windows Firewall click Others tick UPnP framework 3 ...

Страница 24: ...administrator and user mode There are 2 selectable usernames admin default password admin and user default password user Login as admin can access more configuration interfaces than user 6 3 1 Scene Setting Type the user name admin password admin and then click LOGIN it will show the Scene menu as shown below Figure 7 6 Scene Menu ...

Страница 25: ...on matrix displays every possible connection between every input and output users can carry on the connections by clicking corresponding button Buttons 1 4 at the right bottom corner provides quick saving and recall for overall connection status For example Step1 Select button1 at INPUT column Step2 Select button 1 at OUTPUT column If all OUTPUT ports in needed you only need to click All Step3 Cho...

Страница 26: ...Configuration 1 Click setting button to enter the below interface User can select EDID in accordance with actual needs Figure 7 8 Embedded EDID 2 Select EDID Copy to enter the below interface Figure 7 9 Copy EDID ...

Страница 27: ...one or more input devices that need to gain EDID When select To All inputs all input devices will copy the EDID from output device Step3 Click Confirm to save the setting or click Cancel to cancel operation 6 3 4 Audio Out Select Audio Out to enter the following interface to turn on off the Audio Output passage Figure 7 10 Audio EDID ...

Страница 28: ...o enter the following interface to modify the product name and its model and then they will be display in LCD screen Figure 7 11 Status LCD Button label Select Button to enter the following interface to modify the name of buttons Figure 7 12 Status Button ...

Страница 29: ...terface to modify the name of scenes Figure 7 13 Status Scene 6 3 6 Network Configuration Click Network to enter the below interface to inquire and configure network settings including MAC address IP address subnet mask and Gateway Figure 7 14 Network ...

Страница 30: ...cation Click Password to enter the below interface to inquire and modify the admin or user password Figure 7 15 Password In the above interface turn on the Front Panel to lock all buttons of machine they cannot be operated ...

Страница 31: ...Enter correct username and password to log in the WebServer Username admin Password admin Here is the main configuration interface of the WebServer Figure 7 16 TCP IP Configuration 6 5 GUI Update GUI for UHD44MX IP supports online update in http 192 168 0 178 100 Type the username and password the same as the GUI log in settings modified password will be available only after rebooting to log in th...

Страница 32: ...e latest upgrade file bin to PC Step2 Connect the USB ports of UHD44MX IP and the PC via USB cable Step3 Double click the update software icon see as below It will enter the upgrade interface shown as below Step4 Click Connect USB Step5 Click Open to load the upgrade file then click Updata to start firmware upgrading Note To ensure available control the COM number of the PC should be 1 9 ...

Страница 33: ...mm mini jack female RJ45 3 pin pluggable terminal block Video Signal HDMI2 0 HDCP2 2 Audio Signal Dolby Digital DTS DTS HD General EDID Management In built EDID data and manual EDID management Resolution Range 640x480 60Hz 4Kx2K 60Hz 4 4 4 1080P 3D HDMI Cable Length 16 ft recommended when possible Power Supply 24VDC 1 25A Power Consumption 14W Max Dimension W H D 17 2 x 9 3 x 1 7 Inches 43 7 x 23 ...

Страница 34: ...9 Panel Drawing ...

Страница 35: ...10 Troubleshooting Maintenance Contact us at www octavainc com ...

Страница 36: ...plies or parts not meeting our specifications No certificate or invoice as the proof of warranty The product model showed on the warranty card does not match with the model of the product for repairing or had been altered Damage caused by excessive force Servicing not authorized by distributor Any other causes which does not relate to a product defect Shipping fees installation or labor charges fo...

Отзывы: