background image


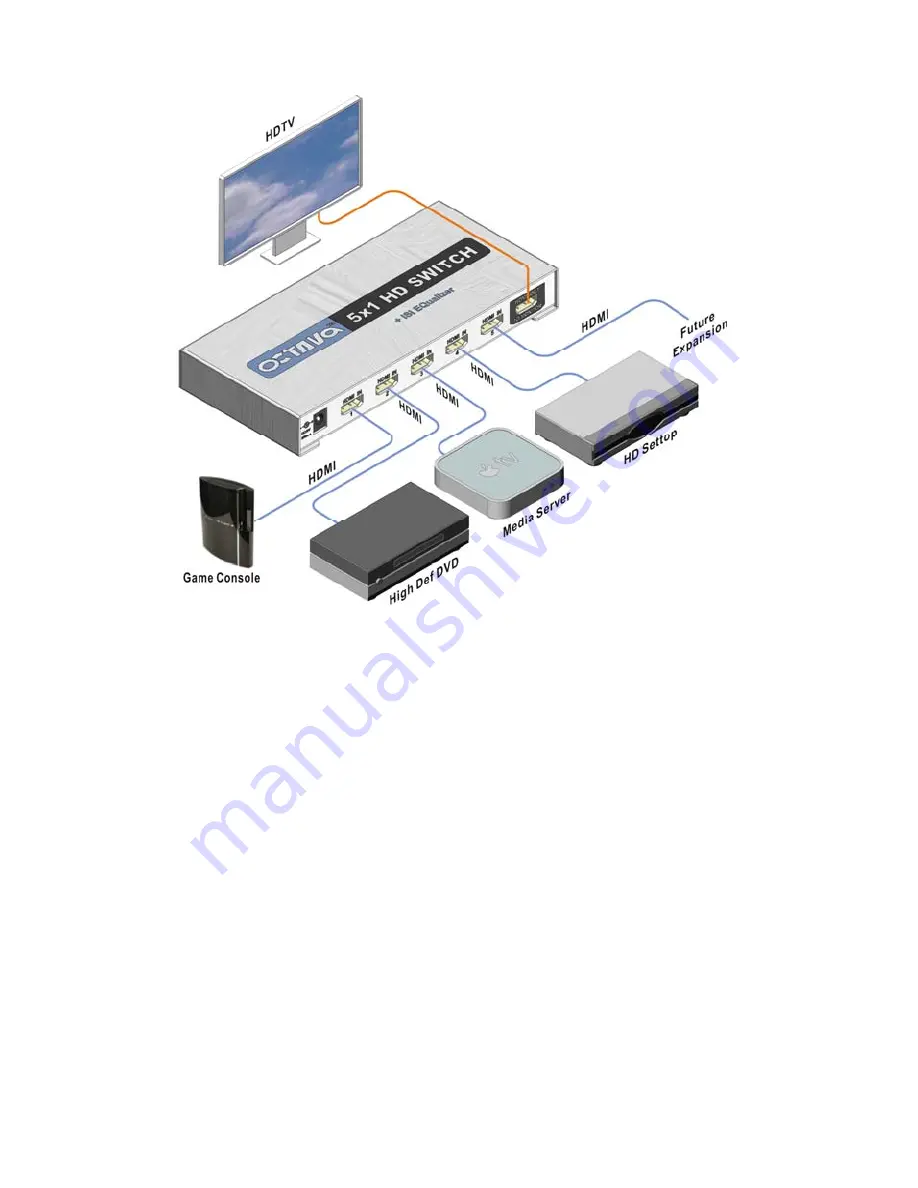
Application Diagram 


Installation: 

 
1) Connect the Display to the HDMI OUT port 
2) Connect the HDMI sources to the HDMI INPUTS 
3) Connect the DC power adapter 


Smart Scan

TM


Octava’s HD switch with Smart Scan

TM

 saves you the hassle of 

fumbling with multiple remote controls. Simply power on the HDMI 
source you want to view and the HDMI switch will automatically 
switch to the correct port.     


Содержание HDS5

Страница 1: ...1 User s Guide ...

Страница 2: ...power supplies and the AC power cord before cleaning or removing any panels for servicing When adding or removing devices to or from the product disconnect all power cables from the existing product before you add a device Operation safety Install the product in a well ventilated location Keep ventilation opening free of obstructions Don t block any ventilation openings on the unit Avoid dust humi...

Страница 3: ...e HDMI sources to the HDMI INPUTS 3 Connect the DC power adapter Smart ScanTM Octava s HD switch with Smart ScanTM saves you the hassle of fumbling with multiple remote controls Simply power on the HDMI source you want to view and the HDMI switch will automatically switch to the correct port ...

Страница 4: ...tly selects the correct HDMI source for touchless video switching note1 Features Connect multiple HD video sources to one HD display Works with HDMI HDCP enabled HDTV Supports high resolution video 1080 P 4k UHD 3840x2160 24 Hz Smart SCAN TM algorithm intelligently selects the correct input Remote Control included Allows fast direct access to the desired channel LED dimming allows for ultimate the...

Страница 5: ...ng numbered source Turns ON OFF the LED light Turns ON HDMI switch Put HDMI switch to Standby mode Other Not used Octava s Remote control uses discrete code so can be easily integrated with most Universal Remote Controls such as Logitech s Harmony Pressing ON OFF Turns On Off the HDMI switch Pressing 1 5 Selects the corresponding numbered source Pressing LED Turns on off the Blue LED light ...

Страница 6: ... off Smart Scan may not work properly in systems with multiple sources that are by design always ON Function Action Notes Change Channel Press to manually change to the next available Source Function Action Notes Disable Smart Scan Press for 5 seconds until LED strobe Enable Smart Scan Press for 5 seconds until LED strobe Input Source LED Infrared Detector Input Select DC Power Input HDMI output T...

Страница 7: ...E TO THE CLAIM WHETHER BASED IN CONTRACT WARRANTY INDEMNITY OR TORT INCLUDING WITHOUT LIMITATION NEGLIGENCE AND STRICT LIABILITY OR OTHERWISE IN NO EVENT SHALL OCTAVA INC OR ITS SUPPLIERS BE LIABLE FOR ANY SPECIAL INCIDENTAL CONSEQUENTIAL OR OTHER INDIRECT DAMAGES INCLUDING WITHOUT LIMITATION LOSS OF REVENUES PROFITS OR OPPORTUNITIES HOWEVER CAUSED ON ANY THEORY OF LIABILITY WHETHER OR NOT OCTAVA ...

Страница 8: ...tava IR Receiver cable Dimension 7 3 x 3 4 x 1 inch 185 5 x 85 5 x 25 1 mm DC adapter included 9VDC 1 5A Remote control IR Infrared Discrete code For Questions and support Email info octavainc com URL www octavainc com Copyright 2015 Octava Inc All rights reserved HDMI the HDMI logo and High Definition Multimedia Interface are trademarks or registered trademarks of HDMI Licensing LL C All trademar...

Отзывы: