ochain Active Spider Скачать руководство пользователя страница 9

Unscrew all four m4x8 mm bolts using a 2.5 mm hex wrench. 

Carefully lift only the upper element of OCHAIN so that small parts, elastomers ad 

springs will not loose their positioning. 

NOTE: use one finger to hold and maintain the bottom part of OCHAIN  laid on a flat 

stable surface.

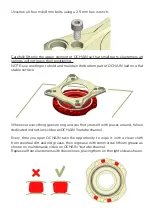
Whenever everything goes wrong and you find yourself with pieces around, follow 

dedicated instructions video onOCHAIN Youtube channel.

Every time you open OCHAIN take the opportunity to wipe it with a clean cloth 

from eventual dirt and old grease, then regrease with commercial lithium grease as 

shown on maintenance video on OCHAIN Youtube channel.

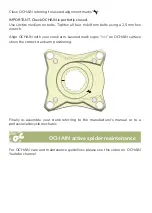
Replace all four elastomers with chosen ones, placing them on the right side as shown.

Содержание Active Spider

Страница 1: ...OCHAIN active spider user manual installation setup and maintenance...

Страница 2: ...and damages caused by transport If Ochain srl after checking the product finds that the damage is due to one of the reasons mentioned above the warranty request will not be accepted and the defective...

Страница 3: ...questions please contact a professional bike mechanic or ask OCHAIN for support at info ochain bike Maintenance Ochain srl Via Carlo Avegno 1 21100 Varese VA ITALY Please note all instructions are sub...

Страница 4: ...Boost only OCHAIN active spider specifications Chainline is the distance between the centerline of your frame and the average centerline of your chainring Compatibility OCHAIN is a 1X 10⁴ BCD Boost a...

Страница 5: ...Bolt Circle Diameter or BCD is the imaginary cirlce that passes through the center of all the chainring mounting holes...

Страница 6: ...reasons make sure to check good conditions of chainring with the help of a professional bicycle mechanic Install your chainring on OCHAIN using 4 standard chainring nuts WARNING OCHAIN fits only with...

Страница 7: ...ur crank arm as shown in the picture Lasered mark signs on OCHAIN surface show the correct crank arm position Finally re assemble your crankset referring to the manufacturer s manual or to a professio...

Страница 8: ...lease refer to our website for detailed setup suggestions Disassemble your crankset always referring to the manufacturer s manual or to a professional bicycle mechanic Remove OCHAIN from the crank arm...

Страница 9: ...a flat stable surface Whenever everything goes wrong and you find yourself with pieces around follow dedicated instructions video onOCHAIN Youtube channel Every time you open OCHAIN take the opportun...

Страница 10: ...2 5 mm hex wrench Align OCHAIN with your crank arm Lasered mark signs on OCHAIN surface show the correct crank arm positioning Finally re assemble your crank referring to the manufacturer s manual or...

Отзывы: