background image


Exemple :  Vous  voulez  cuire  des  aliments  avec  une  puissance  de 
100P pendant 3 minutes, puis les passer au gril pendant 9 minutes. 
C'est un réglage en 2 étapes. 


Étapes 

Affichage 

100P de puissance micro-ondes pendant 3 min. 


1.1 

Appuyez sur le bouton

 Puissance

 pour sélectionner 

le niveau de puissance. 

100P 

1.2 

Tournez  le  bouton 

Temps/Poids

  pour  régler  le 

temps de cuisson. 

03:00 

20P pour 9 min 


2.1 

Appuyez sur le bouton

 Puissance

 pour sélectionner 

le niveau de puissance souhaitée 

20P 

2.2 

Tournez  le  bouton 

Temps/Poids

  pour  régler  le 

temps de cuisson. 

09:00 

Débutez la cuisson en appuyant sur 

Départ


a. Lorsque la cuisson à 100% de puissance est terminée, le four 
commencera automatiquement l'opération suivante. 

b. 4 étapes maximum peuvent être réglées par heure, répétez les 
étapes 

13. FONCTION « SÉCURITÉ ENFANT » 

Utilisez  cette  fonctionnalité  pour  verrouiller  le  panneau  de 
commande lorsque vous nettoyez le four, afin que les enfants ne 
puissent  pas  utiliser  le  four  sans  surveillance.  Tous  les  boutons 
deviennent inopérants avec ce mode. 

1)  Réglez  le  verrouillage---Maintenez  enfoncé  le  bouton 

Pause/Annulation

 pendant environ 3 secondes. 

2)  Annulez  le  verrouillage---Maintenez  enfoncé  le  bouton 

Pause/Annulation

 pendant environ 3 secondes. 


18

Содержание OCEAMO23B

Страница 1: ...MICROWAVE OVEN Instruction manual FOUR A MICRO ONDES Guide d utillisation R f OCEAMO23B...

Страница 2: ......

Страница 3: ...p rature de l huile d Apr s utilisation essuyez le couvercle du guide ondes l aide d un chiffon humide puis utilisez un chiffon sec pour enlever toute trace d aliments et de graisse L accumulation de...

Страница 4: ...es 5 Si le cordon d alimentation est endommag il doit tre remplac par le fabricant ou son agent de service ou un technicien qualifi afin d viter un danger 6 Apr s cuisson le r cipient est tr s chaud U...

Страница 5: ...aration n cessitant le retrait du couvercle qui emp che d tre expos l nergie micro ondes 17 En cas d mission de fum e teignez ou d branchez l appareil et laissez la porte ferm e afin d touffer les fla...

Страница 6: ...ins chauffants pantoufles ponges linge humide et autres articles similaires peuvent entra ner des risques de blessures d inflammation ou de feu 24 Cet appareil peut tre utilis par des enfants g s de 8...

Страница 7: ...n par micro ondes Cette exigence n est pas applicable si le fabricant sp cifie une taille et une forme de r cipients m talliques adapt s la cuisson par micro ondes INSTALLATION 1 Retirez la totalit de...

Страница 8: ...l est donc fortement recommand de placer une tasse d eau sur le plateau tournant r gler le four puissance lev e et le faire fonctionner plusieurs fois NETTOYAGE ENTRETIEN DU FOUR MICRO ONDES 1 Retirez...

Страница 9: ...pour que l enfant puisse utiliser le four en toute s curit et comprenne les dangers d une mauvaise utilisation ASTUCES DE NETTOYAGE D tails du nettoyage des joints de la porte de la cavit et des part...

Страница 10: ......

Страница 11: ...ur du four micro ondes pr s de la paroi du panneau de commande FONCTIONNEMENT DU PANNEAU DE COMMANDE 1 AVANT LA CUISSON La LED clignote 3 fois lorsque l alimentation est branch e Puis elle clignote vo...

Страница 12: ...ps sonores retentiront pour vous signaler de sortir les aliments Si vous n appuyez pas une fois sur le bouton Pause Annulation ou si vous n ouvrez pas la porte le bip sonore sera r p t intervalles de...

Страница 13: ...outon poss de deux fonctions le r glage de l horloge et le r glage du mode de d cong lation Si vous souhaitez r gler l horloge vous devez maintenir enfonc ce bouton pendant 3 secondes alors qu une pre...

Страница 14: ...Annuler pour supprimer la proc dure pr r gl e et ainsi viter un d part de cuisson non sollicit lors de la prochaine utilisation e la puissance micro ondes maximale le four r duira automatiquement la...

Страница 15: ...ION Cette fonction est con ue pour d congeler des aliments Appuyez sur le bouton D cong lation Horloge et l cran LED fera d filer d 1 d 2 d 3 d 1 Pour d congeler de la viande la plage de poids va de 0...

Страница 16: ...0 4 4 D butez la cuisson en appuyant sur D part 5 la moiti du temps de d cong lation 3 bips sonores retentiront deux fois pour vous avertir de retourner les aliments Ouvrez la porte et retournez les...

Страница 17: ...tiquement A 4 Pizza Chauffez 1 ou 2 parts de pizza A 5 Pomme de terre Pour la cuisson de b tonnets de pomme de terre coup s 5 mm de large de haut et de long Le poids total est d environ 0 45 ou 0 65...

Страница 18: ...TOMATIQUE FONCTION DIFF R Si vous ne souhaitez pas un d marrage imm diat vous pouvez pr r gler le mode et le temps de cuisson et le mode pr r gl d marrera automatiquement l heure choisie Le r glage co...

Страница 19: ...le temps de cuisson 09 30 2 3 Maintenez enfonc le bouton D cong lation Horloge pendant 3 secondes pour revenir l horloge actuelle 3 R glez l heure de d marrage choisie R p tez les tapes 1 2 1 3 1 4 4...

Страница 20: ...Poids pour r gler le temps de cuisson 09 00 3 D butez la cuisson en appuyant sur D part a Lorsque la cuisson 100 de puissance est termin e le four commencera automatiquement l op ration suivante b 4 t...

Страница 21: ...chaleur Oui Ne jamais utiliser de c ramique d cor e d un liser m tallique ou vernie Plastique r sistant la chaleur Oui ne pas utiliser pour une cuisson au four micro ondes tr s longue Verre r sistant...

Страница 22: ...t m langez une ou deux fois en cours de cuisson en allant de l ext rieur vers le centre du plat Laisser reposer les aliments la fin du temps de cuisson imparti laissez reposer les aliments dans le fou...

Страница 23: ...ppeler nos services 1 Mettez dans le four l quivalent d une tasse d eau environ 150 ml dans un verre mesureur et fermez bien la porte La lampe du four doit s teindre si la porte est ferm e correctemen...

Страница 24: ...i Jules Guesde 94400 VITRY SUR SEINE France LOT amc092018 OCEAMO23B Ref 23ux93 Mod le 230V 50Hz n o i s n e T Puissance d entr e micro ondes 1280W Fr quence 2450MHz l 3 2 r u o f u d t i c a p a C g k...

Страница 25: ...damp cloth followed by dry cloth to remove any food splashes and grease Built up grease may overheat and begin to cause smoke or catch fire e If materials inside the oven should smoke or ignite keep o...

Страница 26: ...ake out the food and avoid steam burns by directing steam away from the face and hands 7 Slowly lift the furthest edge of dishes cover and microwave plastic wrap and carefully open popcorn and oven co...

Страница 27: ...emitted switch off or unplug the appliance and keep the door closed in order to stifle any flames 20 Microwave heating of beverages can result in delayed eruptive boiling therefore care must be taken...

Страница 28: ...l not be made by children unless they are older than 8 and supervised Keep the appliance and its cord out of reach of children less than 8 years 27 This appliance is not intended for use by persons in...

Страница 29: ...he distance of the microwave to the ground should be at least 85 cm 4 The position of the oven shall be such that it is far from the TV Radio or antenna as picture disturbance The distance should be m...

Страница 30: ...at could adversely affect the life of the appliance and possibly result in a hazardous situation 3 Never use hard detergent gasoline abrasive powder or metal brush to clean any part of the appliance 4...

Страница 31: ......

Страница 32: ...ls it supports the turntable and helps it to balance when rotating 5 Turntable The food sits on the turntable its rotation during operation helps to cook food evenly Place the rotating ring first Fit...

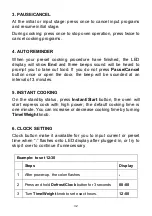
Страница 33: ...ING The LED flashes 3 times when plugged in power supply Then it flashes prompting you to input the cooking menu and time 2 TIME WEIGHT KNOB You can increase or decrease cooking time and weight during...

Страница 34: ...l be sounded at an interval of 3 minutes 5 INSTANT COOKING On the standby status press Instant Start button the oven will start express cook with high power the default cooking time is one minute You...

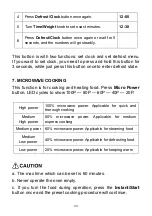
Страница 35: ...for cooking and heating food Press Micro Power button LED cycles to show 100P 80P 60P 40P 20P High power 100 microwave power Applicable for quick and thorough cooking Medium High power 80 microwave po...

Страница 36: ...essing Micro Power button consecutively 80P 3 Set cooking time by turning Time Weight knob 10 00 4 Press Instant Start button to start and LED will count down to show running time 8 EXPRESS COOKING Pr...

Страница 37: ...obtain uniform effect b Usually defrosting will need longer time than that of cooking the food c If the food can be cut by knife the defrosting process can be considered completed d Microwave penetrat...

Страница 38: ...Method A 1 Popcorn Suitable for popping a bag of corn which is available in the market weighted 3 0 or 3 5Oz Popcorn prior to completing if the popping speed has been decreased to 1 time per 1 2 seco...

Страница 39: ...ny deviation has been found to the factor noted on above menu you can adjust the cooking time for best result Example Cook 0 5 kg rice Steps Display 1 After power up the colon flashes 2 Press Auto Coo...

Страница 40: ...1 4 Set minutes by turning Time Weight knob 12 30 1 5 Press Defrost Clock button once or waiting for 5 seconds and the numbers will go steady 12 30 2 Set the cooking menu and time 2 1 Select cooking...

Страница 41: ...20P for 9min 2 1 Press Micro Power button to select desired power level 20P 2 2 Turn Time Weight knob to set cooking time 9 00 3 Start cooking by pressing Instant Start a When microwave 100 power cook...

Страница 42: ...r Microwave Notes Heat resistant ceramic Yes Never use the ceramics which are decorated with metal rim or glazed Heat resistant plastic Yes Can not be used for long time microwave cooking Heat resista...

Страница 43: ...tanding time After cooking times out leave the food in the oven for an adequate length of time this allows it to complete its cooking cycle and cooling it down in a gradual manner Whether the food is...

Страница 44: ...your hand over the rear ventilation openings 4 Does the turntable rotate The turntable can rotate clockwise or counter clockwise This is quite normal 5 Is the water inside the oven hot If NO is the a...

Страница 45: ...has been damaged Correct Disposal of this product This marking indicates that this product should not be disposed with other household wastes throughout the EU To prevent possible harm to the environ...

Страница 46: ......

Страница 47: ......

Страница 48: ......

Отзывы: