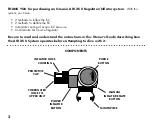
Oceanic Air XS 2 Скачать руководство пользователя страница 6

6

CORRUGATED HOSES/PULL CONNECTOR

Two corrugated hoses are joined by a Pull Connector.  By pulling on the rounded Pull Connector you can 

operate the Rapid Exhaust Valve located in the upper (shoulder) unit while you are using the AIR XS II 

Regulator without having to remove the Regulator from your mouth.  The extended length of the Hose As-

sembly prevents any resistance during head movement.

INFLATOR OVERPRESSURE RELIEF VALVE (OPV)

The integrated OPV, located in the upper (shoulder) unit, automatically vents excess pressure from the BC 

during ascent or if over pressurized with the Power Inflator.  This component of the AIR XS II operates auto-

matically so no instructions for its use are necessary.

WARNING:  The OPV integrated into the upper (shoulder) unit is set to operate 

at a lower relief pressure than the OPV located on the back of the BC to prevent 

damage to the material of the BC air cell.  It is imperative that only Oceanic 

inflator assemblies be used with Oceanic BCs. 

QUICK DISCONNECT CAP (SEE ILLUSTRATION ON PAGE 2)

The rubber Cap secured to the corrugated hose is provided to cover the quick release inlet fitting of the 

AIR XS II Power Inflator Assembly.  The Cap must be installed any time the Inflator Hose is disconnected to 
prevent entry of contaminants.

INFLATOR OPERATION

WARNING:  If you ever hear air, or see bubbles, escaping from the area around 

any of the AIR XS II's connectors, or if the BC fails to hold air, immediately 

terminate or postpone the dive until the BC and AIR XS II can be serviced by 

an Authorized Oceanic Dealer.  You must not dive with an AIR XS II or BC that 
exhibits any signs or symptoms of leakage.

Содержание Air XS 2

Страница 1: ......

Страница 2: ...venting of excess BC pressure an Alternate Air Source Regulator Be sure to read and understand the instructions in this Owner s Guide describing how the AIR XS II System operates before attempting to dive with it PURGE BUTTON POWER INFLATOR BUTTON MANUAL INFLATE DEFLATE BUTTON MOUTHPIECE CORRUGATED HOSE TO UPPER UNIT PROTECTIVE CAP INFLATOR HOSE COUPLING COMPONENTS ...

Страница 3: ... WARRANTY NOTICES 4 COMPATIBILITY AND INSTALLATION 5 FEATURES 5 INFLATOR OPERATION 6 REGULATOR OPERATION 8 CARE AND MAINTENANCE 9 GUIDELINE FOR MINIMUM SEVICE INTERVALS 12 COLD WATER DIVING 13 OCEANIC WORLD WIDE 14 RECORDS 15 ...

Страница 4: ...ed translated or reduced to any electronic medium or machine readable form without prior consent in writing from Oceanic 2002 Design Oceanic AIR XS II Owner s Guide Doc No 12 2116 2002 Design 1998 San Leandro CA USA When using Air with this regulator equipment the Air used must meet EN132 Annex A standards The AIR XS II Regulator Inflator System is designed for minimum working pressures of 120 PSI...

Страница 5: ...nd pull back the coupling release with your thumb and forefinger While holding back the coupling release press it onto the quick release fitting on the AIR XS II and let go of the coupling release while continuing to hold the hose onto the quick release fitting Ensure they are firmly attached prior to pressurizing the regulator inflator system NOTE Refer to the illustration on page 2 for identific...

Страница 6: ...egrated into the upper shoulder unit is set to operate at a lower relief pressure than the OPV located on the back of the BC to prevent damage to the material of the BC air cell It is imperative that only Oceanic inflator assemblies be used with Oceanic BCs QUICK DISCONNECT CAP SEE ILLUSTRATION ON PAGE 2 The rubber Cap secured to the corrugated hose is provided to cover the quick release inlet fit...

Страница 7: ...ill hear the sound of air venting from OPV indicating that it is working properly While the BC is still inflated listen for any undesired air leakage around the AIR XS II The BC should stay inflated until you deflate it manually BC DEFLATION USING THE RAPID EXHAUST VALVE REV The Rapid Exhaust Valve REV is located inside the upper shoulder unit of the Inflator Assembly It is con nected to the lower...

Страница 8: ...ATION USING THE MANUAL INFLATOR DEFLATOR BUTTON To deflate the BC through the Mouthpiece hold the lower power unit higher than the top of the BC and depress the Round Button located on the right side of the Mouthpiece to vent the air from the BC To ensure complete deflation of the BC the Mouthpiece must be held higher than the top of the BC While underwater you will hear the air as it bubbles out ...

Страница 9: ...w and have the entire AIR XS II inspected and serviced annually by your local Authorized Oceanic Dealer DISCONNECTING THE INFLATOR HOSE Close the Cylinder Valve and purge vent the Regulator Assembly completely of all pressure by depressing a second stage Purge Button Grasp the Quick Disconnect Coupling on the AIR XS II Inflator Hose second stage end between the palm of your hand and fingers pull b...

Страница 10: ...surized Remove from the bath and rinse all components of the Assembly with slow running fresh water DO NOT use full water pressure Sand that has collected behind the Lower Power unit Cover behind the Purge Button can be rinsed out by flushing tap water through the opening in the Cover Do not pry or lift up on the Purge But ton or use high pressure water that could damage the internal Diaphragm If ...

Страница 11: ...e or repair any components of the AIR XS II or to adjust the Regulator Doing so could cause misoperation while underwater resulting in serious injury or death It will also void the warranty Once each year your complete BC AIR XS II assembly should be inspected and serviced by an Authorized Oceanic Dealer More frequent service is recommended if you dive in severe conditions or more frequently than ...

Страница 12: ...ected and serviced as required prior to use Equipment used for dive training and or consumer rental activities Equipment should be inspected prior to every use Equipment should be serviced at least once every 6 months regardless of use Equipment should be serviced after 100 dives prior to further use Equipment stored for more than 3 months should be inspected and serviced as required prior to use ...

Страница 13: ...in proper training in the specialized techniques required for diving in cold water environments and failure to apply such techniques to handle situations that could result in Regulator freezing will place you in risk of serious injury or death All Oceanic Regulator First Stages are classified as being suitable for use in waters having Temperatures of 50 F 10 C and higher Refer to the Regulator Own...

Страница 14: ...e oceanic de OCEANIC UK Devon United Kingdom Tel 44 1404 891819 Fax 44 0 1404 891909 Web www OceanicUK com E mail helpyou oceanicuk com OCEANIC AUSTRALIA Rosebud Victoria Australia Tel 61 3 5986 0100 Fax 61 3 5986 1760 Web www OceanicAUS com au E mail sales OceanicAUS com au OCEANIC ASIA PACIFIC Singapore Tel 65 6391 1420 Fax 65 6297 5424 E mail info oceanicasia com sg OCEANIC HAWAII and MICRONESI...

Страница 15: ..._____________________ Date of Purchase ________________________________ Oceanic Dealer ________________________________ Dealer Phone No ________________________________ INSPECTIONS SERVICE Date Service Performed Authorized Technician ...

Страница 16: ......

Отзывы: