background image

WaRRaNTY

All standard Ocean Rodeo products are covered by a 
One Year Warranty offered to the original purchaser on 
workmanship, with a One Year Warranty on materials. 
Warranty is limited to the repair or replacement of Ocean 
Rodeo product at our option. The warranty does not 
cover damage caused by normal wear and tear, fading, 
misuse or negligence, but not limited to punctures, sun 
exposure, seam failure due to over inflation, damage in 
the sun, damage caused by use in waves or shore break 
and damage caused by anything other than defects in 
material and workmanship. This warranty is invalid if 
unauthorized repairs have been carried out. Repairs or 
alterations not covered by warranty will be billed to the 
customer. Factory seconds and clear out products sold at 
a discount carry no warranty. 

26

Содержание Sle Kite

Страница 1: ...SLE KITE MANUAL ...

Страница 2: ..._______________________________________________________________________________________________________________________________ _________________________________________________________________________________________________________________________________________________________________________________________________________________ ______________________________________________________________...

Страница 3: ...Kite bar____________________________________________________________________________________________________________________10 Attaching flying lines to your OR SLE kite______________________________12 Launching Your SLE Kite_______________________________________________________________________________15 Kite care and maintenance____________________________________________________________________...

Страница 4: ... product Our kites are the result of years of passionate R D mixed with technical expertise Enjoy A label showing your serial number is sewn at the underside of the leading edge center strut Important For simplified warranty claims and product updates please register your product with Ocean Rodeo via our website www oceanrodeo com or mail in coupon found on the back page of this manual A user manu...

Страница 5: ...obstacles closer than 2 line lengths downwind people rocks etc Do not kite near power lines Do not ask a non kiter to assist in the launching or landing of a kite Always use the kite with a functioning safety system Always prevent kites from inadvertently launching on land by weighting with sand gravel etc Always announce when you are going to launch your kite so people can be prepared to move in ...

Страница 6: ...gth etc should all be considered When in doubt ask someone who is capable or if there is no one to ask err on the side of caution with a smaller sized kite Location Safe site criteria The site for your kiteboarding must meet the following criteria to ensure your safety and that of others No power lines within 3 line lengths 100 meters of beach No trees 1 line length 30 meters from beach Free from ...

Страница 7: ...to weigh down your kite sand fine gravel weight bag etc Important Before inserting pump nipple into bladder make several pumps to clear nipple of any debris sand stones etc Debris in the bladder can cause small punctures Always use the largest nozzle size possible The back draft valve can be damaged if the nozzle is inserted too far When pumping up a kite for its first time make sure the inner bla...

Страница 8: ...flate dump valve 8 Holding kite at center of leading edge rotate so that kite sits leading edge down and into the wind Use a weight sand fine gravel no sharp objects to weigh down the leading edge of the kite 4 Helpful Tip We recommend using a bag that contains sand fine gravel etc for weighting the kite This reduces your kite s exposure to abrasion 8 2 3 4 ...

Страница 9: ......

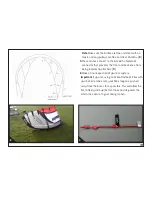
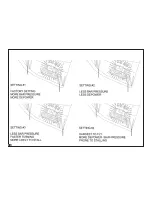
Страница 10: ...ng slebar php Line Lengths And Tuning All lines must be of equal length when measured from bar to end of lines with the center line un cleated and fully extended With all lines equal the kite will perform well and look like the kite pictured 1 Note Wingtips are parallel If the rear lines are shorter than the front lines the kite will be prone to stalling It would look like the 2nd kite pictured 2 ...

Страница 11: ...ave your kite pumped up and your drysuit on if required before laying out your lines Be considerate of others and recognize that tangles and confusion can result from lines left un attended Place the loose end of your lines near the center of the leading edge tube Unwind your lines walking upwind Identify lines at bar end and work your way down to the kite separating the lines Before attaching any...

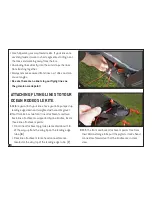
Страница 12: ...efore you attach your lines have your kite pumped up leading edge down and weighted with sand or gravel 2 Your flat kite has two front line attachments and two back line attachments supported by line bridles locate these line attachment points Front line attachment pigtails are located about 1 4 of the way up from the wing tip on the leading edge tube 6 Rear line attachment lark s head connectors ...

Страница 13: ...revents the front and back lines from being incorrectly attached 9 6 Make a final inspection of your bar system Important If you are using an Ocean Rodeo SLE bar with your SLE kite make sure your SLE stopper is pushed away from the bar as far as possible This will allow the bar to freely slide up the front lines and de power the kite in the event of a gust during launch 13 8 9 ...

Страница 14: ...14 ...

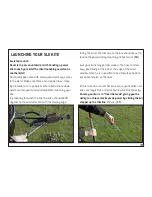
Страница 15: ...uld be 90 degrees to the wind direction with the leading edge facing the wind The trim line on the bar should be set to reduce the power during launching Sheeted in 10 Give your launching partner slack in the lines to allow easy positioning of the kite at the edge of the wind window Once he is in position take a few steps back to put some tension on the lines At this time do a visual check to ensu...

Страница 16: ... your kite to re launch If you want the kite to go to your left pull on the right side of the bar and grab the right outside leader line and pull it towards you Note You may have to pull a couple of meters of leader line to make the kite roll up on its wing tip Once the kite is on its wingtip continue to hold the leader line as the kite moves to the edge of the window When the kite is ready to lau...

Страница 17: ...round Once the kite starts to rotate pull the opposite outside line to complete the rotation This is not an easy technique and requires practice To make this technique work you must be aggressive with your leader lines Note When pulling leader lines avoid line tangles on your body and equipment 17 1 2 3 4 5 TOPVIEW ...

Страница 18: ...he edge of the window and have your partner catch the kite by grabbing onto the leading edge As soon as possible unhook from the chicken loop Self Landing If you have no helper available you can land your kite by use of a front line re ride handle Ease your kite into the water at the edge of the window unhook release your leash grab the front line re ride handle and let the bar go 12 The kite will...

Страница 19: ...KITE CARE AND MAINTENANCE ...

Страница 20: ... and have repaired as soon as possible Beware of heat in vehicles if storing your kite with struts inflated Check bridles for wear Check pulleys for wear and rinse to remove salt and sand Strut Bladder Removal 1 Lay the kite out in a clean non windy area 2 Recruit a friend or get a couple of weights sandbags heavy books etc 3 Disconnect the clamp from the valve stem by twisting the overlapping pie...

Страница 21: ...21 4 5 1 2 3 ...

Страница 22: ...eed the front of the bladder and valve into the strut 4 Have a friend hold the trialing edge of the strut or use a weight while you pull the bladder back into the strut with the line through the bladder opening 7 5 Make sure the valve is seated properly in the opening and disconnect the line 8 Note There is a cut edge on the valve stem This edge should face towards the leading edge tube 6 Close th...

Страница 23: ...23 9 10 11 6 7 8 ...

Страница 24: ...bladder out and tie one line each to the 2 ends of the bladder 15 3 Have a friend hold the wingtip or use weight 4 Detach clamps and tubing from LE 5 Gently push the two valves into the leading edge tube 16 6 Open the zipper and gently remove the bladder 17 7 Disconnect the lines from the bladder but be sure to leave them threaded in the LE tube 8 see Bladder Repairs above 24 13 14 12 ...

Страница 25: ...Re attach the line ends to the ends of the repaired bladder 4 Use the lines to gently pull the bladder back into the leading edge tube making sure there are no twists in the bladder and that the valves line up with the valve hole openings 5 Seat strut valves and then reattach tubing and clamps 6 Close the LE tube ends by closing the Velcro opening 25 16 17 15 ...

Страница 26: ...y normal wear and tear fading misuse or negligence but not limited to punctures sun exposure seam failure due to over inflation damage in the sun damage caused by use in waves or shore break and damage caused by anything other than defects in material and workmanship This warranty is invalid if unauthorized repairs have been carried out Repairs or alterations not covered by warranty will be billed...

Страница 27: ... other favorite sport Why did you purchase from Ocean Rodeo Pleasewriteanyothercommentsorquestionsyou mayhave Male Kiteboarding Snowboarding Landboarding Dealer Friend Trade Show Internet Television Magazine Ad Article Skiing Windsurfing Climbing Hangliding Snowboarding Mountain Biking Quality Fit Design Style Availability Price Reputation Other Surfing Female Wakeboarding Surfing Wakeboarding Pad...

Страница 28: ......

Отзывы: