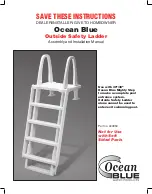
Ocean Blue 400950 Скачать руководство пользователя страница 3

- 2 -

Tools Needed: Rubber Mallet

Step #1

#1: 

Lay out the Swing-up 

Rails and Swing-up Treads as 
shown. 

NOTE: 

The bottom Swing-up 

Tread has a “house shaped” 
tab and is positioned at the 
bottom of the Swing-up Rail.

#3:

 Place the remaining Swing-up 

Rail over the tabs of the Swing-up 
Treads and tap into place using the 
rubber mallet. Set this assembly 
aside.

#1: 

Slip one of the Adjustable Rail 

Boots over the end of a Side Rail. 
It will need to be all the way on 
if the outside dimension of your 
pool is 50” or 
backed off to 
the marked 
number that 
corresponds 
with the height 
of your pool.

#2: 

Using two 1/4-20 x 1 1/2” long 

bolts and two 1/4-20 hex nuts,  
fasten the Adjustable Rail Boot to 
the Side Rail. Repeat for remaining 
Side Rail. 

Step #3 continued

Step #2

Tools Needed: Rubber Mallet, cordless drill with Phillips bit.

#2:

 Using a rubber mallet, tap


the 

Swing-up Treads into place.

Adjustable Rail Boots are not required if the outside height of your pool 
(measured from the ground to the top of the pool ledge) is 48” or less. If 
this measurement is more than 48” rail boots will be required.

 If the out-

side measurement of your pool is 48” or less, skip to step 3.

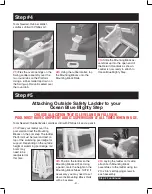
#1:


Overlap the flat end of the 

Handrail onto the top of the Side 
Rail. Using two 1/4 - 20 x 5/8” bolts 
and two 1/4- 20 hex nuts, attach the 
Handrail to the Side Rail. Repeat for 
the remaining Side Rail.

Step #3

Tools Needed: Rubber Mallet, cord-
less drill with Phillips bit.

Содержание 400950

Страница 1: ...ean Blue Outside Safety Ladder Assembly and Installation Manual Part no 400950 Use with 30 38 Ocean Blue Mighty Step to make a complete pool entrance system Outside Safety Ladder alone cannot be used...

Страница 2: ...Boot 1 Left Adjustable Rail Boot 2 Swing up Rails 3 Swing up Treads 1 Bottom Swing up Tread 1 Fixed Ladder Tread 1 Hardware Safety Pack Hardware Bag 10 1 4 20 hex nuts 20 1 4 10 x3 4 Phillips self tap...

Страница 3: ...long bolts and two 1 4 20 hex nuts fasten the Adjustable Rail Boot to the Side Rail Repeat for remaining Side Rail Step 3 continued Step 2 Tools Needed Rubber Mallet cordless drill with Phillips bit 2...

Страница 4: ...LATFORM ALL THE WAY DOWN ONTO LUGS 4 Laying the assembly on its side insert the Return Hand rails through the bottom of the remaining holes in the Platform until seated on the lugs 5 Using two 10 x 3...

Страница 5: ...ide Safety Ladder to your Ocean Blue Mighty Step CHOOSE A LOCATION THAT IS LEVEL AND IN FULL VIEW POOL MUST HAVE COMPETENT ADULT SUPERVISION AT ALL TIMES WHEN IN USE Step 5 1 Place your ladder over th...

Страница 6: ...OCKED AT ALL TIMES WHEN POOL IS NOT IN USE 5 Step 5 continued 4 Position the ladder over the pool step with the Mounting Blocks sitting flat on the top tread Center the ladder side to side and align t...

Страница 7: ...o over the instructions and procedures again to make sure nothing has been overlooked n Be sure and safe The manufacturer IS NOT responsible for improper assembly installation and use To keep your new...

Страница 8: ...or when there is no qualified adult supervision n Consult your local Building Department before installation of your pool and equipment n DANGER Use a cordless drill for assembly and installation NEVE...

Отзывы: