background image

4

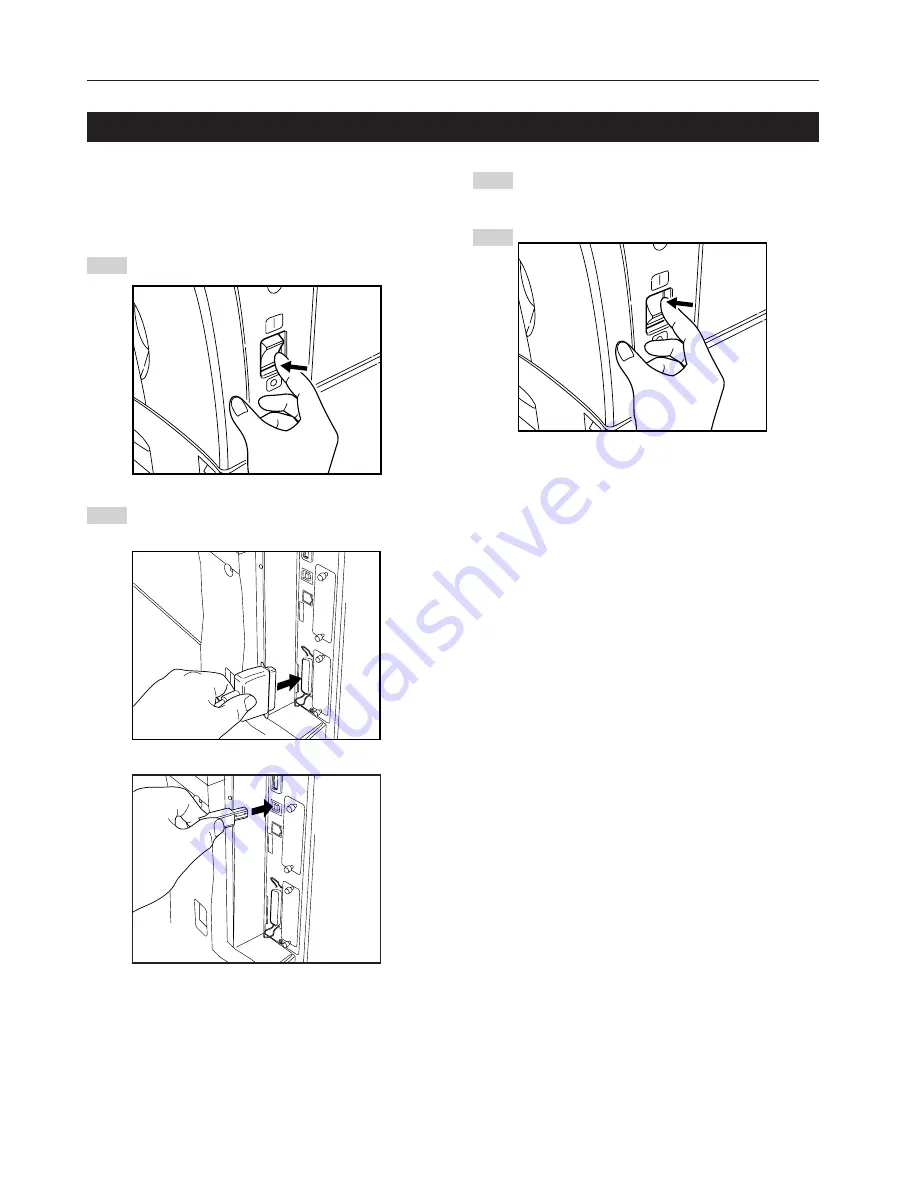
Connect the other end of the printer cable to the parallel
interface connector or USB interface connector on your
computer.

Turn the main switch to the printer back On.

* For details on printer interface setup, see “Functions

Edition”.

To connect the printer directly to your computer, use either a parallel
cable or USB cable.

CAUTION:

ALWAYS turn the main switch to the printer Off BEFORE
connecting the printer cable.

Turn the main switch located on the right side of the printer
Off and then turn the power off to your computer as well.

Connect the printer cable to the parallel interface connector
or USB interface connector located at the back of the right
side of the printer.

2. Set-up

2-1 Connecting the printer cable

1

2

3

4

Содержание OP1030

Страница 1: ...1 1 1 Océ OP1030 1040 1050 Printing System setup Operations Guide Education Services Océ Operations Guide English version ...

Страница 2: ......

Страница 3: ...tion Guide are trademarks or registered trademarks of their respective companies The designations and will not be used in this Operation Guide All rights reserved No part of this material may be reproduced or transmitted in any form or by any means electronic or mechanical including photocopying recording or by any information storage and retrieval system without permission in writing from the Pub...

Страница 4: ...NESS FOR A PARTICULAR PURPOSE Some jurisdictions do not allow the exclusion of implied warranties so the above exclusion may not apply to you SUPPLEMENT TO AGREEMENT FOR SOFTWARE BUNDLING AND DISTRIBUTION FOR ALDC 3 Limitation of Remedies IBM s entire liability under this license is the following 1 For any claim including fundamental breach in any form related in any way to this license IBM s liab...

Страница 5: ...n the connected computer please read those sections related to your specific computer environment and perform the appropriate set up and configuration explained there The Operation Guide Functions Edition contains explanations on printing performing certain settings and configurations and the procedures required at your computer About the On Line Manual The On Line Manual for this Operation Guide ...

Страница 6: ...e printer driver into your computer Refer to the Functions Edition When connecting the printer to a network Example connection 1 Connecting a network cable 100BASE TX 10BASE T etc to the printer Page 5 2 Performing network TCP IP settings at the printer Page 6 3 Installing the printer driver into your computer Refer to the Functions Edition PC Parallel cable or USB cable CD ROM PC Hub PC Network c...

Страница 7: ...4 Name of parts operation panel 3 2 Set up 4 2 1 Connecting the printer cable 4 2 2 Connecting the network cable 5 2 3 Installing the software 5 2 4 Network TCP IP settings 6 3 Troubleshooting 8 3 1 Canceling printing 8 3 2 When an error message appears 9 3 3 Basic troubleshooting chart 13 4 Specifications 14 ...

Страница 8: ...Card CompactFlash here Optional fonts macros and forms can be written into this Memory Card For details refer to the Operation Guide Functions Edition 2 USB interface connector This USB interface conforms to Hi Speed USB2 0 Use a USB cable to connect this connector with a USB port of your computer 3 Network interface connector Use a 10BASE T 100BASE TX network cable to connect the printer to a net...

Страница 9: ...rred Flashes amber when an error that does not interrupt printing has occurred 3 Touch panel Displays printer status and keys for operating various functions 4 Numeric keys Use to set enter settings directly 5 Touch panel in the printer mode 5 Printer Menu key Press to set printer defaults 6 Cancel key Press to stop printing or to clear an error message 7 GO key Press to restart printing as well a...

Страница 10: ...y to your computer use either a parallel cable or USB cable CAUTION ALWAYS turn the main switch to the printer Off BEFORE connecting the printer cable Turn the main switch located on the right side of the printer Off and then turn the power off to your computer as well Connect the printer cable to the parallel interface connector or USB interface connector located at the back of the right side of ...

Страница 11: ...fer to the Functions Edition 2 2 Connecting the network cable To connect the printer to a network use an Ethernet cable 100BASE TX or 10BASE T Turn the main switch located on the right side of the printer Off Connect the network cable to the Ethernet connector at the back of the right side of the printer Connect the other end of the network cable to your hub Turn the printer s main switch back On ...

Страница 12: ...etting To cancel the setting midway through it press the Stop Clear key Press the Printer key The printer will switch to the printer mode Touch the Printer Menu key Touch the Interface key Touch the Network tab key 1 2 3 4 5 6 7 8 2 4 Network TCP IP settings Use the and cursor keys to select TCP IP and then touch the Change key Select On under the TCP IP setting and Off under the DHCP setting Use ...

Страница 13: ...ed address press the sharp key to select a 3 digit block and use the numeric keys to enter the correct address Repeat the same procedure for the remaining blocks of the address Once the input of the IP address is completed touch the Close key The display will return to the TCP IP screen To cancel the entered address touch the Back key The address that was shown before you entered a new address wil...

Страница 14: ...ear data Touch the Cancel key Processing Orig page Count Set Output Plain 1 sided Plain 1 1 Top tray GO Cancel Select the interface over which the job to be cancelled was received To abort the cancel operation touch the Stop key Stop Select interface to cancel the job Printing will be canceled Canceling data GO Cancel 1 2 3 ...

Страница 15: ...ple sheets one at a time Every time you want to feed a sheet touch the GO key The cassette has run out of paper Add paper The finisher option has run out of staples Refer to the Operation Guide for the finisher and replenish the staples Trouble has occurred within the printer Contact your service representative or an authorized service center The department code you entered does not match the regi...

Страница 16: ...nd whether it is on the hard disk or not 06 There is not enough system memory Increase memory capacity 20 The hard disk is loaded in the wrong slot Load the hard disk in the correct slot 85 An illegal name has been used for the virtual tray Rename the tray correctly 86 The wrong password was used for the virtual mailbox Input the correct password 88 Some of the data in the virtual mailbox was not ...

Страница 17: ...or change the resolution A data overrun error has occurred due to insufficient memory Press the Printer key to switch to the printer mode Following commands will be displayed GO Continues printing Cancel Cancels the printing operation completely If auto recovery time has been set printing will resume automatically when the set time elapses Once this error message is displayed Page Protect will be ...

Страница 18: ... chad box Procedure An error occurred when reading the optional ROM Press the Printer key to switch to the printer mode and then touch the GO key to clear the error Initialize the hard disk Either the punch waste box is not correctly installed or it is full Reposition or empty it as necessary ...

Страница 19: ...ter On Is the printer off line Is the Status indicator flashing amber Is the printer cable appropriate and is it connected properly Is the setting configuration in your computer correct Is the emulation protocol setting correct Procedure Connect the power cord securely to a power source Turn the main switch to the printer On Be sure to use a compliant printer cable and make sure it is connected pr...

Страница 20: ...ing OFF 1800 dpi x 600 dpi With smoothing ON interpolated 2400 dpi x 600 dpi Maximum Printing Size A3 11 x 17 RAM Memory Capacity Installed 64 MB Maximum 640 MB with two units of optional 256 MB expansion memory installed Interface Parallel interface IEEE 1284 compliant x 1 USB interface Hi Speed USB 2 0 x 1 Network interface x 1 Installed Fonts PCL 80 KPDL 136 Specifications are subject to change...

Страница 21: ...MEMO ...

Страница 22: ...W ...

Страница 23: ......

Страница 24: ...2003 9 3H880020A ...

Отзывы: