background image

CS9360 User’s Guide

6-114

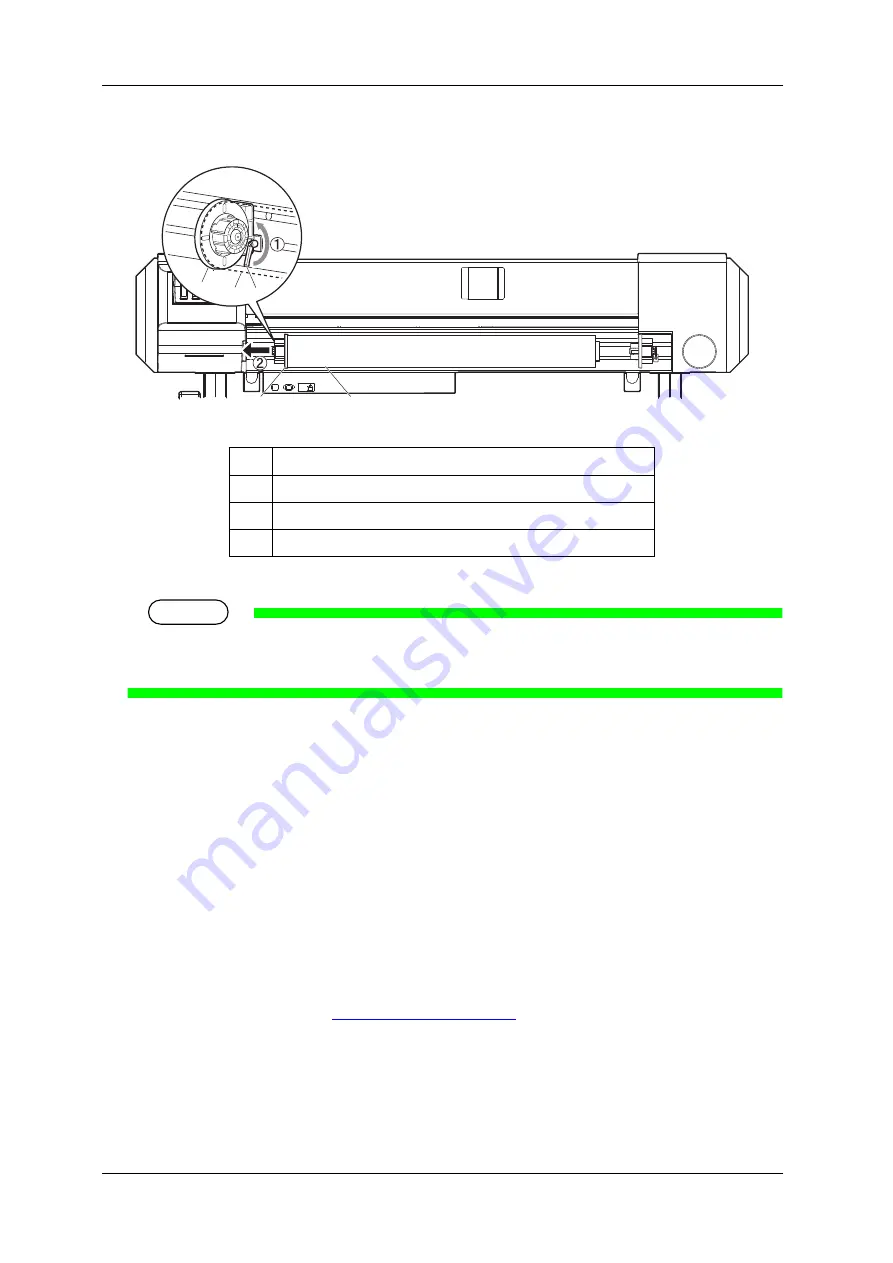
Step 5: 

Take the same procedure as in Step 4, remove the roll media from the left roll media holder.

Step 6: 

To load another roll media, refer to the following.

TIP

For loading the roll media, refer to “3.4 Loading media”.

For storing the roll media not in use, refer to “4.2.3 Precaution on storing media”.

6.1.3 

Replacing the flushing-box sponges

(1) Replacement time

Replace the flushing-box sponges in the following situations.

a. When the flushing-box sponge is deformed

b. When the ink is spattered on the media

c. When more than two months have passed since the last replacement

(2) Type

Please refer to our media guide on 

www.mediaguide.oce.com

N°.

Name

1

Roll media holder (Left)

2

Fixing lever

3

Roll media

2

1

3

1

3

Содержание CS9360

Страница 1: ...Oc CS9360 Eco Solvent User s Guide AP 40811_1 0...

Страница 2: ......

Страница 3: ...14 Location and type of warning labels 14 Chapter 2 Product overview 17 2 1 Names of parts and functions 17 Front section 17 Rear section 19 Operation panel 20 2 2 Printer status 23 Normal 23 Setup m...

Страница 4: ...5 Installing media holder plates 80 4 2 Menu setups on the operation panel 83 Menu setup procedure 83 Panel setup menu overview 85 4 3 Operating from the operation panel 86 Feeding media 86 Stopping p...

Страница 5: ...utter 120 6 2 Cleaning the printer 127 Cleaning the outer case 127 Cleaning the inside of the printer 127 Head cleaning 129 Cleaning the cleaning wiper 130 Cleaning around the print head 136 6 3 Dispo...

Страница 6: ...User s Guide CS9360 6 AP 40811 Revision 1 0...

Страница 7: ...tion of the furnishing of the information contained in this document the party to whom it is given assumes its custody and control and agrees to the following The information herein contained is given...

Страница 8: ...mes may be registered trademarks or product names IMPORTANT NOTICE For users in Europe This is a Class A product approved for industrial environments In a domestic environment this product may cause r...

Страница 9: ...gs of warnings The warnings in the Operation Manual and the warning labels attached to the printer are categorized into three stages Understand the meanings of the following warning terms and follow t...

Страница 10: ...ds Heavy current might flow whenever lightning strikes Water pipe and faucet The earth might not work if a plastic pipe is connected in the middle of the metal pipe Do not place any combustible materi...

Страница 11: ...the power socket When handling ink cartridges pay attention so that ink does not get into your eyes or stick to your skin If ink gets into your eyes or sticks to your skin immediately wash it off with...

Страница 12: ...ersons When installing the dedicated stands make sure to switch OFF the printer and unplug the power cable There may be a risk of electric shock When taking the printer out of the container box make s...

Страница 13: ...nal local exhaust ventilation 200 m h No 150 m Room ventilation 3 times per hour 450 m h Note The recommended room ventilation should be applied in case the printer is used at nominal printing speed 8...

Страница 14: ...careful about the following points NOTE Check whether all the warning labels can be read If the letters or illustrations on the label are not clear remove the dirt from the label Use cloth water and...

Страница 15: ...and paper holding plate will become hot due to the heater temperature setting Beware of being burned Normal cleaning should be done once a week if the printer is not used for a long period If the prin...

Страница 16: ...CS9360 User s Guide 1 16...

Страница 17: ...2 Operation panel Operation condition setting printer display and various function settings are performed 2 2 3 Operation panel 3 Front cover Used for preventing a user from coming in contact with the...

Страница 18: ...ser from touching the inner mechanical section Open and close in the following cases When cleaning the cleaning wiper When cleaning around the print head When replacing the cutter It is normally close...

Страница 19: ...3 Ink cartridge slot Insert the ink cartridge 4 Media guide Used for feeding media smoothly when the media is set or printed The heater pre heater to warm up the media is installed inside 5 AC inlet...

Страница 20: ...peration key and status display along with the functions are explained TIP Refer to the following for details regarding the operation method of the operation panel When setting the menu from the opera...

Страница 21: ...re than two seconds deletes the data already received and analysed Returns to the previous menu hierarchy Changes made in the setting are discarded Shifts from Setup menu display to Normal 4 key Nozzl...

Страница 22: ...reen Lamp ON The head height is set to High Lamp OFF The head height is set to Low 12 Low lamp Green Lamp ON The head height is set to Low Lamp OFF The head height is set to High 13 Take Up lamp Green...

Страница 23: ...ation panel are as follows 2 2 3 Changing printer status 1 Normal Setup menu display Press Menu when the printer is Normal Menu 1 Setup is displayed and the display shifts to the Setup menu NOTE For d...

Страница 24: ...CS9360 User s Guide 2 24...

Страница 25: ...ge is displayed and the printer may stop operating 3 1 2 Switching the power OFF Step 1 Verify the following regarding the operational condition of the product Printing or other operations are not in...

Страница 26: ...t to High Set Height to Low is displayed and the procedure to switch the power OFF stops To restart the procedure return the head height to Low 4 2 5 2 When returning the print head to the original po...

Страница 27: ...CS9360 User s Guide 3 27 Step 3 Raise the media loading lever when the product is not used for a long time N Name 1 Media loading lever 1...

Страница 28: ...TE The following roll media can be loaded to this printer Media tube with a diameter of 3 inches Less than 150mm in outer diameter less than 30kg in weight Media tube with a diameter of 2 inches Less...

Страница 29: ...r s Guide 3 29 Step 2 Fix the roll media holder Left Step 3 Set the roll media to the roll media holder Left N Name 1 Roll media holder Left 2 Fixing lever N Name 1 Roll media holder Left 2 Roll media...

Страница 30: ...of the right and left roll media holders move the roll media to the centre and tighten the levers NOTE Fix the roll media holders by pressing the holders to the printer N Name 1 Roll media holder Righ...

Страница 31: ...te the media loading lever during initial operation The print head portion may touch the pressurizing roller portion and cause a malfunction The printer starts the initializing operation Media End is...

Страница 32: ...3 Open the front cover Step 4 Set the roll media to the media feed slot NOTE If the end of the roll media is not wound tightly wind it tightly again and then load it N Name 1 Front cover N Name 1 Roll...

Страница 33: ...holder while holding the edge of the media and eliminate any slack or slant NOTE If you set the roll media free while rewinding the roll media will fall out from the media feed slot on the rear of the...

Страница 34: ...g printing Step 7 If the edge of the roll media is set less than 5 mm from the edge of the pressurizing roller follow the procedure below to adjust a Loosen the fixing levers of the right and left rol...

Страница 35: ...f the right and left roll media holders NOTE Fix the roll media holders by pressing the holders to the printer Step 8 Lower the media loading lever N Name 1 Roll media holder Left 2 Roll media holder...

Страница 36: ...ncrease the pressure for the media lower the media loading lever further Step 9 Close the front cover The Media type setup menu is displayed TIP To change the media type follow 3 4 3 Setting the User...

Страница 37: ...r The user type setting is set Media initial is displayed and media initialization starts NOTE If the following operations are performed in the user type setting menu the printer starts media initial...

Страница 38: ...Step 2 Confirm that the printer functions normally Step 3 Display the Test Print menu a Press Menu Menu1 Setup is displayed The operation panel shifts to the Setup menu display b Press or to select M...

Страница 39: ...Mode Print Set list All Set list Palette Color Verify Step 5 Press Enter Start performing Test Print for the selected item TIP Refer to the following for details on each of the print list items 3 5 1...

Страница 40: ...is used to check whether there are any clogged heads or missing or blurred prints NOTE If the nozzle check result indicates that the checked points are blurred or missing clean the head 6 2 3 Head cle...

Страница 41: ...nt Used to confirm the following printing conditions PrintMode Effect Preset Pre heater temperature Preset platen heater temperature Preset dryer temperature Adjustment value TIP Refer to the followin...

Страница 42: ...QVQT 2 FFTGUU 5WDPGV CUM CVGYC 5NGGR QFG6KOGT J CPIWCIG PINKUJ 6GORGTCVWTG GNUKWU GPIVJ OO 7UGT 6 RG 2TKPV QFG HHGEV 2 PKVKCN FLWUV 2 KETQ FLWUV 2TG GCVGT 2NCVGP GCVGT T GT 8CEWWO CP 7UGT 6 RG 2TKPV...

Страница 43: ...CS9360 User s Guide 3 43 3 3 4 Palette print Palette print is executed for the color demonstration...

Страница 44: ...Print Adjusts only the print mode in the user type setting which is currently set This menu is made up with the following menus Step 1 Print the confirmation pattern and check the amount of misalignm...

Страница 45: ...k to Step 2 NOTE When you are not satisfied with the result of rough adjustment perform micro adjustment Standard Confirmation Pattern Print the confirmation pattern for the print mode in the user typ...

Страница 46: ...er s Guide 3 46 c Press Enter User TypeXX XX is a number between 1 and 30 is displayed d Press or to select the type of media to load e Press Enter 1 Print Mode is displayed f Press or to select 2 Adj...

Страница 47: ...r s Guide 3 47 g Press Adj Print1 Standard is displayed h Press or to select Adj Print1 Standard i Press Enter Adj 1 Confirm Ptn is displayed The display enters the Adjust Print menu 5 1 1 1 3 Adjust...

Страница 48: ...Enter while Warming Up Skip E is displayed 4 4 7 Start Printing during Warm up An adjust print pattern for print quality adjustment is printed after warming up A confirmation pattern is printed After...

Страница 49: ...rn Check the confirmation pattern and when the misalignment is big perform rough adjustment Print a rough adjustment pattern and register the setting value Step 1 Display the Adjust Print menu in the...

Страница 50: ...pattern name differs depending on the set print mode The print modes and their pattern names are as follows Step 6 Press or to enter the number that you selected in Step 4 NOTE When you press Cancel t...

Страница 51: ...Rough Pattern Standard Micro Adjustment Pattern Check the confirmation pattern and when the misalignment is small perform micro adjustment Print a micro adjustment pattern and register the setting va...

Страница 52: ...quality adjustment is printed after warming up Regarding adjust print patterns the same patterns are printed on both edges and the centre of the paper Step 4 Check the both ends and the centre of the...

Страница 53: ...that you selected in Step 4 NOTE When you press Cancel the input operation is not executed and Adj 3 Fine Pattern is displayed Step 7 Press Enter The value is set in the Pattern indicates a number fro...

Страница 54: ...go back to Step 2 NOTE When you are not satisfied with the result of rough adjustment perform micro adjustment For Micro Adjustment Pattern select Adjust pattern ALL to adjust all patterns or Each Ad...

Страница 55: ...n patterns A to F to check the amount of misalignment Step 1 switch ON the printer and load the roll media 3 4 2 Setting Roll Media Step 2 Display the Adjust Print menu a Press Menu Menu1 Setup is dis...

Страница 56: ...er s Guide 3 56 c Press Enter User TypeXX XX is a number between 1 and 30 is displayed d Press or to select the type of media to load e Press Enter 1 Print Mode is displayed f Press or to select 2 Adj...

Страница 57: ...er s Guide 3 57 g Press Adj Print1 Standard is displayed h Press or to select Adj Print2 Custom i Press Enter Adj 1 Confirm Ptn is displayed The display enters the Adjust Print menu 5 1 1 1 3 Adjust P...

Страница 58: ...ting during warming up press Enter while Warming Up Skip E is displayed 4 4 7 Start Printing during Warm up An adjust print pattern for print quality adjustment is printed after warming up Six confirm...

Страница 59: ...Custom Rough Adjustment Pattern Perform micro adjustment when the misalignment is small When all patterns A to F require adjustment 3 6 2 3 1 Adj PatternALL When any pattern of A to F requires adjust...

Страница 60: ...up press Enter while Warming Up Skip E is displayed 4 4 7 Start Printing during Warm up A rough adjustment pattern for print quality adjustment is printed after warming up The pattern images are print...

Страница 61: ...e number from 1 to 11 that is not out of alignment 3 is selected in the next printing sample of Micro Adjustment Pattern A 5 is selected in the next printing sample of Micro Adjustment Pattern B 4 is...

Страница 62: ...is displayed Step 7 Press Enter The value is set in the Pattern A indicates a number from 1 to 11 Step 8 In the same way enter the numbers for Patterns B to Pattern F Press Enter to set the values On...

Страница 63: ...value Step 1 Display the Custom Adjust Print menu in the same way as in step 2 of 3 6 2 1 Custom Confirmation Pattern Step 2 Press or to select Adj 3 Fine Ptn ALL Step 3 Press Enter Warming Up and th...

Страница 64: ...nt patterns the same patterns are printed repeatedly on both edges and the centre of the paper Step 4 Check the both ends and the centre of the print result that printed with Adjust pattern and select...

Страница 65: ...splayed Step 7 Press Enter The value is set in the Pattern A indicates a number from 1 to 7 Step 8 In the same way enter the numbers for Patterns B to Pattern F Press Enter to set the values Once all...

Страница 66: ...tom Confirmation Pattern Step 2 Press or to select Adj 4 Fine PatternA Step 3 Press Enter Warming Up and then Warming Up Skip E are displayed NOTE To start printing during warming up press Enter while...

Страница 67: ...sample NOTE 4 is the current setting value Step 5 PatternA 4 is displayed Step 6 Press or to enter the number that you selected in Step 4 NOTE When you press Cancel Adj 4 Fine PatternA is displayed S...

Страница 68: ...CS9360 User s Guide 3 68...

Страница 69: ...d burn yourself Do not touch the media feed slot platen and media guide while the heater is working The media feed slot platen and media guide become very hot and you could burn yourself Ventilate the...

Страница 70: ...ocal Oc representative If failures or malfunctions of the printer occur by the use of media that is not dedicated The printer will not be covered by the warranty and repair expenses will be paid by th...

Страница 71: ...wn In such a case open the front cover after the media is cut to remove the media Do not touch the print side Moisture and oil on your hands may affect the print quality Do not leave media set in the...

Страница 72: ...you to avoid head rub Head height can be changed to two levels When raising the print head NOTE If the head height adjustment lever is raised high print quality is not guaranteed Do not open the front...

Страница 73: ...on Doing so may damage the printer The High lamp lights up in green Step 3 Close the front cover When returning the print head to the original position NOTE Do not open the front cover or change the h...

Страница 74: ...en the front cover Step 2 Change the head height by moving the head height adjustment lever orange The Low lamp lights up in green Step 3 Close the front cover N Name 1 Front cover N Name 1 Head heigh...

Страница 75: ...e media firmly Procedure for the media feed compensation value Step 1 Display the Dist Adj menu a Press Menu Menu1 Setup is displayed The operation panel shifts to the Setup menu display b Press Set1...

Страница 76: ...g is complete the printer enters Normal c After the initial adjustment printing cut the media 4 4 3 Cutting media Step 3 Measure the distance between the two pluses in the initial adjustment print usi...

Страница 77: ...mplete the printer enters Normal d After the confirmation adjustment printing cut the media 4 4 3 Cutting media Step 6 Measure the distance between the two pluses in the confirmation adjustment print...

Страница 78: ...splayed d Wait till warming up process is complete or press Enter to shift to the next operation Printing is displayed Starts micro adjustment printing After the micro adjustment printing is completed...

Страница 79: ...r the micro adjustment value according to the printing result in Step 7 d Press Enter The micro adjustment value is saved PF5 Micro Change is displayed Step 10 Press Menu The operation panel returns t...

Страница 80: ...ress Menu Menu1 Setup is displayed The operation panel shifts to the Setup menu display b Press Set1 User Type is displayed c Press or to select Set 3 Side Margin d Press Enter Side Margin mm is displ...

Страница 81: ...ter CAUTION If a media jams when using the media holder plates the plates may be deformed When the media holder plates are deformed Do not remove the clogged media by force Stop using the printer Usin...

Страница 82: ...CS9360 User s Guide 4 82 Step 6 If the plates are not used return the plates to their initial positions as shown in the following figure N Name 1 Roll media 2 Media holder plate 1 1 2 1 2...

Страница 83: ...ation panel shifts to the Setup menu display Step 3 Press or to select a setup item and press Enter The settings will be confirmed When setup items have a submenu the display shifts to the next menu N...

Страница 84: ...g Step 5 To save the changed setting press Enter The setting is saved and the next setup item is displayed NOTE If you press Cancel or without pressing Enter after changing a setting the change will n...

Страница 85: ...u Various settings of the printer are configured Test Print menu Performs nozzle check of the print head and setup list Cleaning menu Performs head cleaning Menu Option menu Set up the contents of the...

Страница 86: ...Forward or Backward Media is fed forward or backward Step 4 Release Backward or Forward after feeding media to the desired position 4 3 2 Stopping printing operation Step 1 Stop sending printing data...

Страница 87: ...you press Cutting more than two seconds while the operation panel is Normal you can cut the media at the desired position Step 1 Confirm that the operation panel is Normal Step 2 Press Cutting for mo...

Страница 88: ...t operation Step 1 Verify the following regarding the operational condition of the product Printing or other operations are not in progress The operation panel display is Normal Step 2 To change the p...

Страница 89: ...ts when cutting roll media Mishandling the razor blade may cause a cut on your finger or hand When you hold media do not place your finger on the media cut groove Move the razor blade along the media...

Страница 90: ...g and confirming settings while printing Step 1 Confirm that the printer is in one of the following conditions Receiving data Analysing data Printing Step 2 2 Press Menu Menu1 Temperature is displayed...

Страница 91: ...on Temperature Pre Checks the current temperature of the pre heater Platen Checks the current temperature of the platen heater Dryer Checks the current temperature of the dryer Pre heater Off 30 C to...

Страница 92: ...during printing NOTE If the printing is paused the print quality will not be guaranteed Step 1 Check that the printer is in operating Step 2 Press Pause The printer pauses printing PrintRestart ENTER...

Страница 93: ...nting is started during warm up the printer continues to be warmed up until the preset temperature has been reached When printing is started during warm up the print quality is not guaranteed Step 1 C...

Страница 94: ...be as follows Make sure the setting before use Media detection Top Width or Width Output mode Off or Auto cut 5 1 6 Output Mode menu When the color target is printed on the translucent or colored med...

Страница 95: ...rs or move media loading lever during printing Step 6 Press Enter Wait for a while is displayed The print head moves to the left Open left mainte cover is displayed Step 7 Open the maintenance cover o...

Страница 96: ...art from the Step 6 Step 8 Firmly pinch the tabs on both sides of the connector cap with your fingers pull the connector cap forward to remove it from the print head Step 9 Press the release buttons o...

Страница 97: ...otometer Set white plate then close left maintenance cover is displayed Step 11 Remove the white reference plate from the plate installation place turn it over so that the white side faces up and inst...

Страница 98: ...arget Measuring is displayed After measuring is complete Detaching instrument ENTER is displayed NOTE Color measurement starts either automatically or manually depending on the RIP software feature Th...

Страница 99: ...Wait for a while is displayed The print head moves to the left Open left mainte cover is displayed Step 15 Open the maintenance cover on the left of the printer Detach instrument and Set connector ENT...

Страница 100: ...rd to remove it from the print head Step 17 Firmly pinch the tabs on both sides of the connector cap with your fingers and install it to the connector at the print head N Name 1 Spectrophotometer 2 Re...

Страница 101: ...move the white reference plate from the plate installation place turn it over so that the black side faces up and install it back to the original place NOTE When the white reference plate is not in us...

Страница 102: ...CS9360 User s Guide 4 102 Step 20 Close the maintenance cover Ready to Print is displayed For the subsequent operations follow the instructions of the RIP software N Name 1 Maintenance cover 1...

Страница 103: ...e Media 1 cnt to 9 cnt 0 0 sec to 0 1 sec to 5 0 sec Off On WaitingTime PrintingTime Before Print Off Roll 1 Roll 2 Roll 3 K C M Y Standby Heating Output Mode 10 min to 60 min User Type Method of Cut...

Страница 104: ...ugh Pattern Fine Pattern Fine Pattern B Fine Pattern C Fine Pattern D Fine Pattern E Fine Pattern F Initial Print Initial Change Confirm Print Micro Print Micro Change Quality 1 Quality 2 Quality 3 Qu...

Страница 105: ...diagram Ready to Print 1 4 Setup to Setup menu diagram Ready to Print 4 4 IP Address Subnet Mask Gateway Temporary 000 000 000 000 to 192 168 001 253 to 255 255 255 255 000 000 000 000 to 255 255 255...

Страница 106: ...On Off On Off On 1 h to 2 h to 3 h to 4 h 5 h to 6 h to 9 h 12 h to 18 h to 24 h Test Print Cleaning Nozzle Check Mode Print Setup List Palette Color Verify Short Normal Long LittleCharge Initial Char...

Страница 107: ...ink cartridge replacement indicates the color that is almost empty or runs out using the following characters K Black C Cyan M Magenta Y Yellow Do not insert or remove the ink cartridge except at the...

Страница 108: ...ur eyes or stick to your skin If ink gets into your eyes or sticks to your skin immediately wash it off with water Failing to do so might cause irritation or light inflammation of eyes In case of any...

Страница 109: ...cartridges when the printer is switched OFF The remaining ink may not be detected correctly causing abnormal printing Step 2 Remove the ink cartridge that you want to replace from the slot a For 220ml...

Страница 110: ...inserting it into the ink cartridge slot Step 5 Confirm that the operation panel returns to Normal NOTE If the ink cartridge is replaced during printing printing resumes 2 Replacing high capacity pac...

Страница 111: ...re installed on the high capacity pack adapter before inserting it to the slot If the high capacity pack adapter is inserted into the slot without the ink pack the remaining information will be rewrit...

Страница 112: ...t End Of Roll is displayed If media runs out during printing the printer stops printing b When you want to change the media type to use 2 Type Please refer to our media guide on www mediaguide oce com...

Страница 113: ...a holder and take up the roll media Step 4 Loosen the fixing lever of the right roll media holder and remove the roll media from the roll media holder N Name 1 Roll media holder 2 Roll media N Name 1...

Страница 114: ...ia not in use refer to 4 2 3 Precaution on storing media 6 1 3 Replacing the flushing box sponges 1 Replacement time Replace the flushing box sponges in the following situations a When the flushing bo...

Страница 115: ...tep 1 If the printer is switched ON make sure the following Printing or other operations are not in progress The operation panel display is Normal Step 2 Display the CR Maintenance Menu a Press Menu M...

Страница 116: ...er s Guide 6 116 b Press Set 1 User Type is displayed c Press or to select Set20 CR Maintenance d Press Enter CR Mainte Start is displayed The display enters the CR Maintenance menu 5 1 20 CR Maintena...

Страница 117: ...ss starts The print head moves to the left CR Maintenance End is displayed Step 4 Open the front cover Replace Flushing box sponges in a short time Leaving the print head at the replacement position m...

Страница 118: ...e fluid comes into contact with the grid roller the surface of the grid roller will be damaged and the media feed function may be affected Step 6 Install the new flushing box sponge to each flushing b...

Страница 119: ...atus 3 b Replacement procedure on the opposite side of the origin side Step 10 If the printer is switched ON make sure the following Printing or other operations are not in progress The operation pane...

Страница 120: ...p 13 Install the new flushing box sponge to each flushing box Step 14 Close the front cover 6 1 4 Replacing Cutter 1 Replacement time Replace the cutter when the following situation occurs a When the...

Страница 121: ...CS9360 User s Guide 6 121 a Press Menu Menu1 Setup is displayed The operation panel shifts to the Setup menu display b Press Set1 User Type is displayed c Press or to select Set20 CR Maintenance...

Страница 122: ...s the CR Maintenance menu 5 1 20 CR Maintenance menu Step 3 Press Enter Maintenance starts The print head moves to the left of the printer cutter replacement position CR Maintenance End is displayed S...

Страница 123: ...Press the tab of the cutter lightly turn the cutter holder in the direction as illustrated below NOTE Do not press the tab of the cutter strongly or suddenly let go of it There is a spring in the cut...

Страница 124: ...se an injury Do not touch the cutter blade edge with a hard substance or drop the cutter The cutter blade may be damaged or chipped NOTE Used cutter should be put in a plastic bag etc and dispose of i...

Страница 125: ...r to its initial position NOTE Do not press the tab of the cutter strongly or suddenly let go of it There is a spring in the cutter holder and it may fly out Do not push the cutter all the way in to a...

Страница 126: ...uide 6 126 Step 9 Close the maintenance cover Step 10 Press Enter The print head returns to its original position CR Maine Start is displayed Step 11 Press Menu The printer enters Normal N Name 1 Main...

Страница 127: ...resentative CAUTION When cleaning the printer be sure to switch OFF the power and disconnect the power plug Do not use volatile solvents such as thinner benzene or alcohol These solvents could cause d...

Страница 128: ...ot blow paper powder inside the printer using tools such as an air duster It may cause an abnormal noise from the inside of the printer Step 3 Apply a damp and tightly squeezed soft cloth to wipe out...

Страница 129: ...cleaning NOTE When not using the printer for a long period one week or more perform Head cleaning once a week If not performing Head cleaning the print head is clogged Doing so will preserve print qua...

Страница 130: ...ith several times of Head cleaning refer to 7 Troubleshooting and take appropriate measures 6 2 4 Cleaning the cleaning wiper 1 Time for cleaning Once a week or when blurs or lacking parts appear on p...

Страница 131: ...CS9360 User s Guide 6 131 a Press Menu Menu1 Setup is displayed The operation panel shifts to the Setup menu display b Press Set1 User Type is displayed c Press or to select Set20 CR Maintenance...

Страница 132: ...Maine Start is displayed The display enters the CR Maintenance menu 5 1 20 CR Maintenance menu Step 3 Press Enter Maintenance starts The print head moves to the left The cleaning wiper sifts towards...

Страница 133: ...t Head cleaning may not be performed correctly because of oil from your hands Make sure to wipe the print head using the cleaning stick A wet cleaning stick may cause the print head to clog Do not reu...

Страница 134: ...er Remove the ink and dust in the horizontal direction b Cleaning wiper back side Remove the ink and dust in the upper direction N Name 1 Cleaning wiper 2 Cleaning stick 3 Head cap unit N Name 1 Clean...

Страница 135: ...er Close the cover firmly until it is locked Step 7 Press Enter The print head returns to its original position The cleaning wiper returns to the original position CR Maine Start is displayed Step 8 P...

Страница 136: ...ing must be done before the print head dries This operation should be done within 15 minutes If the operation lasts over 15 minutes follow the Steps 8 and 9 to stop the operation and perform head clea...

Страница 137: ...User s Guide 6 137 b Press Set1 UserType is displayed c Press or to select Set20 CR Maintenance d Press Enter CR Maine Start is displayed The display enters the CR Maintenance menu 5 1 20 CR Maintenan...

Страница 138: ...er s Guide 6 138 Step 3 Press Enter Maintenance starts The print head moves to the left CR Maintenance End is displayed Step 4 Open the maintenance cover on the left of the printer N Name 1 Maintenanc...

Страница 139: ...Print head section strongly Doing so may cause damage or poor print results Step 6 Use a penlight etc to check if any foreign substance such as dust or ink clump is attached to the following places N...

Страница 140: ...water etc on the tip of the cleaning stick Doing so may damage the print head Do not reuse the cleaning stick The attached dust etc may damage the print head Step 7 When some foreign substance such a...

Страница 141: ...CS9360 User s Guide 6 141 Step 9 Press Enter The print head returns to its original position CR Maine Start is displayed Step 10 Press Menu The printer enters Normal...

Страница 142: ...roperly dispose of waste fluid in compliance with Wastes Disposal and Public Cleansing Act and local ordinances Delegate disposal to an industrial waste disposal contractor Step 1 Ready an empty conta...

Страница 143: ...ring the waste fluid to the empty container close the waste fluid valve securely Step 5 Wipe the opening of the waste fluid valve with a cloth etc Step 6 Dispose of the waste fluid as an industrial wa...

Страница 144: ...ositions cannot be guaranteed 1 Preparation before moving Step 1 Make sure that the printer is switched OFF 3 2 2 switching the power OFF Step 2 Dispose of waste fluid 6 3 Disposal of waste fluids Ste...

Страница 145: ...eck and then confirm that there is no clogging in the print head 3 5 1 Nozzle check Step 10 Perform Alignment 3 6 Adjust Print 6 4 2 Transporting the printer When transporting the printer make sure to...

Страница 146: ...CS9360 User s Guide 6 146...

Отзывы: