background image

Print Job Control Module

Introduction

Print Job Control is the first module displayed when the printer software is loaded. From this
module you can manage all aspects of working with print jobs and also control many features of
the printer. The table "Job Control Panels" documents the numbered call-outs and the rest of this
section explains each of these areas in more detail.

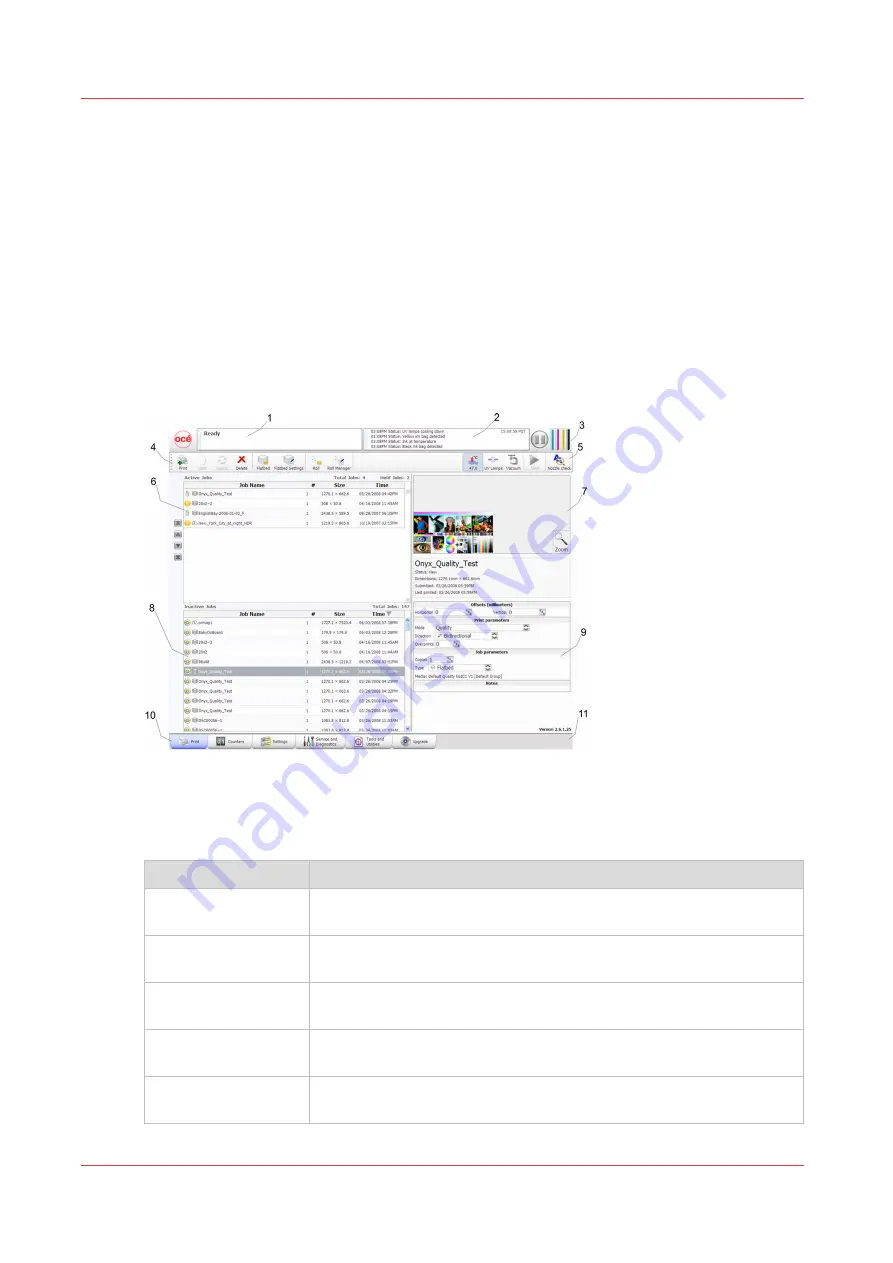
The Print Job Control display is divided into functional and status areas. The functional areas
supports all operator input necessary to operate, maintain and service the printer. The status
areas are used to report image and printer status.

Illustration

[23] Print Job Control

Components of the Print Job Control Module

Job Control Panels

Component

Function

1) Job and Printer Sta-
tus

Displays the status and progress of print jobs

2) Printer Messages
Panel

Displays the last four lines of the log - click in this area to see more of
the log.

3) Pause/Resume and
the Ink System Status

To the right is the print job Pause/Resume button and
the Ink System Status icon - click to view an ink status report.

4) Command
Toolbar left

Displays icons for actions related to the print jobs and control of the
printer.

5) Command Toolbar
right

Displays icons for ink temperature, lamp control, start print jobs, and
print a nozzle check.

4

Print Job Control Module

44

Chapter 4 - How to Navigate the User Interface

Содержание Arizona 365 GT

Страница 1: ...Operation guide Oc Arizona 365 GT User Manual...

Страница 2: ...WITH REGARD TO THE CONTENTS OF THIS PUBLICATION EITHER EXPRESS OR IMPLIED EXCEPT AS PROVIDED HEREIN INCLUDING WITHOUT LIMITATION THEREOF WARRANTIES AS TO MARKETABILITY MERCHANTABILITY FITNESS FOR A PA...

Страница 3: ...eriodic Maintenance 51 Counters Module 53 Settings Module 54 Tools and Utilities Module 57 Installation and Upgrade Module 60 Chapter 5 How to Operate Your Oc Arizona Printer 61 Training Requirements...

Страница 4: ...s for White Ink 114 White Ink Workflow Overview 115 How to Configure ProductionHouse for White Ink 118 White Ink Quick Start 120 How to Prepare White Ink Print Jobs 122 How to Create a White Flood Fil...

Страница 5: ...atcher Foam Pad 197 Clean Gantry Rails 199 How to Change Ink Filters How to Change an Ink Filter 201 How to Change Ink Filters How to Bleed an Ink Filter 204 How to Change Ink Filters Final Steps 206...

Страница 6: ...Contents 6...

Страница 7: ...Chapter 1 Introduction...

Страница 8: ...much information about the problem as possible and have it ready to provide to your customer care center The more information you can provide initially the more quickly the problem can be corrected Re...

Страница 9: ...Product Compliance CE Declaration of Conformity ___________________________________ Product Compliance Chapter 1 Introduction 9...

Страница 10: ...0 0 0 0 Inkjet Heads X 0 0 0 0 0 O indicates that the content of the toxic and hazardous substance in all the homogeneous materials of the part is below the concentration limit requirement as describe...

Страница 11: ...Chapter 2 Product Overview...

Страница 12: ...nal Feature Specification Printing Technology Piezoelectric inkjet using Oc VariaDot technology UV Ink Standard CMYK or Optional White Maximum Media Size 365 GT 2 5m 98 4 x 1 25m 49 2 Media Thickness...

Страница 13: ...Chapter 3 Safety Information...

Страница 14: ...NATURE OR LOSSES OR EXPENSES RESULTING FROM THE USE OF THIS DOCUMENTATION While every precaution has been taken in the preparation of this documentation Oc assumes no responsibility for errors or omis...

Страница 15: ...Read these items carefully and make sure not to perform the de scribed operations NOTE Indicates a clarification of an operation or contains additional explanations for a procedure Reading these note...

Страница 16: ...de WARNING Electricity Main connection for protective earth WARNING Electricity Main switch of the equipment Label Type Description PROHIBITED Do not walk or stand here Label Type Description Optical...

Страница 17: ...person to identify energy sources that may cause pain and to take precautions to avoid unintentional contact with or exposure to those energy sources Power source WARNING Put the power plug directly...

Страница 18: ...machine Do not use any power cord other than the one provided Never use the power cord with any other electrical device Use only a power cord that is fitted with a protective earth conductor Do not ro...

Страница 19: ...ORTANT Do not obstruct the operating and service clearance areas in any way Operation WARNING Do not lean lie or stand on any part of the machine including parts that can be pulled outwards e g media...

Страница 20: ...cted and or skilled persons are allowed to maintain the machine to avoid any risk and or jeopardize given warranties Do not bridge or disable any safety interlock devices CAUTION Do not open any door...

Страница 21: ...en flame Do not leave toner or ink containing parts or contaminated parts within reach of children Store consumables supplies and maintenance materials away from containers for food and drink Be caref...

Страница 22: ...er consult the Safety Data Sheet SDS and contact a doctor Inks are not suitable for food related or children related applications e g plates toys Always measure the thickness of the media in use and s...

Страница 23: ...then dispose of according local regulations concerning mercury disposal Avoid staring directly into the UV lamp As a UV lamp warms up it briefly passes through a section of the light spectrum which e...

Страница 24: ...the date of expiry two years after receipt CAUTION Discard the bottle if it shows any sign of wear or physical damage cracking or leaking or at expiry Flush must not be exposed to air for long periods...

Страница 25: ...rsonal Safety CAUTION Warning for Seated Individuals UV emissions are highest at a height of 90 cm 35 inches above the floor and increase significantly the closer you are to the lamp This can be an is...

Страница 26: ...abled and UV lamps are turned off if they were On when the station drawer is open The Interlock system is automatically reset when the drawer is closed Power up Interlock Test for Carriage On power up...

Страница 27: ...r IMPORTANT The photos in the following table illustrate situations that must be avoided when operating your printer Some of the labels in the pictures may look different on your printer Situations an...

Страница 28: ...es sage will display and you will have to use the mouse to click Reset on the user interface LCD display 4 Hot UV Lamps When the Maintenance Station is open to per form printhead mainte nance do not t...

Страница 29: ...crush hazard Do not rest your hands in this area during daily print head maintenance as this process causes the car riage to move up and down 6 IGUS Hazard Avoid placing fingers hands or other objects...

Страница 30: ...tain some machine operations and functionality certain compromises are required The following table documents some of these residual hazards By making the operator aware of the potential risks we hope...

Страница 31: ...area unless the printer power is off 9 Carriage Guard and Gantry Rails A high risk crushing pinch hazard is created by the table and the gan try 10 Table Gantry Pinch hazard A high risk crushing pinc...

Страница 32: ...is is moving carriage moves up or down 12 Carriage Vertical Movement Pinch Hazard A high risk shearing haz ard is created by the gan try and the gantry rail This photo shows the view from the bottom D...

Страница 33: ...he gantry rail This photo shows anoth er view from the bottom Do not place fingers or hands in this area 14 Gantry Shear Hazard A high risk shearing haz ard is created by the car riage and the gantry...

Страница 34: ...the UV lamp assembly and the sur rounding carriage guard can be hot The Carriage Guard is an aluminum fence around the perimeter of the car riage If the guard is not properly seated all gantry and ca...

Страница 35: ...Residual Risk Area Hazard The carriage guard safety fence has a shearing haz ard when the carriage is at the end of the gantry Safety Awareness Chapter 3 Safety Information 35...

Страница 36: ...he printer with the Media Roll Option Situation and Action to Avoid How NOT to use the Roll Media Option Avoid these Situations For Your Personal Safety Do not place your hands near any of the media s...

Страница 37: ...aft drive mo tors when the printer is printing or when the dual foot controls are pressed Do not place your hand on the Media Roll motor enclosure when the green beacon light is On as the gantry may m...

Страница 38: ...Roll Media Safety Awareness 38 Chapter 3 Safety Information...

Страница 39: ...Chapter 4 How to Navigate the User Interface...

Страница 40: ...n the vacuum pump is switched on 4 Vacuum Table Foot Switch Toggles the pump to turn the table vacuum on off Vacuum must be on prior to starting a print 5 Vacuum Bleed Valve Adjusts the level of vacuu...

Страница 41: ...ure the ink 14 Carriage Guard Protects the Operator from exposure to UV light and stops all motion if dislodged by an obstacle 15 Ink Purge Valves Allow the operator to isolate specific printheads for...

Страница 42: ...atus Onscreen Keyboard Numeric Keypad A mouse is used as the input device to navigate the menu based interface For operations that require operator input the mouse is used to select either numeric cha...

Страница 43: ...s use Printer Settings Settings tab Displays information about and also allows you to change various as pects of the printer Date and Time Network Connections User Inter face Printer Settings and Roll...

Страница 44: ...o report image and printer status Illustration 23 Print Job Control Components of the Print Job Control Module Job Control Panels Component Function 1 Job and Printer Sta tus Displays the status and p...

Страница 45: ...nto the job list or job queue Selecting a job in the list highlights the job and updates the job information area The job information area contains offsets print quality mode information number of cop...

Страница 46: ...puts the job on hold Cancel job The command can do following actions depending on context Deactivates a selected active job by moving it to the inactive list Note that Special Prints will not move to...

Страница 47: ...ters before the job actually prints Roll media print jobs will not print unless this icon is selected NOTE Roll media print jobs do not require explicit user actions to start the print job once Roll m...

Страница 48: ...automatically moves from the active to the inactive job list The operator can drag and drop jobs to move them between the active and inactive job lists except for a job that is being prepared to print...

Страница 49: ...d from the hard drive The operator can automatically set the status of a job to Hold when the job is put in this queue This can be set separately for flatbed and roll media jobs 9 Job information and...

Страница 50: ...Density mode will reduce that because it is done in one pass Direction Bidirectional and Forward or Reverse unidirectional printing Overprints If the Overprint count is set to greater than 0 zero the...

Страница 51: ...ded schedule If you do not follow the maintenance schedule image quality will decrease and printhead replacement frequency and costs will increase NOTE If you have not performed your daily Printhead M...

Страница 52: ...s clean UV lamp filters and check coolant levels See the Maintenance section You can change the day of the week and the time this reminder is displayed in the Settings Printer menu Monthly Empty the w...

Страница 53: ...le Counters Explained Component Function Non resettable Counters These counters display a cumulative total of ink consumed or area printed over the whole life of the printer Resettable Coun ters These...

Страница 54: ...matically obtain network settings If Use DHCP is selected the only thing you might want to change is the network name of the printer The settings are displayed to troubleshoot possible network connect...

Страница 55: ...e effect If any settings require a printer restart a reminder will be displayed when that settings is selected User Interface Settings 29 User Interface Settings Settings Available The user interface...

Страница 56: ...ppression On or Off Roll Module 31 Roll Media Settings Top Margin Specifies the distance left unprinted above the image Bottom Margin Specifies the distance left unprinted below the image Media Move o...

Страница 57: ...d of Oc approved ink and need to flush out all of the existing ink Spit Catcher Alignment allows you to adjust the carriage position over the spit catcher after you install it System Logs allows the o...

Страница 58: ...of the table They are available in metric or imperial measure The Nozzle Check is used to determine if there are any clogged nozzles that can affect print quality note that it is also available on th...

Страница 59: ...te ink option installed or for any printer that uses the Oc ICJ256 inks The Spit Catcher consists of a slotted cover for the Maintenance Station drawer and a foam pad that is held in place under the d...

Страница 60: ...ntract Your local service representative will either install the upgrade or provide you with the upgrade file in some circumstances Illustration 34 Printer Upgrade Module How to Upgrade the Firmware a...

Страница 61: ...Chapter 5 How to Operate Your Oc Arizona Printer...

Страница 62: ...ficial training Onyx ProductionHouse Training Maximum performance from the printer requires a properly trained operator Oc trains the operator in the use of the printer hardware and software at instal...

Страница 63: ...parameters for the job will be displayed If needed enter the measured media thickness value and set the lamp levels Select the Confirm Printing parameters buttons when the information is correct Prepa...

Страница 64: ...ropyl alcohol allow sufficient time to dry prior to imaging Start Print The physical Print button is located at the corner of the table where media is loaded and a Start print is also available in the...

Страница 65: ...and Toolbar and other components mentioned in this section Start up Procedure NOTE Make sure the ink is up to temperature before you perform Printhead Maintenance 1 Turn on the Ink Heater click on the...

Страница 66: ...re the printer software is automatically started The software displays a splash screen The splash screen will show initialization messages and then the Print Job Control module screen appears The init...

Страница 67: ...t the printer software 4 Turn the AC power switch to the OFF position 5 Turn the power back on when the service or procedure is complete NOTE Avoid Extended Power Off If the power is switched off for...

Страница 68: ...er If the Automatic printer warm up was set in Printer Settings turn it off 3 to 14 days Turn off lamps Perform printhead maintenance when the ink tem perature is at least 40 Centigrade 104 Fahrenheit...

Страница 69: ...s 4 Perform service procedure generally this is done by a service technician 5 When maintenance or service is complete remove the lock and tag out label and turn the AC power switch to the On position...

Страница 70: ...table by 0 5mm diameter formed half shear features This produces a small gap between the sheet and the top of the table for air to flow Foam tape applied around the perimeter of the sheet provides an...

Страница 71: ...and location as the vacuum table punched holes introduce bleed until the dimples disappear from the media The bleed valve is off when its handle is in the horizontal position To activate the bleed va...

Страница 72: ...nes are open when the handles are vertical To close a zone turn the control handle a quarter turn clockwise Purpose The vacuum system holds the media in place The suggested custom zones described in t...

Страница 73: ...name of the zone indicates which vacuum handle controls that zone 1 Vacuum zone 1 36 x 48 inches 2 Vacuum zone 3 36 x 48 inches 3 Vacuum zone 2 24 x 48 inches 4 Vacuum zone 1 2 3 96 x 48 inches 39 Co...

Страница 74: ...u monitor the nozzle check and printhead nozzle plates Perform additional printhead maintenance if required to prevent ink from partially curing gelling on the printhead nozzle plates How to Handle St...

Страница 75: ...e to uncured ink Media Adhesion Some media have better adhesion quality than others Factors such as the amount of ink used and the amount of curing energy from the UV lamps can affect adhesion For mor...

Страница 76: ...How to Handle Media 76 Chapter 5 How to Operate Your Oc Arizona Printer...

Страница 77: ...Chapter 6 How to Operate the Roll Media Option...

Страница 78: ...uum platen media gimbal and a take up media drive This system accurately advances the roll of media during printing The roll media is positioned with a high resolution media encoder This ensures accur...

Страница 79: ...Bar Provides tension to ensure steady movement of the media 9 Vacuum Platen Holds the roll media in place while an image is printed 10 Gimbal Maintains alignment of the media on the take up shaft 11 C...

Страница 80: ...will have a serious effect on printer performance Any spilled ink must be removed immediately See RMO Maintenance section If an image exceeds the 5mm border requirement printing will not be allowed t...

Страница 81: ...edia core End of Roll Waste minimum possible 920mm 36 inches End of roll waste is the media that cannot be printed at the end of the supply media roll This will vary slightly depending on the attachme...

Страница 82: ...winds media onto supply shaft Unlocks media supply shaft Advance media from supply shaft Unlocks take up shaft Initialized Rewinds media n a Advances media n a Unload before media cut Important Don t...

Страница 83: ...and print the job is explained in the section How to Print on Roll Media How to Access the Roll Media Manager Click on the Roll Manager icon in the command toolbar of the Print Job module 41 Roll Mana...

Страница 84: ...s icon in the top right corner it changes to Slow Move Use Slow Move when you want to advance or rewind media and stop it at a more precise position It causes the dual foot pedal switches to move the...

Страница 85: ...t means that the media unrolls from the bottom of the supply shaft Print side in means that the media unrolls from the top of the shaft see the diagram below This allows you to print on the back side...

Страница 86: ...Take up Shaft Procedure 1 Place an empty media shaft on a suitable flat work area positioned as shown so that the 5mm hex key is inserted on the right side of the shaft to lock and unlock the core lo...

Страница 87: ...oad an Empty Core and Install it in the Take up Position 8 Place an empty media shaft on a suitable work surface and unlock the media shaft locks with the 5mm hex key 9 Slide an empty media core that...

Страница 88: ...en insert the shaft into the Take up top position on the RMO unit NOTE Make sure that the core lock and coupler end of the shaft are on the right side of the printer 4 Lock the take up media shaft cor...

Страница 89: ...ect the Load icon from the Roll Media Manager 2 If you are going to print with Print Side In click the icon in the Roll Media manager Print Side Out is the default so you do not need to select it unle...

Страница 90: ...Through Access Door 6 Check alignment of the media by feeding it down to the supply roll and make sure that the edge lines up with the edge of the supply roll 48 Align Media 7 Rewind the media by con...

Страница 91: ...oth ends of the media 49 Tape Media to the Take up Roll Core NOTE Important Use the supplied ruler to check that the edge of the take up roll is aligned within 1mm of the feed roll 9 Select the Initia...

Страница 92: ...efore proper alignment is hard to achieve with the standard method Procedure 1 Load the roll on the media shaft and begin the load procedure as described in steps 1 to 5 in the standard method to the...

Страница 93: ...ted advance the media until the cut area is wound onto the core across the width of the roll and verify with the ruler that the supply and take up edges are at the same location NOTE Important Use the...

Страница 94: ...ools 5mm hex key Procedure 1 Click on the Roll Manager icon to bring up the Roll Media Manager 2 Select the Unload icon in the Roll Media Manager to release the tension 3 Cut the media using the cutte...

Страница 95: ...Unload and Cut Media B Cut the Media Procedure 1 Cut the media using the cutter guide 2 Click on OK to proceed How to Unload and Cut Media B Cut the Media Chapter 6 How to Operate the Roll Media Opti...

Страница 96: ...p media shaft in the reverse direction You can then roll up the media by hand as it comes off the take up roll 2 To remove the take up roll without manually rolling up the media tap the right pedal mo...

Страница 97: ...supply shaft momentarily press the left pedal to rotate the shaft to the unlocked position 2 Remove the supply shaft from the printer by pulling it towards you Pull one end out at a time How to Unloa...

Страница 98: ...ocedure 1 Place the media shaft on a suitable work surface 2 Unlock the media shaft core locks using a 5 mm hex key 3 Slide the media core off the shaft How to Unload and Cut Media E Remove Media Roll...

Страница 99: ...tion job 53 ONYX Page Size Roll Option Set a Hold on a Roll Job Procedure 1 To ensure that your roll media print job is held and not automatically printed click on the box in front of Hold for printer...

Страница 100: ...NOTE The Hold for operator is not selected in this illustration since the box is unchecked If you want to initiate a hold click it to select Set a Hold on a Roll Job 100 Chapter 6 How to Operate the...

Страница 101: ...stop the media transport when you print on roll media they only stop gantry and carriage movement If you encounter a situation where the roll media runs continuously without operator input the only r...

Страница 102: ...e next roll media print job even if the change was not saved This allows temporary changes to the parameters without the need to save that media 57 Roll Media Manager Keyboard NOTE There is always at...

Страница 103: ...nd marked as roll jobs will print There is no explicit confirmation required to start a roll media print job Any roll media jobs in the print queue will start to print immediately How to Print on Roll...

Страница 104: ...he MACF is only required when this particular banding occurs If you don t see any banding in your images there is no need to change the value from its default setting of 50 Before you begin It is crit...

Страница 105: ...lines start to disappear Make a note of the MACF value Continue to increase the MACF until white lines just start to appear and note the value Typically the average of these two is the ideal MACF for...

Страница 106: ...n to have to have fuzzy edges you can sometimes minimize the problem by cutting or burning the debris off Required tools A package of edge detectors is included in the Accessory kit that ships with th...

Страница 107: ...he double sided tape on the back of the protector 5 Place the bent edge of the protector into the media cut guide but do not press down on the tape yet 6 Slide the protector towards the media edge unt...

Страница 108: ...er and other debris However it is important to keep the platen and cutting guide areas clean as indicated in the Roll Media maintenance section How to Deal with Wide Media If you use media of the maxi...

Страница 109: ...Chapter 7 How to Use the Static Suppression Upgrade Kit...

Страница 110: ...atly reduced by an increase in print environment humidity While most media will print without difficulty at humidity levels between 30 and 50 thermoplastics will print more successfully when humidity...

Страница 111: ...ith the ionizer bar is 38mm 1 5 inches Procedure 1 Turn off the printer power switch 2 Press down on the ionizer bar first from one end and then the other to release the bar from all four brackets 62...

Страница 112: ...igh 6 Make sure the bracket is level an then tighten the bracket mount screw 7 Repeat Steps 2 to 5 until all four mounts are reversed Result The printer can now use media with a maximum thickness of 3...

Страница 113: ...Chapter 8 How to Work With White Ink...

Страница 114: ...urge out a small amount of white ink in order to keep the printheads clear and operating reliably White ink may require additional purges Before you begin If your printer includes the white ink option...

Страница 115: ...aphical representation of the Print Layers that allows you to verify the layer order 65 Preview Layer in Printer UI Spot Versus Flood Layers White layers can take two forms Flood Fill layers and Spot...

Страница 116: ...erate the spot layer information for parts of an image in PhotoShop and then go on to specify a Flood Layer Configuration in Production House This can result in a Flood Layer and a Spot Layer followed...

Страница 117: ...es Day Night First or Second surface CMYK White CMYK CMYK data is printed reverse or right reading Opaque White White CMYK 3 layers Opaque empty White CMYK 2 layers White Ink Workflow Overview Chapter...

Страница 118: ...best for your print job application In order for ProductionHouse to successfully address white ink work flow data there are options in the software that must be configured Procedure 1 Within Rip Queu...

Страница 119: ...urn off two stage processing make sure the box is not checked 67 Turn off Two Stage Processing Result ProductionHouse is now prepared to accept print jobs with white ink data How to Configure Producti...

Страница 120: ...a profiles for white and all other inks are available for download from the DGS website https dgs oce com How to Print a Simple Job Using White Ink Procedure 1 Open an image of your choice with an ONY...

Страница 121: ...ve ink on it then the bottom layer should be a CMYK data layer and the middle and top layers white flood layers 5 Put the printer back online in ONYX RIP Queue and send the job to the printer 6 Print...

Страница 122: ...od fill The printer itself provides the white flood fill rather than the ONYX Spot Layer Tool or an image editing application so no additional data preparation is required NOTE If jobs are nested in t...

Страница 123: ...ou want to print second surface e g transparent media viewed from the side that does not have ink on it then the bottom layer should be a CMYK data layer and the middle and top layers are white flood...

Страница 124: ...Knockout or Full Knockout NOTE The generation options are used in combination with the fill options except when the media color handling is set to No Knockout If you want to use the Spot Layer Tool to...

Страница 125: ...where mask data exists The fill will be generated anywhere the image data matches the mask color For example if your image is on a white background and the default white mask is used this option will...

Страница 126: ...n printed as white by the printer Download Application Bulletin 22 from the Customer Support web site https dgs oce com How to Create Spot Data with the Spot Layer Tool How to Access the Spot Layer To...

Страница 127: ...to activate the tool 5 Use the explanations of the Spot Layer Tool options at the beginning of this section to help you use the tool How to Create Spot Data with the Spot Layer Tool How to Access the...

Страница 128: ...low is to prepare your source image to use a spot ink channel The spot data must be designed entirely on a separate channel either as a spot channel layer or a custom spot color to be recognized by th...

Страница 129: ...nd of this section How to Name Your Spot Data Opacity Set the opacity to 10 Edit the channel COLOR by double clicking on the swatch Set the spot color in PhotoShop to a color similar to the spot ink i...

Страница 130: ...based program such as Illustrator save it as a PSD file in order for all channel information to be carried over The white spot color is printed in the order it appears in the Channels palette with the...

Страница 131: ...color When to do The first step in the white ink workflow is to prepare your source image to use the spot channel The spot data must be designed entirely on a separate channel either as a spot channe...

Страница 132: ...lor Type Use the drop down menu to select Spot Color Swatch Color Use the sliders to adjust the swatch color You can make this color any value that will help you see the design better 5 Click OK to sa...

Страница 133: ...r work How to Overprint Spot Data in Illustrator Set Up Overprint By default when you print opaque overlapping colors the top color knocks out cuts a hole in the area of colored image underneath Overp...

Страница 134: ...providing an ink preview that approximates how transparency and overprinting will appear in output 2 In the Attributes panel select Overprint Fill Overprint Stroke or both NOTE While it is possible t...

Страница 135: ...n order for image data not to be obliterated by spot flood To properly view the image ensure that Overprint Preview is selected See images below for a representation of how this will appear NOTE When...

Страница 136: ...llustrator document This step is necessary in order to make use of all channel data contained in the file 88 Embed File 89 Embed Placed 3 Note the information contained in the layers palette for file...

Страница 137: ...s palette In this particular case the complexity of the selection path may dictate it s creation in PhotoShop and Illustrator may be better used for simpler objects Procedure 1 First select your clipp...

Страница 138: ...re some additional setup Make sure that when you save the file Preserve Overprints is enabled It is also possible and sometimes preferable to print directly from Illustrator to Rip Queue For instructi...

Страница 139: ...ke sure this new box is selected and select Fill swatch located at the bottom of the Illustrator toolbar This will fill the box with color By double clicking on this swatch a dialog box will open allo...

Страница 140: ...ming spot data may make desired output results more clear As well if English is not your native language use a name that is more meaningful in your language to be more effective Please do not use the...

Страница 141: ...Profiles tab Click on Spot Channel Replacement box 97 Spot Channel Replacement 4 Enter the new name in PostScript Spot Color Name in Spot 1 space 5 Click OK to save your settings How to Name Your Spot...

Страница 142: ...be confusing as it really has two meanings in the context of your ONYX workflow In general use it refers to a physical material that you can print on ONYX uses the term media to refer to how a particu...

Страница 143: ...ose Print Reflection in Print Setup in order for the images to read correctly when viewed from the front side of the media 98 Day Night Define Layers 99 Day Night Print Reflection When you process a p...

Страница 144: ...her created in an image editing program prior to opening in Production House or it can be set up with Onyx Preflight Spot Layer Tool To re purpose the model for use with flood fill access the drop dow...

Страница 145: ...owed by a layer of white flood data for diffusion Since a Flood Fill layer has been defined no additional file prep is required to activate white printing Because this media is built for second surfac...

Страница 146: ...verage before your CMYK image data As two layers of white are not necessary this media model contains only one white layer followed by the CMYK color data Since a Flood Fill layer has been defined no...

Страница 147: ...is media is to be used as either a pre print or post print flood fill when the speed of application is foremost and fully opaque white coverage is not necessary This mode is not intended for 4 color C...

Страница 148: ...ss a print job in ProductionHouse with this media model as provided the job information displayed in the Print Job Control screen will appear as follows 114 Parameters How to Use Media Models 148 Chap...

Страница 149: ...nearlier section How to Prepare Images for White Ink NOTE Most of the media settings can be overridden in Preflight or RIP Queue if desired Purpose The media you create for white ink use is actually a...

Страница 150: ...lt in inaccurate color output and without an ICC profile your usable file color space is limited to CMYK As well not restricting your ink levels correctly may result in an increase in ink droplet mist...

Страница 151: ...your spot layer highlight Spot 1 and click Edit NOTE If you change the name of your Spot color to anything other than Spot 1 the data file you prepare for this media must also make use of the exact sa...

Страница 152: ...he profiling steps and color theory are not explained in detail and are not covered in this document 9 For the best quality output results we recommend that you continue building your media model as d...

Страница 153: ...Mode Click OK to save these settings and close the window 120 Define Layers 3 Once you select a mode the Define Layers button appears under the Printer Print Mode 121 Define Layers How to Configure La...

Страница 154: ...ble to build a media using only one or two layers The ink usage options for CMYK White Spot and White Flood Fill data are set to default values If you want to edit these layer options choose Custom fr...

Страница 155: ...nerate spot data from your image use the Spot Layer Tool in Preflight to create the data for the white layers To generate white flood or any color flood it is not necessary to set up files in any spec...

Страница 156: ...ers 2 This configuration allows you to print your linearization and ICC target swatches directly from Media Manager with a white underlay NOTE You can always go back and change the layer configuration...

Страница 157: ...b in the Spot field In testing we have found this value is usually acceptable if left at 100 126 Set Ink Restrictions 3 If you are printing on clear materials make sure the opacity is acceptable as we...

Страница 158: ...the Swatch Options tab click select Spot 1 to substitute with the black linearization information 127 Print Swatch 128 Substitute White for Black 2 Once the swatch is dry click Read Swatch and Read S...

Страница 159: ...rmine Ink Limits as usual Look for bleed in the columns and choose a value where you can eliminate waste ink 2 Click Read Swatch and enter in the values in the recommended Advanced tab 3 Click Next to...

Страница 160: ...to choose a larger number of swatches for profile accuracy otherwise click Print 3 Click Read Swatch and read in the ICC data 4 Click Options to modify the settings or click Build to use the default b...

Страница 161: ...nd click Copy and rename the media 3 Highlight the media and click Edit Conversely to keep the size of the OMLs down you may want to select and copy the print mode only rather than the entire media fo...

Страница 162: ...d Options The options shown here are the ones that will provide the most benefit to white ink workflow productivity Quick Set Name The Quick Set Name is the name that will appear in the RIP Queue menu...

Страница 163: ...were present when you exported it from Preflight NOTE Many of the Quick Set and Filter settings for a job can be overridden in RIP Queue or Preflight if desired Procedure 1 In ProductionHouse RIP Queu...

Страница 164: ...How to Create and Use Quick Sets 164 Chapter 8 How to Work With White Ink...

Страница 165: ...Chapter 9 Ink System Management...

Страница 166: ...s opens up the flow path for the ink The bags contain tags that identifies them to the printer when they are loaded This allows the printer to ensure that the correct ink is loaded This method of ink...

Страница 167: ...nted media if you suspect the ink is not properly cured Illustration 129 Ink Bags in the Ink Bay Ink Filters The UV ink in your printer is protected from contaminants in the ink by means of ink filter...

Страница 168: ...Ink System Status menu click the Ink icon in the Print Job Control module to view the ink menu Store in cool dry place and keep away from heat and direct sunlight Perform Printhead Maintenance every...

Страница 169: ...your skin or in your eyes Be sure to read the section on Safety Guidelines for Ink Materials before handling UV inks Also read the SDS sheets available from the Oc Downloads website for more informati...

Страница 170: ...Change Ink Bags 170 Chapter 9 Ink System Management...

Страница 171: ...Chapter 10 Error Handling and Troubleshooting...

Страница 172: ...s Printer behavior Print quality Data transfer Example 1 If There is No Power Is the printer connected to a working power source The service should be a dedicated supply that is not susceptible to vol...

Страница 173: ...ce representative However it is important to know when to call for service Without training servicing the printer yourself may cause further damage When you have determined that a service call is requ...

Страница 174: ...Troubleshooting Overview 174 Chapter 10 Error Handling and Troubleshooting...

Страница 175: ...Chapter 11 Printer Maintenance...

Страница 176: ...Do Maintenance If your site has a technician in charge of machine maintenance that person is the optimal candidate While routine maintenance may be performed by any trained operator the best maintena...

Страница 177: ...Coolant Monthly and check weekly Clean Gantry Rails Monthly and as needed Change Ink Filters Yearly or after 11 bags of ink or if pigment looks weak Reprint the Rulers When the rulers become unreadab...

Страница 178: ...NT When you clean the carriage or printheads you may need a light to evaluate their condition All light sources emit varying amounts of UV ultraviolet light UV light cures the UV based ink used in you...

Страница 179: ...has accumulated 130 Cleaning the metal plate between printheads 6 Reposition the wipe so that a clean area is exposed 7 Proceed to the next space between printheads and slide the clean area of cloth a...

Страница 180: ...on so avoid touching them Ink must be at the operating temperature of at least 40 Centigrade 104 Fahrenheit before you perform printhead maintenance The Job Control module displays the ink temperatur...

Страница 181: ...enance station Wipe the suction head with a new clean lint free wipe to remove any particles that could damage the nozzles in the printheads 132 Clean Suction Head NOTE In the next step start with the...

Страница 182: ...two ellipses in the picture below A single swab can be used for each color channel or use it until the swab becomes saturated with ink 9 Slide the maintenance station drawer back to its closed positio...

Страница 183: ...at the right end of the Command Toolbar to place the nozzle check into the Active Print Job list you can also add a Nozzle Check to the active print list when you select it from the Special Prints mod...

Страница 184: ...les illustrated in the top left section of the sample below but it will not affect image quality although it could if multiple adjacent nozzles show this problem 135 Nozzle Check Print Black Section H...

Страница 185: ...OTE Isolating individual colors to purge does not perform a stronger purge but it does conserve ink 136 Purge Valves with Yellow Turned Off 3 Remember to open any purge valves that were closed for thi...

Страница 186: ...abbed You can also do a visual inspection of the nozzles use a flashlight if the ambient room light is not adequate A small bottle 125ml is supplied with the printer accessory kit Label this bottle as...

Страница 187: ...ay Procedure 1 Perform Printhead Maintenance see previous section 2 Open the maintenance station drawer 3 Press Switch 2 to raise the carriage 4 Dip a swab in a small container of flush or alcohol NOT...

Страница 188: ...ng properly NOTE If the problem persists you can swab multiple times Use a new clean side of the swab each time this means a maximum of two swipes per swab It is possible that as many as ten swipes ca...

Страница 189: ...ll for service immediately NOTE When you change a UV lamp bulb replace the filter Before you begin 1 Turn off the ink temperature 2 Turn off UV lamps Required tools small hand vacuum cleaner NOTE Alwa...

Страница 190: ...n top of the lamp housing and then squeeze the filter so that the middle bulges and allow the other edge to slide into the other channel 5 Repeat steps 2 to 4 for the filter in the other UV lamp assem...

Страница 191: ...bsorbent clothes Nitrile Gloves and wrap around safety glasses Isopropyl alcohol 95 pure NOTE When scraping ink off the table be sure to remove all of the dry ink particles Use a portable vacuum and t...

Страница 192: ...wipe away any ink deposits 4 On a new cloth apply some alcohol and remove any residual flush or other debris NOTE If you leave the maintenance door open and do not wipe away any deposited ink it will...

Страница 193: ...is located below the ink spit catcher It accumulates waste ink from printhead spitting 139 1 Purge Waste Tray 2 Spit Waste Tray When to do Empty both waste trays weekly Equipment Coth or paper towel A...

Страница 194: ...o wipe it clean as some ink can remain inside and drip out later when the printer is in motion NOTE Tip You can also use a funnel or a long piece of tubing that allows you to place the container on th...

Страница 195: ...ned at the proper temperature Periodically check the level of coolant and add more coolant if it is below the center of the sight tube When to do Check the coolant level sight tube located at the side...

Страница 196: ...p 4 Insert the hose into the fill nozzle above the coolant level tube 5 Press on the syringe plunger to inject the fluid Inject the entire contents of the syringe Repeat if necessary until the coolant...

Страница 197: ...on the underside of the maintenance drawer absorbs this small amount of ink NOTE Although the carriage is oriented so that the nozzles spit into the slots in the spit catcher some ink will find it way...

Страница 198: ...o reveal the pad 141 Change Spit Catcher Pad 4 Remove the spit catcher foam pad and replace it with a new one 142 Close Spit Catcher 5 Swing the metal base up and lock it with the knob Replace the Spi...

Страница 199: ...t run on the rails are equipped with shields that are designed to keep debris from entering the bearing housing After a period of time and use debris can accumulate on the outside of the bearing shiel...

Страница 200: ...ove any chemical residue before running the gantry over the area again Slight ink stains that remain on the rail after cleaning are not a major problem Procedure 1 Open the Maintenance Station cover t...

Страница 201: ...an affect the vacuum and result in dripping ink and deteriorated image quality as a result of nozzle dropout Bleeding the ink filters is a strategy to avoid persistent nozzle dropout You must bleed an...

Страница 202: ...wo screws that hold the ink filter enclosure cover in place thumbscrews can be loosened by hand or use a Philips screwdriver if they are too tight 146 Remove Ink Filter Enclosure Cover 5 Locate the bl...

Страница 203: ...ed around the end of the bleed tube so that any ink spay is contained 8 Pull the target ink filter out of its metal retainer clip 9 Unscrew the bleed tube cap from the old filter and thread it into th...

Страница 204: ...uttons 4 Press the Raise Carriage button switch 2 middle and then use the maintenance suction nozzle to remove any excess ink from the printhead that you purged 5 Close the maintenance station door 6...

Страница 205: ...unt of air in the filter since the ink pump is only active for a brief period every 5 seconds Ignore the residual ink that is already in the bleed tube How to Change Ink Filters How to Bleed an Ink Fi...

Страница 206: ...e that are still closed 3 Use a marker or create a label to record the install date 4 Replace the ink filter enclosure cover 5 Perform routine printhead maintenance before printing 6 Replace the ink f...

Страница 207: ...operator to control the power output of each UV lamp independently To extend lamp life use the lowest setting that provides adequate curing for a particular media However avoid handling media with in...

Страница 208: ...amp housing interlock safety arm out of the way 152 Interlock Safety Arm first lift it straight up to the height of the blue connector then angle it away from the connector as you raise it higher and...

Страница 209: ...and cotton gloves 2 Turn the housing upside down on a clean work space away from the printer 3 Rotate the shutter motor dampener until the UV shutters are open 153 Rotate shutter motor dampener 4 Ope...

Страница 210: ...connectors 6 Ease the bulb out of the retainer clips one end at a time and then remove it from the housing 156 Remove UV lamp bulb 7 Place the used bulb in a container for recycling 8 Dispose of the...

Страница 211: ...ation bulletin 38 for more details 2 Use the lint free cloth soaked in isopropyl alcohol to clean both sides of the quartz window in the bottom of the UV lamp housing bucket 3 Ensure that the UV shutt...

Страница 212: ...tor to the top of the UV lamp housing 6 Repeat the above two sets of procedures to change the bulb in the other lamp housing NOTE We recommend that both UV Lamp bulbs be replaced at the same time to e...

Страница 213: ...ntenance every day for all colors including white Weekly Agitate the white ink bag as described on the ink bag label even when white is not actively used Swab all printheads As Needed Purge the white...

Страница 214: ...n it must be removed immediately Any spilled UV ink must be removed immediately before it can cure from exposure to light RMO Maintenance The following table provides our recommended maintenance activ...

Страница 215: ...e shields and nitrile gloves when working with ink or liquid solvents If a significant amount of ink has spilled consider donning an apron or smock IMPORTANT The only way to remove cured ink is if the...

Страница 216: ...b has tested only Ivory Detergent If you are uncertain about a detergent try it out in a 50 1 solution on a small area at the end of the capstan 3 Wet the cloth in the cleaning solution and wring out...

Страница 217: ...Supplies needed Nitrile gloves safety goggles with side shields several absorbent clothes and Isopropyl Alcohol 95 pure Procedure 1 Put on gloves and goggles 159 Ink Spill on Capstan How to Remove Unc...

Страница 218: ...th alcohol and wipe up the remaining ink 161 Wet fresh cloth with alcohol NOTE It may be difficult to tell whether or not all the ink has left the surface Continue to wet and wipe the capstan surface...

Страница 219: ...pletely then follow the procedure listed above for Removing Solid Debris When the capstan is kept clean and its rubber surface free of blemishes or defects you will be ensured of accurate media transp...

Страница 220: ...How to Remove Uncured Ink on the Capstan 220 Chapter 11 Printer Maintenance...

Страница 221: ...Chapter 12 Regulation Notices...

Страница 222: ...f you make such changes or modifications you could be required to stop operation of the equipment This equipment contains a certified modular transmitter The transmitter s FCC ID label is located near...

Страница 223: ...Waste batteries please recycle End of Life WEEE EEA including Switzerland This symbol indicates that this product is not to be disposed of with your household waste according to the WEEE Directive 20...

Страница 224: ...f the Ministry of Industry and Trade stipulating temporarily the permissible content limitation of some toxic chemicals in the electronic electrical products Decision No 4693 QD BCT correcting Circula...

Страница 225: ...l that will be experienced at operator position around the product at a distance of 1 m and a height of 150 cm 59 1 inch and is defined as the dynamic variation of the static pressure of air measured...

Страница 226: ...226 Chapter 12 Regulation Notices...

Страница 227: ...Appendix A Application Information...

Страница 228: ...lication Bulletin 6 How to Improve UV Ink Adhesion Application Bulletin 7 About Media Models and Application Notes Application Bulletin 8 How to Hold Media Flat on the Printer Table Application Bullet...

Страница 229: ...letin 42 Dibond Media Models Added to the Customer Support Website Application Bulletin 43 Roll Media Option Tips and Troubleshooting Application Bulletin 44 Oc UV Adhesion Promoters Application Bulle...

Страница 230: ...el Application Bulletin 66 How to Empty the Ink Waste Trays Customer Support The information found on our website is based on our experience with the Oc Arizona printers It is offers suggestions or so...

Страница 231: ...ance 176 Maintenance Schedule 176 Maintenance Station 40 Maintenance Station 185 Maintenance Station 180 183 Measurement Units 55 Media Adhesion 75 Media shaft 78 Media Storage 74 Media Storage 74 med...

Страница 232: ...rmal Expansion 75 Training 62 U Upgrade 42 User Interface Settings 55 UV Flush 166 V Vacuum Bleed Valve 40 71 Vacuum Overlay 70 Vacuum Pump Timeout 70 Vacuum System 70 Vacuum Zone Control 40 Vacuum Zo...

Страница 233: ......

Страница 234: ...nada Inc www canon ca Canon Europe Ltd www canon europe com Canon Latin America Inc www cla canon com Oc Australia Pty Ltd www oce com au Canon China Co Ltd www canon com cn Canon Singapore Pte Ltd ww...

Отзывы: