background image

3-4  Print Controller User’s Guide

Chapter 3 Printer Driver Functions

Windows 95/98/Me

1.

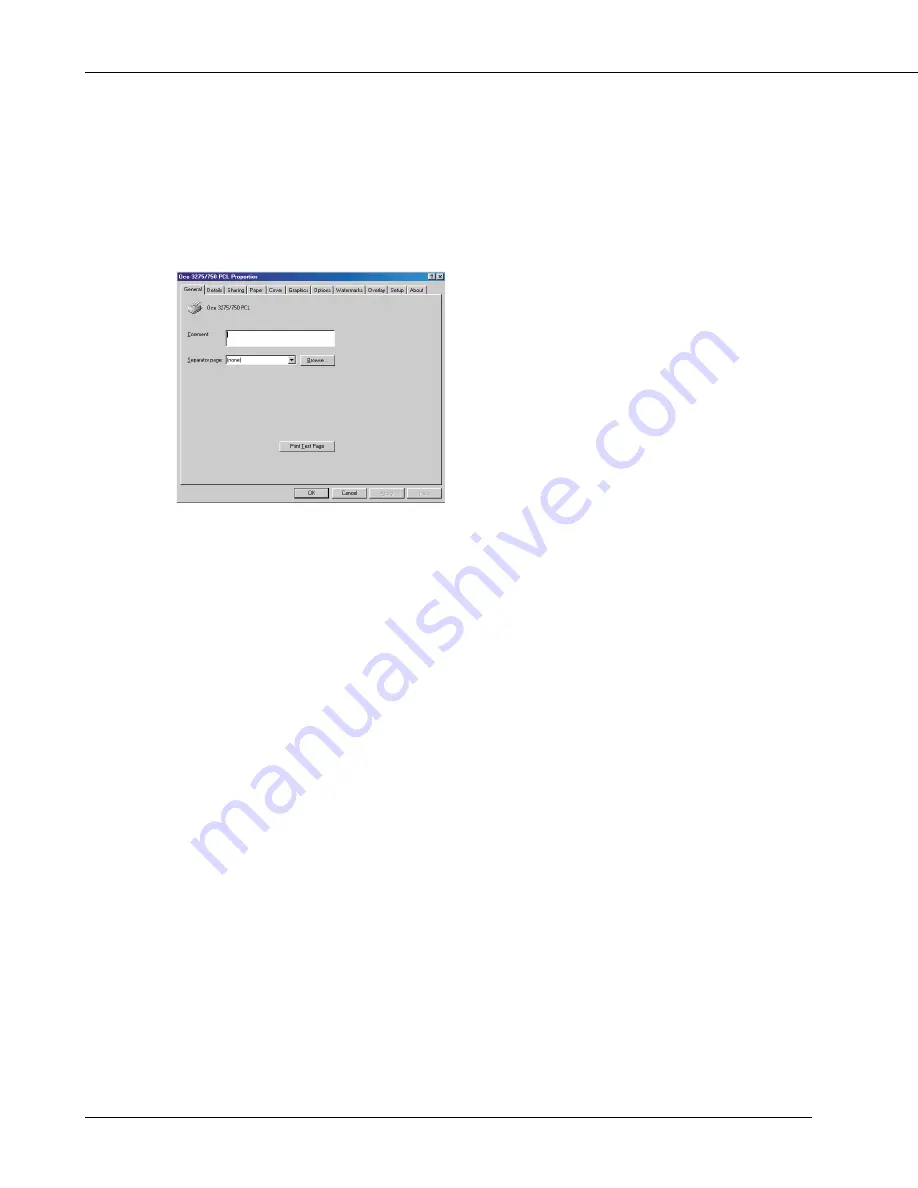
Click [Start]-[Settings]-[Printers], right-click the [Océ 3275/750 PCL] icon, and

then click [Properties].

The following tabs will appear:

[General], [Details], [Sharing], [Paper], [Cover], [Graphics], [Options], [Watermarks], [Over-

lay], [Setup] and [About].

[OK]

When the [OK] button is clicked, all tab settings are saved with the close of the proper-
ties screen.

[Cancel]

When the [Cancel] button is clicked, all tab settings are canceled with the close of the
properties screen.

[Apply]

When the [Apply] button is clicked, the present tab settings are saved. This button is used when
settings continue to be performed by using other tabs, and the present tab settings are registered
before using other tabs.

[Help]

When the [Help] button is clicked, Help information will appear. As well, when you click
[Help] button, which appears when right-clicking a desired item, pop-up help for the item
appears.

Содержание 75

Страница 1: ...User s Guide Network Print Controller 75 2001 by Oc USA Inc and Oc Printing Systems USA Inc...

Страница 2: ...ogo Acrobat Acrobat Logo PostScript and PostScript Logo are registered trade marks or trademarks of Adobe Systems Inc Other company names and product names used in this manual are the registered trade...

Страница 3: ...low 1 4 Hardware Configuration 1 5 Interface 1 5 Printer Driver 1 6 Page Description Language 1 6 Memory 1 7 Chapter 2 Printer Driver Setup 2 1 Installation of the Printer Driver 2 2 Before Installati...

Страница 4: ...PCL Setup 4 15 Time Change 4 15 Print Job 4 16 Cancel 4 16 Check 4 17 Interrupt Reserve 4 19 Forced Output 4 20 Password Print Confidential Output 4 21 Job Combination 4 24 Chapter 5 Scanner Operatio...

Страница 5: ...rinter ECM 6 1 Overview of the Printer ECM 6 2 Setting of Printer ECM 6 2 Printing with Printer ECM 6 2 ECM Limit 6 3 Appendix A Troubleshooting Appendix A 1 Appendix B Product Specifications Appendix...

Страница 6: ...urning the equipment off and on the user is encouraged to try to correct the interference by one or more of the following measures Reorient or relocate the receiving antenna Increase the separation be...

Страница 7: ...d to print from Windows compliant computers to the printing system Computers on which Windows 95 98 Me NT4 0 2000 can run CD ROM drive necessary to install the printer driver or the scanner driver Usi...

Страница 8: ...e print controller and the main body printer copier Chapter 2 Printer Driver Setup Chapter 2 describes how to install the printer driver user software included on the user software CD to Windows compl...

Страница 9: ...soft Windows 2000 Windows 2000 Above OSs Windows 95 98 Me Windows NT4 0 2000 Windows NT 2000 Windows 95 98 Me NT 2000 Notation of cautions in this manual are shown with the caution symbol Each mark us...

Страница 10: ...de 1 1 Chapter 1 Overview Overview of the Print Controller 1 2 Print Controller and Main Body Printer 1 2 Print Data Flow 1 4 Hardware Configuration 1 5 Interface 1 5 Printer Driver 1 6 Page Descripti...

Страница 11: ...rk The interpreter inside the print controller rasterizes the print data to image data bitmap extracting process which is sent to the print engine in the main body printer via the VIC video interface...

Страница 12: ...he printer to request a print job the copier counts up printouts based on the ECM counter to know when a preset limit is hit and also rejects a print request from a client having no valid password E R...

Страница 13: ...ard Disk PDL Processing Rasterization Interpreter Page memory IEEE 1394 Communication Board IEEE 1394 VIC Video Interface Card PCI bus E RDH memory PCI bus Printer Driver Spooler Print Commands Browse...

Страница 14: ...ernet This card is the internal network interface card which supports multiple protocols on the Ethernet This card includes a CPU and flash memory with an upgradable program The network interface card...

Страница 15: ...Windows 98 Windows Me Windows NT4 0 Windows 2000 Refer to Chapter 2 Printer Driver Setup p 2 1 for how to set up the printer Refer to Chapter 3 Printer Driver Functions p 3 1 for detailed functions o...

Страница 16: ...For printouts using such features as multiple copies booklet mode and wait mode all data about the entire set of pages rasterized by the print controller one job must be first stored in the E RDH mem...

Страница 17: ...e 2 1 Chapter 2 Printer Driver Setup Installation of the Printer Driver 2 2 Before Installation 2 2 Installing to Windows 95 98 Me 2 3 Installing to Windows NT4 0 2000 2 5 Uninstalling the Printer Dri...

Страница 18: ...can be installed to computer models as long as Windows 95 98 Me NT 2000 has been installed on them to use the printing system Please keep the User Software CD on hand since it is required to install...

Страница 19: ...appear for setting the printer 4 Click the Next button 5 Select Local and click the Next button When the printing system is directly connected to a computer in which the printer driver will be instal...

Страница 20: ...Next button The next Add Printer Wizard window to assign a port will appear 12 Select the port to which the printing system is connected and click the Next button Select LPT port when the printing sys...

Страница 21: ...p t n e m u c o d f o n o i t u c e x E t e s e b o t d e w o l l a e r a t n e m u c o d h c a e g n i t n i r p o t d e t a l e r s n o i t a r e p O c t e y a r t r e p a p d n a e z i s r e p a p...

Страница 22: ...indows NT4 0 follow steps 6 6 Select Local printer Windows 2000 My Computer Windows NT4 0 and click the Next button When the printing system is directly connected to a computer in which the printer dr...

Страница 23: ...utton The next Add Printer Wizard window to specify the printer name will appear 14 Specify the printer name and click the Next button Default Oc 3275 750 PCL The next Add Printer Wizard window to per...

Страница 24: ...Windows 2000 Digital Signature Not Found window will appear then follow steps 20 20 In case of Windows 2000 click the Yes button Necessary files will be copied from the User Software CD to complete t...

Страница 25: ...My Computer To open the Printers window double click the Printers folder or Control Panel Printers after double clicking the My Computer icon on the desktop 3 Click the printer icon of the Printers wi...

Страница 26: ...ning from My Computer To open the Printers window double click the Printers folder or Control Panel Printers after double clicking the My Computer icon on the desktop 2 Right click Oc 3275 750 PCL ico...

Страница 27: ...Print Controller User s Guide 3 1 Chapter 3 Printer Driver Functions Printer Driver Functions 3 2 Compliant OS 3 2 Properties 3 3 Function List 3 7 Description of Functions 3 13...

Страница 28: ...nd setting up the printing system It expands the OS functions to control the I O of the printing system This chapter fully describes the various functions of the printer driver Compliant OS The printe...

Страница 29: ...printouts In advance check to make sure of Printer Name by selecting File Print Print Dialog on the application in use Settings made in the first way are effective when getting printouts whatever the...

Страница 30: ...ed with the close of the proper ties screen Cancel When the Cancel button is clicked all tab settings are canceled with the close of the properties screen Apply When the Apply button is clicked the pr...

Страница 31: ...ferences The following tabs will appear Paper Graphics Options and About OK When the OK button is clicked all tab settings are saved and the properties screen is closed Cancel When the Cancel button i...

Страница 32: ...nd Features to use the main body printer functions Cover tab Performs settings related to front back cover intersheet and PI cover sheet Graphics tab Performs settings related to Halftones Brightness...

Страница 33: ...o i t a t n e i r o o o e z i s r e p a P 5 8 x 5 5 1 1 x 5 8 4 1 x 5 8 7 1 x 1 1 m m 0 2 4 x 7 9 2 3 A m m 7 9 2 x 0 1 2 4 A m m 0 1 2 x 8 4 1 5 A m m 8 4 1 x 5 0 1 6 A m m 4 5 3 x 0 5 2 4 B m m 7 5...

Страница 34: ...i h T t u o y a l e g a p o o h c n u P f f O t f e L p o T t c e l e s o t d e s u s i n o i t c n u f s i h T n o i t i s o p h c n u p e h t o o h c t i t S d l o F e n o N y l n O d l o F m i r T...

Страница 35: ...o t d e s u s i n o i t c n u f s i h T e g a m i e h t o o 5 7 2 3 e v i r D d r a H e g a r o t S e g a m I s g n i t t e S b o J n e p o o t n o t t u b s i h t s s e r P s g n i t t e S t n i r P...

Страница 36: ...l a c i t a m o t u A d e n i f e d r e s U 0 0 1 o t 0 X 0 0 1 o t 0 Y y f i c e p s o t d e s u s i n o i t c n u f s i h T d e t c e l e s e h t f o n o i t i s o p e h t k r a m r e t a w o e l g...

Страница 37: ...w o h S e g a p e l g n i s w o h S w e i v e r p o t d e s u s i n o i t c n u f s i h T e h t h t i w t u o y a l n i s g n i t t e s r u o y s g n i t t e s y a l r e v o t n e r r u c o s t l u a...

Страница 38: ...s t e e h s r e t n i o o n o i t r e s n I t e e h S s e g a P y f i c e p s o t d e s u s i n o i t c n u f s i h T d e t r e s n i e b o t e g a p e h t o o n o i t r e s n I t e e h S y a r T y a...

Страница 39: ...d in the tab order Refer to Properties p 3 3 for how to indicate each tab in the properties Some of the interfaces to tabs and others are displayed differently by OSs Also among the tabs there are som...

Страница 40: ...tion is used to specify how to output multiple pages When Collate is checked on Default after one copy of all pages has been printed the second copy the third copy are printed When Collate is not chec...

Страница 41: ...x 5 8 7 1 x 1 1 m m 0 2 4 x 7 9 2 3 A m m 7 9 2 x 0 1 2 4 A m m 0 1 2 x 8 4 1 5 A m m 8 4 1 x 5 0 1 6 A m m 4 5 3 x 0 5 2 4 B m m 7 5 2 x 2 8 1 5 B m m 2 8 1 x 8 2 1 6 B s e h c n i 3 1 x 0 8 4 F m m...

Страница 42: ...Interleave Blank or OHP Interleave Print is selected specify the paper tray in which the interleaf sheet is loaded from Tray 1 2 3 or 4 Available paper size in each paper tray is shown in the followi...

Страница 43: ...e foot of the back Output Tray Default SubTray or MainTray can be selected from the list shown by clicking the button If you select Default the main body printer will use Main Tray automatically Sub T...

Страница 44: ...en the Password is entered the password of Job Combination Print Settings dialog for Password Print is replaced with the password of Password Print Settings dialog You must enter the same password 8 d...

Страница 45: ...Proof Image Shift Off On Features Offset On offsets each copied set upon exit 3 sets 2 sets 1 set Offset OFF Collate ON only In case of printing page1 2 and 3 Offset ON Collate ON 3 sets 2 sets 1 set...

Страница 46: ...cape Double Left Portrait Double Left Landscape Staple can not be performed in the following cases When Finisher is not available When A6 or B6 is selected in Paper size When OHP Transparency OHP Inte...

Страница 47: ...onto a A3 size paper 2 2 2 in 1 Repeat Combination can not be selected in the following cases When Collate is not selected in Copies When 8 5 x 14 11 x 17 A3 A6 B4 B6 F4 8K K16 11 x 17 W A3W or B4W is...

Страница 48: ...lowing cases When Finisher is not available When 5 5 x 8 5 8 5 x 14 A5 A6 F4 or wide paper is selected in Paper size When OHP Transparency OHP Interleave Blank OHP Interleave Print Tab sheet is select...

Страница 49: ...i h c n u p g n i h c n u p g n i l p a t s g n i h c n u p g n i h c n u p g n i l p a t s g n i h c n u p g n i h c n u p g n i l p a t s 5 8 x 5 5 O O X X X X 1 1 x 5 8 O O O O O X 4 1 x 5 8 O O X...

Страница 50: ...es and cuts off the excess part resulted from folding to keep the paper size and outputs to the tray of the finisher Fold Stitch Fold Only Fold Stitch Trim Fold Trim Cutting off the excess part Fold S...

Страница 51: ...he LCD touch screen of the main body printer and to see how the printed job will look before printing out multiple sets Refer to Chapter 4 Control Panel Setup Print Job Check p 4 16 Features Image Shi...

Страница 52: ...ed nothing is printed on the front cover When Printed is selected the first page data is printed on the front cover None Printed Blank Front Cover can not be performed in the following cases When Coll...

Страница 53: ...Cover can not be performed in the following cases When Collate is not selected in Copies When Booklet 2 in 1 or 2 in 1 Repeat is selected in Features Combination When OHP Transparency OHP Interleave...

Страница 54: ...yed page You can specify the numbers using comma as follows e g insert at page 3 3 insert at pages 3 5 and 12 3 5 12 The maximum number of total pages you can specify to insert is 28 You can not speci...

Страница 55: ...t cover and or a Back cover The settings you can select are as follows Front Back or Front and Back PI Cover Sheet can not be performed in the following cases When Finisher Folder 75 is not available...

Страница 56: ...into the text box beside the slider you can brighten or darken the graphic If the graphic appears too bright slide the brightness slider to the left If the graphic appears too dark slide the brightnes...

Страница 57: ...the number of document pages to be printed on one piece of paper Select 1 2 4 6 9 or 16 from the list shown by clicking the button Default for Pages per sheet is 1 1 2 4 6 9 16 At the Pages per sheet...

Страница 58: ...at Bitmap soft fonts prints documents using a TrueType font which downloaded from your computer using bitmap data format Rasters is selected all text and font data is converted in the computer into Ra...

Страница 59: ...ou can specify 1 to 999 as follows e g chapter at page 4 4 chapter at pages 4 6 and 12 4 6 12 Chapter can not be performed in the following cases When Collate is not selected in Copies When OHP Transp...

Страница 60: ...ing of stored images Settings Open the Job Combination Print Settings dialog for password setting The Job Combination Print Settings dialog also appears on checking Image Storage unless password setti...

Страница 61: ...l e s t o n s i t e l k o o B d e t c e l e s t o n s i t e l k o o B t o n s i e v a e l r e t n I P H O d e t c e l e s t o n s i e v a e l r e t n I P H O d e t c e l e s t o n s i t r e s n I e g...

Страница 62: ...others you ve created click the button Page Select the pages on which to print watermarks Select All but first page All pages First page only or No watermark from the list shown by clicking the butto...

Страница 63: ...matting will be applied to your selected watermark text When both of these are selected bold and italic formatting will be applied Size Select a point size for the font to be used in your watermark by...

Страница 64: ...cked you can preview how the single page will look with the current watermark settings The Show single page button will change to the Show layout button by clicking it New When the New button is click...

Страница 65: ...on which to place the overlay design Select All but first page All pages First page only or No overlay from the list shown by clicking the button Select bitmap When you click the Select bitmap button...

Страница 66: ...down of the overlay on the page by clicking the or button or by directly entering the values from the keyboard 0 100 Show layout Show single page When the Show layout button is clicked you can previe...

Страница 67: ...Available options such as Finisher Hard Disk Large Capacity Tray Trimmer Unit Punch Unit etc the driver software will make the option available from that point on Remove Clicking the Remove button aft...

Страница 68: ...3 42 Print Controller User s Guide Chapter 3 Printer Driver Functions About Tab The About tab shows some system information and the printer driver version...

Страница 69: ...5 Job Status Screen 4 6 Printer Mode Basic Screen 4 8 Configuration of Printer Setting Menu 4 10 Functions of the Printer Setting 4 11 Test Print 4 11 Controller Set 4 12 Set Default 4 14 PCL Setup 4...

Страница 70: ...tions CHECK COPY SCANNER SERVER PRINTER INTERRUPT PROOF COPY TIMER STOP START JOB MEMORY CLEAR QTY COUNTER AUTO RESET HELP POWER SAVER ON OFF 1 2 3 1413 12 4 11 10 9 5 6 7 8 1 LCD TOUCH SCREEN Display...

Страница 71: ...when weekly timer function is active 9 START Activates scanning or copying Restarts the printing after Wait Mode Wait or Proof 10 C CLEAR QTY Allows resetting of print quantity 11 P COUNTER Displays t...

Страница 72: ...ame displays for approximately 10 seconds until initial machine settings are established Then the 7 levels of Warm Up Screen displays for approximately 6 minutes until the fixing temperature is reache...

Страница 73: ...IDLE The printing system is ready to receive the print data from your computer PRINT The print controller is currently printing The print data rasterized in the print controller is now being transferr...

Страница 74: ...the No 1 99 for each job print copy scan assigned to the machine MODE Displays the current operation mode of the printing system COPIER PRINTER SCANNER STATUS Displays the current status of the machin...

Страница 75: ...the remaining print count of the job 0 to 9999 The number exceeding 9999 will be displayed as 9999 MINUTE s TO GO Displays the time in minutes required for completing the job 1 to 999 Exceeding 999 m...

Страница 76: ...ntroller Set Screen You can perform various settings related to the Print Controller Set Default Display the Set Default Screen You can return various settings to the factory default by selecting the...

Страница 77: ...ta of Test Print Menu How to set the Banner Page On 1 Press the MODE key to show the Printer Mode Basic Screen The Copy Mode Basic Screen is switched to the Printer Mode Basic Screen 2 Touch the Contr...

Страница 78: ...ssword Print A4 B5 8 5 x 14R A3R B4R 8 5 x 11 default default Dark Light CR LF default CR default Auto Tray Tray 3 Tray 1 Tray 2 Tray 4 Bypass Tray default Long Edge Short Edge default Off Off Print Q...

Страница 79: ...age to print the PCL Demo Page immediately PCL Font List Select PCL Font List to print the PCL Font List immediately Config Data Select Config Data to print the System Configuration data immediately I...

Страница 80: ...set the tray for Banner Page Setting items are as follows Auto Tray Tray1 Tray2 Tray3 Tray4 Bypass Tray Spool Select Spool to set the Spool condition Setting items are as follows On spool waiting prin...

Страница 81: ...body printer the print controller can receive the print job data Setting values are as follows 15 30 Default 60 90 unit seconds Scan Data AutoDel Select Scan Data AutoDel to set the Scan Data AutoDel...

Страница 82: ...lution to set the default Resolution Setting items are as follows 400 x 400 dpi set the Resolution to 400 dpi Default 600 x 600 dpi set the Resolution to 600 dpi Print Quality Select Print Quality to...

Страница 83: ...old version Courier Style Light use new version Courier Style Default CR LF Mapping Select CR LF Mapping to set the CR LF Mapping Setting items are as follows CR LF replace line ending LF code to CR L...

Страница 84: ...and E RDH in the main body printer but can not clear the remaining job on your computer How to cancel the job 1 While a job is currently printing touch the Stop key to cancel the job The confirmation...

Страница 85: ...tures in Paper tab of the printer properties window and select Proof from the list by clicking the button of the lower box of the Features 3 Start to print On the control panel 4 The Printer Check Mod...

Страница 86: ...firming the settings on the control panel without printing On your computer 1 Right click the printer icon and then click the properties to display the printer properties dialog 2 Select Wait Mode fro...

Страница 87: ...gain to enable the engine to resume the Interrupted print job If the INTERRUPT key is pressed while receiving the job data Interrupt mode will become available after the receiving is complete If the I...

Страница 88: ...ent size of papers on the operation panel and lets the print work continue on these papers is referred to as Forced Output Forced Output Procedure 1 Make sure that the LCD touch screen shows a massage...

Страница 89: ...Settings dialog appears When you have already set up the password on the Password Print Settings dialog go to step 6 3 Enter your user ID in the UserID text box You can select any eight digit number f...

Страница 90: ...h the OK key If no uppercase letters are displayed you can touch the Uppercase key to get them displayed If no lowercase letters are displayed you can touch the Lowercase key to get them dis played If...

Страница 91: ...is in the window appearing in step 11 under the heading of Password Print Confidential Output Procedures select the print job you want to delete and touch the Delete key When the Delete After 24H is s...

Страница 92: ...ID and the password on the Job Combination Print Settings dialog go to step 7 4 Enter your user ID in the UserID text box You can select any eight digit number for user ID If the Printer ECM has been...

Страница 93: ...ver 5 3 Scanning from the Copier 5 4 To Scan Documents in Real Mode 5 4 To Scan Documents in Store Mode 5 6 Scanner Setting Basic Screen 5 7 Functions 5 10 Reading in Scanned Data on a Computer 5 13 T...

Страница 94: ...digit box number on the control panel This box number is handled like a folder on the controller s hard disk The saved file can be read into TWAIN capable Windows applications through the network for...

Страница 95: ...he PC and the network interface card should be assigned appropriate IP addresses and that the TCP IP network should be enabled For the TCP IP settings of the network interface card see the separate Us...

Страница 96: ...specify IMAGE ENHANCE SCAN MODE SCAN DENSITY LENS MODE SCAN SIZE QUALITY SPECIAL ORIGINAL and others before getting the original read in To Scan Documents in Real Mode The scanned data is sent to the...

Страница 97: ...er When using the printing system as a scanner we recommend assigning a box number 1 9998 to each user and informing them of their numbers via e mail beforehand The box number assists in protecting th...

Страница 98: ...ce 1 Complete steps 1 through 5 under the heading To Scan Documents in Real Mode 2 Press the STORE key in the scanning setting basic screen 3 Press the START button so the original document you ve set...

Страница 99: ...the copy mode Key Operation mode refer to the copier manual AUTO Distinguish between text and photo automatically and select the appropriate image quality INCREASE CONTRAST Darken lightly printed ima...

Страница 100: ...the default in the copy mode ZOOM range in each resolution are as follows 200 dpi 0 66 4 00 300 dpi 0 44 4 00 400 dpi 0 33 4 00 600 dpi 0 33 2 00 SCAN SIZE Press this key to select the scanning paper...

Страница 101: ...n o i t u l o s e R l a n i g i r O e z i S a t a D t e e h s 1 f o o N s l a n i g i r O i p d 0 0 2 y l n o t x e T B K 0 7 t u o b A 0 9 8 t u o b A d n a t x e T e r u t c i P B K 0 3 1 t u o b A...

Страница 102: ...asic screen displays the special original screen which looks like this Special Original Screen Pressing the APPLI key in the scanning setting basic screen displays an application selection screen whic...

Страница 103: ...Layout Application Dual Page Sets Cancels the book copy settings and binding position Non Image Area Erase is selected automatically This feature cannot be used in combination with Mixed Original App...

Страница 104: ...s This feature cannot be used in combination with Non image Area Erase Re verse Image or Frame Fold Erasure ROTATION OFF Use this feature not to rotate the original image automatically by 90 degrees c...

Страница 105: ...anned data 1 Run the Application that conforms to TWAIN Adobe Acrobat 4 0 2 Select File Import Scan Adobe Acrobat Scan dialog box will appear 3 Select Oc Scanner Driver in the Device then click Scan b...

Страница 106: ...file list shown in the main window then click Reading to allow the selected file to be read in By default the file is cleared from the controller s hard disk immediately after the file is fully read...

Страница 107: ...d name can be entered Document Shows scanned data file numbers Numbers are automatically assigned in sequence Date Time Shows the date and time each scanned data file was generated Page Shows the tota...

Страница 108: ...age Selection key This key is used to select a page or pages when reading in a scanned data file Enter the number of start page and end page By default All Pages is selected With applications that can...

Страница 109: ...User s Guide 5 17 Chapter 5 Scanner Operation Option key This is used to change various settings of the scanner driver Close key This key is used to close the scanner driver Help key This key is used...

Страница 110: ...ed below Use reverse display of Scanned document Reverse the image of the scanned document Delete after taking in Scanner document Delete a scanned document file held in the scanner after reading it i...

Страница 111: ...disk 1 Run Adobe Acrobat 4 0 2 Select File Import Scan Adobe Acrobat Scan dialog box will appear 3 Select Oc Scanner Driver in the Device then click Scan button The Oc Scanner Driver main window will...

Страница 112: ...Print Controller User s Guide 6 1 Chapter 6 Printer ECM Overview of the Printer ECM 6 2 Setting of Printer ECM 6 2 Printing with Printer ECM 6 2 ECM Limit 6 3...

Страница 113: ...ts counter are set in the copier s key operator settings For guidance in setting Printer ECM refer to the copier user s guide A password for Printer ECM has need to be the same as User ID to enter at...

Страница 114: ...lete job list If the ECM counter hits a preset limit in the process of getting an output A message will appear indicating that the ECM counter reached a preset limit but the printing process is brough...

Страница 115: ...nd Appendix A 3 A message requesting a paper size you do not use is displayed Appendix A 3 You can not print the test print Appendix A 3 The print setting of a job does not correspond to the result of...

Страница 116: ...k the LCD touch screen of the main body printer to find information con cerning the current trouble 3 If possible print the Test Print from the LCD of the main body printer to check that the settings...

Страница 117: ...rea of the control panel then press the START button The forced out will start Refer to Chapter 4 Control Panel Setup Print Job Forced output p 4 20 for forced output You can not print the test print...

Страница 118: ...pacity is 2 GB the HD Full is 20 MB free space Under the HD Full condition the following message is displayed on the front panel of the main body printer Printer HD Full Please free HD space 1 Remove...

Страница 119: ...rough the destination host to the IP address of the scanner If the ping test fails check whether the copier s main power is switched on and also check the network cable for proper connection If the pi...

Страница 120: ...L e r o f e b d e t i b i h o r p y p o C t n u o c r e f f i D D I h c t a m t o n d i d D I r e s U e s u a c e b t u p t u o t o n b o J r e v o t i m i L t i m i l t e s e r p a d e h c a e r M C...

Страница 121: ...Print Controller User s Guide Appendix B 1 Appendix B Product Specifications Product Specifications Appendix B 2...

Страница 122: ...Printer is available 5 jobs including scanning jobs can be processed at the maximum Special Printing Offset Staple function Combination Punch Function Fold and Stitch function Wait Mode function Imag...

Страница 123: ...uired Compliant Host Computer A Windows based computer Macintosh optional PS3 kit required Option memory Memory Upgrade 64 DIMM 64 MB Dimension 200 mm W x 415 mm D x 350 mm H 7 9 W x 17 D x 13 8 H Wei...

Страница 124: ...Print Controller User s Guide Appendix C 1 Appendix C Font List Internal Font List Appendix C 2...

Страница 125: ...Appendix C 2 Print Controller User s Guide Appendix C Font List Internal Font List...

Страница 126: ...Print Controller User s Guide Appendix C 3 Appendix C Font List...

Страница 127: ...Appendix C 4 Print Controller User s Guide Appendix C Font List...

Страница 128: ...ies 3 14 Copy Mode 1 3 Courier Style 4 15 CR LF Mapping 4 15 D Default Paper 4 14 Deleting Password Print Jobs 4 23 Description of Functions 3 13 Details tab 3 6 Duplex 3 17 4 14 E E RDH 1 3 Ethernet...

Страница 129: ...llel Port vi Password Print 3 18 4 21 PCL Demo Page 4 11 PCL Font List 4 11 PCL Setup 4 15 Peer to Peer 1 5 Position 3 37 POWER SAVER ON OFF 4 3 Print Data Flow 1 4 Print Job 4 16 Print Quality 4 14 P...

Страница 130: ...4 3 To Delete Scanned Data 5 19 To import scanned data 5 13 To install the Scanner Driver 5 3 To Scan Documents in Real Mode 5 4 To Scan Documents in Store Mode 5 6 Troubleshooting Appendix A 2 TrueTy...

Страница 131: ...Oc USA Inc 5450 N Cumberland Avenue Chicago IL 60656 Oc Printing Systems Inc 5600 Broken Sound Blvd Boca Raton FL 33487 2001 11 Oc 3275_750_v100...

Отзывы: