


ASSEMBLY INSTRUCTIONS
AMERIGO VESPUCCI
A:
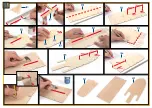
On a flat, stable surface glue pieces A1 and A2, and reinforce the joint with pieces A3 and A4. Following the alphanumeric order, insert and glue the parts as shown in the figures. Before
gluing the frames together, check that they fit correctly into position by "butting" them into the corresponding sockets in the false keel. It is important that the frames are fitted completely
perpendicular to the false keel so that the decks fit properly afterwards. Use white glue (Ref.19200).
B:
Cut the planks and highlight their edges with a pencil. Start planking the deck by fitting the first plank to the pencil line shown in the picture. Glue the planks tightly together so that the
joints are not visible. Use contact glue (cobbler's glue) as adhesive. Press the sheets against the deck so that they adhere firmly. Then cut off any excess using a box cutter. Sand the deck to
a fine, even surface. Afterwards, remove the dust from sanding and apply a couple of coats of satin varnish, (Ref.19209), sanding between coats. Cover all decks as shown in the pictures,
then sand and varnish, (Ref.19209).
C-D:
Build the structures following the alphanumeric order of the images. Use white glue. Fit and glue the covers onto the structures. Use crack-covering putty (Ref.19143) for the structures.
After sanding, apply primer, (Ref.19142).
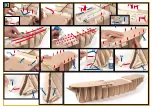
E:
Place the hull upside down and begin sanding starting from the bow and working towards the stern. You must rough the edges of the frames but without deforming their original shape.
The sanding of the hull must be symmetrical, that is, the right side must be the same as the left. For the middle of the hull, use a sanding block with a larger surface. Sanding must be
progressive and smooth. Check with a strip that the sanding is correct. To do this, you must slide the slat, over the frames, to see how it adjusts to its shape.
F-G-H:
Start the hull planking using the F2 pieces. If the planks are too dry and break when bent, soak them in water for about 20 minutes. This will make them flexible. Afterwards, dry them
with a cloth. You must glue the first batten from the bow to frame 7, using white glue, (Ref.19200). Then fasten it using A pins. Glue another F2 batten to continue the first one to the stern of
the hull. The remaining planking must be glued to the frames and to each other with white glue and pinned. Continue gluing planking from bow to stern to cover the entire hull. You will need
to cut the pieces to size and adjust them to fit the holes. If there are any loose planks at any point, you can apply quick-drying glue. If any of the planks are recessed, glue another one on top
and then sand them. File the pinheads with a flat file until they are flush with the planking. Dilute a little white glue with water so that you can apply it gently and it seeps between the joints of
the planks. Set the hull aside until the glue dries. This will bind the hull lining and make it stronger. Then sand the entire hull. It should be smooth and even.
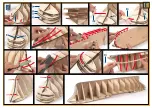
i-J:
Apply contact glue (cobbler's glue) to the area of the hull shown in the pictures. Glue the planking strips i1. You must join i1 strips to complete the total length of the hull. Cut the planking
to size according to need. Press the planks so that they adhere firmly.
K:
Apply crack-cover putty, (Ref.19143) to the entire hull and when dry sand it; it should be smooth to the touch. Repeat the same operation until a fine finish is obtained. Apply primer,
(Ref.19142) to the entire hull and sand again.
Use masking tape to mask areas of the hull’s frame. Paint the lower part of the hull with dark green paint, (Ref.19315). You can use a brush,
spray or airbrush for this operation. Complete the hull with the colors white, (Ref.19300), light ochre, (Ref.19387), and black (Ref.19301).
L:
Use template PL-01 to identify the pieces and their position on the hull. Use an awl to mark the centre of each hole on the hull. Then drill all the holes. Proceed in the same way on the
other side of the hull. Insert and glue an C10 piece into each hole.
M to Z:
Build the structures following the alphanumeric order of the images. Go building and decorating the pieces and add them to the ship to complete it. Use masking tape to insulate
structures so you can decorate them precisely. Build and decorate the boats using the images as a color guide.
MASTS AND SPARS
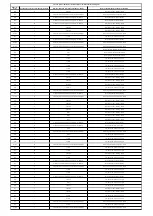
In order to make up the masts the first step is to cut the rods to size, as indicated in the parts list, or by taking measurements directly from the plans, which are printed in 1/1 scale.
All of the masts and spars have to have a certain conical shape, which they will have to be given.
In order to achieve this conical shape for the masts, sand down the rod (using a sander), increasing the amount of sanding down as you get closer to the end at which you want to decrease
the diameter. Turn the rod so that you sand it down evenly on all sides, until achieving the diameter indicated in the plan.
To achieve this conical shape for the spars carry out the above operations but in this case evenly reducing the diameter at both ends of the rod.
The rods will have to be stained or painted, depending on the model that you are building.
To correctly make up the must for this model you must take into account:
-The plans
-The close-up photos of the masts and spars
-The measurements and material descriptions of the parts list
-The “PI” parts identification sheets
-Template PL-01
The masts and spars need to be varnished, while some of the parts that make them up are meant to be painted. Examine the general and close-up photos of the masts
Once the mast and spars has been assembled and varnished fix the tackle (slings, blocks, eyebolts, clump blocks, etc.) into place on the ship. The masts will have to be fully inserted into the
sockets prepared to receive them in the false keel.
SAILS AND RIGGING
In order to make up the running gear for this ship follow the alphabetic order of the images printed on the plans, indicating the order for fitting the (ropes, clump blocks, blocks, sails, etc.)
highlighted in red. In combination with the parts list this will serve as a guide with regard to the type of material to be used and the measurements.
A method for simulating the aging of the sails is to soak them in an infusion of tea, without boiling, and then leaving them to dry all wrinkled up. Fit them in place without ironing so that they
will have a certain consistency.
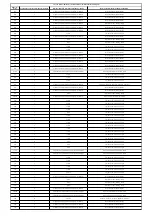
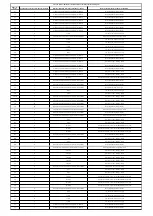
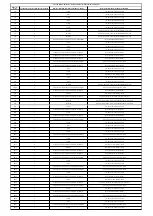
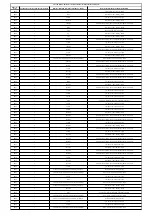
Содержание AMERIGO VESPUCCI 15006
Страница 1: ......
Страница 14: ......
Страница 15: ......
Страница 16: ......
Страница 17: ......
Страница 18: ......
Страница 19: ......
Страница 20: ......
Страница 21: ......
Страница 22: ......
Страница 23: ......
Страница 24: ......
Страница 25: ......
Страница 26: ......
Страница 27: ......
Страница 28: ......
Страница 29: ......
Страница 30: ......
Страница 31: ......
Страница 32: ......
Страница 33: ......
Страница 34: ......
Страница 35: ......
Страница 36: ......
Страница 37: ......
Страница 38: ......
Страница 39: ......
Страница 40: ......
Страница 41: ......
Страница 42: ......
Страница 43: ......
Страница 44: ......
Страница 45: ......
Страница 46: ......
Страница 47: ......
Страница 48: ...PL 01 Scale 1 1 Amerigo Vespucci...
Страница 49: ...Scale 1 1 PL 01 Amerigo Vespucci H Amerigo Simbol OcCre B N jpg...
Страница 50: ...PL 01 Scale 1 1 Amerigo Vespucci S21 S22 S20 S16 S17 S18 S19 N6...
Страница 51: ...Scale 1 1 PL 01 Amerigo Vespucci S12 138 6832...
Страница 65: ...VT12 VT11 VT10 VT8 VT9 Scale 1 1 Amerigo Vespucci...
Страница 66: ...VT22 VT21 VT19 VT17 VT23 VT24 VT18 Scale 1 1 Amerigo Vespucci...
Страница 67: ...VT3 VT7 VT2 VT6 VT1 VT5 VT4 Scale 1 1 Amerigo Vespucci...
Страница 68: ...VT16 VT13 VT14 VT15 VT20 Scale 1 1 Amerigo Vespucci...