Océ OP25 Скачать руководство пользователя страница 21

3. Performing the Required Operation at the Scanner

3-3

• Scan settings

13

The Scan Settings menu is displayed in the right
portion of the touch screen. If you want to change
any settings, touch the key that corresponds to that
setting. The following gives an example of the proce-
dure to specify the orientation of the original.
Touch the “Orig set direction” key.
The Original Set Direction screen will appear.

14

If you set the original with its top edge towards the
rear of the scanner, select “Back Edge”. If you set the
original with its top edge towards the left of the
scanner, select “Left top corner”. Touch the “Close”
key to register the change to that setting or the
“Back” key if you want to cancel the operation and
return to the previous setting. The screen will return
to that shown in step 12.
* If the setting for the orientation of the original is not

appropriate to the actual orientation, scanning may
be accomplished incorrectly. Be sure to confirm the
orientation of the original when making scan
settings.

15

Once you have checked all of the settings, set the
original and press the Start key.
Scanning of the original will begin.

* If you want to stop the scanning operation, touch

the “Cancel” key.

16

If you select “ON” under “Batch scanning” in the Scan
Settings menu, a message that asks whether or not
you want to continue scanning will appear after
scanning of the original is complete.
If you DO want to continue scanning, set the next
original, change any scan settings that you want, and
then press the Start key.
Once you have finished scanning originals, touch the
“Scanning finished” key.
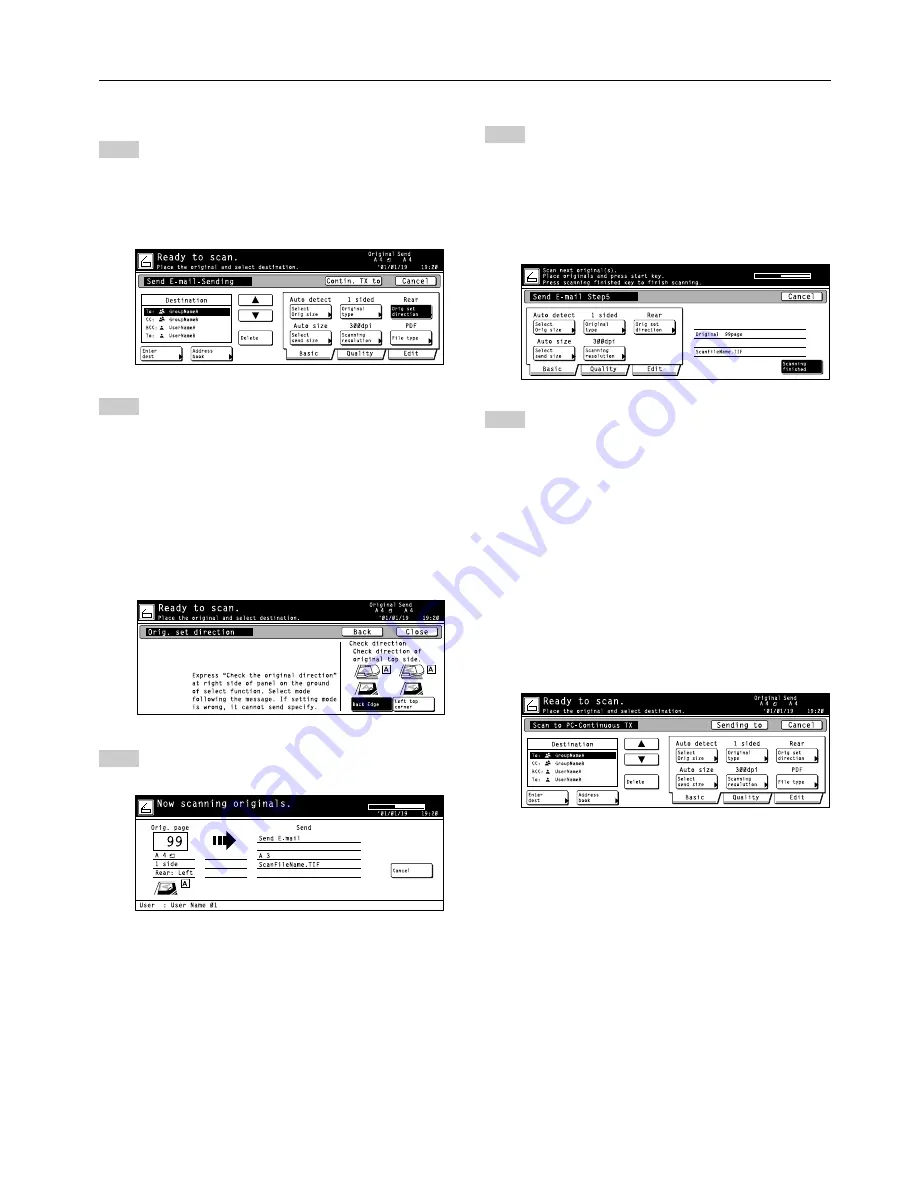
17

If you select “On” under “Continuous sending” in the
Scan to PC or Send E-mail screen, once the
scanning operation is completed, the touch panel will
return to the Scan to PC or Send E-mail screen, as
appropriate, with the current settings unchanged.
To continue scanning more originals, set the next
original, change any of the scanning settings as
required, and then press the Start key.
Once you have finished scanning originals, touch the
“Cancel” key.
* If “Permit file overwrite” is selected in the

computer’s Scanner File Utility when you are using
the Scan to PC function, previous files saved to that
computer may be overwritten if a duplicate file
name is use. Be aware of this fact when
designating file names for transmission, especially
when the “Continuous sending” setting is turned
ON.

Содержание OP25

Страница 1: ...1 1 1 Oc OP25 35 40 Scan System setup Operations Guide Education Services Oc Operations Guide English version...

Страница 2: ......

Страница 3: ...countries All other company and product names contained in this Operation Guide are trademarks or registered trademarks of their respective companies The designations and will not be used in this Ope...

Страница 4: ...ons Edition On Line Manual in a PDF Portable Document Format file format The Operation Guide Functions Edition On Line Manual explains how to use the required applications when using your copier as a...

Страница 5: ...he following items may result in legal penalty Bank notes coins government issue securities national bonds local bonds foreign currencies and securities unused postage stamps government post cards gov...

Страница 6: ...enclosed CD ROM disk Scanner File Utility Saves the scanned image as a data file on your computer TWAIN Source Enables you to utilize scanned images in a TWAIN compatible application Address Book A pe...

Страница 7: ...7 3 Installing the utilities 2 8 4 Installing the TWAIN source 2 8 3 Performing the Required Operation at the Scanner 3 1 3 1 Scanning under the Scan to PC and Send E mail functions 3 1 1 Before usin...

Страница 8: ...of the platen 3 Original size indicator lines Be sure to align the original with these lines when setting an original on the platen 4 Operation panel Perform operations here 5 Main switch Turn this s...

Страница 9: ...nal Network Scanner Kit is installed in your machine and you want to switch to the Scanner Operation mode The Scanner indicator is lit when the machine is in the Scanner Operation mode The touch panel...

Страница 10: ...Source Address Book Address Editor Configuration Tool DB Assistant Acrobat Reader On Line Manual Refer to the On Line Manual Functions Edition of this Operation Guide for information on using the inc...

Страница 11: ...software indicated in the thick lined balloons is included with this product Install the software that is appropriate to your operating environment and needs Image data receive through the Scan to PC...

Страница 12: ...ed with this product it is possible to perform the following settings from an Internet Web browser or the Address Editor software from a computer that is connected to the same network as the scanner R...

Страница 13: ...ponding information in accordance with the settings etc that are shown on the touch panel For more information on entering characters refer to the Operation Guide for your copier 3 Use the numeric key...

Страница 14: ...Register new dest key If you want to register a new group of destinations or add a destination to a previously registered group touch the Register new group key If you are registering a new destinatio...

Страница 15: ...is not required to register a pass word The password can be up to 8 numbers long Save folder No This is the registered number of the destination folder when Save at user PC is selected Use the Scanner...

Страница 16: ...ppm machines is 4000 If the entered number matches the registered one the Scanner Setting menu will appear It is possible for you to change the administrator password number as desired For more infor...

Страница 17: ...tings from an Internet Web browser as well as for each utility refer to the On Line Manual Functions Edition of this Operation Guide Send E mail Sends the image data of scanned originals to the desire...

Страница 18: ...enu 4 Click on the name of the utility that you want to install The installation window for that utility will appear Follow the instructions on screen in order to install the selected utility 4 Instal...

Страница 19: ...splay the Select Scanner Function screen 2 Touch the Send E mail key or the Scan to PC key as appropriate The Select Sender Name screen will appear 3 Use the and cursor keys to select your user name a...

Страница 20: ...ves an example of selecting a desti nation from the shared Address Book Use the and cursor keys to select the desired destination and then touch the Add key If you are using the Send E mail function s...

Страница 21: ...Start key Scanning of the original will begin If you want to stop the scanning operation touch the Cancel key 16 If you select ON under Batch scanning in the Scan Settings menu a message that asks wh...

Страница 22: ...ng will begin When performing the scanning operation at your computer 1 Run the TWAIN Source in the corresponding application The main dialogue box for the TWAIN Source will appear Make any settings t...

Страница 23: ...3 Performing the Required Operation at the Scanner 3 5...

Страница 24: ...3 Use the or the cursor key to select your sender name and then touch the Enter key The Destination of input data screen will be displayed You can also select the destination by entering the correspon...

Страница 25: ...not possible to select a destination folder that exists at a higher level than the folder which was designated using the Scanner File Utility 7 Select the item that you want to register the keyword un...

Страница 26: ...lowing screen will be displayed If there are no more originals to be scanned touch the Input data complete key If you are using the PDF Keyword Assist option the file information that you just registe...

Страница 27: ...entered number is not appropriate Check the correct number and enter it again Check to make sure that the network cable is connected securely and properly If this message appears immediately after tur...

Страница 28: ...t registered in the Select sender name List of this scanner First register a user under that number or turn the Selec of senders users setting OFF then select another user The selected destination is...

Страница 29: ...entium or faster 266 MHz Celeron recommended RAM 64 MB or more recommended Available hard disk space 20 MB or more 300 MB or more recommended CD ROM drive One Ethernet Port 100BASE TX and 10BASE T aut...

Страница 30: ...W...

Страница 31: ......

Страница 32: ...2002 8 3CS80011B...

Отзывы: