


2
www.Observint.com
© 2020 Observint Technologies. All rights reserved.
Remove the equipment from its packaging and place it on a flat, clean surface. Inspect each item. If any visible damage is present, contact
your supplier for a replacement. Verify that your order is complete.
What you need
Although each security system installation is different, most require the following items not included with your system components:
•
Cameras and cables compatible with the DVR. The Video in ports on the back panel support most analog CCTV camera brands and Alibi
HD-TVI, AHD, CVI and CVBS analog cameras
•
IP cameras installed on the Ethernet network (LAN) that associated with the DVR must be Alibi IP cameras.
•
Tools to install the cameras and route power and video cables
•
Fasteners to attach the cameras to the mounting surfaces
•
VGA or HDMI compatible computer monitor to connect to the DVR. (An HDMI cable is provided.)
•
Uninterruptible power supply (UPS) is recommended. This device is used to ensure system stability during voltage surges, sags, and
outages. If a UPS is not available, a power strip with strong surge protection is highly recommended.
Step 2. Install the DVR
For the following steps, refer to the back panel photo above for the location of connectors.
1.
Place the DVR in a location that is secure, well ventilated and clean. The DVR should be positioned such that the backpanel connectors
are accessible and the ventilation holes on the sides are not blocked.
2.
Connect the ground terminal on the back of the DVR to an earth ground. Refer to local electrical codes for proper grounding.
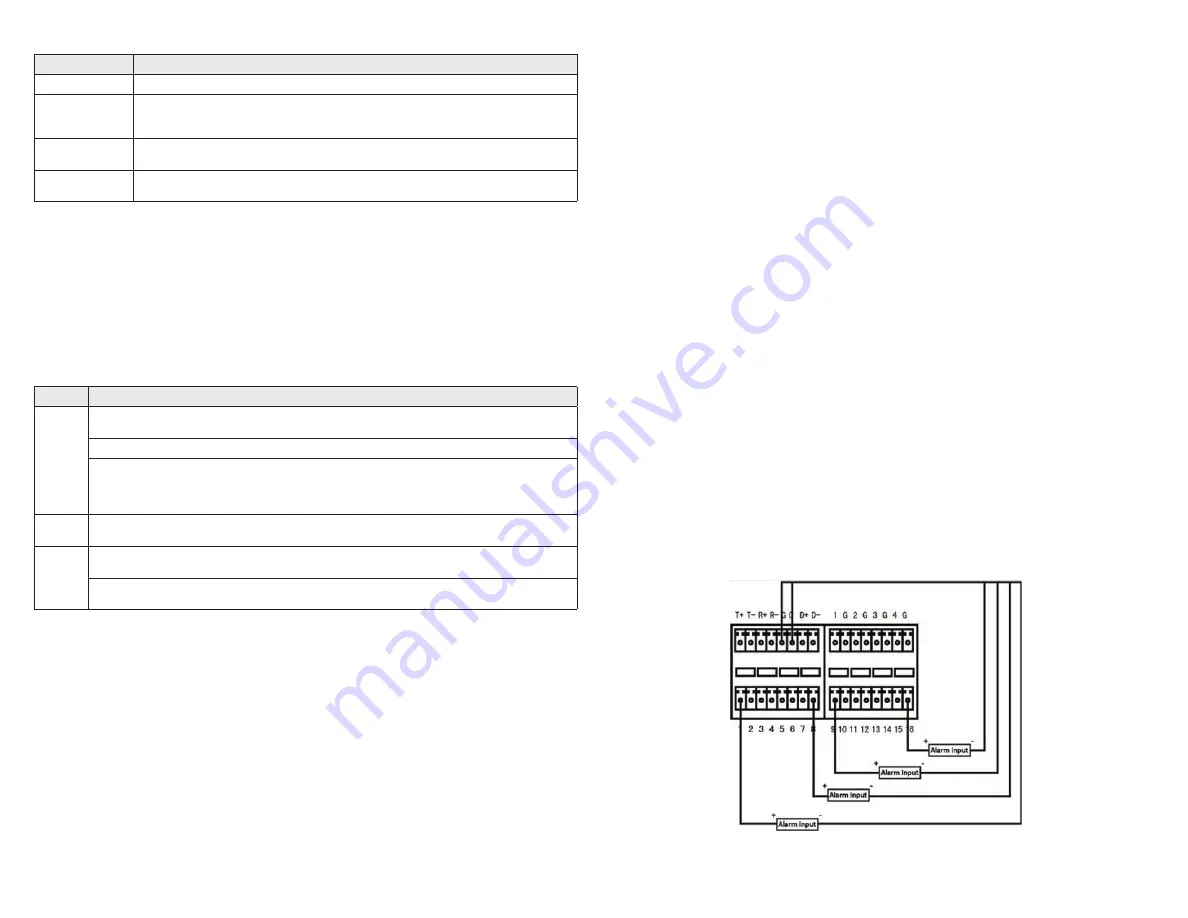
Step 3. Connect alarm devices to the DVR
Wiring alarm inputs to the DVR
You can wire up to 16 alarm inputs to the DVR. Alarm input ground wiring connects to the RS-485, Alarm IN / OUT connector blocks on the
back of the DVR.
RS485
KB
Ground (G)
ALARM OUT (4)
ALARM IN (1 - 8)
ALARM IN (9 - 16)
ALI-QVR5116H RS485 and Alarm terminations
Item
Description
RS-485 (T+, T-, R+. R-)
T+ and T- pins connect to R+ and R- pins of PTZ receiver respectively.
KB
Controller port:
D+, D- pin connects to Ta, Tb pin of controller.
For cascading devices, the first DVR’s D+, D- pin should be connected with the D+, D- pin of the next DVR
ALARM IN (1 through 16)
Alarm inputs 1 - 16. Alarm input is tied to ground through the alarm sensor.
See
“Step 3. Connect alarm devices to the DVR” on page 2
for more information.
ALARM OUT
(1-G through 4-G)
Alarm outputs 1 - 4 with ground terminations.
See
“Step 3. Connect alarm devices to the DVR” on page 2
for more information.
Mouse control
A standard 3-button (left / right / scroll-wheel) USB mouse can also be used with this DVR. To use a USB mouse:
1.
Plug the USB mouse into the either the front panel or backpanel USB connector of the DVR.
2.
The mouse will be automatically detected. If the mouse is not detected, the mouse may not be compatible with the DVR. Please refer
to the recommended device list from your provider.
Using the mouse
Action
Effect
Left click
Single click
: Live view: Select channel and show the quick set menu.
Menu
: Select and enter.
Double click
: Live view: Switch between single-screen and multi-screen.
Click and drag
: PTZ control: pan, tilt and zoom.
Tamper-proof, privacy mask and motion detection
: Select target area.
Digital zoom-in
: Drag and select target area.
Live view
: Drag channel / time bar
Right click
Live view
: Show menu.
Menu
: Exit current menu to upper level menu.
Scroll wheel
Scroll up
: Live view: Previous screen.
Menu
: Previous item.
Scroll down
: Live view: Next screen.
Menu
: Next item.
Installing the System
Step 1. Getting Started: Unpacking the Equipment
What’s in the box
Your system includes:
•
ALI-QVR5116H or ALI-QVR5132H DVR
•
USB mouse
•
HDMI cable
•
Rack mount hardware
•
Power adapter for DVR
•
This Quick Start Guide


