background image

18

GLOWPLUG

The role of the glowplug

Glowplug life

Particularly  in  the  case  of  very  high  performance 
engines, glowplugs must be regarded as expendable 
items. However, plug life can be extended and engine 
performance maintained by careful use, i.e.: 

Install a plug suitable for the engine.
Use  fuel  containing  a  moderate  percentage  of 
nitromethane unless more is essential for racing events.
Do  not  run  the  engine  too  lean  and  do  not  leave  the 
battery connected while adjusting the needle. 

With  a  glowplug  engine,  ignition  is  initiated  by  the 
application  of  a  1.5-volt  power  source.  When  the 
battery is disconnected, the heat retained within the 
combustion chamber remains sufficient to keep the 
plug filament glowing, thereby continuing to keep the 
engine running. Ignition timing is 'automatic' : under 
reduced load, allowing higher rpm, the plug becomes 
hotter  and,  appropriately,  fires  the  fuel/air  charge 
earlier; conversely, at reduced rpm, the plug become 
cooler and ignition is retarded.

Apart  from  when  actually  burned  out,  a  plug  may 
need to be replaced because it no longer delivers its 
best performance, such as when:

When to replace the glowplug

Filament surface has roughened and turned white. 
Filament coil has become distorted.
Foreign  matter  has  adhered  to  filament  or  plug 
body has corroded.
Engine tends to cut out when idling.
Starting qualities deteriorate.

Since  the  glowplug  and  fuel  combination 
used  may  have  a  marked  effect  on 
performance  and  reliability,  it  would  be 
worthwhile  to  experiment  with  different 
plug  types.  Recommended  O.S.  plugs  are 
No.8,    No.7 and No.10 (Former A5)  . 
Carefully  install  plug  finger-tight,  before 
final  tightening  with  the  correct  size  plug 
wrench.

19

With  a  fixed-wing  model,  power  failure  is  rarely  a 
serious threat to the safety of the aircraft since it can 
usually glide down to a safe landing. In a helicopter, 
on the other hand, it is vitally imporant that the engine 
keeps  running  and  that  there  is  a  quick  and  reliable 
response to the throttle in order to ensure safe ascent 
and descent of the model.

The High-Speed (Main) Needle Valve

When  set  to  produce  maximum  power  at  full 
throttle,  this  establishes  the  basic  fuel/air  mixture 
strength. This is then maintained by the carburetor's 
automatic  mixture  control  system  to  cover  the 
engine's requirements at reduced throttle settings.

The  Idle Mixture Control Screw

This  provides  the  means  of  manually  adjusting  the 
mixture  control  valve.  By  setting  the  Mixture  Control 
Screw  for  the  best  idling  performance,  the  mixture 
control  valve  automatically  ensures  that  fuel  is 
accurately  metered  to  maintain  the  correct  mixture 
strength as the throttle is opened. 

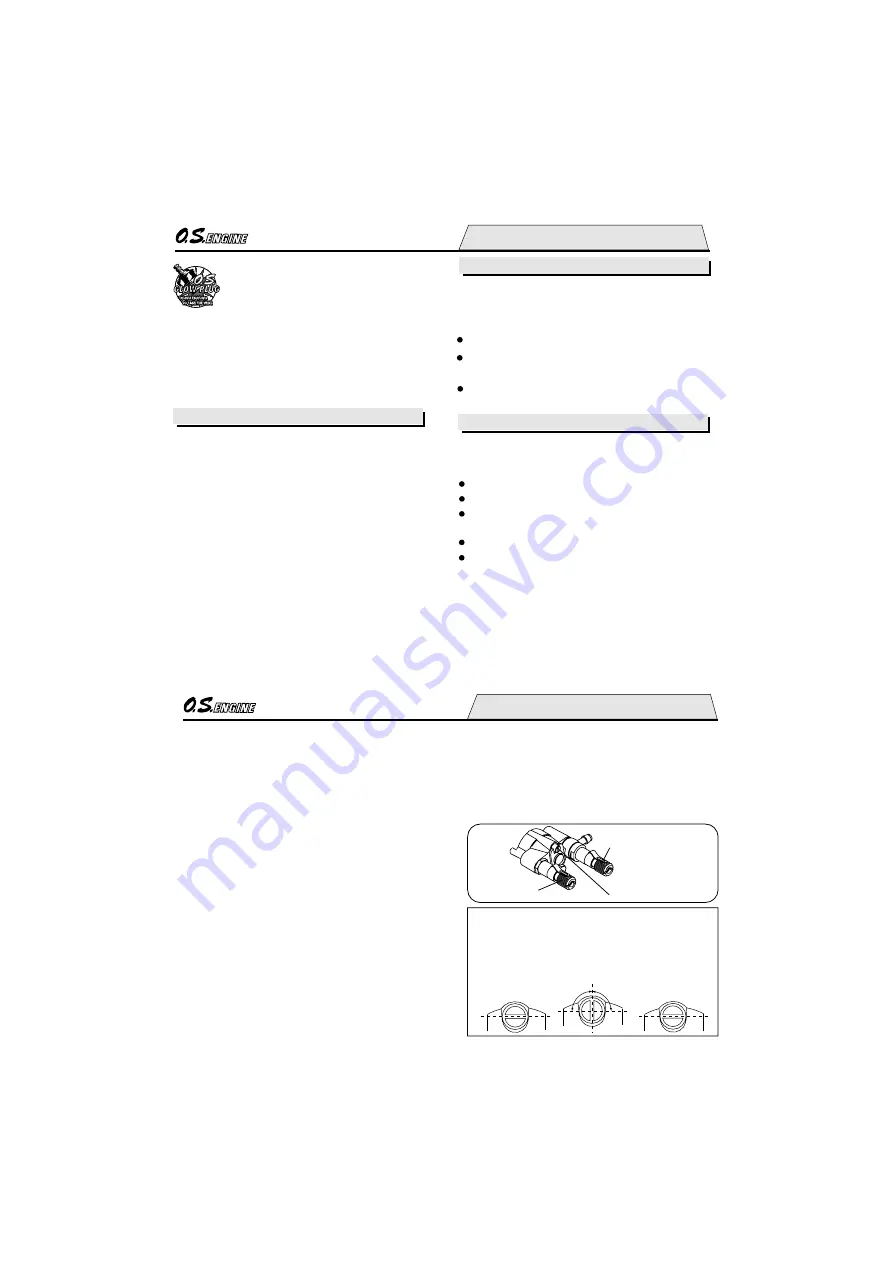
Three adjustable mixture controls are incorporated in the 
Type 40L. They are as follows.

A

B

The Medium Speed Needle Valve

This  is  an  extra  control  that  can  be  brought  into 
play, if necessary, after adjusting A and B above. It 
provides  the  means  of  fine-tuning  mixture  strength 
over  that  all-important  part  of  a  helicopter's  throttle 
range  where  the  model  is  flying  in,  or  near,  the 
hovering mode.

C

Idle MIxture Control Screw

High Speed Needle Valve
(Main Needle)

Medium Speed
Needle Valve

As  the  idle  mixture  control  screw  is  installed  with 
LOCTITE, it may initialy feel stiff, and it is suggested 
to use a slightly oversized screwdriver. The screw can 
be turned only 90 degrees either way. Do not force to 
turn further, or it may break or cause trouble.

NOTE

90 degrees

90 degrees

CARBURETOR CONTROLS

Содержание MAX-55HZ HYPER

Страница 1: ...control equipment etc are accessible for checking at the same time 1 2 5 6 7 8 9 10 12 17 21 25 31 38 39 40 41 42 26 30 18 32 33 34 37 13 16 19 20 43 44 CONTENTS SAFETY INSTRUCTIONS AND WARNINGS ABOUT YOUR O S ENGINE NOTES ON INSTALLING COOLING FAN AND CLUTCH NOTES WHEN APPLYING AN ELECTRIC STARTER INSTALLATION OF THROTTLE SERVO NOTES ON HEATING THE GLOW PLUG INTRODUCTION ENGINE PARTS NAME BEFORE ...

Страница 2: ... many other possibilities generally less obvious sources of danger but which under certain circumstances may also cause damage or injury 3 WARNINGS Never touch or allow any object to come into contact with the rotating parts Model engine fuel is poison ous Do not allow it to come into contact with the eyes or mouth Always store it in a clearly marked container and out of the reach of children Mode...

Страница 3: ... head down securely Take care that the glow plug clip or battery leads do not come into contact with rotating parts Adjust the throttle linkage so that the engine stops when the throttle stick and trim lever on the transmitter are fully retarded Alternatively the engine may be stopped by cutting off the fuel supply Never try to stop the engine physically 5 NOTES Take care that loose clothing ties ...

Страница 4: ...amaged Also do not insert a screw driver or the similar into the exhaust port It is recommended to use Crankshaft Clamp 3246 Code No 71530400 available as an optional tool 7 Do not grip the engine mounting beams with a vise or the crankcase will be distorted which will result in engine breaking Vise Beam Mount Notes on installing cooling fan and clutch ...

Страница 5: ...surplus fuel Cover the head with a rag to prevent pumped out fuel from getting into your eyes 9 F J J F 28 34 27 33 A B 9 0 9 0 A B Linking the throttle servo to the carburetor Link the throttle servo to the carburetor using the throttle lever supplied Throttle control rod A and B should be equal length Set the linkage so that the servo output lever and throttle lever are parallel when the throttl...

Страница 6: ... No 8 Instruction manual This is a high performance engine expressly designed for 50 size helicopters Since engine mounting and muffler mounting bolt patterns are the same as the 50SX H Hyper it can be installed in the existing 50 size helicopters Newly designed 40L carburetor enables to adjust idling hovering and high speed independently Close to 60 size power offers wide power range suitable for...

Страница 7: ...ting the glowplug may be either a large heavy duty 1 5volt dry cell Ni cd battery or glowplug Igniter 1 5 volt dry cell These are used to conduct current from the battery to the glowplug Basically two leads with clips are required but for greater conve nience twin leads with special glowplug connectors as shown on the right are commercially available Battery leads glowplug Igniter Make sure glowpl...

Страница 8: ...ow anyone else to smoke near to it Alternatively one of the purpose made manual or electric fuel pumps may be used to transfer fuel directly from your fuel container to the fuel tank Manual Electric Install a filter to the outlet tube of your refueling container to prevent entry of foreign matter into fuel tank O S Super Filters large and small are available as optional extras O S Super Filter Fue...

Страница 9: ...aces are not in the same plane Engine does not rest firmly Make sure that only the under surfaces of the engine s mounting lugs are in contact with the engine mount INSTALLATION OF THE ENGINE 17 GLOWPLUG CARBURETOR INSTALLING THE GLOWPLUG Install washer on glowplug and insert carefully into Heatsink head making sure that it is not cross threaded before tightening firmly Glow plug Washer As deliver...

Страница 10: ...t before final tightening with the correct size plug wrench 19 With a fixed wing model power failure is rarely a serious threat to the safety of the aircraft since it can usually glide down to a safe landing In a helicopter on the other hand it is vitally imporant that the engine keeps running and that there is a quick and reliable response to the throttle in order to ensure safe ascent and descen...

Страница 11: ...ile the engine is running and rotor is rotating or you may be hit by rotating rotor which results in serious injury Stop the engine and rotor before checking the triangle mark position Carburetor Rotor Carburetor Body Fully closed position Fully opened position As shown in the sketch the carburetor has graduation marks GRADUATIONS ON THE CARBURETOR BODY 21 Be sure to use an electric starter to sta...

Страница 12: ...ing creating a dangerous situation High Speed needle valve Idle Mixture Control Screw Medium Speed needle valve 23 5 Inserting the starter shaft Insert the starting shaft into the shaft cup securely 6 Priming Without energizing the glowplug open the throttle a little from the idle position Turn the engine over using the starter until the fuel is seen to reach the carburetor Stopping the engine Ful...

Страница 13: ...o contact with the rotating rotor 25 All internal combustion engines benefit to some degree from extra care when they are run for the first few times known as running in or breaking in This allows the working parts to mate together under load at operating temperature However because O S engines are made with the aid of the finest modern precision machinely and from the best and most suitable mater...

Страница 14: ...or is not equipped with a throttle stop screw Instead idle speed is adjusted by means of the throttle trim lever on the trans mitter ADJUSTMENT 27 As a safety measure first check the transmitter controls including the throttle stick and trim lever positions and hold the main rotor securely before starting the engine Warm the engine by allowing it to idle for about 30 seconds If the engine stops ad...

Страница 15: ...oo far open Needle Valve too far closed High Speed Needle Valve Setting varies according to the curve When satisfactory hovering flight has been achieved land the modeI again and re check the engine s idle qualities 29 Now re check hovering performance It may be found that with the High Speed Needle Valve now set for optimum full throttle performance hovering will reveal symptoms of slightly lean ...

Страница 16: ...unter clockwise prior to establishing the new setting The same applies if the silencer type is changed A different silencer may alter the exhaust pressure applied to the fuel feed and call for a revised Needle Valve setting The use of a different glowplug or changes to the main rotor and its pitch angles may also require compensating carburetor readjustments 31 ADJUSTING CHART High Speed Needle Va...

Страница 17: ...m 33 Do not close the needle valve and mixture control valve too far as this will cause a lean setting and over heating of the engine This can in turn create nitromethane oxide leading to internal rusting of the engine Always adjust the needlevalve slightly on the rich side of peak rpm Do not leave unused fuel in the engine at the conclusion of a day s flying Accepted practice is to cut off the fu...

Страница 18: ...Incorrect carburetor settings Return the needle valve and mixture control valve to basic position Incorrect servo linkage Reconnect linkage after setting servo at neutral Reverse rotating direction of electric starter Mare sure the engine rotates counter clockwise seen from crankshaft side 35 Symptom Cause Corrective action Engine fires intermittently but does not run Insufficient fuel in the tank...

Страница 19: ...nected or disconnected Check the connections and secure them Fuel tubing from tank to is split or broken Replace the tubing 37 Symptom Cause Corrective action Symptom Cause Corrective action Poor response Deteriorated glowplug Replace glowplug Incorrect carburetor settings Readjust low r p m range with metering needle and mixture control valve Poor r p m drop Too much throttle opening at idle Lowe...

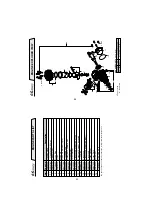
Страница 20: ... 14 15 16 17 18 25804000 25804160 25803100 27703400 25803200 25806000 25217000 25205000 25881000 23210007 46120000 26731002 25881700 45566310 25801000 25830000 25802000 25804170 25807000 25613000 71608001 Heatsink Head Head Gasket 0 2mm Cylinder Liner Piston Ring Piston Piston Pin Piston Pin Retainer 2pcs Connecting Rod Carburetor Complete 40L Propeller Nut Thrust Washer Crankshaft Ball Bearing Fr...

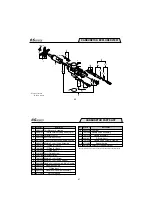
Страница 21: ...he specifications are subject to alteration for improvement without notice CARBURETOR PARTS LIST No Description Code No Throttle Lever Assembly Throttle Lever Retaining Screw 2pcs Carburetor Rotor Rotor Guide Washer Rotor Guide Washer Retaining Screw Mixture Control Valve Assembly O Ring L 2pcs O Ring S 2pcs O Ring 2pcs Rotor Guide Screw Carburetor Body Mixture Control Screw Mixture Control Valve ...

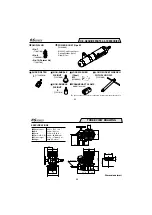
Страница 22: ...N BUBBLE WEIGHT S 71605100 No 10 Former A5 71608001 No 8 71607100 No 7 71530400 3246 CRANKSHAFT CLAMP POWER BOOST Pipe 55 M3x35 Cap Screw 2pcs Nipple 1pc Spring Washer 2pcs 43 37 7 11 5 37 31 51 6 44 17 5 UNF1 4 28 18 3 51 6 25 72 6 54 JAPAN 52 36 38 47 8 93 cc 0 55 cu in 23 mm 0 91 in 21 5 mm 0 85 in 2 000 20 000 r p m 2 1 hp 17 000 r p m 408g 14 40 oz THREE VIEW DRAWING Displacement Bore Stroke ...

Страница 23: ...right 2009 by O S Engines Mfg Co Ltd All rights reserved Printed in Japan 60092230 100903 TEL 06 6702 0225 FAX 06 6704 2722 6 15 3 Chome Imagawa Higashisumiyoshi ku Osaka 546 0003 Japan URL http www os engines co jp ...

Отзывы: