

有 毒 有 害 物 质 及 元 素
Part Name /
部件名称
PCBA & Components
PCBA
及板上元件
Connector
连接器
Cables
线材
Metal Structure
金属结构件
Plastic Structure
塑胶结构件
Fans
风扇
Coating & Finish
涂料
Packaging Material
包装及缓冲材料
Key /
图示说明
Indicates toxic and hazardous substances in all homogeneous materials of the stated part is below the limit
requirement of SJ / T 11363-2006 standard.
表示该物有毒有害物质在该部件所有的均质材料中的含量均在
SJ/T 11363-2006
标准规定的限量要求以下。
Indicates toxic and hazardous substances in all homogeneous materials of the stated part is within the limit
requirement of the European Restriction of Hazardous Substances Directive 2011/65/EC
(the "RoHS Directive).
表示该物有毒有害物质在该部件的某一均质材料中的含量超出
SJ/T11363-2006
标准中的限量要求。系因全球技术发展水平
限制而无法实现有毒有害物质或元素替代。
HAZARDOUS SUBSTANCES
Paper and Printed Material
纸类及印刷品
Lead
(Pb)
铅
Mercury
(Hg)
汞
Calcium
(Cd)
镉
Hexavalent
Chromium
(Cr(VI))
六价铬
Polybrominated
Biphenyls
(PBB)
多溴联苯
Polybrominated
Diphenyl
Ethers
(PBDE)
多溴二苯醚
Soporte y servicio
Si tiene preguntas o problemas con el producto NZXT que usted compró, no dure en ponerse en contacto
con [email protected] y suministrar una explicación detallada de su problema así como su prueba de
compra. Puede hacer consultas sobre piezas de repuesto en support.nzxt.com. Para comentarios y
sugerencias, escriba un mensaje de correo electrónico a nuestro equipo de diseño: [email protected].
Gracias por comprar un producto NZXT. Para más información acerca de NZXT, visítenos en línea. Página
web de NZXT: nzxt.com
サポートおよびサービス
購入されました
NZXT
の製品に関するご質問または問題は、問題の詳細および購入の証明を添えて、ご遠慮なく
までご連絡ください。
交換部品は
support.nzxt.com
までお尋ねください。ご意見およびご提案は弊社設
計チーム、
までメールを送信してください。
NZXT
製品をご購入いただきましてありがとうございます
。
NZXT
に関する詳細は、インターネット上のウェブサイトをご覧ください。
NZXT
ウェブサイト
: nzxt.com
Kundendienst und service
Falls Fragen oder Probleme bezüglich Ihres NZXT-Produktes auftreten, wenden Sie sich bitte mit einer
detaillierten Problembeschreibung und Ihrem Kaufbeleg an [email protected]. Ersatzteile können Sie
unter support.nzxt.com anfragen. Kommentare und Anregungen senden Sie bitte per [email protected]
an unser Designteam. Vielen Dank, dass Sie ein NZXT-Produkt erworben haben. Weitere Informationen über
NZXT erhalten Sie im Internet. NZXT-Webseite: nzxt.com
Support et service
Si vous avez des questions ou des problèmes avec le produit NZXT que vous avez acheté, n’hésitez pas à
contacter [email protected] avec une description détaillée de votre problème et votre preuve d’achat. Vous
pouvez aussi commander des pièces de remplacement auprès support.nzxt.com. Pour les commentaires et
les suggestions, envoyez un email à notre équipe de design, [email protected]. Merci d'avoir acheté ce
produit de NZXT. Pour plus d'informations sur NZXT, visitez notre site Web. Site Web de NZXT : nzxt.com
Support and service
If you have any questions or problems with the NZXT product you purchased, please don’t hesitate to
contact us using our support system. support.nzxt.com
Please include a detailed explanation of your problem and your proof of purchase. For comments and
suggestions, you can e-mail our design team, [email protected]. Lastly we would like to thank you for
your support by purchasing this product.
For more information about NZXT, please visit us online. NZXT Website: nzxt.com
Assistenza e servizio
In caso di dubbi o problemi con il prodotto NZXT acquistato, non esitate a contattarci utilizzando il nostro
sistema di assistenza. support.nzxt.com
Includere una spiegazione dettagliata del problema e la prova di acquisto. Per commenti e suggerimenti,
siete pregati di inviare un messaggio al nostro team di progettisti, all'indirizzo: [email protected]. Infine,
vogliamo ringraziarvi del vostro supporto con l'acquisto di questo prodotto. Per altre informazioni su NZXT,
visitate il nostro sito. Sito NZXT: nzxt.com
지원
및
서비스
구입한
NZXT
제품과
관련하여
질문
또는
문제가
있을
경우
,
당사의
지원
시스템
(support.nzxt.com)
을
사용하여
문의하십시오
.
문제를
자세히
기술하고
구매
증빙을
제출하십시오
.
의견
또는
제안
사항이
잇을
경우
당사
설계
팀에
으로
이메일을
보내십시오
.
마지막으로
이
제품을
구입하여
당사를
응원해
주셔서
감사합니다
.
NZXT
에
대해
자세히
알려면
온라인으로
방문하십시오
. NZXT
웹사이트
: nzxt.com
Assistência e manutenção
Caso tenha questões ou problemas com o produto NZXT adquirido, não hesite em contactar-nos através do
endereço [email protected] fornecendo a explicação detalhada do seu problema e a prova de compra.
Poderá solicitar peças de substituição através do endereço support.nzxt.com. Para comentários e
sugestões, contacte a nossa equipa de design através do endereço de e-mail, [email protected].
Obrigado por ter adquirido um produto NZXT. Para mais informações acerca da NZXT, visite-nos online.
Web site da NZXT: nzxt.com
支持和服务
如果有任何疑问或者在使用
NZXT
产品的过程中遇到任何问题,欢迎联络
,联络时请提供关于问题的详细说
明及购买凭证。您可以向
support.nzxt.com
查询更换部件。如有任何意见或建议,欢迎致信我们的设计团队,电子邮件地址是
。感谢您购买
NZXT
产品。有关
NZXT
的更多信息,请造访我们的在线网站。
NZXT
网站:
nzxt.com
支援和服務
如果在使用NZXT 產品的過程中有遇到任何問題或疑問,歡迎聯繫
,
並請提供問題的詳細敘述及購買證
明。您可以透過
support.nzxt.com
查詢更換部件。如有任何意見或建議,歡迎來信與設計團隊聯繫
。
最後,感謝您購買
NZXT
產品。有關
NZXT
的更多信息,請訪問我們的網站。
NZXT
網站:
nzxt.com
SUPPORT AND SERVICE
Служба поддержки и обслуживания
В случае возникновения вопросов или неисправностей в приобретенных вами продуктах NZXT обращайтесь по
адресу: [email protected] с подробным описанием проблемы и подтверждением покупки. О наличии запчастей можно
узнать, обратившись по адресу: support.nzxt.com. Замечания и предложения отправляйте в адрес нашей группы
разработчиков: [email protected]. Благодарим вас за покупку продукта NZXT. Более подробная информация о
компании NZXT представлена на наших веб-сайтах. Веб-сайт NZXT: nzxt.com
nzxt.com
For more building tips and information, visit: blog.nzxt.com
NZXT, Inc.
13164 E Temple Ave, City of Industry, CA 91746, USA
NZXT Europe GmbH
Industieiring Ost 66 47906 Kempen Germany
Warranty terms for all NZXT products sold to Australia.
Our goods come with guarantees that cannot be excluded under the Australian Consumer Law. You are
entitled to a replacement or refund for a major failure and or compensation for any other reasonably
foreseeable loss or damage. You are also entitled to have the goods repaired or replaced if the goods fail to
be of acceptable quality and the failure does not amount to a major failure' (NZXT Corporation, 13164 E.
Temple Ave., City of Industry, CA 91746, USA TEL: +1-800-228-9395) Please contact the shop you purchased
from to receive prompt service. If the dealer refuses to offer the service, please contact us at directly at
support.nzxt.com
North American Customers:
Within the first 60 days after purchase, please return your product (or for power supplies
installed within our enclosures, just the failed power supply) to your dealer or reseller for a replacement. If
the product is still within warranty and you can no longer return it to your dealer, please contact NZXT
Customer Support (support.nzxt.com) for assistance and instructions. NZXT will not accept returns
without prior approval and an RMA number.
In Europe:
Within the first year after purchase, please return your product (or for power supplies
installed within our enclosures, just the failed power supply) to your dealer or reseller for a replacement. If
the product is still within warranty and you can no longer return it to your dealer, please contact NZXT
Customer Support for assistance and instructions. NZXT will not accept returns without prior approval.
Global Customers (Outside North America and Europe):
If your product needs to be returned or repair within the warranty period, please do so
through the retailer or distributor from whom you purchased the product. If you can no longer return the
product to your dealer, please contact NZXT Customer Support for assistance. Please note, proof of
purchase from an authorized NZXT retailer is required for ALL warranty servicing.
VII. To Obtain Technical Support.
If you have already referenced your product owner's manual and still need help, please visit
support.nzxt.com for details and contact information.
VIII. For Warranty Service.
In the event that warranty repair or replacement is necessary, NZXT will request and you must provide proof
of purchase (store receipt or invoice) in order to receive warranty service. For
Visit support.nzxt.com for information on warranty coverage and service
Visitare il sito support.nzxt.com per informazioni sulla copertura e sul servizio della garanzia.
보증 범위와 서비스에 대한 자세한 내용은
support.nzxt.com
을 참조하십시오
Informationen zu Geltungsbereich und Service der Garantie finden Sie unter support.nzxt.com
Visite el sitio Web support.nzxt.com para obtener información sobre la cobertura y el servicio de la garantía.
Visitez support.nzxt.com pour les informations de la couverture de la garantie et du service.
Visite support.nzxt.com para obter informações sobre a cobertura da garantia e assistência
Подробную информацию об условиях гарантийного обслуживания см. на веб-сайте support.nzxt.com
请造访
support.nzxt.com
了解保修范围和服务的信息
請訪問
support.nzxt.com
了解產品保固範圍和更多服務訊息
保証範囲およびサービスに関する情報については、
support.nzxt.com
にアクセスしてください。
REGULATIONS
This Class B personal computer case with smart device complies with Canadian ICES-003
CAN ICES-3(B) / NMB-3(B)
Cet étui pour ordinateur personnel de classe B avec dispositif intelligent est conforme à la norme NMB-003
du Canada
This personal computer case with the smart device is tested to comply with FCC standard, Australian standard
and EU EMC Directive (2014/30/EU)
I. Warranty Length
NZXT computer cases, temperature meters, fans, accessories, and cables carry a 2 year warranty from the
date of purchase for parts and labor. Any replacement product will be warranted for the remainder of the
warranty period or thirty days, whichever is longer. Proof of purchase is required for warranty service.
II. Who Is Protected
The Warranty covers only NZXT products purchased by the original consumer from authorized NZXT retailers.
III. What Is Covered
Please note that our warranty is not an unconditional guarantee. If the product, in NZXT's opinion,
malfunctions within the warranty period, NZXT will at its discretion repair or replace the product that is
equal or greater in value depending on supply. The warranty does not cover any NZXT product that was
damaged due to accident, misuse, abuse, improper installation, usage not in accordance with product
specifications and instructions, natural or personal disaster, or unauthorized alterations, repairs or
modifications.
Our warranty does not cover the following:
Any product or serial number/warranty sticker modification applied without permission from NZXT. Any
damage that is not a manufacturing defect. Damage, deterioration or malfunction resulting from accident,
abuse, misuse, neglect, fire, water, lightning, or other acts of nature, unauthorized product modification or
failure to follow instructions included with the product. Repair or attempted repair by anyone not
authorized by NZXT. Shipping or transport damage (claims must be made with the carrier) Normal wear and
tear. NZXT does not warrant that this product will meet your requirements. It is your responsibility to
determine the suitability of this product for your purpose. Removal or installation charges. Shipping
charges. Any incidental charges.
IV. Exclusion Of Damages (Disclaimer)
NZXT's sole obligation and liability under this warranty is limited to the repair or replacement of a defective
product at our option. NZXT shall not, in any event, be liable for any incidental or consequential damage,
including but not limited to damages resulting from interruption of service and loss of data, business, or for
liability in tort relating to this product or resulting from its use or possession.
V. Limitations Of Implied Warranties
There are no other warranties, expressed or implied, including but not limited to those of merchantability or
fitness for a particular purpose. The duration of implied warranties is limited to the warranty length
specified in Paragraph I.
NZXT WARRANTY
VI. Local Law And Your Warranty
This warranty gives you specific legal rights. You may also have other rights granted under local law. These
rights may vary.
CABLE CONNECTIONS
D I S C O D E A D M I N I S T R A C I Ó N D E C A B L E S
C O N N E X I O N S D E S C Â B L E S
K A B E LV E R B I N D U N G E N
П О Д К Л Ю Ч Е Н И Е К А Б Е Л Е Й
C O L L E G A M E N T I D E I C AV I
L I G A Ç Õ E S D E C A B O S
케 이 블 연 결
ケ ー ブ ル 接 続
线 缆 连 接
線 路 連 接
PANEL REMOVAL
E X T R A C C I Ó N D E PA N E L
R E T R A I T D U PA N N E A U
B L E N D E E N T F E R N E N
С Н Я Т И Е П А Н Е Л И
R I M O Z I O N E D E L PA N N E L L O
R E M O Ç Ã O D O S PA I N É I S
패 널 제 거
パ ネ ル の 取 り 外 し
卸 下 面 板
移 除 面 板
BUTTONS AND I/O
B O T O N E S Y E / S
B O U T O N S E T E / S
TA S T E N U N D E / A
К Н О П К И И РА З Ъ Е М Ы В В О Д А / В Ы В О Д А
P U L S A N T I E I / O
B O T Õ E S E E / S
버 튼
및
I / O
ボ タ ン お よ び
I / O
按 钮 和
I / O
按 鈕 和
I / O
C O M PAT I B I L I D A D D E V E N T I L A D O R E S Y R A D I A D O R E S
P R I S E E N C H A R G E D E S R A D I AT E U R S E T V E N T I L AT E U R S
LÜ F T E R - U N D K Ü H L E R - U N T E R S T Ü T Z U N G
S U P P O R T O V E N T O L E E R A D I AT O R E
S U P O R T E PA R A V E N T O I N H A E A R A D I A D O R
С О В М Е С Т И М Ы Е РА Д И АТО Р И В Е Н Т И Л Я ТО Р
팬 및 라 디 에 이 터 지 원
対 応 フ ァ ン お よ び ラ ジ エ ー タ
风 扇 和 散 热 器 支 持
風 扇 和 散 熱 排 支 援
FAN AND RADIATOR SUPPORT
1.
2.
3.
4.
5.
6.
Power switch
Power LED
USB 3.1 Gen 1
HD Audio Output
Microphone Input
HDD LED
1.
2.
3.
4.
5.
6.
Interruptor de encendido
LED de alimentación
USB 3.1 Gen 1
Salida de audio HD
Entrada de micrófono
LED de unidad de disco duro
1.
2.
3.
4.
5.
6.
Interrupteur marche/arrêt
Témoin d’alimentation
USB 3.1 Gen 1
Sortie audio HD
Entrée micro
Témoin disque dur
1.
2.
3.
4.
5.
6.
Netzschalter
Betriebs-LED
USB 3.1 Gen 1
HD-Audioausgang
Mikrofoneingang
Festplatten-LED
1.
2.
3.
4.
5.
6.
Interruttore d’alimentazione
LED alimentazione
USB 3.1 Gen 1
Uscita audio HD
Ingresso microfono
LED HDD
1.
2.
3.
4.
5.
6.
Interruptor de alimentação
LED de alimentação
USB 3.1 Gen 1
Saída de áudio HD
Entrada para microfone
LED do HDD
1.
2.
3.
4.
5.
6.
Выключатель питания
Индикатор питания
USB 3.1 Gen 1
Звуковой выход HD
Разъем для подключения микрофона
Индикатор жесткого диска
1.
2.
3.
4.
5.
6.
전원
스위치
전원
LED
USB 3.1 Gen 1
HD
오디오
출력
마이크
입력
HDD LED
1.
2.
3.
4.
5.
6.
電源スイッチ
パワー
LED
USB 3.1 Gen 1
HD
オーディオ
マイク
HDD LED
1.
2.
3.
4.
5.
6.
电源开关
电源
LED
USB 3.1 Gen 1
高清音频输出
麦克风输入
HDD LED
1.
2.
3.
4.
5.
6.
電源開關
電源
LED
USB 3.1 Gen 1
高清音頻輸出
麥克風輸入
HDD LED
1
2
4
3
6 5
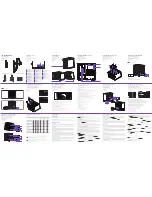
TOP
1x 120mm
FRONT
2x 120mm
2x 140mm
REAR
1x 120mm
FRONT
2x 120mm
REAR
1x 120mm
1
REMOVE SCREWS
REMOVE SFX PSU BRACKET
INSTALL ATX PSU
3
REMOVE FRONT PANEL
2
REMOVE SIDE PANEL
CABLE MANAGEMENT SYSTEM
S I S T E M A D E G E S T I Ó N D E C A B L E S
S Y S T È M E D E C Â B L A G E
K A B E L M A N A G E M E N T S Y S T E M
С И С Т Е М А П Р О К Л А Д К И К А Б Е Л Е Й
S I S T E M A D I G E S T I O N E D E I C AV I
S I S T E M A D E G E R E N C I A M E N T O D E C A B O S
케 이 블 관 리 시 스 템
ケ ー ブ ル マ ネ ジ メ ン ト シ ス テ ム
理 线 管 理 系 统
整 線 管 理 系 統
24-PIN CABLE AND
SMART DEVICE CABLE CHANNEL
FAN CABLE CHANNEL
8-PIN
CABLE CHANNEL
I N S TA L A C I Ó N D E L A P L A C A B A S E
I N S TA L L AT I O N D E L A C A R T E M È R E
I N S TA L L AT I O N D E R H A U P T P L AT I N E
У С ТА Н О В К А С И С Т Е М Н О Й П Л АТ Ы
I N S TA L L A Z I O N E D E L L A S C H E D A M A D R E
I N S TA L A Ç Ã O D A P L A C A P R I N C I PA L
마 더 보 드 설 치
マ ザ ー ボ ー ド の 装 着
主 板 安 装
主 機 板 安 裝
MOTHERBOARD INSTALLATION
E
D
D
A
C
H A Z L O T Ú M I S M O : S O P O R T E PA R A R E F R I G E R A D O R L Í Q U I D O
S U P P O R T D E R E F R O I D I S S E M E N T L I Q U I D E À A S S E M B L E R V O U S - M Ê M E
W A S S E R K Ü H LU N G M A R K E E I G E N B A U
S U P P O R T O P E R D I S S I PAT O R E A L I Q U I D O FA I - D A - T E
S U P O R T E A R E F R I G E R A Ç Ã O L Í Q U I D A D I Y
П О Д Д Е Р Ж К А С А М О С ТО Я Т Е Л Ь Н О Й С Б О Р К И Ж И Д К О С Т Н О Й С И С Т Е М Ы О Х Л А Ж Д Е Н И Я
D I Y
수 냉 식
쿨 러
지 원
水 冷 ク ー ラ ー 支 持 部 の
D I Y
D I Y
液 体 冷 却 器 支 持
D I Y
水 冷 支 援
DIY LIQUID COOLER SUPPORT
The Cable Bar could support up to 150mm tall tube reservoir with M4 screws
The bottom Panel could support D5 or DDC pump mount with M4 screws
La barra para cables podría soportar un depósito de tubo de hasta 150 mm de alto con tornillos M4
El panel inferior podría soportar el montaje de una bomba D5 o DDC con tornillos M4
La barre de gestion des câbles peut supporter un réservoir d'une hauteur maximale de 150 mm avec des vis M4
Le panneau inférieur peut supporter un montage de pompe D5 ou DDC avec des vis M4
Die Kabelschiene bietet Platz für einen bis zu 150 mm hohen Rohrbehälter mit M4-Schrauben
Die untere Abdeckung bietet Platz für eine D5- oder DDC-Pumpenhalterung mit M4-Schrauben
La barra dei cavi supporta un serbatoio tubolare alto fino a 150 mm con viti M4
Il pannello inferiore supporta il montaggio della pompa D5 o DDC con viti M4
A barra de limpeza pode suportar um reservatório de tubos alto de 150 mm com parafusos M4
O painel inferior pode suportar montagem de bomba D5 ou DDC com parafusos M4
На кабельную панель можно устанавливать трубчатый резервуар высотой до 150 мм с помощью винтов M4
На нижнюю панель можно устанавливать насос D5 или DDC с помощью винтов M4
케이블
바는
M4
나사로
최대
150mm
높이의
튜브
물통을
지지할
수
있습니다
.
하단
패널은
M4
나사로
D5
또는
DDC
펌프
마운트를
지지할
수
있습니다
.
ケーブルバーで、
M4
ネジで高さが最大
150mm
のチューブ式水タンクを支える必要があります。
ボトムパネルには、
M4
ネジで
D5
または
DDC
ポンプを取り付ける必要があります。
线缆条可以用
M4
螺丝支撑高达
150
毫米的高管容器
底部面板可以用
M4
螺丝支持
D5
或
DDC
泵安装
纜線桿使用
M4
螺絲,可以支撐最高
150mm
的蓄水管
底部面板使用
M4
螺絲,可以支撐
D5
或
DDC
泵安裝座
I N S TA L A Ç Ã O D A P L A C A D E E X PA N S Ã O
확 장 카 드 설 치
拡 張 カ ー ド の 装 着
扩 展 卡 安 装
擴 充 卡 安 裝
I N S TA L A C I Ó N D E L A TA R J E TA D E E X PA N S I Ó N
I N S TA L L AT I O N D E L A C A R T E D ’ E X T E N S I O N
I N S TA L L AT I O N D E R E R W E I T E R U N G S K A R T E
У С ТА Н О В К А П Л АТ Ы РА С Ш И Р Е Н И Я
I N S TA L L A Z I O N E D E L L A S C H E D A D ' E S PA N S I O N E
EXPANSION CARD INSTALLATION
I N S TA L A C I Ó N D E L S O P O R T E D E L A G P U
I N S TA L L AT I O N D U S U P P O R T D U G P U
I N S TA L L AT I O N D E S G P U - S TÄ N D E R S
УСТАНОВКА ПОДСТАВКИ ДЛЯ ГРАФИЧЕСКОГО ПРОЦЕССОРА
I N S TA L L A Z I O N E S U P P O R T O G P U
I N S TA L A Ç Ã O D O S U P O R T E D A G P U
G P U
스 탠 드
설 치
G P U
ス タ ン ド 取 り 付 け
G P U
支 架 安 装
G P U
座 安 裝
GPU STAND INSTALLATION
I N S TA L A C I Ó N D E D I S C O D U R O / S S D
I N S TA L L AT I O N D U D I S Q U E D U R / S S D
H D D - / S S D - I N S TA L L AT I O N
У С ТА Н О В К А Ж Е С Т К О ГО Д И С К А И S S D - Н А К О П И Т Е Л Я
I N S TA L L A Z I O N E H D D / S S D
I N S TA L A Ç Ã O D O H D D / S S D
H D D / S S D
설 치
H D D / S S D
取 り 付 け
H D D / S S D
安 装
H D D / S S D
安 裝
HDD/SSD INSTALLATION
UNSCREW THE INSERTS COVER
SCREW THE INSERTS COVER
B
B
B
F
C
E
F
1.
2.
3.
4.
5.
Plug the GPU onto the motherboard
Find a location where you can place the GPU stand and make sure the GPU stand would not interfere with the GPU fans
Remove the GPU and plug the GPU stand onto PSU shroud
Plug the GPU onto the motherboard again
Raise the GPU stand’s top cap until it slightly lifts the GPU
Conecta la GPU en la placa base
Busca una ubicación en la que puedas colocar el soporte de la GPU y asegúrate de que este no interfiera con los
ventiladores de la GPU
Extrae la GPU y conecta el soporte de la GPU en la envoltura PSU
Conecta la GPU en la placa base de nuevo
Levanta la tapa superior del soporte de la GPU hasta que suba levemente la GPU
Branchez le GPU sur la carte mère
Trouvez un endroit où placer le support du GPU en vous assurant qu'il ne gêne pas le fonctionnement des
ventilateurs du GPU
Retirez le GPU et branchez le support du GPU à la coque du bloc d'alimentation
Branchez à nouveau le GPU sur la carte mère
Soulevez le capot du support du GPU jusqu'à ce qu'il le soulève légèrement
1.
2.
3.
4.
5.
1.
2.
3.
4.
5.
1.
2.
3.
4.
5.
GPU an die Hauptplatine anschließen
GPU-Ständer so positionieren, dass keine Beeinträchtigung der GPU-Lüfter vorliegt
GPU entfernen und GPU-Ständer an Netzteilverkleidung anbringen
GPU erneut an die Hauptplatine anschließen
GPU mit der Oberkappe des Ständers leicht anheben
1.
2.
3.
4.
5.
Collegare la GPU alla scheda madre
Trovare una posizione in cui si possa collocare il supporto GPU ed accertarsi che questo non interferisca con le
ventole della GPU
Rimuovere la GPU e collegare il relativo supporto allo strato PSU
Ricollegare la GPU alla scheda madre
Sollevare la protezione superiore del supporto GPU in modo che sollevi leggermente la GPU
1.
2.
3.
4.
5.
Conecte a GPU na placa-mãe
Encontre um local no qual você pode colocar o suporte da GPU e certifique-se de que o suporte da GPU não interfere
nas ventoinhas da GPU
Remova a GPU e conecte o suporte da GPU no compartimento do PSU
Conecte a GPU na placa-mãe novamente
Levante a tampa superior do suporte da GPU até levantar a GPU levemente
1.
2.
3.
4.
5.
Установите графический процессор на материнскую плату
Найдите место, куда можно установить подставку для графического процессора, и убедитесь, что она не будет
мешать работе вентиляторов графического процессора
Извлеките графический процессор и установите подставку на кожух блока питания
Повторно установите графический процессор на материнскую плату
Поднимите регулятор высоты подставки, чтобы она слегка приподнимала графический процессор
1.
2.
3.
4.
5.
GPU
를
마더보드에
꽂습니다
.
GPU
스탠드를
배치할
수
있는
위치를
찾고
GPU
스탠드와
GPU
팬이
서로
닿지
않도록
주의합니다
.
GPU
를
제거하고
GPU
스탠드를
PSU
덮개에
꽂습니다
.
GPU
를
마더보드에
다시
꽂습니다
.
GPU
스탠드가
GPU
를
살짝
들
때까지
GPU
스탠드의
상단
캡을
올립니다
.
1.
2.
3.
4.
5.
1.
2.
3.
4.
5.
1.
2.
3.
4.
5.
將
GPU
插入主機板
找到要安裝
GPU
座的位置,確定
GPU
座不會干擾
GPU
風扇
拆下
GPU
並把
GPU
座插到電源供應器遮罩上
將
GPU
插回主機板
抬升
GPU
底座的頂蓋,直到頂蓋能稍微把
GPU
推起
将
GPU
插入主板
找到可以放置
GPU
支架的位置,并确保
GPU
支架不会干扰
GPU
风扇
移开
GPU
并将
GPU
支架插入
PSU
罩盖
再次将
GPU
插入主板
提高
GPU
支架顶盖,直到略微提升起
GPU
GPU
をマザーボードに差し込みます。
GPU
ファンの動作に干渉しないように
GPU
スタンドを配置できる場所を決めます。
GPU
を取り外し、
GPU
スタンドを
PSU
シュラウドに差し込みます。
もう一度
GPU
をマザーボードに差し込みます。
GPU
スタンド最上部のキャップを引き上げて、
GPU
を少し持ち上げます。
A T X P S U I N S T A L L A T I O N
D
I N S TA L A C I Ó N D E L A F U E N T E D E A L I M E N TA C I Ó N
I N S TA L L AT I O N D E L’A L I M E N TAT I O N
I N S TA L L AT I O N D E R S T R O M V E R S O R G U N G
У С ТА Н О В К А И С ТО Ч Н И К А П И ТА Н И Я
I N S TA L L A Z I O N E D E L L’A L I M E N TAT O R E
I N S TA L A Ç Ã O D A F O N T E D E A L I M E N TA Ç Ã O
전 원 공 급 장 치 설 치
電 源 の 装 着
电 源 安 装
電 源 安 裝
POWER SUPPLY INSTALLATION
S F X P S U I N S T A L L A T I O N
U S B 3 .1 G E N 1
H D A U D I O
U S B 2 . 0
IMPORTANT!
Install the PSU with the fan facing down.
CABLE CONNECTIONS
FOR NON-INTEL STANDARD F_PANEL HEADER USE
FOR INTEL STANDARD F_PANEL HEADER USE
L