Model Based Design Toolbox MPC57xx Series
Quick Start Guide
2-15
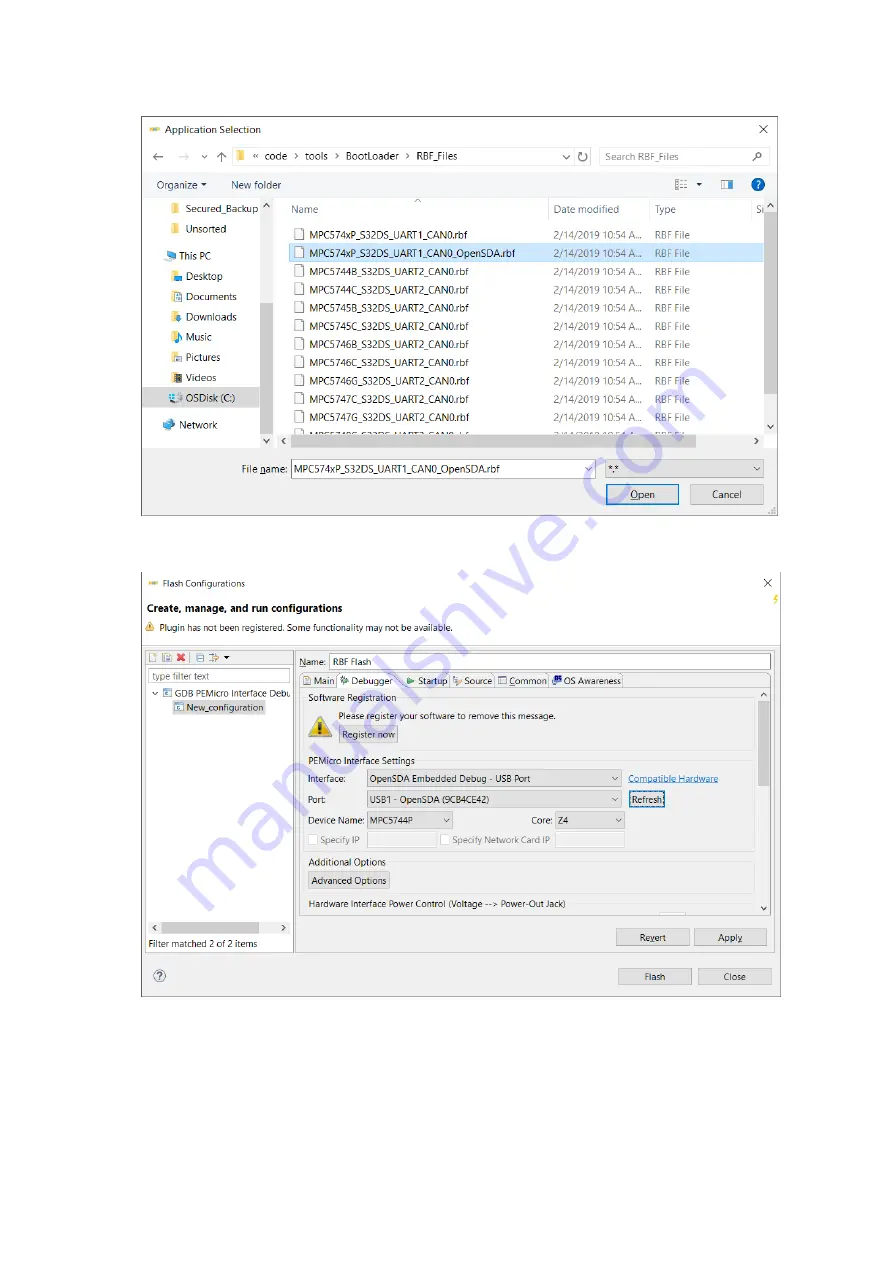
4.
Configure the
Debugger
interface to connect with the target.
Страница 1: ...ased Design Toolbox MPC57xx Series Quick Start Guide An Embedded Target for the MPC57xx Family of Processors Version 3 0 0 Target Based Automatic Code Generation Tools For MATLAB Simulink Stateflow Mo...
Страница 2: ...nstallation Steps 1 3 1 2 1 Run Add on installer 1 4 1 2 2 License Registration Installation 1 7 1 2 3 Setting up the Target Compilers 1 8 1 2 4 Setting the Path for Model Based Design Toolbox 1 8 2 R...
Страница 3: ...Installation Steps NXP s Model Based Design Toolbox is delivered as MATLAB Toolbox Package that can be installed offline or online from MathWorks Add ons This document shows how to install the offlin...
Страница 4: ...ivate the MATLAB Add ons installer that will automatically start the installation process After the MATLAB opens you will be prompted with the following options 1 The NXP s Model Based Design Toolbox...
Страница 5: ...ill be automatically copied into default Add Ons folder within the MATLAB The default location can be changed prior to installation by changing the Add Ons path from MATLAB Preferences 4 After a coupl...
Страница 6: ...Series Quick Start Guide 1 6 6 NXP s Model Based Design Toolbox documentation help and examples are fully integrated with MATLAB development environment Get more details by accessing the standard Help...
Страница 7: ...Toolbox appears Select the appropriate toolbox you wish you evaluate to bring up the Software Terms and Conditions page 3 Click I Agree to consent to the software license agreement 4 If you need to do...
Страница 8: ...tion your installation path may be different Once environmental variables are setup you will need to restart MATLAB for the IDE environment to see these system variables In case there is no compiler i...
Страница 9: ...n Toolbox MPC57xx Series Quick Start Guide 1 9 mbd_mpc_path Treating C Users xxxxx Documents MATLAB Add Ons Toolboxes NXP_MBDToolbox_MPC57xx code as MBD Toolbox installation root MBD Toolbox path prep...
Страница 10: ...essors and boards supported with none or minimal changes The custom examples are targeted for a specific processor and board and are highly dependent on peripherals and pins available Each category co...
Страница 11: ...Model Based Design Toolbox MPC57xx Series Quick Start Guide 2 11...
Страница 12: ...he DEVKIT MPC5744P a proper communication setup between the board and the host PC must be enabled Please follow the next steps to ensure a working setup 1 Place J13 jumper on positions 2 3 to power th...
Страница 13: ...am a special application called RBF into the MCU flash memory For the first time programming you need to have the S32 Design Studio for PA IDE installed Follow the next steps to flash the RBF image to...
Страница 14: ...e tools BootLoader RBF_Files and choose the appropriate RBF image to be flashed on your setup Note each file contains in its name the interfaces allowed for Flash Tool download communication Choose th...
Страница 15: ...Model Based Design Toolbox MPC57xx Series Quick Start Guide 2 15 4 Configure the Debugger interface to connect with the target...
Страница 16: ...ash programming sequence The debugger will connect with the target selected and will start to flash the RBF image into the non volatile memory of the target At this point the target should be ready fo...
Страница 17: ...ted and visible in Control Panel Device Manager Port COM LPT then all requirements for running a Model Based Design Toolbox for MPC57xx Examples are fulfilled Open the Examples Library and go to Commu...
Страница 18: ...Model Based Design Toolbox MPC57xx Series Quick Start Guide 2 18...
Страница 19: ...Series Quick Start Guide 2 19 Follow the next steps to run the example 1 Double click on MBD_MPC574x_Config_Information block and setup the Download Config parameters according with your PC and HW se...
Страница 20: ...s built and the following message is displayed on the screen Press the board reset button SW3 and then within 5 seconds press the OK button to start the application programming to the target 5 Wait un...
Страница 21: ...et button on the evaluation board 9 The MPC5744P MCU sends Hello World Press RESET to see this msg again message over the UART and the UART terminal should display it Congradulations You succedded wit...
Страница 22: ...authorized for use as components in systems intended for surgical implant into the body or other applications intended to support or sustain life or for any other application in which the failure of...