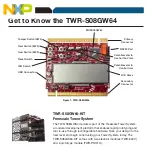


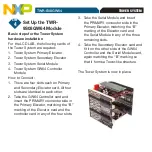


TOWER SYSTEM
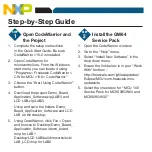
Open CodeWarrior and
the Project
1. Complete the setup instructions
in the Quick Start Guide. Be sure
CodeWarrior v10.0 is installed.
2. Open CodeWarrior for
microcontrollers. From the Windows
start menu, you can locate it using
“Programs > Freescale CodeWarrior >
CW for MCU v10.0> CodeWarrior.”
3. Choose the “Start Using CodeWarrior”
button.
4. Download the project Demo_Board_
Application_Software.zip(LAB1) and
LCD LAB.zip(LAB2).
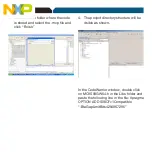
Unzip and save the folders Demo_
Board_Application_Software and LCD
LAB on the desktop.
5. Using CodeWarrior, click File > Open
and browse to Desktop/Demo_Board_
Application_Software /demo_board.
mcp for LAB1
Desktop/LCD LAB/build/mwerks/evb/
LAB_LCD.mcp for LAB2
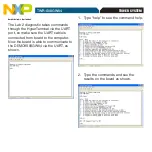
Install the GW64
Service Pack
1. Open the CodeWarrior window.
2. Go to the “Help” menu.
3. Select “Install New Software” in the
drop down menu.
4. Ensure the link below is in your “Work
With” textbox -
http://freescale.com/lgfiles/updates/
Eclipse/MCU/com.freescale.mcu.
updatesite
5. Select the check box for “MCU 10.0
Service Pack for MC9S08GW64 and
MC9S08GW32”
STEP
1
STEP
2
Step-by-Step Guide