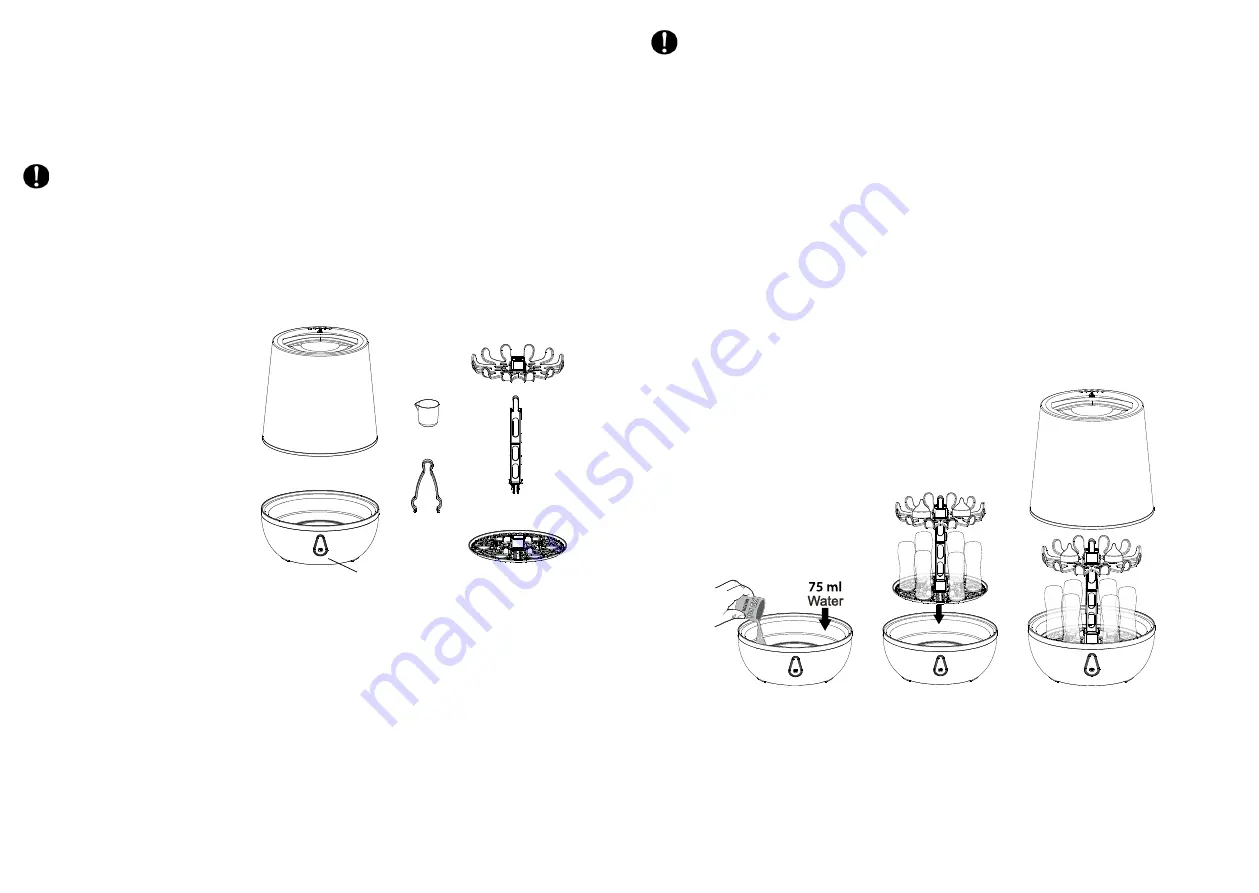
DEVICE DESCRIPTION
INITIAL USE
GENERAL ADVICE
PARTS
1. Before use, ensure that the device and accessories (including mains cable)
do not have any visible damage.
2. Place the device on a firm, level surface.
3. Put all the included parts of the steriliser together:
– Insert the central frame into the designated opening on the lower rack for bottles.
– Turn the central frame clockwise until it clicks into place.
– Put the upper rack for small parts on the central frame, until they are resting flat.
4. Plug the mains plug into a socket.
Before using for the first time, let the sterilisation process run once without any parts to be sterilised.
For this, follow the steps in the ‘Operation’ section.
1. Cover with steam outlet
2. Sterilisation base with
heating plate
3. Analogue button
4. Measuring cup (120ml)
5. Gripping tongs
6. Upper rack for small parts
7. Central frame
8. Lower rack for bottles
•
Repairs must only be carried out by Customer Services or authorised suppliers. Do not open or repair
the device yourself under any circumstances, otherwise its perfect functioning is no longer guaranteed.
Failure to observe this will invalidate the warranty.
•
If you should have any questions about using our devices, please contact either your retailer or
customer services.
•
Keep the mains cable away from hot surfaces.
•
Do not remove the mains plug from the socket by pulling on the cable!
•
Do not pull, twist or bend the mains cable.
•
Never submerge the device in water. Never rinse it in running water.
•
Do not use any additional parts that are not recommended by the manufacturer
or offered as accessories.
6.
4.
7.
8.
1.
5.
2.
3.
If you would like to use the device immediately after the empty process, allow it to cool for at least
20 minutes after draining the residual water. The same applies to numerous consecutive uses.
OPERATION
CLEANING AND MAINTENANCE
1. Clean the parts that are to be sterilised with mild washing up liquid or in the dishwasher.
Disassemble any assembled parts.
2. Measure 75 ml distilled or tap water and pour it into the sterilisation container.
3. Now place the bottles into the lower rack for bottles with the opening pointing downwards and place
the teats or other small parts in the upper rack for small parts.
4. Place the lower rack for bottles and the upper rack for small parts into the sterilisation container.
5. Then put the lid on the device.
6. Plug the mains plug into a socket and press the physical on and off switch at the back.
7. Press the button and the indicator light will turn on.
8. When the water runs out, the indicator light will turn off and the device will stop working.
The total sterilisation time will be approximately 8mins.
9. After a cooling down period of at least 5 minutes, carefully open the lid and remove the sterilised
parts using the gripping tongs. Shake the parts to remove any excess water.
Drain the residual water and dry the sterilizer with a cloth.
The service life of the device depends on careful use:
•
Use distilled or tap water for the sterilisation.
•
Unplug the device before cleaning.
•
To clean the device, use only a damp cloth. Do not use any scouring agents or other cleaning products.
•
Descale the device using vinegar or citric acid. Mix 50 ml white vinegar with 100 ml cold water or a
13
14


