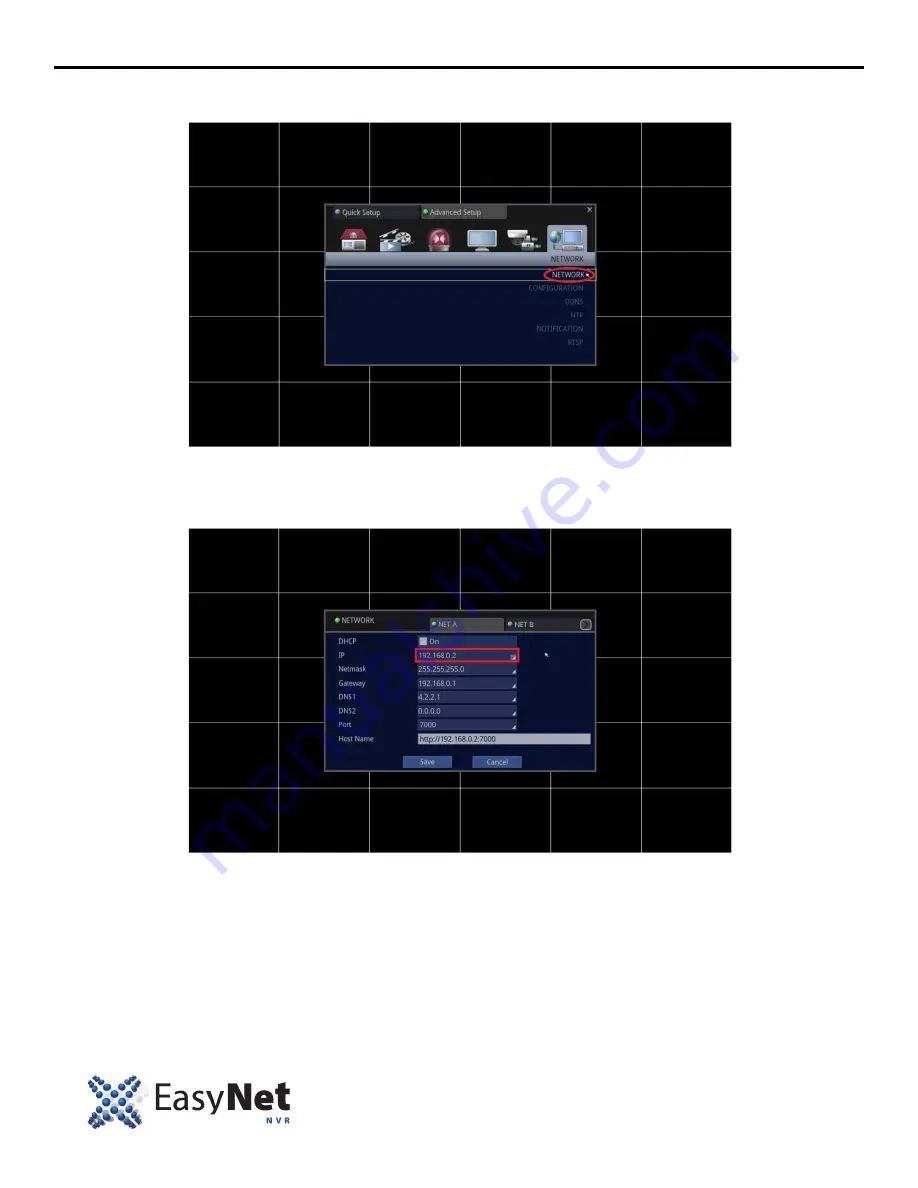
Nuvico EasyNet Series Скачать руководство пользователя страница 31

30


ENU-3000


NETWORK SETUP 

 
3. Select Network and access the sub-menu of NETWORK. 

• Using Mouse: First, click on the [NETWORK] icon, and then click on the [NETWORK] text.  


4. Make necessary changes. 

Note

: To change the parameters of IP, Netmask, Gateway, DNS1, DNS2, Port, follow the instructions below.  

(These parameters are given by your Internet Service Provider or Network Administrator.) 


Содержание EasyNet Series

Страница 1: ......

Страница 2: ...1 INSTALLATION DIAGRAM 2 EN U3000 SAMPLE INSTALLATION DIAGRAM 2 HOW TO MOUNT THE HDD TO THE NVR 3 GETTING STARTED 6 HOW TO START THE NVR 6 HOW TO LOG IN TO THE NVR 6 MONITOR SETUP 9 CONFIGURE NVR S M...

Страница 3: ...ch that truly outputs 15 4 watts per port 2 The Make and Model of the PoE Network Switch illustrated in the diagram is a 8 Port Make ifs Model GE DS 82 POE b 24 Port Make ifs Model GE DSSG 244 POE 3 T...

Страница 4: ...U3000 3 HOW TO MOUNT THE HDD TO THE NVR 1 When you unpack the NVR box locate the removable HDD tray shown below 2 The removable HDD tray shown below needs to be inserted into the empty slot of the NV...

Страница 5: ...4 ENU 3000 HOW TO MOUNT THE HDD TO THE NVR 3 With the latch pointing upwards slide the tray into the slot 4 Lock the tray in the slot by applying downward pressure to the latch...

Страница 6: ...EN U3000 5 HOW TO MOUNT THE HDD TO THE NVR 5 Finally use the supplied tray key to lock the HDD tray into the chasis to prevent unauthorized removal...

Страница 7: ...referably a UPS to the back of the NVR Turn on and start the NVR Using Front Panel Remote Press the POWER button for 3 seconds Using Mouse Not supported HOW TO LOG IN TO THE NVR By default when you tu...

Страница 8: ...EN U3000 7 GETTING STARTED 1 Follow the instructions below Using Mouse Click on the Log In icon 2 You need to input admin password which is 0 0 0 0 0 0 Using Mouse Click on the Keyboard icon...

Страница 9: ...yboard should now appear The default admin password for the NVR is 0 0 0 0 0 0 Using Mouse Highlight 0 and click six times then highlight and click 4 Lastly when you select OK you are now logged on as...

Страница 10: ...To take full advantage of the EasyNet NVR you want to make sure that you have a 1080p capable monitor Follow the instructions below 1 Follow the instructions below Using Mouse Click on the Setup Menu...

Страница 11: ...00 MONITOR SETUP 3 Select MONITOR under DISPLAY option Using Mouse Click on the DISPLAY then click on MONITOR 4 Select 1920 x 1080 which is true 1080p resolution Using Mouse Select and click on the 19...

Страница 12: ...screen Using Mouse Right click on your mouse twice IF YOU ARE USING A BNC MONITOR IMPORTANT NOTE If you are ONLY using a BNC type monitor which is Main 2 output Using Mouse On the Main 1 move the mous...

Страница 13: ...h which is connected either HDMI DVI or VGA The factory default setting for 2nd Monitor is turned On However should you NOT want to take advantage of the 2nd Monitor Main 2 follow these instructions 1...

Страница 14: ...YSTEM 4 Uncheck to turn off Monitor Key and define which monitor you would solely like to use Since HDMI VGA is Main 1 you want to make sure that Main 1 is displayed next to the Use checkbox Using Mou...

Страница 15: ...14 ENU 3000 MONITOR SETUP 5 Save the changes Using Mouse Click on Save to save 6 To exit out to the Live screen Using Mouse Right click on your mouse twice...

Страница 16: ...EN U3000 15 HOW TO INITIALIZE THE HDD FOR RECORDING 1 Follow the instructions below Using Mouse Click on the Setup Menu icon 2 Select Advanced Setup Using Mouse Click on the Advanced Setup...

Страница 17: ...16 ENU 3000 HOW TO INITIALIZE THE HDD FOR RECORDING 3 Select Utility Using Mouse Click on the UTILITY 4 Select Disk Manager Using Mouse Click on the Disk Manager...

Страница 18: ...EN U3000 17 HOW TO INITIALIZE THE HDD FOR RECORDING 6 Disk Manager will alert with caution message Using Mouse Click on the OK 7 Select INT 1 HDD Using Mouse Click on the Off status of the INT 1...

Страница 19: ...18 ENU 3000 HOW TO INITIALIZE THE HDD FOR RECORDING 8 Select Add Using Mouse Click on the Add 9 You are finished To exit out to the Live screen Using Mouse Right click on your mouse twice...

Страница 20: ...me and date may be incorrect Before any other operation of the NVR is started it is important to setup the time and the date 1 Follow the instructions below Using Mouse Click on the Setup Menu icon 2...

Страница 21: ...its regional NTP Network Time Server if an active internet connection is maintained Time Zone Select appropriate Time Zone for your location Format Allows the format and display of DATE Time to be cus...

Страница 22: ...EN U3000 21 CAMERA SETUP 1 Follow the instructions below Using Mouse Click on the Setup Menu icon 2 Select Advanced Setup Using Mouse Click on the Advanced Setup...

Страница 23: ...here are no specific orders since the NVR is broadcasting to the network switch for any available EasyNet cameras NOTE If you do not see all of your cameras being displayed on this screen try one of t...

Страница 24: ...entified with specific channel ID going forward Using Mouse Click on the channel drop down menu and choose from 1 through 30 Tip It is possible that the Camera Manager Window can block some of the cam...

Страница 25: ...24 ENU 3000 CAMERA SETUP 6 If all of your camera s Channel ID is set click on Save to exit out of this menu...

Страница 26: ...EN U3000 25 RECORD SETUP 1 Follow the instructions below Using Mouse Click on the Setup Menu icon 2 Click on the Advanced Setup Using Mouse Click on the Advanced Setup...

Страница 27: ...ces 4CIF 2MP 4CIF refers to 704 x 480 resolution and 2MP is full 1080P resolution of 1920 x 1080 PPS 1 2 4 7 15 Refers to pictures per second for all cameras 1 being jerky and 15 being smooth almost a...

Страница 28: ...LY when the motion is detected follow these further instructions 5 Uncheck CONTINUOUS Record option to all of the cameras that you wish to record ONLY on motion Using Mouse Uncheck CONTINOUS Record on...

Страница 29: ...e MOTION Again you can use the Apply to All shortcut to apply the setting to all cameras Using Mouse Click on Record to activate Motion Recording 7 Save and exit out to the Live screen 8 Begin recordi...

Страница 30: ...UP The network menu allows for adjustment to the TCP IP settings for viewing video across a local area network or through the internet 1 Follow the instructions below Using Mouse Click on the Setup Me...

Страница 31: ...g Mouse First click on the NETWORK icon and then click on the NETWORK text 4 Make necessary changes Note To change the parameters of IP Netmask Gateway DNS1 DNS2 Port follow the instructions below The...

Страница 32: ...RK SETUP Highlight and click the IP portion on the screen Virtual numeric keypad will pop up on the screen Use your mouse to click on the desired value such as 0 9 Backspace Enter and Clear button to...

Страница 33: ...rovider or Network Administrator Port 7000 is the factory default This port number is customizable and can be changed Host Name This is the unique ID of the NVR that communicates to our DDNS server Ty...

Страница 34: ...0 33 VIDEO SEARCH PLAYBACK HOW TO SEARCH FOR VIDEO USING TIME SEARCH METHOD 1 Follow the instructions below Using Mouse Click on the Search icon 2 Select Time Search Using Mouse Click on the Time Sear...

Страница 35: ...use Click on the desired group such as Month Day Year Hour Minute Second and click on the part of the screen to change the value Then highlight and click on Start Your desired video will start playing...

Страница 36: ...IDEO SEARCH PLAYBACK HOW TO SEARCH FOR VIDEO USING CALENDAR SEARCH METHOD 1 Follow the instructions below Using Mouse Click on the Search icon 2 Select Calendar Search Using Mouse Click on the Calenda...

Страница 37: ...hen Month and Finally the day of the month Using Mouse Click on either the Year Date or Day and change to the desired value 4 Select your desired time of the day Using Mouse Click on the desired time...

Страница 38: ...EN U3000 37 VIDEO SEARCH PLAYBACK 5 To exit out to the Live screen Using Mouse Click on the X Close...

Страница 39: ...38 ENU 3000 HOW TO COPY VIDEOS INTO CD DVD USB 1 Follow the instructions below Using Mouse Click on the Copy icon...

Страница 40: ...ked therefore all the channels or cameras will be copied However should you want to copy only the specific cameras you can unselect Select All and check only the cameras that you desire to be copied N...

Страница 41: ...VIDEO 1 Insert the copied medium such CD DVD or USB Thumbdrive into the NVR 2 Follow the instructions below Using Mouse Click on the Search icon 3 Choose your desired medium such as DVD or USB Using M...

Страница 42: ...41 HOW TO VIEW COPIED VIDEO 4 NVR will search for video from your desired medium 5 NVR will display videos that are available on your desired medium 6 Follow Time Search method that is explained on pa...

Страница 43: ...42 ENU 3000 NOTES...

Страница 44: ......

Отзывы: