


7
PIPA next base instructions
EN
5
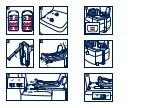
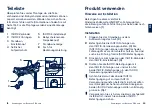
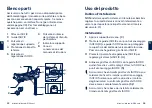
After placing the base on the vehicle seat,
extend the load leg to floor
(6)
. When the load
leg indicator shows green means it is installed
correctly, red means it is installed incorrectly.
(6)-2
The load leg has 19 positions. When the load leg
indicator shows red this means the load leg is in
the wrong position.
Make sure the load leg is in full contact with the
vehicle floor pan.
To shorten the load leg, squeeze the load leg
release button and pull the load leg upwards.
(6)-1
The completely assembled base is shown as
(7)
.
The ISOFIX connectors must be attached and
locked onto the ISOFIX anchor points.
(7)-1
The load leg must be installed correctly with
green indicator.
(7)-2
6
To remove the base, press the secondary lock
button
(8)-1
first and then the button
(8)-2
on the
latch connectors before removing the base from
the vehicle seat.
7
Press the ISOFIX adjust button to fold the ISOFIX.
NUNA International B.V. Nuna and all associated logos are trademarks.
IMPORTANT !
CES INSTRUCTIONS
COURTES SERVENT
UNIQUEMENT DE
VUE D’ENSEMBLE.
POUR UNE
PROTECTION
MAXIMALE ET UNE
INFORMATION
COMPLÈTE, IL EST
ESSENTIEL DE
LIRE
ET DE RESPECTER
SCRUPULEUSEMENT
LE MANUEL
D’INSTRUCTIONS
DU SIÈGE AUTO.


