The tool may fire when it is first
connected to the air source. Always
connect the tool to the air source
before loading fasteners to prevent
injury from unintended cycling. Always
make sure the tool's magazine is empty
at the beginning of each work session,
before connecting to an air source.
!
WARNING:
Use only those fasteners recommended
for use with this tool. Fasteners not
identified for use with this tool by the
tool manufacturer are able to result in a
risk of injury to persons or tool damage
when used in this tool.
!
WARNING:
Keep the tool pointed away from
yourself and others when loading
fasteners. Failure to do so could result
in possible serious personal injury.
!
WARNING:
Never load fasteners with the
workpiece contact or trigger activated.
Doing so could result in possible
serious personal injury.
!
WARNING:
!
WARNING:
!
WARNING:
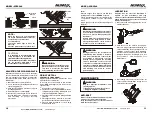
Connect the tool to the air source.
Press down on the magazine latch
button(F). Pull back on the magazine
cover(G).
Brad nails: Insert a stick of fasteners into
the magazine rail(H). Make sure the pointed
ends of the fasteners are resting on the
bottom edge of the magazine when
loading. Make sure the fasteners are not
dirty or damaged.
Staples: Load a clip of fasteners with the
crowns straddling the magazine rail(H).
Push the magazine cover(G) forward until
latch button pops up.
LOADING FASTENERS
PRESS
PULL OPEN
Latch
button(F)
Brad nail head
Staples
Magazine cover (G)
Magazine rail (H)
UNLOADING FASTENERS
Unloading is the reverse of loading. Always
disconnect the air source before unloading.
Always unload all fasteners before
removing tool from service.
Always disconnect the air source
before unloading.
CLEARING JAMS
Disconnect the tool from air source.
Remove fasteners from the tool. Failure to
do so will cause the fasteners to eject from
the front of the tool.
Pull up on the latch (A) and open the flooring
nose cover(B).
Using caution not to bend or damage the
driver blade, using pliers or a screwdriver if
required to clear the jammed fastener.
Close the jam release and latch.
Reconnect the tool to the air source.
Reload the tool with fasteners.
Occasionally, a fastener may become jammed
in the firing mechanism of the tool, making the
tool inoperable. To remove a jammed fastener,
follow these steps below:
Latch(A)
Flooring nose cover(B)
Make sure there is no fastener in
magazine before clearing a jam.
NOTE:
It's the same way to clear the jam with
the regular nose cover.
Disconnect the tool from the air source
whenever clearing a jam. After
disconnecting the tool from the air
compressor, there should still be
enough air pressure to fire the tool.
After the air hose is disconnected,
always fire the tool into scrap wood
repeatedly to make sure all of the
compressed air is expended.
SETTING THE AIR PRESSURE
The amount of air pressure required depends
on the size of the fasteners and the workpiece
material.
Begin testing the depth of drive by driving a test
nail into the same type of workpiece material
used for the actual job. Drive a test fastener
with the air pressure set at 90-95 psi.
Raise or lower the air pressure to find the
lowest setting that will perform the job with
consistent results.
It may be possible to achieve the desired depth
with air pressure adjustments alone.
DEPTH ADJUSTMENT
The driving depth of the fasteners are
adjustable. To adjust the depth, use the drive
depth adjustment wheel (J) on the the tool.
Disconnect the tool from air source.
Turn the depth wheel left or right to change
the driving depth.
Reconnect the tool to the air source.
Drive a test nail after each adjustment until
the desired depth is set.
Turn the adjustment knob counter clockwise
Adjustment
wheel(J)
Too Deep
Flush
MODEL: SFBC940
MODEL: SFBC940
1.
2.
3.
4.
5.
6.
7.
1.
2.
3.
4.
!
WARNING:
!
WARNING:
1.
2.
3.
4.
HTTP://WWW.NUMAXTOOLS.COM 1-888-669-5672
HTTP://WWW.NUMAXTOOLS.COM 1-888-669-5672
08
09


