6
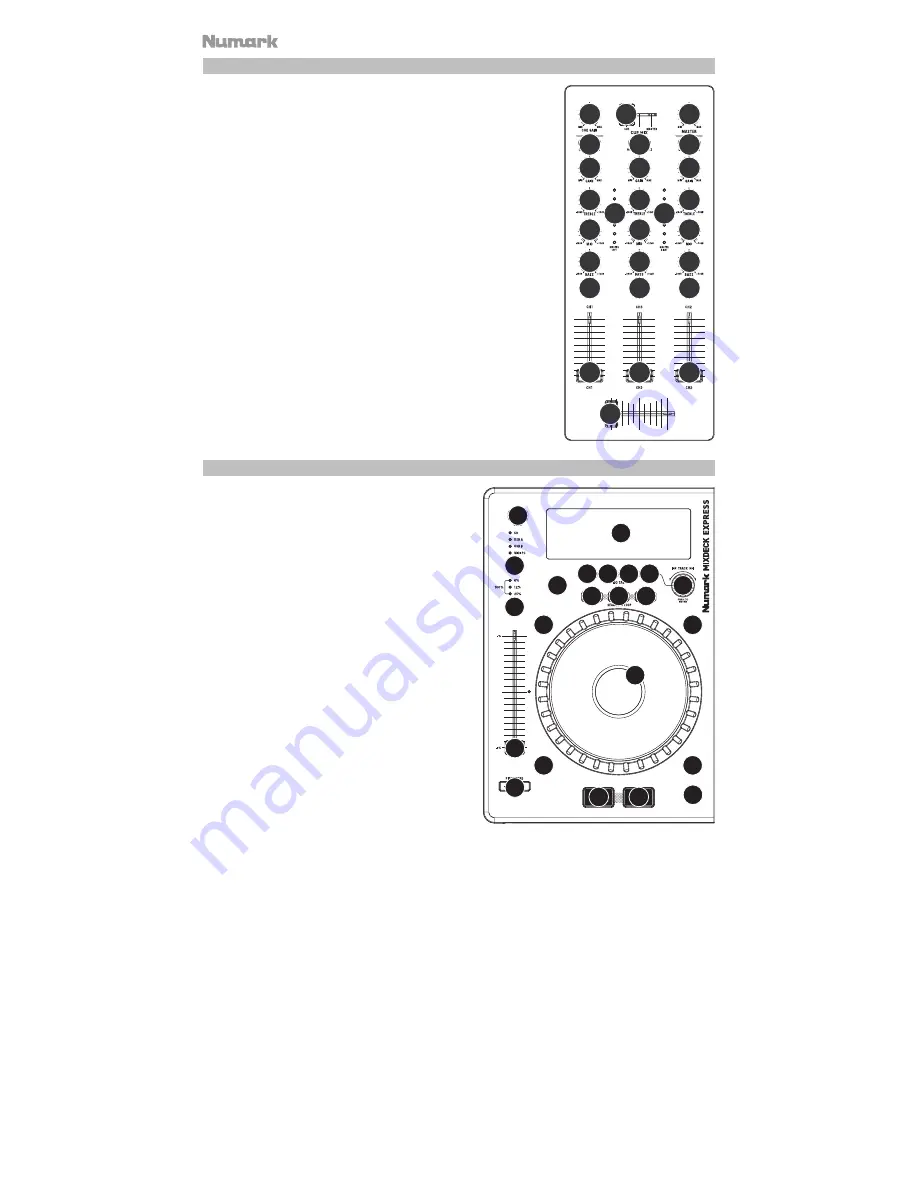
Mixer
Note:
The mixer controls do not have any MIDI function.
1.
MASTER VOLUME –
Adjusts the output volume of the Program mix.
2.
CHANNEL GAIN –
Adjusts the channel’s pre-fader and pre-EQ gain
level.
3.
CHANNEL TREBLE –
Adjusts the high (treble) frequencies of the
corresponding channel.
4.
CHANNEL MID –
Adjusts the mid-range frequencies of the
corresponding channel.
5.
CHANNEL BASS –
Adjusts the low (bass) frequencies of the
corresponding channel.
6.
INPUT SELECTOR –
Selects the input source to be routed to the
corresponding channel. Input jacks are located on the rear panel (plus
the USB port on the top panel).
7.
CUE –
Press this button to send this channel's pre-fader signal to the
Cue Channel for monitoring. When engaged, the button will be lit.
8.
CHANNEL FADER –
Adjusts the audio level on the corresponding
channel.
9.
CROSSFADER –
Blends audio playing between Channels 1 and 2.
Sliding this to the left plays Channel 1 and sliding to the right plays
Channel 2.
Note:
The crossfader is user-replaceable if it should ever wear out.
Simply remove the facepanel, then remove the screws holding it in
position. Replace the fader with a quality authorized replacement from
your local Numark retailer only.
10.
CUE SLIDER –
Previews the audio playing on Channels 1 and 2. Sliding
this to the left plays Channel 1. Sliding to the right plays Channel 2.
11.
CUE GAIN –
Adjusts the level of the headphone audio.
12.
LED METERS –
Monitors the audio level of the Program mix.
Deck
1.
EJECT
– Press this button to eject the CD. If a CD is
currently playing, this button will have no effect.
2.
USB
– Connect your favorite USB storage device to
this connector to allow the Mixdeck Express to read
and play back your music files. The Mixdeck Express
only supports the MP3 format so please make sure
that your audio files are encoded as MP3s if you
would like to use them with the Mixdeck Express.
Note:
Mixdeck Express supports the HFS+, FAT and
NTFS files systems. HFS+ GUID Partition Table is not
supported at this time.
3.
SOURCE
– Press the SOURCE button to choose
which audio source you want to play; CD, USB A,
USB B, or you can use the Mixdeck Express as a USB
MIDI controller. This button will not function if the
Mixdeck Express is currently playing.
4.
TRACK KNOB
– Used to skip from track to track, for
folder navigation and as an "enter" button.
5.
BACK
– When navigating a CD or device with folders,
this button will take you back to the previous level
(folder).
6.
PLAY / PAUSE –
Starts or resumes playback if the
Deck is paused. Pauses playback if the Deck is
playing.
7.
CUE
– Returns and pauses the music at the last set
cue point. The cue point is the last place in which the
unit was paused and then PLAY was pressed.
Pressing and holding a second time allows for
temporary play of this point. You can easily edit the cue point by turning the wheel. As you rotate the wheel
the music will sound. By stopping the wheel and pressing PLAY a new point is set.
1
2
3
4
5
6
10
11
12
12
7
8
9
2
3
4
5
6
7
8
2
3
4
5
6
7
8
1
2
3
4
5
6
7
8
9
10
11
12
13
15
16
17
18 20
21
19
17 17
14
Содержание MIXDECK EXPRESS
Страница 2: ......


