background image

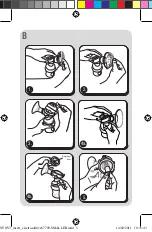
5a. 

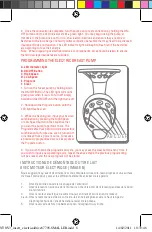
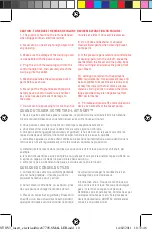
Introduisez l’élément en silicone dans l’entonnoir et tirez les bords au-dessus de la lèvre  


de l’entonnoir. 

5b. 

Assurez-vous que la valve de débit sur le cylindre situé dans l’embouchure de la pompe  


soit bien fixée et en haut du cylindre. 

7.  

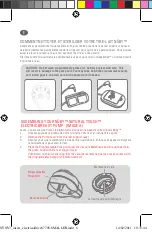
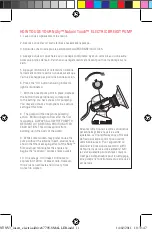
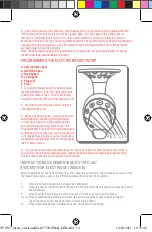
Connect a power source to your Programmable Pump Hood and your Nûby™ Natural 


Touch™ Rhythm™ Electric Breast Pump.  To ensure that there is a proper connection  


between the motorised arm and the vacuum membrane post, hold the ON/OFF button  


and allow the pump to cycle once; the vacuum membrane is now  connected and your  


pump is ready for use.  If you do not want to use the pump  immediately, you may choose  


to remove the power source at this time and instead snap  the travel cover over the  


front of the funnel, and your pump should be clean and sterile until ready for use

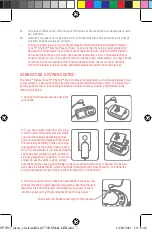
CONNECTING A POWER SOURCE:

The Nûby™ Natural Touch™ Rhythm™ Electric breast pump allows you to choose between two 

power sources, a wall cord which can plug into any standard electrical  outlet, or a convenient 

battery pack for travel. Connecting the desired power source is simple, and detailed in the 

instructions below

1. Choose which power source best suits 

your needs.

2. If you have chosen the wall cord, plug 

it in to an electrical outlet close to where 

you intend to begin expressing so that 

you are not uncomfortable and that there 

is a reduced possibility of the cord being 

unplugged from the outlet while in opera-

tion. You should also try to ensure that the 

cord does not impede the path of others 

as it may present a trip hazard. If you have 

chosen to use the battery pack, ensure 

that the batteries have a good charge so that your pump functions as it should. The battery 

pack uses 4 x AA batteries, which should be installed at the correct polarity. The batteries 

should be disposed of according to the manufacturer’s instructions.

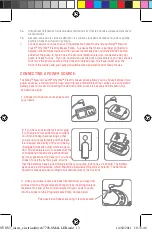
3.  Once your power source has been established, you may now 

connect it to the Programmable Pump Unit by inserting the jack, 

located at the end of the cord connected to your power source, 
into the socket on the Programmable Pump Unit as below

Push Jack into Socket ensuring it is fully seated.

NTNV3_insert_electricaldrive67705-SMALLER.indd   7

14/02/2011   10:33:46

Содержание Natural Touch 67705

Страница 1: ...ue 2 N 1 Milchpumpen Set Elektrischen Antrieb 2 N 1 Set tiralatte Meccanismo elettrico 2 N 1 Borstpomp set Elektrische aandrijving 2 N 1 Breast pump set Electric drive NTNV3_insert_electricaldrive67705 SMALLER indd 1 14 02 2011 10 33 40 ...

Страница 2: ...p 03 Instructies om uw elektrische borstpomp te ontmantelen Instructions for disassembling your electric breastpump 04 Instructies om uw manuele borstpomp om te vormen tot elektrische borstpomp Instructions for transforming yr manual breastpump into an electrical breastpump 05 Instructions Français 06 10 Deutsche Anleitung 11 15 Instruzioni Italiano 16 20 Nederlandstalige Instructies 21 25 English...

Страница 3: ... J A Coper tura igienica per il trasporto B Coppa in silicone C Collo Com fort D Membrana di aspirazione E Copertura pompa F Valvola di aspirazione regolabile G Camera di aspirazione H Valvola di flusso I Leva di tiraggio J A Hygiënische Reiskap B Silicone Hoornwand C Comfort Hoorn D Vacuum Membraan E Pompdeksel F Regelbaar Zui gkrachtventiel G Pomphals H Debietventiel I Pomparm J A Travel Cover B...

Страница 4: ...A 2 1 3 4 5a 5b NTNV3_insert_electricaldrive67705 SMALLER indd 4 14 02 2011 10 33 42 ...

Страница 5: ...B 1 2 4b Diaphragm stem 5 3 4a NTNV3_insert_electricaldrive67705 SMALLER indd 5 14 02 2011 10 33 43 ...

Страница 6: ...IRE LAIT NÛBY Lavez vous les mains Vissez le biberon en silicone sur la base de votre tire lait Nûby 1 Otez la capote de la pompe de votre tire lait en tirant et en inclinant la capote 2 Remove the Pump Lever from the rear support lever 3 Assurez vous que la membrane à vide est bien positionné Enfoncez et passez le doigt sur le bord extérieur pour bien fermer 4 Place the Programmable Pump Unit ove...

Страница 7: ...a convenient battery pack for travel Connecting the desired power source is simple and detailed in the instructions below 1 Choose which power source best suits your needs 2 If you have chosen the wall cord plug it in to an electrical outlet close to where you intend to begin expressing so that you are not uncomfortable and that there is a reduced possibility of the cord being unplugged from the o...

Страница 8: ...w Speed button in the sequence that you want the pump to perform them The Programmable Pump Unit will remember this combination for future use even if turned off or removed from a power source To resume a previously programmed cycle simply press the Program button 4 If you wish to stop the programmed cycle you may press the clear button at any time If you wish to input a new pumping cycle repeat t...

Страница 9: ...use while bathing 5 Do not place or store the product where it can fall or be pulled into a tub or sink 6 Do not reach for a product that has fallen into water Unplug from the wall outlet immediately 7 Close supervision is necessary when the product is used near children or persons with disabilities 8 Do not allow children or pets to play with the breast pump battery pack wall cord or accessories ...

Страница 10: ...nt idéal pour vous familiariser avec votre nouveau tire lait 2 Vous pouvez commncer plus tôt ou l employer exceptionnellement si a Vous devez tirer du lait pour le bébé lors de votre séjour en clinique b Vos seins sont engorgés douloureux et gonflés le fait de tirer du lait avant ou entre les repas du bébé peut réduire l inconfort et aider lors de la mise au sein du bébé c vous êtes séparée de vot...

Страница 11: ...ion Milk will begin to flow after the first few pumps ALWAYS ALLOW THE PUMP TO RETURN TO ITS RESTING POSITION AFTER EACH ACTION This will keep milk from building up in the body of the pump 9 While some women may prefer to use the pump without the silicone insert studies have shown that the massaging effect of the Nûby Silicone Insert stimulates the areola and begins the let down process more quick...

Страница 12: ...IRE LAIT NÛBY Lavez vous les mains Vissez le biberon en silicone sur la base de votre tire lait Nûby 1 Otez la capote de la pompe de votre tire lait en tirant et en inclinant la capote 2 Remove the Pump Lever from the rear support lever 3 Assurez vous que la membrane à vide est bien positionné Enfoncez et passez le doigt sur le bord extérieur pour bien fermer 4 Place the Programmable Pump Unit ove...

Страница 13: ...a convenient battery pack for travel Connecting the desired power source is simple and detailed in the instructions below 1 Choose which power source best suits your needs 2 If you have chosen the wall cord plug it in to an electrical outlet close to where you intend to begin expressing so that you are not uncomfortable and that there is a reduced possibility of the cord being unplugged from the o...

Страница 14: ...w Speed button in the sequence that you want the pump to perform them The Programmable Pump Unit will remember this combination for future use even if turned off or removed from a power source To resume a previously programmed cycle simply press the Program button 4 If you wish to stop the programmed cycle you may press the clear button at any time If you wish to input a new pumping cycle repeat t...

Страница 15: ...use while bathing 5 Do not place or store the product where it can fall or be pulled into a tub or sink 6 Do not reach for a product that has fallen into water Unplug from the wall outlet immediately 7 Close supervision is necessary when the product is used near children or persons with disabilities 8 Do not allow children or pets to play with the breast pump battery pack wall cord or accessories ...

Страница 16: ...nt idéal pour vous familiariser avec votre nouveau tire lait 2 Vous pouvez commncer plus tôt ou l employer exceptionnellement si a Vous devez tirer du lait pour le bébé lors de votre séjour en clinique b Vos seins sont engorgés douloureux et gonflés le fait de tirer du lait avant ou entre les repas du bébé peut réduire l inconfort et aider lors de la mise au sein du bébé c vous êtes séparée de vot...

Страница 17: ...ion Milk will begin to flow after the first few pumps ALWAYS ALLOW THE PUMP TO RETURN TO ITS RESTING POSITION AFTER EACH ACTION This will keep milk from building up in the body of the pump 9 While some women may prefer to use the pump without the silicone insert studies have shown that the massaging effect of the Nûby Silicone Insert stimulates the areola and begins the let down process more quick...

Страница 18: ...IRE LAIT NÛBY Lavez vous les mains Vissez le biberon en silicone sur la base de votre tire lait Nûby 1 Otez la capote de la pompe de votre tire lait en tirant et en inclinant la capote 2 Remove the Pump Lever from the rear support lever 3 Assurez vous que la membrane à vide est bien positionné Enfoncez et passez le doigt sur le bord extérieur pour bien fermer 4 Place the Programmable Pump Unit ove...

Страница 19: ...a convenient battery pack for travel Connecting the desired power source is simple and detailed in the instructions below 1 Choose which power source best suits your needs 2 If you have chosen the wall cord plug it in to an electrical outlet close to where you intend to begin expressing so that you are not uncomfortable and that there is a reduced possibility of the cord being unplugged from the o...

Страница 20: ...w Speed button in the sequence that you want the pump to perform them The Programmable Pump Unit will remember this combination for future use even if turned off or removed from a power source To resume a previously programmed cycle simply press the Program button 4 If you wish to stop the programmed cycle you may press the clear button at any time If you wish to input a new pumping cycle repeat t...

Страница 21: ...use while bathing 5 Do not place or store the product where it can fall or be pulled into a tub or sink 6 Do not reach for a product that has fallen into water Unplug from the wall outlet immediately 7 Close supervision is necessary when the product is used near children or persons with disabilities 8 Do not allow children or pets to play with the breast pump battery pack wall cord or accessories ...

Страница 22: ...nt idéal pour vous familiariser avec votre nouveau tire lait 2 Vous pouvez commncer plus tôt ou l employer exceptionnellement si a Vous devez tirer du lait pour le bébé lors de votre séjour en clinique b Vos seins sont engorgés douloureux et gonflés le fait de tirer du lait avant ou entre les repas du bébé peut réduire l inconfort et aider lors de la mise au sein du bébé c vous êtes séparée de vot...

Страница 23: ...ion Milk will begin to flow after the first few pumps ALWAYS ALLOW THE PUMP TO RETURN TO ITS RESTING POSITION AFTER EACH ACTION This will keep milk from building up in the body of the pump 9 While some women may prefer to use the pump without the silicone insert studies have shown that the massaging effect of the Nûby Silicone Insert stimulates the areola and begins the let down process more quick...

Страница 24: ...IRE LAIT NÛBY Lavez vous les mains Vissez le biberon en silicone sur la base de votre tire lait Nûby 1 Otez la capote de la pompe de votre tire lait en tirant et en inclinant la capote 2 Remove the Pump Lever from the rear support lever 3 Assurez vous que la membrane à vide est bien positionné Enfoncez et passez le doigt sur le bord extérieur pour bien fermer 4 Place the Programmable Pump Unit ove...

Страница 25: ...a convenient battery pack for travel Connecting the desired power source is simple and detailed in the instructions below 1 Choose which power source best suits your needs 2 If you have chosen the wall cord plug it in to an electrical outlet close to where you intend to begin expressing so that you are not uncomfortable and that there is a reduced possibility of the cord being unplugged from the o...

Страница 26: ...w Speed button in the sequence that you want the pump to perform them The Programmable Pump Unit will remember this combination for future use even if turned off or removed from a power source To resume a previously programmed cycle simply press the Program button 4 If you wish to stop the programmed cycle you may press the clear button at any time If you wish to input a new pumping cycle repeat t...

Страница 27: ...use while bathing 5 Do not place or store the product where it can fall or be pulled into a tub or sink 6 Do not reach for a product that has fallen into water Unplug from the wall outlet immediately 7 Close supervision is necessary when the product is used near children or persons with disabilities 8 Do not allow children or pets to play with the breast pump battery pack wall cord or accessories ...

Страница 28: ...nt idéal pour vous familiariser avec votre nouveau tire lait 2 Vous pouvez commncer plus tôt ou l employer exceptionnellement si a Vous devez tirer du lait pour le bébé lors de votre séjour en clinique b Vos seins sont engorgés douloureux et gonflés le fait de tirer du lait avant ou entre les repas du bébé peut réduire l inconfort et aider lors de la mise au sein du bébé c vous êtes séparée de vot...

Страница 29: ...ion Milk will begin to flow after the first few pumps ALWAYS ALLOW THE PUMP TO RETURN TO ITS RESTING POSITION AFTER EACH ACTION This will keep milk from building up in the body of the pump 9 While some women may prefer to use the pump without the silicone insert studies have shown that the massaging effect of the Nûby Silicone Insert stimulates the areola and begins the let down process more quick...

Страница 30: ...IRE LAIT NÛBY Lavez vous les mains Vissez le biberon en silicone sur la base de votre tire lait Nûby 1 Otez la capote de la pompe de votre tire lait en tirant et en inclinant la capote 2 Remove the Pump Lever from the rear support lever 3 Assurez vous que la membrane à vide est bien positionné Enfoncez et passez le doigt sur le bord extérieur pour bien fermer 4 Place the Programmable Pump Unit ove...

Страница 31: ...a convenient battery pack for travel Connecting the desired power source is simple and detailed in the instructions below 1 Choose which power source best suits your needs 2 If you have chosen the wall cord plug it in to an electrical outlet close to where you intend to begin expressing so that you are not uncomfortable and that there is a reduced possibility of the cord being unplugged from the o...

Страница 32: ...w Speed button in the sequence that you want the pump to perform them The Programmable Pump Unit will remember this combination for future use even if turned off or removed from a power source To resume a previously programmed cycle simply press the Program button 4 If you wish to stop the programmed cycle you may press the clear button at any time If you wish to input a new pumping cycle repeat t...

Страница 33: ...use while bathing 5 Do not place or store the product where it can fall or be pulled into a tub or sink 6 Do not reach for a product that has fallen into water Unplug from the wall outlet immediately 7 Close supervision is necessary when the product is used near children or persons with disabilities 8 Do not allow children or pets to play with the breast pump battery pack wall cord or accessories ...

Страница 34: ...nt idéal pour vous familiariser avec votre nouveau tire lait 2 Vous pouvez commncer plus tôt ou l employer exceptionnellement si a Vous devez tirer du lait pour le bébé lors de votre séjour en clinique b Vos seins sont engorgés douloureux et gonflés le fait de tirer du lait avant ou entre les repas du bébé peut réduire l inconfort et aider lors de la mise au sein du bébé c vous êtes séparée de vot...

Страница 35: ...ion Milk will begin to flow after the first few pumps ALWAYS ALLOW THE PUMP TO RETURN TO ITS RESTING POSITION AFTER EACH ACTION This will keep milk from building up in the body of the pump 9 While some women may prefer to use the pump without the silicone insert studies have shown that the massaging effect of the Nûby Silicone Insert stimulates the areola and begins the let down process more quick...

Страница 36: ...ower 12 0 Watts Special Cooling Requirements Convection Cooled Only Supply Voltage Fluctuations 90 VAC 264 VAC Ambient Temperature Range 10 C to 40 C 50 F to 104 F Atmospheric Pressure 700 to 1060hPa Relative Humidity Range 30 to 75 Equipment Rating Rated for Continuous Operation Maximum Speed at Maximum Vacuum 94 RPM Limited Mechanical Stability Voltaggio input alimentazione 100 240 VAC Frequenza...

Страница 37: ...cuüm is 94 cyclussen per minuut Limited Mechanical Stability Line Mains Input Voltage 100 240 VAC Line Mains Input Frequency 50 60 Hz Power Input 0 4 Arms at 90 VAC input Max Load Aux Line Mains Output Power 12 0 Watts Special Cooling Requirements Convection Cooled Only Supply Voltage Fluctuations 90 VAC 264 VAC Ambient Temperature Range 10 C to 40 C 50 F to 104 F Atmospheric Pressure 700 to 1060h...

Страница 38: ... INDOORS CLASS II EQUIPMENT DISPOSE OF THROUGH SEPARATE COLLECTION ROUTE FOR WASTE ELECTRICAL EQUIPMENT SOLO PER USO INTERNO CLASS II EQUIPMENT GETTARE L APPARECCHIATURA ELETTRICA ATTENENDOSI ALLE NORME PER LA RACCOLTA DIFFERENZIATA DEL MATERIALE ELETTRICO DI SCARTO ALLEEN GESCHIKT VOOR GEBRUIK BIN NENSHUIS KLASSE II APPA RATUUR AFGEDANKTE ELEKTRISCHE EN ELEKTRONISCHE APPARATUUR DIENT GESCHEIDEN I...

Страница 39: ...CONTACT Buntstraat 100 9940 Evergem BELGIUM 0032 0 9 216 71 71 info nuby be www nuby com NTNV3_insert_electricaldrive67705 SMALLER indd 39 14 02 2011 10 34 00 ...

Страница 40: ...l Nurser are trademarks licensed to Luv n care Ltd Made in China to Luv n care Ltd specifications Manufactured by Luv n care Ltd 3030 Aurora Avenue Monroe Louisiana 71201 U S A Imported by New Valmar b v b a NTNV3_insert_electricaldrive67705 SMALLER indd 40 14 02 2011 10 34 00 ...

Отзывы: