


Nu-Air Ventilation Systems Inc. - HRV Operating & Installation Manual
Rev. 2.3 Aug. 19, 2014
- 11 -
2.
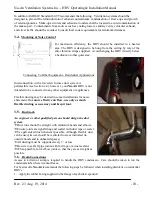
Insert the drain spouts through the holes in the drain pan (B)
3.
Use the provided nut to tightly secure the drain spout
4.
Cut two lengths of drain hose (E) long enough to avoid kinking
5.
Attach the hose to the drain spout by sliding it over the spout until it is tight to the bottom of the speed nut.
Repeat for the other side
6.
Secure the hose to the spout with the plastic tie wraps (D)
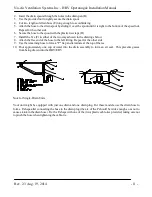
7.
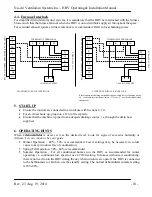
Install the Tee (F) in either of the two ways shown in the drawings below
8.
Attach the free end of the hose to the left fitting. Repeat for the other side
9.
Use the remaining hose to form a "P" trap and terminate at the top of the tee
10.
Pour approximately one cup of water into the drain assembly to form an air seal. This prevents gasses
from being drawn into the HRV/ERV
Note for Single-Drain Units
Your unit might be equipped with just one drain and one drain plug. For these models, use the drain hose to
form a P-shape after connecting the hose to the drain plug (the arc of the P should be wide enough so as not to
cause a kink in the drain hose). Fix the P-shape with one of the (two) plastic cable-ties provided, taking care not
to pinch the hose when tightening the cable-tie.


