
DOC RPM_EL80_010117006
3
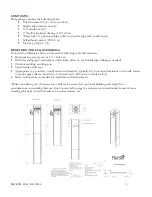
Mounting
flange
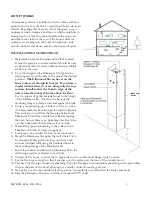
HOW IT WORKS
A basement extractor is installed so that its intake section is
positioned just above the floor
—
right where heavy, damp air
collects. By pulling this heavy air out of the space, out go
unpleasant smells, damp air and factors which contribute to
mold growth. As this air is exhausted from the space, air
naturally moves in from the rest of the house and from
outdoors, by seeping into the home through tiny voids
around windows and doors, and into the basement space.
INSTALLATION INSTRUCTIONS:
1.
Determine where the Eliminator 80 will be located.
It must be against an outside wall and should be near
an electrical outlet. Avoid conditions that may inhibit
air flow to the unit.
2.
To set the height of the Eliminator 80, tighten the
adjusting screws on the side of the unit in the desired
position.
The Eliminator 80 can be set on the
floor to draw air though its louvres. If you have a
model without louvers, or are using only the top
section, install so that the bottom edge of the
unit is raised 2 inches (51 mm) above the floor.
Cut two pieces of gasket material equal to the height
of the Eliminator 80. Attach to the back of the
mounting flanges to form an air seal against the wall.
3.
Using a reciprocating, jig or hole saw, cut a 6½-inch
(152 mm) diameter hole through the wall or sill plate.
This is where you will run the flex pipe between the
Eliminator 80 and the outside hood. Before making
the hole, be sure there is no plumbing, electrical wire
or other obstruction behind the wall or outside.
4.
Secure flex pipe and sheathing to the collar on the
Eliminator 80 with tie wrap(s) supplied.
5.
Feed pipe to the outside for later hood connection.
6.
Stand the Eliminator 80 against the wall where it is to
be mounted. Drill a pilot hole for your sheet rock
anchors (finished wall) using the predrilled holes in
the mounting flange of the Eliminator 80.
7.
Insert the anchors and fasten the Eliminator 80 to the
wall using a washer and screw in each hole.
8.
Outside of the house,
connect the 6” pipe collar to the outside hood
flange using 3 screws.
9.
Cut the flex pipe to length so that it reaches over the collar, near the base of the outside hood.
10.
Peel back the flex pipe insulation/sheathing. Tape the flex pipe, then insulation/sheathing, to the pipe collar
close to the base of the hood, allowing for a sturdy connection and a good seal.
11.
Mount the hood to the outside wall using screws. Use caulking to seal between the house and hood.
12.
Plug the Eliminator 80 power cord into a standard 120 V outlet.


