MAN111 Rev Date 11/21/2012
ST-C6HD(-A)-300
ST-C6HD-(A)IR-300
300 FOOT HDMI, STEREO AUDIO AND IR
EXTENDER
Installation and Operation Manual
XTENDEX
®
Series
Страница 1: ...MAN111 Rev Date 11 21 2012 ST C6HD A 300 ST C6HD A IR 300 300 FOOT HDMI STEREO AUDIO AND IR EXTENDER Installation and Operation Manual XTENDEX Series...
Страница 2: ...itten consent of Network Technologies Inc 1275 Danner Drive Aurora Ohio 44202 CHANGES The material in this guide is for information only and is subject to change without notice Network Technologies In...
Страница 3: ...ure 1 Connect the XTENDEX Local Unit to the source 5 Figure 2 Connect the XTENDEX Local Unit to stereo audio source 5 Figure 3 Connect the extended video display to the Remote Unit 6 Figure 4 Connect...
Страница 4: ...pports x v Color Dolby Digital and DTS Dolby TrueHD and DTS HD Master Audio bandwidth to 225 MHz 6 75 Gbps 12 bit Deep Color Lip Sync Supports the DDC2B protocol Supports digital audio format such as...
Страница 5: ...ht thru pin 1 to pin 1 etc see page 14 for proper EIA TIA 568 B wiring method Note Use only CAT7 solid STP cable if the extender is a rackmount module i e ST C6HD LA L 300M HDMI male male cable to con...
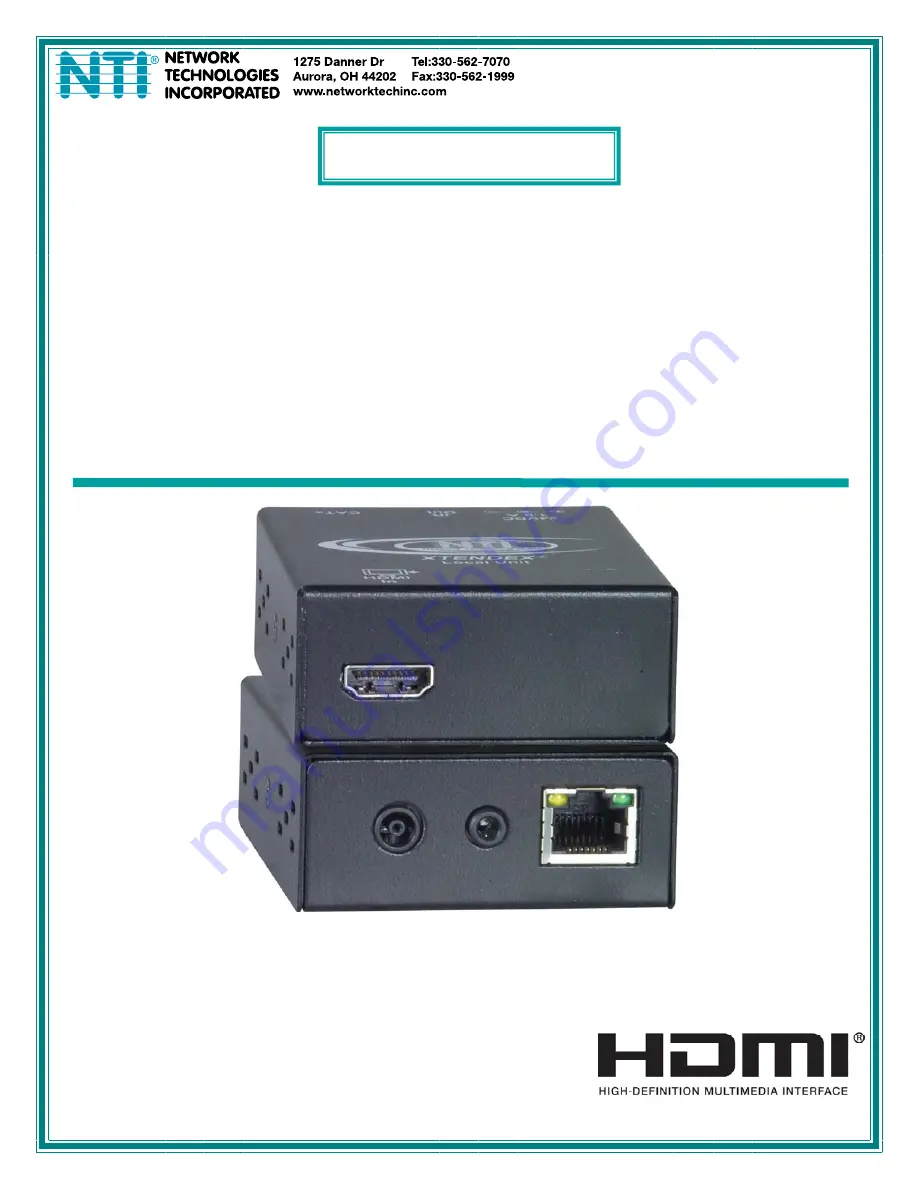
Страница 6: ...D power indicator illuminates when power has been supplied to the unit 5 IR Out 3 5mm Stereo Jack for connecting the IR Emitter models with IR support only 6 HDMI In HDMI Type A Female for connecting...
Страница 7: ...ent fluorescent lighting etc All cables should be installed in such a way that they do not cause stress on their connections to the equipment Extended lengths of cable hanging from a connection may in...
Страница 8: ...DVI HD xx MM cable page 2 between the video source and the HDMI In connector on the Local Unit Figure 1 If stereo audio support is present a stereo audio source can be connected Figure 2 Figure 1 Con...
Страница 9: ...HD xx MM cable depending upon what connector your display will accept to the female HDMI video connector labeled HDMI Out on the Remote Unit Figure 3 Connect the extended video display to the Remote U...
Страница 10: ...cable may cause poor video quality or prevent operation altogether Figure 5 Connect CATx cable Plug in and Boot Up 1 Plug the power cord from the monitor into the power outlet 2 Connect an AC adapter...
Страница 11: ...nuts supplied to the rack in locations that line up with the holes in the mounting flange on the tray Then secure the tray to the rack using four 10 32 x 3 4 screws supplied Be sure to tighten all mou...
Страница 12: ...DMI video source Figure 10 shows the proper connections for the ST C6HD LA 2L 300M using a HD xx MM cable xx 3 6 9 14 20 30 50 75 100 and 150 foot length Make sure connections are firmly seated If you...
Страница 13: ...ect the CAT7 cable to a CATx 1 or CATX 2 port on the front of the Local Unit see Figure 12 When properly inserted the cable end should snap into place Connect the other end of the cable to the CATx po...
Страница 14: ...ndicating that a proper power connection has been made 4 Turn ON the video audio source s and display devices They should each react as if they were directly connected to each other The yellow Traffic...
Страница 15: ...T port on the Local unit Position the end of the receiver such that the signal from the remote control can easily reach the IR sensor Position the end of the emitter such that the extended signal can...
Страница 16: ...le CAT5e solid stranded UTP 550MHz or better CAT6 6a Solid UTP CAT7 Solid STP EIA TIA 568 B wiring with male RJ45 connectors Operating Temperature 0 50 C Operating Humidity Range 5 to 90 non condensin...
Страница 17: ...tor One or more video cables is loose or disconnected No power to Remote Unit CATx cable is not connected CATx cable is too long HDMI DVI cable is too long CATx cable from other unit s running too clo...
Страница 18: ...years from the date of purchase Please contact Network Technologies Inc at 800 742 8324 800 RGB TECH or 330 562 7070 or visit our website at http www networktechinc com return policy html for informat...