background image

Manejo 


38


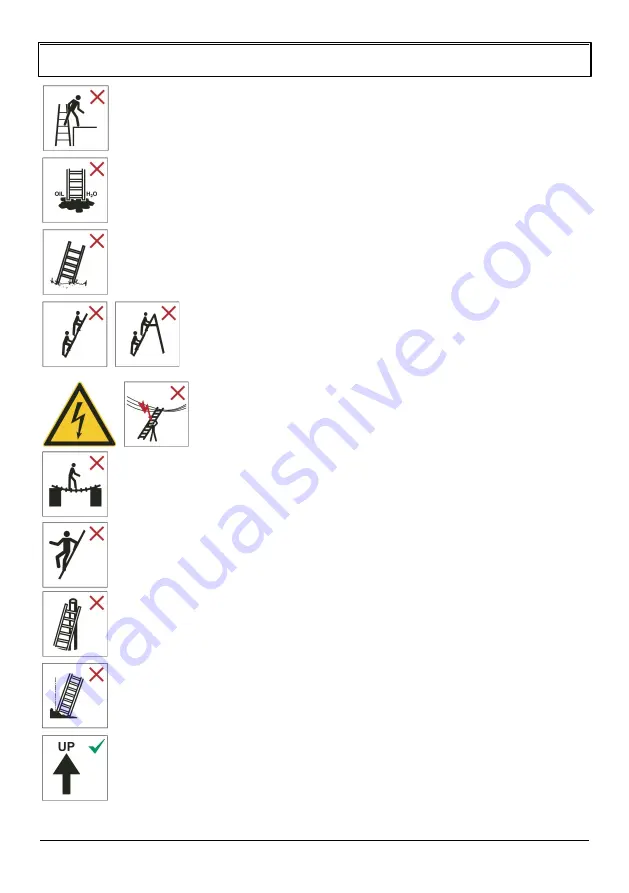
Está prohibido pasar lateralmente de la escalera a otra superficie.


Asegúrese de que el suelo sobre el que instale la escalera esté 
limpio.   
 
 
Instale la escalera únicamente sobre un suelo firme. 


Solo puede haber una persona cada vez en cada brazo de 
subida y bajada de la escalera.   
 
 
¡Advertencia! ¡Peligro por electricidad!   

Cuando transporte la escalera, preste atención a las 
líneas eléctricas. 


No utilice la escalera como puente. 


Suba y baja la escalera siempre de frente a ella. 


Asegúrese de que el extremo superior de la escalera esté 
correctamente apoyado. 


No instale la escalera sobre una superficie irregular o inestable.  


Asegúrese de instalar la escalera en la dirección correcta antes de 
usarla.   


Содержание 4000722004

Страница 1: ...anual de instrucciones original Mode d emploi original Manuale d uso originale Oryginalna instrukcja obs ugi Teleskopleiter Telescopic Ladder Escalera Telesc pica chelle t lescopique Scala telescopica...

Страница 2: ...II...

Страница 3: ...III...

Страница 4: ...IV...

Страница 5: ...V...

Страница 6: ...lm 7 Schutzkappe Sprosse 8 Blockbildung oben bei nicht auf Maximall nge ausgezogener Leiter 9 Sechskantschraube mit Mutter 2 10 Schutzkappe Wand 2 11 Schraube 4 Inhalt Allgemeines 2 Sicherheit 5 Ersti...

Страница 7: ...n geben Sie unbedingt diese Gebrauchsanleitung mit Zeichenerkl rung Die folgenden Symbole und Signalworte werden in dieser Gebrauchsanleitung auf der Leiter oder auf der Verpackung verwendet WARNUNG D...

Страница 8: ...achten Sie die maximale Belastungsgrenze von 150 kg Beachten Sie dass der Leiter berstand ber dem Anlegepunkt mindestens 1 m betragen muss F hren Sie immer eine Sichtpr fung der Leiter durch bevor Sie...

Страница 9: ...Person auf jedem besteigbaren Schenkel der Leiter befinden Warnung elektrische Gef hrdung Achten Sie beim Transport der Leiter auf Gef hrdungen durch Stromleitungen Verwenden Sie die Leiter nicht als...

Страница 10: ...iegshilfe mit einer Maximalbelastung von 150 kg konzipiert Sie ist ausschlie lich f r den Privatgebrauch bestimmt und nicht f r den gewerblichen Bereich geeignet Die Leiter ist ausschlie lich als Anle...

Страница 11: ...ung und vor der ersten Benutzung um den Zustand und die Funktion aller Teile Festzustellen F hren Sie eine Sichtpr fung der Leiter auf Besch digung und sichere Benutzung zu Beginn jeden Arbeitstages a...

Страница 12: ...f und nicht auf den Sprossen bzw Stufen Stellen Sie die Leiter nicht auf rutschige Fl chen z B Eis blanke Fl chen oder deutlich verunreinigte feste Fl chen sofern nicht durch zus tzliche Ma nahmen ver...

Страница 13: ...Beim Aufsteigen und Absteigen an der Leiter gut festhalten Bei Arbeiten auf der Leiter festhalten oder andere Sicherheitsma nahmen ergreifen wenn dies nicht m glich ist Verwenden Sie die Leiter nicht...

Страница 14: ...d lassen Sie nicht mehrere Sprossen aus Rutschen Sie nicht an den Holmen herunter Sichern Sie bei Bedarf die Stabilit t der Leiter durch Zusatzma nahmen z B durch Verzurren der Leiter an einer festen...

Страница 15: ...sch digt werden Gehen Sie beim ffnen vorsichtig vor 1 Nehmen Sie die Leiter aus der Verpackung 2 Pr fen Sie ob die Lieferung vollst ndig ist siehe Abb A 3 Kontrollieren Sie ob die Leiter oder die Einz...

Страница 16: ...echtstehende Teile Sprossen oberster Tr ger Standfu nicht fehlen und nicht lose stark abgenutzt korrodiert oder besch digt sind berpr fen dass die Verriegelungsmechanismen und die Verriegelungsanzeige...

Страница 17: ...ossen sowie den obersten Tr ger der Leiter W hrend des Stehens auf der Leiter diese nicht bewegen Stellen Sie sicher dass die Leiter ordnungsgem gesichert ist wenn Sie sie umstellen Steigen Sie nur au...

Страница 18: ...tzkappen 7 am oberen Ende der Leiter befinden 1 Stellen Sie die Leiter auf einem festen und ebenen Untergrund auf 2 Stabilisieren Sie die Leiter indem Sie einen Fu auf den Standfu 2 stellen 3 Ziehen S...

Страница 19: ...rrest oberhalb der Sprosse wird zusammengeschoben Reinigung und Wartung WARNUNG Verletzungsgefahr Bei unsachgem er Handhabung besteht Verletzungsgefahr wenn Sprossen oder Holme verunreinigt sind k nne...

Страница 20: ...beren Fl che abgestellt Die Leiter immer nur dort lagern wo sie nicht durch Fahrzeuge schwere Gegenst nde oder Verschmutzung besch digt werden kann Die Leiter immer nur dort lagern wo sie keine Stolpe...

Страница 21: ...4 schlechter Zustand der Leiter fehlende oder besch digte Gummikappen am Standfu 5 Wegsteigen von einer ungesicherten Leiter in der H he 6 ungeeigneter Untergrund am Aufstellort der Leiter z B instabi...

Страница 22: ...ische Daten Artikelnummer 4000722004 Maximale zul ssige Belastung 150 kg Maximale L nge 2 63 m Neigungswinkel 65 75 Gewicht 8 kg Maximal zul ssige Anzahl von Benutzern 1 Artikelnummer 4000722005 Maxim...

Страница 23: ...18...

Страница 24: ...6 Beam 7 Protective cap rung 8 Upper block with ladders not extended to the maximum length 9 Hexagon bolt with nut 2 10 Protective cap wall 2 11 Screw 4 Contents General information 20 Safety 23 First...

Страница 25: ...these instructions for use are included Symbols The following symbols and signal words are used in these instructions for use on the ladder or on the packaging WARNING This symbol signal word indicat...

Страница 26: ...the contact point by at least 1 m Always visually inspect the ladder before using it Always check the feet of the ladder before using it Secure the top and bottom of the ladder A maximum of 1 user may...

Страница 27: ...ard Pay attention to hazards caused by power lines when transporting the ladder Do not use the ladder as a bridge Always ascend and descend facing the ladder Ensure that the top end of the ladder is c...

Страница 28: ...escribed in these instructions for use Any other use is considered incorrect use and may lead to property damage or even personal injury The ladder is not a toy The manufacturer or retailer accepts no...

Страница 29: ...tion e g correct angle for lean to ladders inclination of roughly 1 4 with the rungs and treads level Locking devices where attached must be completely removed before use The ladder must be placed on...

Страница 30: ...the ladder or use an appropriate setup to secure the stability Do not stand on the top three rungs of the ladder Caution the top bracket is not a rung Do not stand on the top bracket Only use the ladd...

Страница 31: ...on it or if this is not possible take additional safety precautions Before use make sure that the ladder s locking devices are working and that all extended sections are properly locked before you cl...

Страница 32: ...WARNING Risk of injury A significant risk of injury exists if you use a damaged ladder or do not use the ladder as intended Inspect the ladder after delivery and before initial use to check the condi...

Страница 33: ...ars legs upright parts rungs top bracket stand are in good condition around the fixing points for other parts Check that attachments usually rivets screws bolts are not missing and are not loose or co...

Страница 34: ...ing on it Make sure that the ladder is properly secured when you move it Only climb the ladder if you have set it up at the correct angle of 75 1 4 inclination CAUTION Risk of crushing You may trap or...

Страница 35: ...ked before you climb the ladder see Locking device section Extending the ladder up to its overall length 1 Set up the ladder on a solid and flat surface 2 Stabilise the ladder by placing a foot on the...

Страница 36: ...lon bristles and do not use sharp or metal cleaning objects such as knives hard scrapers and the like These can damage the surfaces Keep the protective caps and the slip resistant caps of the stand fr...

Страница 37: ...following non exhaustive list of risk names typical dangers and examples of common causes of accidents when using ladders Consider the risks mentioned when handling the ladder as the basis of safe wor...

Страница 38: ...trical hazards 1 Unavoidable work involving live parts e g fault tracing 2 Setting up the ladder directly adjacent to live electrical equipment e g high voltage overhead lines 3 Damage to electrical e...

Страница 39: ...e of the packaging separated by identical materials Dispose of the cardboard with waste paper and the films in the recyclable materials container Disposing of the ladder Dispose of the ladder in line...

Страница 40: ...Larguero 7 caperuza Pelda os 8 Formaci n de bloque arriba con escalera no extendida hasta la longitud m xima 9 Tornillo hexagonal con tuerca 2 10 Tapa protectora pared 2 11 Tornillo 4 Contenido Aspec...

Страница 41: ...a la escalera a otra persona aseg rese de entregarle tambi n este manual de uso Explicaci n de s mbolos En este manual de uso en la escalera o en el embalaje se emplean los siguientes s mbolos y las s...

Страница 42: ...ximadamente 75 relaci n 1 4 Respete el l mite m ximo de carga de 150 kg Tenga en cuenta que la escalera debe sobresalir por encima del punto de apoyo al menos 1 m Realice siempre una inspecci n visual...

Страница 43: ...zo de subida y bajada de la escalera Advertencia Peligro por electricidad Cuando transporte la escalera preste atenci n a las l neas el ctricas No utilice la escalera como puente Suba y baja la escale...

Страница 44: ...exclusivamente como una herramienta de subida y bajada con una capacidad de carga m xima de 150 kg Est destinada nicamente a un uso privado no industrial Esta escalera se ha dise ado exclusivamente co...

Страница 45: ...uncionen correctamente Realice una inspecci n visual de la escalera para asegurarse de que es seguro utilizarla y de que no presenta da os al comienzo de cada jornada laboral durante la que se vaya a...

Страница 46: ...pelda os o escalones No instale la escalera sobre superficies resbaladizas p ej hielo superficies pulidas o superficies s lidas muy sucias a menos que se pueda garantizar que la escalera no se deslice...

Страница 47: ...as salidas de emergencia Suba y baje la escalera siempre de frente a ella Sujete firmemente la escalera cuando suba y baje Mientras realice trabajos en la escalera mant ngase sujeto a ella o si no es...

Страница 48: ...e accesible Suba y baje la escalera pelda o a pelda o No se salte nunca ning n pelda o No baje nunca la escalera desliz ndose por los largueros Si es necesario tome medidas adicionales para asegurar l...

Страница 49: ...udo ya que podr a da ar la escalera Abra el embalaje cuidadosamente 1 Extraiga la escalera del embalaje 2 Compruebe que el volumen de entrega est completo vea la fig A 3 Compruebe si la escalera o alg...

Страница 50: ...s est n presentes y que no est n sueltos ni corro dos Compruebe que no falte ninguno de los largueros patas partes verticales pelda os soporte superior o soporte inferior y que no est n sueltos excesi...

Страница 51: ...que los pies sobre los tres pelda os superiores ni sobre el soporte superior de la escalera No mueva la escalera mientras est subido a ella Aseg rese de que la escalera est bien asegurada cuando la mu...

Страница 52: ...porte 2 Extienda la escalera de abajo arriba pelda o por pelda o hasta la longitud deseada vea la fig D Mediante los mecanismos de bloqueo cada tramo se bloquea autom ticamente cuando extiende por com...

Страница 53: ...limine la suciedad los restos de pintura etc despu s de cada uso antes de retraer la escalera Limpie siempre los pelda os Encargue la realizaci n de los trabajos de reparaci n y mantenimiento nicament...

Страница 54: ...gar de acceso restringido para evitar que pueda ser utilizada con fines delictivos Si la escalera se va a utilizar durante un periodo prolongado de tiempo y como consecuencia de ello permanece libreme...

Страница 55: ...n con una escalera p ej veh culos o puertas 9 selecci n incorrecta de la escalera p ej escalera demasiado corta o inadecuada para la tarea b Manejo inadecuado 1 enderezamiento de la escalera a la posi...

Страница 56: ...o 4000722005 Capacidad m xima de carga admisible 150 kg Longitud m xima 3 27 m ngulo de inclinaci n 65 75 Peso 11 28 kg N mero m ximo de usuarios permitido 1 Eliminaci n Eliminaci n del embalaje Desec...

Страница 57: ...52...

Страница 58: ...6 Montant 7 Capuchon de protection chelon 8 Blocage en haut en cas d chelle non sortie au maximum 9 Vis t te hexagonale avec crou 2 10 Capuchon de protection mur 2 11 Vis 4 R pertoire G n ralit s 54 S...

Страница 59: ...nnez galement imp rativement ce mode d emploi Explication des signes Les symboles et signaux suivants sont utilis s dans ce mode d emploi sur l chelle ou sur son emballage AVERTISSEMENT Ce symbole mot...

Страница 60: ...on d installation de l chelle doit comprendre environ 75 rapport 1 4 Respectez la valeur de chargement maximale de 150 kg Veuillez noter que le surplomb de l chelle doit d passer d au moins 1 m le poi...

Страница 61: ...que branche praticable de l chelle Attention risque lectrique Lors du transport de l chelle restez attentif au danger repr sent par les lignes lectriques N utilisez pas l chelle pour franchir un obsta...

Страница 62: ...nt e et peut supporter une charge maximale de 150 kg Elle est exclusivement destin e un usage priv et ne convient pas un usage commercial L chelle est exclusivement con ue comme une chelle simple ce q...

Страница 63: ...de constater l tat et le fonctionnement de toutes les pi ces Avant chaque journ e de travail durant laquelle l chelle doit tre utilis e effectuez un contr le visuel de l chelle afin de rep rer toute...

Страница 64: ...arches Ne pas poser l chelle sur des surfaces glissantes par ex glace surfaces lustr es ou surfaces fixes clairement sales tant que des mesures suppl mentaires ne sont pas prises pour emp cher l chell...

Страница 65: ...de l chelle le visage face l chelle Bien se tenir lors de la mont e ou de la descente sur l chelle En cas de travaux sur l chelle bien se tenir ou prendre d autres mesures de s curit lorsque ceci n es...

Страница 66: ...ont visibles Installez l chelle de mani re la laisser toujours accessible Montez sur l chelle chelon apr s chelon et ne sautez pas plusieurs chelons Ne glissez pas le long des poteaux Si besoin assure...

Страница 67: ...vec le film d emballage REMARQUE Risque d endommagement Si vous ouvrez l emballage imprudemment avec un couteau aiguis ou l aide d autres objets pointus vous risquez d endommager l chelle Ouvrez l emb...

Страница 68: ...on d autres pi ces V rifiez que les fixations habituellement les clous vis boulons ne sont pas manquantes desserr es ou corrod es V rifiez que les barres pieds pi ces la verticale chelons support le p...

Страница 69: ...is derniers chelons sup rieurs de l chelle Ne pas d placer l chelle tant que vous tes debout dessus Assurez vous que l chelle est attach e correctement lorsque vous la d placez Montez uniquement sur l...

Страница 70: ...plane 2 Stabilisez l chelle en pla ant un pied sur le socle 2 3 D pliez l chelle du bas vers le haut chelon par chelon jusqu obtenir la longueur souhait e voir figure D l aide du dispositif de blocag...

Страница 71: ...Gardez l chelle dans un tat propre Apr s chaque utilisation et avant de replier l chelle retirez les impuret s par ex salissures r sidus de peinture etc Essuyez toujours les chelons Confiez exclusivem...

Страница 72: ...e s curis e l o elle est inaccessible et ne peut donc tre utilis e des fins criminelles En cas d utilisation en continu et donc d acc s libre p ex sur un chafaudage toujours s curiser l chelle contre...

Страница 73: ...avec des v hicules ou des portes 9 mauvais choix d chelle par ex chelle trop courte usage non compatible b Manipulation incorrecte 1 dresser l chelle durant l utilisation 2 montage et d montage de l c...

Страница 74: ...ssible 150 kg Longueur maximale 3 27 m Angle d inclinaison 65 75 Poids 11 28 kg Nombre maximal d utilisateurs autoris 1 Mise au rebut Mise au rebut de l emballage Triez l emballage en le mettant au re...

Страница 75: ...70...

Страница 76: ...a 5 Piolo 6 Staggio 7 cappuccio protettivo Piolo 8 Formazione di blocchi sopra con scala non estesa alla massima lunghezza 9 Vite esagonale con dado 2 10 Cappuccio protettivo Parete 2 11 Vite 4 Sommar...

Страница 77: ...erzi necessario accludere anche le presenti istruzioni per l uso Spiegazione dei simboli Nelle presenti istruzioni per l uso sulla scala o sull imballaggio vengono utilizzati i seguenti simboli e le s...

Страница 78: ...ondere circa a 75 rapporto 1 4 Rispettare il carico utile massimo di 150 kg Tenere presente che la sporgenza della scala oltre il punto di appoggio deve corrispondere a minimo 1 m Eseguire sempre un c...

Страница 79: ...sempre solo una persona Attenzione pericolo elettrico Durante il trasporto della scala prestare attenzione ai pericoli causati dalle condutture elettriche Non usare la scala come ponteggio Salire e sc...

Страница 80: ...ncepita esclusivamente come ausilio di salita per una portata massima di 150 kg destinata esclusivamente all uso privato e non adatta al settore commerciale La scala concepita esclusivamente come scal...

Страница 81: ...ondizioni e il funzionamento di tutti i componenti Eseguire un controllo visivo della scala per verificare l eventuale presenza di danneggiamenti e l uso sicuro prima di iniziare una giornata di lavor...

Страница 82: ...li o gradini Non posizionare la scala su superfici scivolose p es ghiaccio superfici lisce o superfici solide visibilmente sporche salvo nei casi in cui si garantisca con misure supplementari che la s...

Страница 83: ...pre saldamente alla scala Durante i lavori sulla scala tenersi saldamente oppure laddove non sia possibile adottare altre misure di sicurezza Non usare la scala come ponteggio o ponte Indossare scarpe...

Страница 84: ...iolo e non escluderne nessuno Non usare i montanti come scivolo All occorrenza assicurare la stabilit della scala con misure supplementari p es fissandola a un punto di ancoraggio fisso Se si lavora a...

Страница 85: ...to o con altri oggetti appuntiti si rischia di danneggiare la scala Aprire l imballaggio con delicatezza 1 Rimuovere la scala dall imballaggio 2 Controllare che il contenuto della fornitura sia comple...

Страница 86: ...oni non siano mancanti allentati o corrosi Controllare che montanti gambe componenti verticali pioli supporto superiore traversa non siano mancanti allentati fortemente consumati corrosi o danneggiati...

Страница 87: ...nte bloccata quando viene spostata Salire sulla scala solo se stata posizionata con l angolo di apertura corretto di 75 angolo di inclinazione 1 4 ATTENZIONE Pericolo di schiacciamento Qualora non si...

Страница 88: ...iolo 5 raggiunge l estrazione massima 4 Assicurarsi che ciascuna sezione della scala sia bloccata prima di salire vedi paragrafo Dispositivo di arresto Estrazione della scala fino alla lunghezza compl...

Страница 89: ...i piedini contattare il produttore o il rivenditore qualora necessario INDICAZIONE Pericolo di danneggiamento Una pulizia inappropriata pu causare danneggiamenti Non usare detergenti aggressivi spazz...

Страница 90: ...amente aperta Immagazzinare la scala in un luogo asciutto Immagazzinare la scala fuori dalla portata di bambini Non permettere ai bambini di manipolare la scala incustoditi Immagazzinare la scala in u...

Страница 91: ...a scala c Scivolamento inciampo e caduta 1 calzature inadatte 2 pioli sporchi 3 comportamento incosciente da parte dell utente p es salire due gradini per volta usare i montanti come scivolo d Deterio...

Страница 92: ...assimo ammissibile 150 kg Lunghezza massima 3 27 m Angolo di inclinazione 65 75 Peso 11 28 kg Numero massimo ammissibile di utenti 1 Smaltimento Smaltimento dell imballaggio Sottoporre l imballaggio a...

Страница 93: ...88...

Страница 94: ...Czapka ochronna Szczebel 8 Blokowanie formacji powy ej z drabin nie przed u on do maksymalnej d ugo ci 9 ruba sze ciok tna z nakr tk 2 10 Ko pak ochronny ciana 2 11 ruba 4 Spis tre ci Informacje og l...

Страница 95: ...rzystania W przypadku przekazywania drabiny osobom trzecim nale y przekaza koniecznie niniejsz instrukcj obs ugi Obja nienie znak w Poni sze symbole i has a s u ywane w niniejszej instrukcji obs ugi n...

Страница 96: ...o 75 proporcja 1 4 Nale y przestrzega maksymalnej granicy obci enia 150 kg Nale y pami ta e drabina musi wystawa ponad punkt przy o enia na co najmniej 1 m Przed u yciem drabiny nale y zawsze wykona...

Страница 97: ...zawsze znajdowa si tylko jedna osoba Ostrze enie zagro enie elektryczne Podczas transportu drabiny nale y uwa a na zagro enia spowodowane przewodami elektrycznymi Nie stosowa drabiny jako przej cie Wc...

Страница 98: ...y przy wchodzeniu z maksymalnym obci eniem 150 kg Jest ona przystosowana wy cznie do u ytku prywatnego a nie do obszaru komercyjnego Drabina jest zaprojektowana wy cznie jako drabina przystawna tzn mu...

Страница 99: ...e cia a i szk d rzeczowych Po dostarczeniu drabiny i przed pierwszym u yciem sprawdzi drabin aby ustali stan i sprawno wszystkich cz ci Wykona kontrol wzrokow drabiny pod k tem uszkodze i bezpiecznego...

Страница 100: ...e na n kach a nie na szczeblach lub stopniach Nie ustawia drabiny na powierzchniach liskich np lodzie powierzchniach pustych lub stabilnych znacznie zanieczyszczonych je eli przez dodatkowe rodki nie...

Страница 101: ...odczas wchodzenia i schodzenia dobrze trzyma si drabiny Podczas prac na drabinie trzyma si lub zastosowa inne rodki bezpiecze stwa je eli nie jest to mo liwe Nie u ywa drabiny do przechodzenia lub jak...

Страница 102: ...abin i nie pomija kilku szczebli Nie zsuwa si po d wigarach W razie potrzeby zabezpieczy stabilno drabiny przez dodatkowe dzia ania np przez przymocowanie drabiny do nieruchomego zakotwienia Podczas p...

Страница 103: ...uszkodzenia drabiny Podczas otwierania nale y zachowa ostro no 1 Wyj drabin z opakowania 2 Sprawdzi czy dostawa jest kompletna patrz rys A 3 Sprawdzi czy drabina lub poszczeg lne elementy s uszkodzone...

Страница 104: ...Sprawdzi czy mechanizmy blokuj ce i wska niki blokuj ce dzia aj prawid owo nie brakuje ich nie s poluzowane silnie zu yte skorodowane lub uszkodzone a segmenty szczebli prawid owo si blokuj Sprawdzi...

Страница 105: ...a lub zsuwania drabiny mo e spowodowa zakleszczenie palc w lub zgniecenie Podczas wyci gania i zsuwania drabiny nale y zachowa ostro no Zwr ci uwag aby podczas zsuwania palce d onie i r ce znajdowa y...

Страница 106: ...go ca kowit 1 Ustawia drabin na stabilnym i r wnym pod o u 2 Stabilizowa drabin stawiaj c stop na nodze 2 3 Wyci ga drabin od g ry do do u szczebel po szczeblu na d ugo ca kowit patrz rys E i F Nale y...

Страница 107: ...Z WKA Niebezpiecze stwo uszkodzenia Nieprawid owe czyszczenie mo e spowodowa uszkodzenia Nie u ywa agresywnych rodk w czyszcz cych szczotek z w osiem metalowym lub nylonowym ani ostrych b d metalowych...

Страница 108: ...ony Po ka dym u yciu zsun drabin ca kowicie i zabezpieczy pasem 4 aby nie dopu ci to jej przypadkowego rozsuni cia Przechowywa drabin w suchym miejscu Przechowywa drabin poza zasi giem dzieci Upewni s...

Страница 109: ...e i sk adanie drabiny 3 Noszenie przedmiot w podczas wchodzenia na drabin c Po lizgni cie potkni cie i upadek 1 Nieodpowiednie obuwie 2 Zanieczyszczone szczeble 3 Lekkomy lne post powanie u ytkownika...

Страница 110: ...2005 Maksymalne dopuszczalne obci enie 150 kg D ugo maksymalna 3 27 m K t nachylenia 65 75 Ci ar 11 28 kg Maksymalna dozwolona liczba u ytkownik w 1 Utylizacja Utylizacja opakowania Utylizowa opakowan...

Страница 111: ...106...

Страница 112: ...Gestaltung urheberrechtlich gesch tzt VI Nordwest 05 20 NORDWEST Handel AG Robert Schuman Stra e 17 44263 Dortmund Germany Tel 49 231 2222 3001 www nordwest com...

Отзывы: