NorthStar EXPLORER 557 Скачать руководство пользователя страница 64

Northstar 

Explorer 557/567

 Installation and Operation Manual

64

2 Bracket Mounting

Requires a panel for mounting the bracket. Ensure 
that the panel is not likely to deform and is not 
subject to excessive vibration. The bracket can 
be tilted and rotated. The display unit can be 
removed when it is not in use.

1   Hold the bracket in place and mark the screw 

holes.

Drill the screw holes and screw the bracket in 
place. Do not overtighten the screws or the 
display unit might not rotate. 

Hold the display unit in place on the 
mounting bracket shaft. Hand tighten the 
knob on the mounting bracket. 

Select a position for the display unit:

• 

At least 4” (100 mm) away from the compass, 
at least 12” (300 mm) away from any radio 
transmitter and at least 4 ft (1.2 m) away from 
any antenna.

• 

Easy to read and operate. If possible, mount 
the display unit in front of the navigator or to 
the right of the navigator because the LCD 
display is more readable from these positions. 

There are two mounting arrangements:
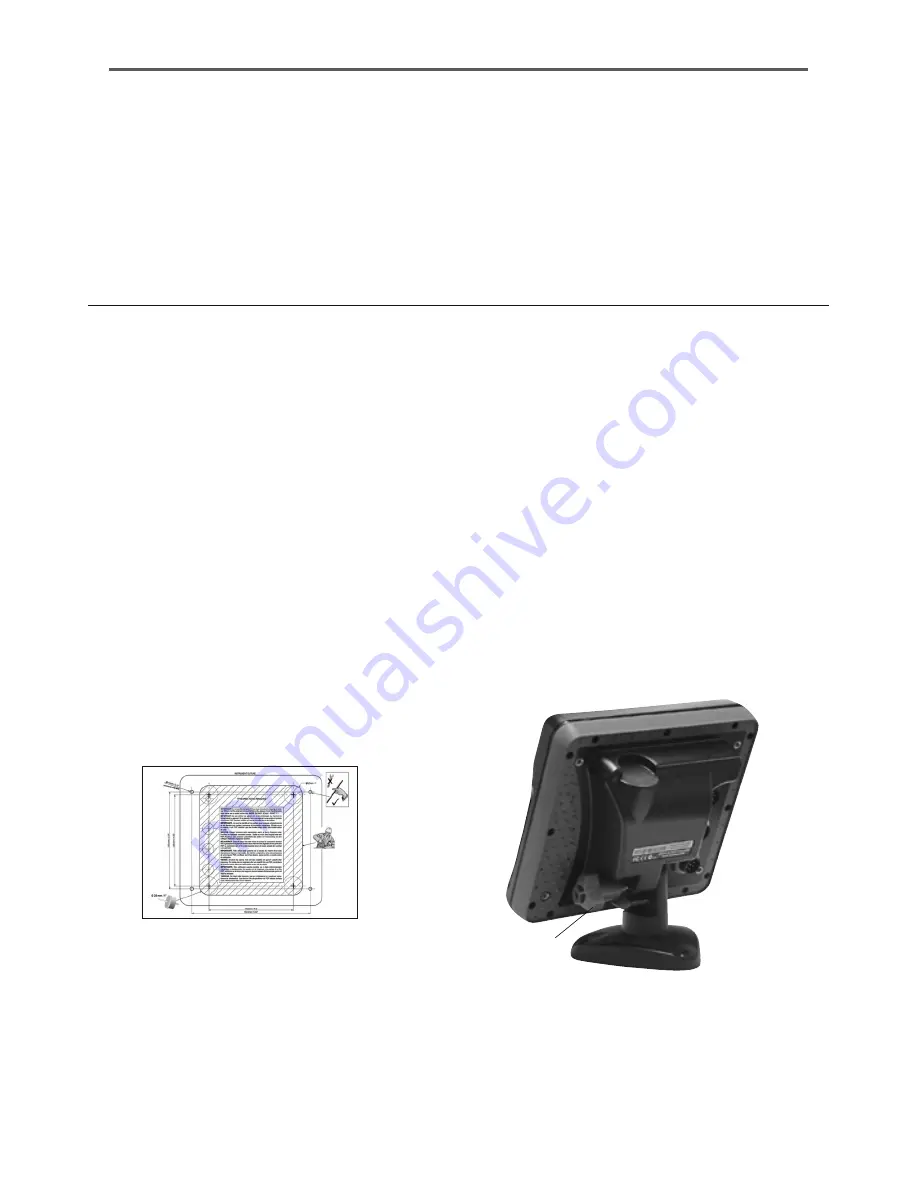
1 Flush Mounting

Requires a solid panel with access behind 
for wiring and mounting screws. After flush 
mounting, the display unit cannot be tilted or 
moved after installation to reduce any unwanted 
glare or reflections. Carefully select the best 
viewing position before installation. This would 
generally be in a shaded area.

Cut a hole in the bulkhead for the display unit 
using the flush mount template.

Drill four holes for the mounting studs using 
the flush mount template.

Screw the four studs into the brass inserts in 
the back of the display unit.

Sit the display unit in place and fit the 
washers and nuts to the studs.

16-3 Installation: The display unit

Knob

Mounting 
bracket

• 

Not exposed to the direct sun or water and 
protected from physical damage during 
rough sea passages.

• 

Easy to access the 12/24 V DC power source 
and convenient to route the transducer 
cables.

Содержание EXPLORER 557

Страница 1: ...www northstarnav com Explorer 557 567 Chartplotter Installation and Operation Manual ...

Страница 2: ... avoid possible injury or death WARNING WARNINGindicatesapotentiallyhazardoussituationwhich ifnotavoided could result in death or serious injury CAUTION CAUTION indicates a potentially hazardous situation which if not avoided could result in minor or moderate injury CAUTION CAUTION used without the safety alert symbol indicates a potentially hazardous situation which if not avoided may result in p...

Страница 3: ...Should the information not agree the discrepancy must be resolved before proceeding any further AIS The AIS features on this chart plotter are designed as a safety aid only and do not guarantee safety at sea AIS transmission is mandatory on some but not all vessels You should check your local laws and regulations for requirements in your area As a result of different legal requirements different ves...

Страница 4: ...2 4 Backlight and night mode 12 2 5 Man overboard MOB 12 2 6 Alarms 12 2 7 Simulate mode 13 2 8 The main windows 13 3Navigation Chart 18 3 1 Overview of navigating 18 3 2 Chart window 20 3 3 Distance and bearing calculator 22 3 4 Projected course 22 3 5 Tracks and tracking 23 4Navigation Highwaywindow 24 5Navigation Waypoints 24 5 1 Waypoints window 25 5 2 Managing waypoints 25 6Navigation Routes ...

Страница 5: ...ideswindow 40 12Usercardwindow 41 13AIS 42 13 1 Viewing AIS Vessels 43 13 2 Dangerous Vessels 43 13 3 AIS Windows 44 14DSC Buddytrackwindows 45 14 1 The windows 45 14 2 Using the windows 46 15Settingupthe557 567 47 15 1 Setup System 49 15 2 Setup Chart 50 15 3 Setup GPS 53 15 4 Setup Fuel 54 15 5 Setup Track 55 15 6 Setup AIS 56 15 7 Setup Logs 56 15 8 Setup Alarms 57 15 9 Setup Units 58 15 10 Set...

Страница 6: ...a cable 65 16 5 Installation GPS antenna 66 16 6 Installation Northstar petrol gasoline sensors 66 16 7 Installation SmartCraft 67 16 8 Installation Other NavBus instruments 68 16 9 Installation Other NMEA instruments 69 16 10 Installation Setup and test 69 AppendixA Specifications 70 AppendixB Troubleshooting 71 B 1 General Problems 72 B 2 GPS navigation problems 72 B 3 Fuel consumption problems ...

Страница 7: ...along a route 3 1 Projected course An estimate of progress 3 4 Tracks records of where the boat has been 3 5 GPS receiver status 7 Saving and loading data with a user card 12 User card Chart data Chart features built in world chart 3 2 Chart details 3 2 4 5 C MAP chart Tides at a port 11 C MAP chart AIS 13 Alarms Built in alarms 2 6 SmartCraft engine alarms 1 1 SmartCraft Boat data Data at top of ...

Страница 8: ...up 2 SmartCraft engine functions require a SmartCraft system to be installed For information on using SmartCraft see the 1 1Overview SmartCraft Gateway Installation and Operation Manual 3 The 557 567 can send data to other instruments such as an autopilot and receive data from other instruments 4 AIS functions require an optional AIS receiver to be installed For information on installing options s...

Страница 9: ...e connector s color to the socket color Insert each connector and turn the locking collar clockwise until it is finger tight Handle plug in cards carefully Keep them in their protective cases when not plugged into the 557 567 Keep the holder in place in the 557 567 at all times to prevent moisture from entering the card compartment Nothing will be damaged if a cable is plugged into the wrong socke...

Страница 10: ...the current window Press again to display the Setup menu see section 15 ENTER Start an action or accept a change ZOOM Zoom in or out to display different areas and detail on the chart WAYPOINT Create an instant waypoint at the boat position see section 5 2 1 MOB Man Overboard see section 2 5 POWER Turn 557 567 on and off see section 2 3 adjust the backlighting see section 2 4 2 1Usingthekeys In th...

Страница 11: ...red for auto power then the 557 567 does not record engine hours and might not record fuel consumption see section 16 4 Turning off manually If the 557 567 is not wired for auto power or if the ignition switch is off hold down until the display turns off Auto power If the 557 567 is wired for auto power see section 16 4 then The 557 567 automatically turns on when you turn the boat s ignition swit...

Страница 12: ... to If the NMEA output autopilot is off see section 15 10 use the 557 567 to manually navigate to the destination MOB waypoint see sections 3 1 1 and 3 1 2 2 5Manoverboard MOB If the NMEA output autopilot is on the 557 567 asks if the autopilot is active Select No Use the 557 567 to manually navigate to the destination MOB waypoint see sections 3 1 1 and 3 1 2 Yes The 557 567 asks if the boat is t...

Страница 13: ...oute and automatically displays different 557 567 functions To start and stop Simulate mode and for more information see section 15 13 In simulate mode Simulate or Demo flashes at the bottom of the display 2 8Themainwindows WARNING Never have Simulate mode on when the 557 567 is navigating on the water The display menu allows quick access to the main windows and favorites Full screen Chart is at t...

Страница 14: ...Northstar Explorer 557 567 Installation and Operation Manual 14 Note The windows below the menu divider can only be shown full screen without a data header see section 2 8 3 ...

Страница 15: ...ay 1 Press twice to change the active window 2 Press select Replaceand select the second window The 557 567 exchanges the two windows Replacing a window on the display 1 Press twice to change the active window 2 Press select Replaceand select a new window that is not currently visible Note When some windows are small then not all the data is shown The active window If there is more than one window...

Страница 16: ...splays Chart Gauges Highway Fuel Data and Tanks windows can be combined in a display Each of these displays can have a data header see section 2 8 3 and a compass see section 2 8 4 Selecting a favorite display Press and select a favorite from the menu Adding a favorite display to the list 1 Set up the display with the window or windows you want in the new favorite see sections 2 8 2 and 2 8 3 2 Pr...

Страница 17: ...peat the above step to set the other data fields Tip If all fields in a line are None then the line will not be displayed and the data header will take less space on the display 5 Press Tip The data header will change when you select another display To set a data header that you can recall later set the header as part of a favorites display see below Favorites displays and data headers To set a da...

Страница 18: ...w that the boat has reached the destination see section 15 8 3 1 2Goingtoawaypointortoapointonthe chart A waypoint is a position that you can set on the 557 567 chart for example a fishing spot see section 5 Going to a waypoint from the chart window 1 Go to the chart window 2 Move the cursor to the waypoint either use the cursor keys or use Find see section 3 2 5 3 Press and select Goto Going to a...

Страница 19: ...67 asks for the direction to traverse the route Select Forward the order the route was created or Reverse 4 The 557 567 displays a chart with the route marked and starts navigating from the start of the route Navigating The 557 567 navigates to each waypoint on the route in turn as described in section 3 1 1 The 557 567 stops navigating to the waypoint at the end of the current leg and starts the ...

Страница 20: ...is displayed see section 2 8 2 B Compass see section 2 8 3 C Chart scale see section 3 2 3 D Boat position see section 3 2 1 E Boat track see section 3 5 F Boat course and CDI lines see Appendix C CDI G Distance and bearing of cursor from boat H Land I Sea J The cursor see section 3 2 1 K A typical waypoint see section 5 Note To change the types of information displayed on the chart see section 15...

Страница 21: ...show this 36 29 637 N or S Latitude 175 09 165 E or W Longitude If the cursor has been moved in the last ten seconds then the position is the cursor s position and the latitude and longitude has a cursor symbol to show this 36 29 841 N or S Latitude 175 09 012 E or W Longitude WARNING When reading the boat position make sure the position is not the cursor position 3 2 3Chartscale Press to zoom in ...

Страница 22: ...wo steps to enter the whole course 6 To save the new course as a route press and select Save This also saves any new points on the course as new waypoints with default names If necessary edit the route later see section 6 2 2 and edit any new waypoints later see section 5 2 3 7 Finally press to return to the chart window For Ports by name to search for a different port name press change the name t...

Страница 23: ... sections to be retraced accurately for example entering a river mouth Tip Record the tracks in good conditions When recording is on and the track becomes full then recording continues and the oldest points in the track are deleted The maximum length of a track depends on the selected track interval a small interval will give a shorter more detailed track and a long interval will give a longer les...

Страница 24: ...00 waypoints A waypoint can be created changed or deleted A waypoint has A name up to eight characters An icon showing what kind of waypoint it is The available icons are A position A color for the waypoint symbol and name on the chart A type Normal A normal waypoint can be navigated to or included in a route Danger A danger waypoint is a point to avoid If the boat comes within the danger radius o...

Страница 25: ... to that point on the chart 2 Press 3 A new waypoint with the default name and data is created 4 Change the waypoint data if necessary see section 5 2 7 Select Save Creating a new waypoint from the waypoints window 1 In the waypoints window press and select Create 2 A new waypoint with a default name and data is created at the boat position 3 Change the waypoint data if necessary see section 5 2 7...

Страница 26: ...han one route A waypoint that is used in one route can be deleted WARNING When a waypoint is deleted from a route check that the changed route does not cross land or dangerous waters Deleting a waypoint from the chart window 1 In the chart window move the cursor to the waypoint to delete 2 Press and select Delete 3 Select Yes to confirm Deleting a waypoint from the waypoints window 1 In the waypoi...

Страница 27: ... either direction Waypoints on the route can be skipped Routes are a powerful feature when the 557 567 is connected to an autopilot allowing the vessel to be automatically guided along the route 6 1Routeswindow The routes window is a list of the routes that have been entered each with route name start waypoint end waypoint number of legs and total distance To go to the routes window press select M...

Страница 28: ...Managingroutes 6 2 1Creatinganewroute A Creating a new route from the chart window While creating the route Press or to change the range scroll the chart by moving the cursor to the edge of the chart A data box at the bottom left of the display shows the route name and total distance If the cursor is near a leg it shows the length and bearing of the leg as well The legs of a route must start and e...

Страница 29: ...a route from the chart 1 In the routes window select the route to edit Press and select Edit on chart 2 The selected route is displayed on the chart with a circle around the first waypoint 3 Edit the route as described in section 6 2 1 A starting at step 4 Editing a route from the routes window 1 In the routes window press or to highlight the route to edit Press and select Edit 2 The selected rout...

Страница 30: ...are received by the 557 567 s standard GPS antenna The accuracy of the corrected GPS position is typically better than 5 m 15 ft for 95 of the time WAAS covers all of the USA and most of Canada EGNOS will cover most of Western Europe when it becomes operational Differential beacon DGPS Differential beacons are land based radio transmitters that broadcast correction signals that can be received by ...

Страница 31: ... satellites The higher the bar the stronger the signal E Boat position F Positions of visible GPS satellites Outer circle is horizon Inner circle is 45 elevation Centre is directly above North is at top of display G If the boat is moving COG is a line from centre The Gauges window shows boat data such as water speed as analog gauges To select the Gauges window press select More then select Gauges ...

Страница 32: ...o to the data window press select More then select Data To select what data is displayed 1 Press and select Data setup 2 Change a data field i Press the cursor keys to highlight the field ii Press to display a menu of data items iii Select a data item that is available on your system or select None to leave the field empty 3 Repeat the above step to set the other data fields 4 Press ...

Страница 33: ...l gauge on the right of the display The height of the yellow bar s show how much fuel remains in the tank s If you have set a low fuel alarm see section 10 4 a red bar shows the level at which the alarm will trigger If there are two tanks the left bar shows the port tank the right bar shows the starboard tank 10 1Whatthefuelcomputerdoes Used The fuel used during a trip On a multi engine boat the d...

Страница 34: ...rfloor fuel tanks are often difficult to refill to the same level twice due to air pockets With underfloor fuel tanks Trim the boat to the same angle in the water each time you follow procedure A Mostly use procedure B below when adding fuel but completely fill the tank and follow procedure A about every tenth time you add fuel B When you partially fill a tank 1 Add fuel to a tank and write down h...

Страница 35: ...addlewheel sensor at high speeds but is not accurate at low speeds A paddlewheel sensor is more accurate than a pitot sensor at low speeds 10 5Boatspeedsensors To select an optional speed sensor 1 Press twice select Fuel and select Speed source 2 To use a paddlewheel or pitot sensor select Water speed otherwise select Ground speed to use GPS speed 3 If you selected Water speed and you have both a ...

Страница 36: ...n 10 5 1 When the current is from ahead ground speed is less than water speed For this example If the boat travels for one hour uses 3 gallons of fuel per hour and has 50 gallons of fuel left Speed Log Economy Range Using water speed 10 knots 10 nm 3 3 nm gal 165 nm Using ground speed 6 knots 6 nm 2 0 nm gal 100 nm Water speed 10 knots Gives a ground speed of about 8 knots Current 4 knots at 45º W...

Страница 37: ...ter you can make fuel consumption curves for different boat weather or sea conditions Compare these with your first curve to see how your boat s performance changes with conditions Making a curve 1 Start running the boat in a straight line 2 Choose a speed source for the curve see section 10 5 1 Normally choose Water speed to measure the boat s potential performance 3 Press twice then select Fuel ...

Страница 38: ...ype of speed sensor you selected when making the curve see sections 10 5 1 and 10 5 Using a curve C D E F A B Compare your boat s performance now at the current RPMs with the boat s performance when you made the curve You can compare your boat s performance now with a curve made under ideal conditions or with a curve made under similar conditions Information in a curve A RPM of the boat now For a ...

Страница 39: ...ifficult to fill underfloor tanks to the same level twice due to air pockets so the more fuel used the more accurate the calibration 10 7Calibration To calibrate the sensor s 1 Record the level of the fuel in the tank s 2 Connect the portable tank s to the engine through the fuel sensor s 3 Run the engine at normal cruising speed until at least 4 gallons 15 litres of fuel has been used per engine ...

Страница 40: ...4 Press and select Chart info 5 Select Tide height Choosing the date of the tide chart 1 Press 2 Select Today Next day or Prev day To choose a different date from these select Set date edit the date press A Tide station name and distance from boat B Current time and chosen date for display C Tide chart D Night E Dawn F Day G Dusk H Tide height I Time cursor a vertical dotted line Press or to move ...

Страница 41: ... see below 2 Data stored on the user card and shown on the file list is not available to be used by the 557 567 until loaded into the 557 567 with the LOAD command see below Saving data to the user card This saves all the 557 567 s waypoints all the 557 567 s routes or one of the 557 567 s tracks to one file on the user card 1 Press and select Save 2 Select Waypts Routes or Tracks 3 For Tracks sel...

Страница 42: ...elect Sort 2 Select sort by Name Type or Time CAUTION Before using a user card remove any chart card and plug the user card in When you have finished with the user card remove the user card and replace the chart card see section 1 3 AIS is short for Automatic Identification System The International Convention for Safety of Life At Sea SOLAS requires all vessels greater than 300 tons and all passen...

Страница 43: ...e the cursor over an AIS vessel for at least two seconds and press Press either or to clear the information 13 2DangerousVessels The 557 567 calculates the time of closest point of approach TCPA and closest point of approach CPA for each AIS vessel This is used to determine potential dangerous vessels If the TCPA and the CPA is below the trigger values then it will be considered dangerous See sect...

Страница 44: ...the last message DisplayinganAISvesselonthechart 1 Press or to select a vessel 2 Press and select Display The Instrument switches to chart window with the selected vessel position in the middle DisplayingFullAISDetails 1 Press or to select a vessel 2 Press and select More Info or press This window displays all information for the selected AIS vessel provided by the AIS receiver SortingVessels Pres...

Страница 45: ...ur DSC radio receives a distress message the Instrument creates a distress waypoint at the boat position Distress waypoints have default names like DSTRSS01 The Instrument displays a Distress warning Select OK to return to what you were doing Display to switch to Chart and display the position of the boat sending the distress message Boatpositions The boat positions on the Instrument can differ fr...

Страница 46: ...point A distress message creates a waypoint for the boat or you can create a waypoint at a polled boat s position To change the data of these waypoints 1 Press or to select a boat 2 Press and select Edit waypoint Edit the waypoint data if required see section 5 2 7 Deletingaboat At the Distress or Poll windows 1 Press or to select a boat 2 Press and select Delete The boat is deleted from that wind...

Страница 47: ...miliar with the operation of the unit using the default settings before making any changes to the data in these menus To go to a setup option menu press twice then select an option Note 1 The Setup menu options are explained in the following sections 2 Section 2 1 describes how to set or change data in the setup menus 3 The setup data available will depend on the optional sensors and instruments i...

Страница 48: ...s are shown The setup data available will depend on the optional sensors and instruments installed System see 15 1 Alarms see 15 8 Water see 15 2 Other see 15 2 Land see 15 2 AIS see 15 6 Calibrate see 15 11 General see 15 2 Chart see 15 2 Comms see 15 10 Fuel see 15 4 GPS see 15 3 Logs see 15 7 Simulate see 15 14 Track see 15 5 Time see 15 12 Units see 15 9 Favorites see 15 13 ...

Страница 49: ...the 557 567 settings except the language waypoints and routes to the default factory settings shown on the setup menus Aboutwindow The about window shows The versions and dates The world chart version Any card fitted 15 1Setup System The number of waypoints routes and tracks you have stored Connector wiring information In the unlikely event of having to contact a Northstar dealer for service quote...

Страница 50: ...o preserve night vision Map datum 557 567 GPS positions are based on a worldwide reference datum known as WGS 84 Most paper charts are based on WGS 84 However some paper charts are based on other datums In these cases the latitude and longitude coordinates of objects on the 557 567 chart window are different to the latitude and longitude coordinates of these objects on the paper chart This applies...

Страница 51: ...he correct datum is available Use map shift with caution incorrect application will cause incorrect boat positions Some charts have consistent position errors To correct this apply a map shift After a map shift The positions of cartographic features such as land rocks buoys and depth contours move on the 557 567 chart window to where they should be The positions of the boat waypoints tracks and li...

Страница 52: ... Auto shows the next four detail levels On shows all Text icon size Select the size of chart text and icons Water submenu Water features Displays marine sediment labels for example M shows areas of mud and tide station icons Bathymetrics Displays underwater depth contours between Bath sndgs min and max Spot soundings Displays depth soundings between Bath sndgs min and max Bath sndgs min The minimu...

Страница 53: ...r see section 7 Restart the GPS if the receiver has not been used for some time and is taking a long time to get a GPS fix 15 3Setup GPS StaticNavigation When the boat stops or moves very slowly the calculated GPS speed and course become erratic Static navigation is a number and the options are 0 01 to 99 9 If the boat speed is slower than this the speed is displayed as zero and the course stays u...

Страница 54: ...st engines do not draw fuel from the tank at a steady rate To give a stable fuel flow reading the 557 567 calculates the flow by taking several measurements and averaging them Use the Flow filter to set the period over which the fuel flow is averaged The Flow filter can be set from 0 to 30 seconds Use the lowest value which gives a stable flow Usually a value of 5 to 10 seconds will give a satisfa...

Страница 55: ...tions are Distance or Time Distance Select the distance plotting interval 0 01 0 05 0 1 0 5 1 0 2 0 5 0 or 10 0 distance units Time Select the time plotting interval 1 5 10 or 30 seconds or 1 minute Memory used The percentage of memory used in the track being recorded Tip Use the user card window to check the number of points recorded in each track see section 12 Send track This option is included...

Страница 56: ...erride any other filter option DangerousVesselAlarm When enabled an alarm will activate when both the TCPA and CPA is less than the trigger values Even when this setting is disabled the dangerous vessels will still be indicated on the chart TCPALimit Set the Time of Closest Point of Approach limit CPALimit Set the Closest Point of Approach limit ProjectedCourse Show the estimated course of all ves...

Страница 57: ...arm Alarm sounds when it is on and the Arrival radius boat is closer to the destination or to a waypoint than the alarm trigger value Anchor alarm boat moves by more than the alarm trigger value XTE boat moves off course by more than the CDI scale see section 15 2 Danger boat comes closer to a danger waypoint than the alarm trigger value Loss of DGPS fix 557 567 can not receive the DGPS signal beaco...

Страница 58: ...ected to other Northstar instruments through NavBus or any compatible NMEA instrument Press twice then select Comms NMEAout NMEA is generally used with third party instruments see section 16 10 Select this to transmit NMEA sentences for example to an autopilot NMEAdata Use this to specify which NMEA sentences will be transmitted see section 16 9 and Appendix A Lat londps Select the number of decim...

Страница 59: ...Waves and wind cause the boat speed from the paddlewheel transducer to fluctuate slightly To give stable readings the Instrument calculates these values by taking several measurements and averaging them Set the Speed filter to the lowest value which gives stable readings The range is 1 to 30 seconds or Off 0 Temperature The factory settings should be sufficiently accurate for normal usage To calib...

Страница 60: ...o display by adding the keel offset to all measured depths A Have a zero keel offset to display depths below the transducer B Enter a positive keel offset to increase the displayed depth For example to display the total depths below the surface enter the depth of the transducer below the surface C Enter a negative keel offset to decrease the displayed depth For example to display the depths of cle...

Страница 61: ...o use Course The simulated bearing for the boat to follow Note To select the start point go to the chart window before starting the simulation Then To start the simulation from the boat position press to switch to centre on boat mode To start the simulation from a different point move the cursor to that point on the chart Tip To calculate a course use the cursor see section 3 3 Tip As the boat mov...

Страница 62: ...ation is critical to the performance of the unit It is vital to read the entire installation section of this manual and the documentation that comes with the antenna and any other units before starting installation 16 Installation 16 1Installation Whatcomeswiththe557 567 16 2Installation OptionsandAccessories 557 567 display unit Dust cover for display unit Blanking caps for unused connectors Powe...

Страница 63: ...Minimum 5 litres per hour 1 3 U S gallons per hour Maximum 130 litres per hour 34 U S gallons per hour SmartCraft fuel sensors see section 16 9 Connections GPS antenna 16 5 Power 16 4 External alarms 16 4 NavBus instruments 16 10 NMEA out to instruments 16 9 Petrol gasoline sensors 16 6 NMEA in 16 9 Display unit 16 3 Power data cable Pin Wire Function 1 Black Ground power in NMEA ground The cable ...

Страница 64: ...in front of the navigator or to the right of the navigator because the LCD display is more readable from these positions There are two mounting arrangements 1FlushMounting Requires a solid panel with access behind for wiring and mounting screws After flush mounting the display unit cannot be tilted or moved after installation to reduce any unwanted glare or reflections Carefully select the best vi...

Страница 65: ...ire for basic power for more information see section 2 3 Basic power Power data cable Yellow Red Black Ignition Ignition switch Main switch 12 24 V DC Fuses 2A Power data cable Red Green 2 Wire any external alarm beepers or lights The alarm output switches to ground to sound the alarm If the current is more than 200 mA fit a relay 3 Connect the power data cable to the black display unit connector ...

Страница 66: ...he equator EGNOS will cover most of Western Europe Restart GPS Restarts the GPS receiver satellite reception will be lost until the receiver completes its restart and acquires the satellites Fit the optional petrol gasoline fuel kit following the instructions supplied with the kit Note Fit one kit for each engine up to two engines SmartCraft engines have fuel flow sensors therefore Northstar fuel ...

Страница 67: ...he SmartCraft engines with a Northstar SmartCraft gateway i For single engine fit a single gateway ii For dual engines fit a dual gateway SmartCraft engines have fuel flow sensors therefore Northstar fuel sensors are not required as well Wire the unit for auto power see section 16 4 During setup a Enter fuel setup data see section 15 4 b Set NavBus and SmartCraft to see section 15 1 c Enter SmartC...

Страница 68: ...ent Receive and display depth from an optional Northstar depth instrument Receive and display boat speed and water temperature from a paddlewheel sensor on an optional Speed instrument Receive data from an optional Northstar VHF radio with NavBus functionality The 557 567 can display Baro barometric pressure Baro history barometer history Weather a predication based on changes in barometric pressu...

Страница 69: ...minutes see section 7 7 Go on a test run to check that the navigation equipment works correctly particularly when a radio transmitter or radar is used 16 10Installation Setupandtest NMEA is an industry standard for interconnecting instruments It is not as flexible or as easy to install as NavBus The 557 567 can Receive and display wind speed and direction from an optional compatible wind instrumen...

Страница 70: ...phanumeric names up to eight characters Routes 25 Routes with up to 50 points each Tracks By time or distance one track of 2000 points and four of 500 points Chart datums 121 Chart datums see next page One user defined map shift Chart scale 0 05 to 4096 nm for chart chart dependent down to 0 01 nm in plotter mode COMMUNICATIONS NavBus Connection to other Northstar instruments NMEA NMEA 0183 ver 2 ...

Страница 71: ...North Sahara 1959 Observatorio Meteorolog 1939 Old Egyptian 1907 Old Hawaiian Oman Ord Survey Great Britain 1936 Pico de las Nieves Pitcairn Astro 1967 Point 58 Pointe Noire 1948 Porto Santo 1936 Provis South American 1956 Provis South Chilean 1963 Puerto Rico Pulkovo 1942 Qatar National Qornoq Reunion Rome 1940 S 42 Pulkovo 1942 Santo DOS 1965 Sao Braz Sapper Hill 1943 Schwarzeck Selvagem Grande ...

Страница 72: ...n off The 557 567 may have been wired for Auto power In this case the 557 567 cannot be turned off while the ignition power is on see section 2 3 1 3 If the 557 567 beeps when turned on but nothing is displayed The 557 567 may be operating but the backlight settings may have been set too low see section 2 4 1 4 The wrong language is displayed See section 15 1 B 1GeneralProblems 2 1 No GPS fix or l...

Страница 73: ... the sensor installation manual Otherwise the warranty is void d Recalibrate the fuel flow sensor s see section 10 7 e Check that the fuel filter is clean f In rough seas fuel may surge back and forth through the fuel sensor s resulting in incorrect readings Try installing a one way valve between the fuel sensor s and the fuel tank 3 3 Fuel remaining seems inaccurate a The 557 567 is not wired for...

Страница 74: ...satellite based navigation tool see section 7 Leg The straight segments of a route between waypoints A route with four waypoints has three legs MMSI Maritime Mobile Service Identity Unique identification number for a vessel for use in Digital Selective Calling MOB Man overboard MOB function Starts navigating back to the place where someone fell overboard see section 2 5 NavBus A way of connecting ...

Страница 75: ...ourse Over Ground Direction in which the boat is moving over the ground CTS Course To Steer Optimum course to steer to return to the plotted course DTG Distance To Go Distance from the boat to the destination ETA Expected Time of Arrival At the destination assuming that SOG and COG remain constant RNG Range to cursor Distance from boat to cursor cursor mode see section 3 2 SOG Speed Over Ground Cu...

Страница 76: ...ROPE Unit 2 Ocean Quay Belvidere Rd Southampton SO14 5QY ENGLAND Ph 44 2380 339922 Fax 44 2380 330345 northstaruk northstarnav com AUSTRALIA PO Box 479 Gladesville NSW 2111 AUSTRALIA Ph 61 2 9879 9060 Fax 61 2 9879 9009 northstaraus northstarnav com NEW ZEALAND PO Box 68 155 Newton Auckland Auckland NEW ZEALAND Ph 64 9 481 0500 Fax 64 9 481 0590 northstarnz northstarnav com ...

Отзывы: