Northern Tool and Equipment Ironton Series Скачать руководство пользователя страница 13

Page 13 of 30 


Step 1. Connect Hoses and Water Supply 

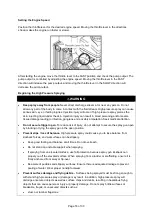
Position Pressure Washer for Use 

● For detailed instruction on positioning the pressure washer for use, see the Before Each Use 
section of this manual and reference Step 2: Select Suitable Location. 

● In a location free of flammable vapors, dusts, and gases. 

● In a location with adequate, unobstructed ventilation airflow. 

● In a location with clearance from combustible materials. 

● On a firm, level, heat-resistant surface with good drainage and nearby access to a continuous water 
supply. 

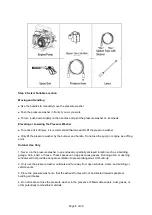
Step 2. Attach Garden Hose to Water Inlet


1.) Make sure the water supply is clean. Debris can cause excess pump wear and reduce 
performance. 

2.) The water supply garden hose must have an inside diameter of at least 5/8

’’. If the hose is more 

than 100 ft. long, the diameter must be at least 3/4

’’. 

3.) Never use a reservoir tank as a water source. Drawing water out of a tank may cause pump 
cavitation and damage to your pump. This pressure washer is designed for a pressurized water 
source such as a city water faucet. The water source pressure must not exceed 115 psi (8 bar). 

4.) Always use a flexible rubber hose for your water supply. Do not use rigid piping. 

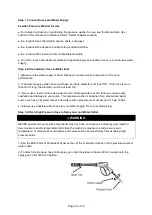
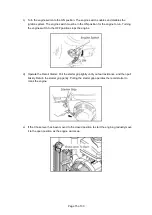
Step 3. Attach High Pressure Hose to Spray Gun and Water Outlet 

WARNING


NEVER operate this pump with components (such as hose, connections, and spray gun) rated for 
lower pressure and/or temperature limits than the machine's maximum rated pressure and 
temperature, or component could rupture and cause serious personal injury from escaping high 
pressure fluids. 

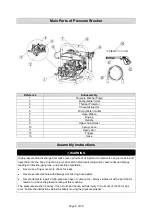
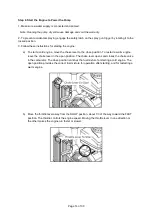
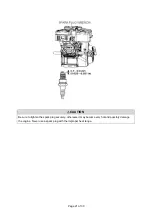
1) See the Main Parts of Pressure Washer section of this manual for location of the pressure washer's 
water outlet. 

2) To attach the pressure hose to the spray gun, spin the pressure hose

’s 22mm coupler onto the 

spray gun

’s inlet and hand tighten. 


Содержание Ironton Series

Страница 1: ...ssure Washer Owner s Manual WARNING Read carefully and understand all ASSEMBLY AND OPERATION INSTRUCTIONS before operating Failure to follow the safety rules and other basic safety precautions may result in serious personal injury Items 60727 ...

Страница 2: ...that you read the entire manual to become familiar with this product before you begin using it This pressure washer is designed for certain applications only Northern Tool and Equipment is not responsible for issues arising from modification or improper use of this product such as an application for which it was not designed We strongly recommend that this product not be modified and or used for a...

Страница 3: ...f Pressure Washer 6 Assembly Instructions 6 Before Each Use 7 Operating Instructions 12 After Each Use 18 Maintenance 19 Troubleshooting 22 Parts Diagram of Pressure Washer 22 Parts List of Pressure Washer 23 Parts Diagram of Pump 24 Parts List of Pump 25 Parts Diagram of Engine 26 Parts List of Engine 27 Replacement Parts 28 Limited Warranty 29 ...

Страница 4: ...low persons to operate or assemble the product until they have read this manual and have developed a thorough understanding of how it works Do not modify this product in any way Unauthorized modification may impair the function and or safety and could affect the life of the product There are specific applications for which the product was designed Use the right tool for the job DO NOT attempt to f...

Страница 5: ...guards in place Do not leave the tool running unattended Specific Operation Warnings WARNING CO Poisoning Exhaust from engine contains carbon monoxide a poisonous gas that can cause carbon monoxide poisoning and possible death if inhaled ONLY run pressure washer OUTDOORS and at least 20 feet from the home away from windows vents and air intakes to allow proper ventilation If you start to feel sick...

Страница 6: ... and inject fluid into the body Injection injury can result in blood poisoning and or severe tissue damage leading to infection gangrene and possibly amputation Never use a finger or skin to check for leaks Never operate machine with damaged or missing hoses parts Never attempt to repair a high pressure hose or component Always replace it with a part that is rated at or above the pressure rating o...

Страница 7: ...h an S8 open end wrench Before Each Use Step 1 Inspect Unpack Upon receiving the pressure washer check for missing or damaged parts See the Main Parts of Water Pump section of this manual for a diagram of the pressure washer and its components For missing components contact Product Support at 1 877 234 6869 For damaged components contact the freight company that delivered the unit and file a claim...

Страница 8: ...engine as a lifting point Outdoor Use Only 1 Never run the pressure washer in an enclosed or partially enclosed location such as a building garage barn shed or house These spaces can trap poisonous gasses Running a fan or opening windows will not provide adequate ventilation to prevent dangerous CO build up 2 Only use the pressure washer outdoors and far away from open windows doors and building o...

Страница 9: ...oper combustion can only be obtained when there is a sufficient supply of oxygen available for the amount of fuel being burned Cooling ventilation is required to prevent overheating of the pressure washer and possible fire Exhaust WARNING Carbon Monoxide Hazard Exhaust fumes from the engine contain carbon monoxide CO a poisonous gas you cannot see smell or taste The CO generated by the engine can ...

Страница 10: ...s which could result in fuel ignition gas vapor collection inside enclosures static electric sparks sparks from electric wiring batteries or running engines sources of heat such as a hot engine exhaust open flames including pilot lights Always follow these general safety rules when fueling 1 Turn pressure washer off and allow to cool for at least two minutes before removing any fuel cap Note A run...

Страница 11: ...as cap 2 Add gasoline through the fill opening Use only a UL listed portable gasoline container to transfer the gasoline to engine s tank Do NOT overfill the gasoline tank Allow at least 1 2 of empty space below the fill neck to allow for fuel expansion 3 Replace gas cap securely before starting engine 4 Store extra gasoline in a cool dry place in a UL listed tightly sealed container Step 6 Inspec...

Страница 12: ...to the type of noise produced by this pressure washer The use of ear plugs or other hearing protection device is recommended for persons working within 15 20 feet of the running pressure washer for an extended period of time Eye Protection Wear OSHA required ANSI Z87 1 safety glasses when operating or servicing the pressure washer Pressurized spray from this unit can cause severe injury to the eye...

Страница 13: ...ameter must be at least 3 4 3 Never use a reservoir tank as a water source Drawing water out of a tank may cause pump cavitation and damage to your pump This pressure washer is designed for a pressurized water source such as a city water faucet The water source pressure must not exceed 115 psi 8 bar 4 Always use a flexible rubber hose for your water supply Do not use rigid piping Step 3 Attach Hig...

Страница 14: ...ke lever to the close position To restart a warm engine leave the choke lever in the open position The choke lever opens and closes the choke valve in the carburetor The close position enriches the fuel mixture for starting a cold engine The open position provides the correct fuel mixture for operation after starting and for restarting a warm engine b Move the throttle lever away from the SLOW pos...

Страница 15: ...gine switch to the OFF position stops the engine d Operate the Recoil Starter Pull the starter grip lightly until you feel resistance and then pull briskly Return the starter grip gently Pulling the starter grip operates the recoil starter to crank the engine e If the Choke lever has been moved to the closed position to start the engine gradually move it to the open position as the engine warms up...

Страница 16: ...k medical attention Do not secure trigger open To reduce risk of injury do not attempt to secure the spray gun open by blocking or tying the spray gun in the open position Prevent slips loss of balance High pressure spray could cause you to lose balance from kickback forces and wet surfaces can be slippery Keep good footing and balance at all times Do not overreach Do not stand on unstable support...

Страница 17: ... spray paths for complete coverage 5 Small parts should be washed in a basket so the pressure does not push them away Larger lightweight parts should be clamped down 6 Always turn off the engine and activate the spray gun trigger to relieve system pressure when the sprayer is unattended or disconnecting hoses and servicing the pump Shutting Down the Pressure Washer WARNING Never disconnect the hig...

Страница 18: ...ast five minutes before storing a hot engine is a fire hazard After Each Use When you are finished using the pressure washer you must prepare the sprayer for storage and store it in a proper location 1 Make sure the engine start switch is OFF 2 Disconnect the engine spark plug wire if you haven t already done so 3 Disconnect the high pressure hose garden hose and spray gun 4 Let the engine cool fo...

Страница 19: ...adjustment Clean combustion chamber Spark eliminator Every 100 hours running lean Fuel supply pipe Replace every 2 years Clean inlet filter Check tire pressure Key 1 If used in extremely dusty areas this maintenance should be done more often 2 Should only be done by an authorized service technician unless you are equipped with proper repair tools Engine Oil Replacement WARNING Burn Hazard Never op...

Страница 20: ...the removed parts Spark Plug Maintenance To keep the engine in good working condition check the spark plugs regularly and keep them clean and free of accumulated carbon 1 Remove the spark plug cap WARNING When the engine has been running the exhaust muffler is very hot and dangerously hot to the touch 2 Check the spark plug visually If there are signs of wear around it or the gasket is cracked rep...

Страница 21: ...Page 21 of 30 CAUTION Be sure to tighten the spark plug securely otherwise it may become very hot and possibly damage the engine Never use a spark plug with the improper heat range ...

Страница 22: ...o start No Fuel Add gas to fuel tank Make sure fuel shutoff valve is open Engine not turned ON Place ON OFF switch in the ON position Spark plug wire not attached Attach spark plug wire to spark plug LOW SURGING PRESSURE Insufficient water supply Increase water flow Check for kinked or pinched hose Plugged inlet screen Pull out and clean screen carefully Leak in high pressure line Fix leaks NO CHE...

Страница 23: ... 6 N A VIBRATION 4 7 90018 M8 BOLT 4 8 92050 M6 16 SCREW 1 9 94025 FLAT GASKET φ6 4 1 10 814027V229 HOSE RIBBON 1 11 814020 UPPER GUN HOLDER 1 12 94024 FLAT GASKET Φ6 6 6 13 91827 M6 35 SCREW 2 14 246503 FLAT KEY 1 15 91345 M8 x 20 BOLT 4 16 S810019 WATER PUMP ASSEMBLY 1 17 S817058 SPRAY GUN 1 18 S817059 SPRAY LANCE 1 19 S811524 HOSE 1 20 811002 SIPHON TUBE 1 21 817005 FILTER SIPHON TUBE 1 ...

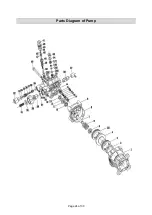
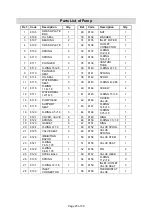
Страница 24: ...Page 24 of 30 Parts Diagram of Pump ...

Страница 25: ... 11 8 1 8 3 40 8144 SCREW 4 13 8117 WATER SEAL 12 18 5 3 41 8145 O RING 15 1 8 1 14 8118 PUMP HEAD 1 42 8146 COVER VALVE 1 15 8119 SUPPORT SEAT 3 43 8147 O RING 14 5 1 5 1 16 8120 O RING 9 5 1 8 3 44 8148 O RING 3 75 1 5 1 17 8121 COVER VALVE 6 45 8149 RING 1 18 8122 SPRING 6 46 8150 O RING 7 1 1 8 1 19 8123 GASKET 6 47 8151 RING 1 20 8124 O RING 9 1 8 7 48 8152 VALVE SPOOL 1 21 8125 VALVE SEAT 3 ...

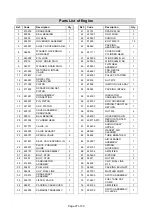
Страница 26: ...Page 26 of 30 Parts Diagram of Engine ...

Страница 27: ... 1 16 225501 PIN PISTON 1 56 222701 ROD GOVERNOR 1 17 221301 CLIP PISTON 2 57 224202 SPRING THROTTLE RETURN 1 18 220101 COVER ASSEMBLY CRANKCASE 1 58 90016 NUT M6 4 19 93019 BALL BEARING 1 59 224001 GOVERNOR ARM 1 20 221004 CYLINDER HEAD 1 60 224710 010 RECOIL STARTER ASSEMBLY 1 21 221701 VALVE IN 1 61 224403 SHROUD ASSY UPPER 1 22 225902 VALVE EXHAUST 1 62 96035 GASKET AIR CLEANER 1 23 226001 SPR...

Страница 28: ... call Customer Service at 1 877 234 6869 Not all product components are available for replacement The illustrations provided are a convenient reference to the location and position of parts in the assembly sequence When ordering parts the following information will be required item description item model number item serial number item lot date code and the replacement part reference number The dis...

Страница 29: ...claim contact Us at 1 877 234 6869 identify the product by make and model number and follow the claim instructions that will be provided The product and the purchase receipt must be provided to Us in order to process Your warranty claim Any returned product that is replaced or refunded by Us becomes our property You will be responsible for return shipping costs or costs related to Your return visi...

Страница 30: ...Page 30 of 30 Distributed by Northern Tool Equipment Company Inc Burnsville Minnesota 55306 www northerntool com Made in China ...

Отзывы: