background image

7371389 (Rev. A  6/11/18)

In

st

al

la

tio

an

O

pe

ra

tio

M

an

ua

l

System tested and certified by the

Water Quality Association against CSA B483.1.

Manufactured and warranted by

North Star Water Treatment Systems

1890 Woodlane Drive

Woodbury, MN 55125

Designed, Engineered &

Assembled in the U.S.A. 

How to install, operate

and maintain your Demand

Controlled Water Conditioner

Model NSCWC

System tested and certified by NSF International

against NSF/ANSI Standard 42 for the reduction 

of chlorine taste and odor, and Standard 44 

for hardness reduction, efficiency and the 

reduction of barium and radium 226/228, 

and certified to NSF/ANSI Standard 372.

If you have any questions or concerns when

installing, operating or maintaining your 

water softener, contact us at:

[email protected]

or visit 

www.northstarwater.com
Содержание NSCWC

Страница 1: ...erate and maintain your Demand Controlled Water Conditioner Model NSCWC System tested and certified by NSF International against NSF ANSI Standard 42 for the reduction of chlorine taste and odor and S...

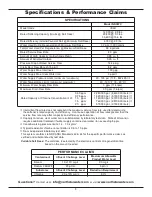
Страница 2: ...or be operated at a sustained maximum service flow rate greater than its listed rating This system has been proven to deliver soft water for at least ten continuous minutes at the rated service flow r...

Страница 3: ...Pa l Water Temperature Limits minimum maximum 40 120 F 5 49 C Minimum Water Supply Flow Rate 3 gpm 11 4 lpm Maximum Drain Flow Rate 2 0 gpm 7 6 lpm 0 50 ppm 0 75 ppm Rated Capacity at Chlorine Concent...

Страница 4: ...al 120V 60 Hz household outlet that is in a dry location only grounded and properly protected by an overcurrent device such as a circuit breaker or fuse Do not use this system to treat water that is m...

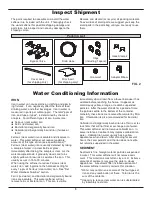
Страница 5: ...water stands for a period of time the particles settle to the bottom of the container Generally these irons are removed from water by filtra tion Chlorination is also recommended for bacterial iron C...

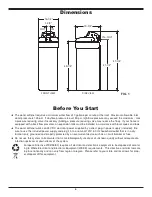
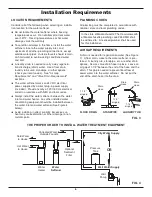
Страница 6: ...o condition all water in the home install the water softener close to the water supply inlet and upstream of all other plumbing connections except outside water pipes Outside faucets should remain on...

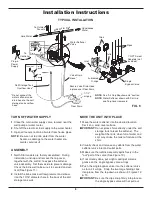
Страница 7: ...r if desired parts for a 3 valve bypass system not included can be purchased and assembled as shown in Figure 8 Bypass valves allow you to turn off water to the softener for mainte nance if needed but...

Страница 8: ...ll of water and salt may cause the tank to fracture at the shim 2 Visually check and remove any debris from the water softener valve inlet and outlet ports 3 Make sure the turbine assembly spins freel...

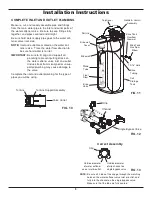
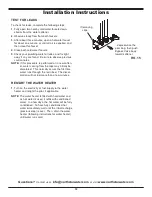
Страница 9: ...on the single bypass valve Make sure that the tabs are fully seated COMPLETE INLET AND OUTLET PLUMBING Measure cut and loosely assemble pipe and fittings from the main water pipe to the inlet and out...

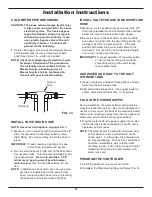
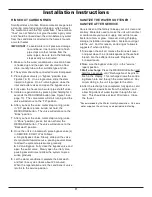
Страница 10: ...and connect the 3 8 drain line provided to the salt storage tank overflow elbow and secure in place with a hose clamp 2 Route the hose to the floor drain or other suitable drain point no higher than...

Страница 11: ...he home s faucets or water heater IMPORTANT To avoid water or air pressure damage to conditioner inner parts and to flush pipe chips or other residue from the water pipes be sure to do the following s...

Страница 12: ...If this procedure is performed on a new soften er water coming from the taps may initially be discolored This normally occurs the first time water runs through the resin bed The discol oration will n...

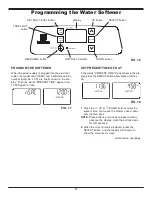
Страница 13: ...ress the r UP or s DOWN buttons to set the present time Up moves the display ahead down sets the time back NOTE Press buttons and quickly release to slowly advance the display Hold the buttons down fo...

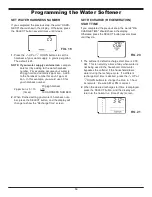
Страница 14: ...ater s hardness num ber press the SELECT button and the display will change to show the Recharge Time screen FIG 19 Programming the Water Softener SET RECHARGE REGENERATION START TIME If you completed...

Страница 15: ...ut ton RECHARGE TONIGHT will begin flashing in the display and the softener will begin regeneration at the next preset recharge time 2 00 AM or as set If you decide to cancel the regeneration before i...

Страница 16: ...the normal regeneration sequence This provides extra cleaning of the resin bed before it is regenerated with the salt brine To conserve water if your water supply does not contain iron or sedi ments b...

Страница 17: ...en regenerations Default Display 6 Press SELECT again to display the 12 or 24 hr screen 12 OR 24 HOUR CLOCK All time displays are shown in standard clock time 1 to 12 AM and 1 to 12 PM at the 12 hr de...

Страница 18: ...on again to turn the light off It will also turn off automatically after 15 minutes RECHARGE TIME REMAINING VALVE POSITION INDICATORS One of the valve position indicators Serv Fill Brine Bkwsh Rinse i...

Страница 19: ...felt before the pencil mark is even with the top it is most likely a salt bridge Carefully push into the bridge in several places to break it Do not use any sharp or pointed objects as you may punctu...

Страница 20: ...Cone Screen Flow Plug Install with lettered side up concave side down CLEANING THE NOZZLE VENTURI A clean nozzle venturi See Figure 38 is a necessity for the water softener to work properly This small...

Страница 21: ...er Contact a licensed plumber 6 Brine float dirty or broken Clean or replace Brine Valve Float Assembly 7 Leak between valve and resin tank Replace o rings between resin tank and valve Water hard some...

Страница 22: ...his pattern OTHER INFORMATION While in the diagnostics screen the following information is available and may be beneficial for various reasons This information is retained by the electronic controller...

Страница 23: ...hining a flashlight into the brinewell and observing a noticeable drop in the liquid level 5 If the softener does not draw brine nozzle and or venturi dirty nozzle and venturi not seated properly on g...

Страница 24: ...24 8 7 6 5 Rating Decal Location Softener Exploded View Valve Assembly See Pages 26 27 for parts 1 2 3 4 5 6 7 8 10 11 9 14 12 13 15 16 17 18 21 19 20 22 23 24 26 27 25 28...

Страница 25: ...s Manual Not illustrated Softener Parts List Key No Part No Description 1 7351054 Power Supply 24V DC 2 7360825 Top Cover 3 7360833 Salt Lid order decal below 7371258 Instruction Decal 4 7360867 Repl...

Страница 26: ...26 Valve Exploded View 51 50 52 53 55 56 59 58 57 60 61 66 67 62 63 64 68 69 70 71 75 65 76 77 79 78 80 81 82 Wear Strip Seal Cross section View 83 84 85 86 87 88 89 90 54 72 73 74...

Страница 27: ...single 2 req 7336402 O Ring 15 16 x 1 3 16 pack of 20 7113040 Turbine Support Assembly including 2 O Rings See Key No 72 1 ea of Key Nos 73 74 73 Turbine Support Shaft 74 Turbine 75 7082053 Valve Bod...

Страница 28: ...al force of nature such as but not limited to freezing flood hurricane tornado or earthquake is not covered by this warranty In all such cases regular parts and serv ice charges will apply We assume n...

Отзывы: