background image

5

Table light

Unpack the box, lay the parts on a soft surface and make sure that they are  
undamaged. Wait until the light is completely assembled before plugging it in.

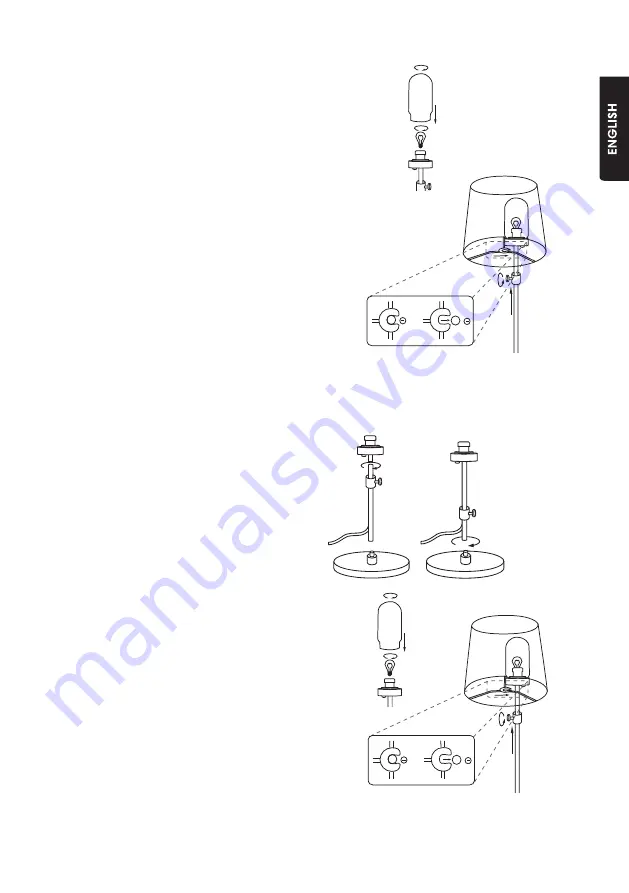
5.  Screw in a light bulb (max. 60 W, E27) and 

then screw on the diffuser (1).

6.  Carefully fit the rattan shade (3) on from the side, 

push the locking ring (4) up against the rattan 
shade and screw in the locking screw (5).

1.  Screw the tube (6) and lamp holder (2)  

together.

2.  Screw the lamp holder and tube assembly 

onto the base (7).

3.  Screw in a light bulb (max. 60 W, E27) and 

then screw on the diffuser (1).

4.  Carefully fit the rattan shade (5) on from the side, 

push the locking ring (3) up against the rattan 
shade and screw in the locking screw (4).

The light does not have an on/off switch so it can 
only be switched on/off at the socket, by using a 
timer or simply by unplugging it.

Содержание 18-2640

Страница 1: ...Tr dg rds terrassbelysning Hage terrassebelysning Puutarha terassivalaisin Art no Model 18 2640 OCL 213 18 2641 OCL 215 36 4514 OCL 213 36 4515 OCL 215 Garden Patio Light Oscar Ver 201101...

Страница 2: ......

Страница 3: ...or outdoor use The light fitting is approved for outdoor use IP44 The light fitting must always be placed on a stable surface where it cannot tip over Do not place the product where there is a risk of...

Страница 4: ...n the upper tube 6c 3 Screw the lamp holder 2 onto the upper tube You could ask a friend to twist the cable in the same direction as the lamp holder is threaded so that the cable doesn t coil up 4 Scr...

Страница 5: ...g 4 up against the rattan shade and screw in the locking screw 5 1 Screw the tube 6 and lamp holder 2 together 2 Screw the lamp holder and tube assembly onto the base 7 3 Screw in a light bulb max 60...

Страница 6: ...6 Specifications Art no 36 4514 15 18 2640 41 Model OCL 213 OCL 215 Voltage 220 230 V AC 50 Hz Protection class IP44 Light source 1 x 60 W E27 not included Connecting cable 1 8 m IP44...

Страница 7: ...omhusbruk Armaturen r godk nd f r utomhusbruk enligt IP44 Armaturen m ste alltid st p ett stadigt underlag s att den inte kan v lta Placera inte produkten s att den kan falla ner i vatten eller annan...

Страница 8: ...b och skruva sedan fast det versta r ret 6c 3 Skruva fast lamph llaren 2 be g rna n gon om hj lp att vrida kabeln t samma h ll som lamph llaren g ngas s att kabeln inte tvinnas 4 Skruva fast hela r re...

Страница 9: ...ttingsk rmen 3 fr n sidan och tryck upp l sringen 4 mot rotting sk rmen och skruva t l sskruven 5 1 Skruva ihop r r 6 och lamph llare 2 2 Skruva fast r ret p foten 7 3 Skruva i en gl dlampa max 1 x 60...

Страница 10: ...10 Specifikationer Art nr 36 4514 15 18 2640 41 Modell OCL 213 OCL 215 Sp nning 220 230 V AC 50 Hz Kapslingsklass IP44 Ljusk lla 1 x 60 W E27 medf ljer ej Anslutningskabel 1 8 m IP44...

Страница 11: ...nger utend rs skal disse v re godkjent for utend rs bruk Armaturen er godkjent for utend rsbruk IP 44 Armaturen m plasseres p et stabilt og plant underlag hvor den ikke kan velte Plasser ikke produkte...

Страница 12: ...et nederste r ret 6a og skru fast mellomr ret 6b Skru deretter fast det verste r ret 6c 3 Skru fast lampeholderen 2 P se at kabelen ikke tvinner seg inni r ret ved montering 4 Skru hele r ret fast p f...

Страница 13: ...forsiktig fra siden og trykk l seringen opp mot skjermen og skru l seskruen fast 1 Skru sammen r r 6 og lampeholder 2 2 Skru r ret fast p foten 7 3 Skru i en lysp re maks 1 stk 60 W E27 og sett p pla...

Страница 14: ...14 Spesifikasjoner Art nr 36 4514 15 18 2640 41 Modell OCL 213 OCL 215 Spenning 220 230 V AC 50 Hz Kapslingsklasse IP44 Lyskilde 1 stk 60 W E27 medf lger ikke Str mkabel 1 8 m IP44...

Страница 15: ...ytt n tarkoitettuja jatkojohtoja Valaisin on ulkok ytt n hyv ksytty IP44 Valaisin tulee aina asettaa tukevalle alustalle siten ett se ei p se kaatumaan l sijoita tuotetta sellaiseen paikkaan josta se...

Страница 16: ...sek yl putki 6c 3 Kierr kiinni my s lampunpidike 2 Jotta johto ei menisi kierteelle on hyv pyyt jotakin toista henkil kiert m n johtoa lampunpidikkeen kiertymissuuntaan 4 Ruuvaa kiinni kokoamasi putk...

Страница 17: ...rovasti sivusta ja paina lukitusrengas 4 varjostinta vasten ja kirist kiristysruuvi 5 1 Ruuvaa yhteen putki 6 ja lampunpidike 2 2 Kierr putki kiinni jalkaan 7 3 Asenna valaisimeen hehkulamppu maks 1 x...

Страница 18: ...18 Tekniset tiedot Tuotenro 36 4514 15 18 2640 41 Malli OCL 213 OCL 215 J nnite 220 230 V AC 50 Hz Kotelointiluokka IP44 Lamppu 1 x 60 W E27 myyd n erikseen Liit nt johto 1 8 m IP44...

Страница 19: ......

Страница 20: ......

Отзывы: