Norsonic 140 Скачать руководство пользователя страница 1

Norsonic 140 User Guide

Getting the Settings Right

1

Содержание 140

Страница 1: ...Norsonic 140 User Guide Getting the Settings Right 1 ...

Страница 2: ...urrently Fast Sound Pressure Level Adjusted using keys 8 for Time Constant and 3 to change display function A weighted and 2nd network Weighted readings Display Range Values Adjusted using inc dec keys Note this Does not alter the measurement Range Graphical dB reading Corrections Applied G is pre amp W is windscreen 2 ...

Страница 3: ...r 140 Storing Methods Automatic Automatic saving Repeat Repeat measurement duration and save until stopped Syncro Synchronise with the clock Manual Waits for Store Record key to be pressed before saving 3 ...

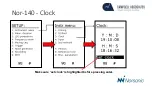
Страница 4: ...Nor 140 Clock Make sure set clock is highlighted before pressing enter ...

Страница 5: ... with the Pol Volts set to On If very lowlevels are measured on the front screen then it is likely that the voltage to the microphone is turned off Active corrections are displayed by letters at the base of every screen W is the windshield correction and G is the preamp correction ...

Страница 6: ...depend on the age of your 140 Pol Volt needs to be on for standard free field microphones to work Nor 1225 This is turned off for Electret Mics Horizontal Vertical is the direction of sound hitting the microphone Typically Vertical is only used for aircraft measurements where the source is above the microphone ...

Страница 7: ...Nor 140 Measurement Durations To move between boxes type the number press enter use arrow keys to move to next box Resolution reduced using inc and dec keys 7 ...

Страница 8: ...herwise it will be straight to the l ast screen 8 Press button 5 to scroll between weighting networks if you have the option For Noise Nuisance you only really need Leq SPL is required for BS4142 1 3 Leq gives 1 3 octave spectrums per second or per resolution setting for tonal investigations ...

Страница 9: ...0kHz standard microphone measurement capabilities 1 3w 0 4Hz 20kHz for use with accelerometer 9 The latest version of the 140 can now show the Leq for specific frequency ranges in the table view This does not affect the standard results ...

Страница 10: ...y starts measurement Clock press 1 when highlighted measurement starts at specified time and runs for measurement duration External Link to external control Level Above press 1 when highlighted set dB level to exceed before measurement starts 10 ...

Страница 11: ...rigger 2 Record Trigger and then change the external to off handswitch and the level to on Press button 1 with the Level On highlighted to change the dB level With this set the meter will record audio every time the noise goes above this Threshold Be careful when using this as manned properties will set the trigger off more often 11 ...

Страница 12: ...g Settings 12 Enter Max duration at the top The other settings should be as above for best quality audio that can be played on the average PC In order to have the hamdswitch as a start stop button set the duration to 0 ...

Страница 13: ... it has been saved To load the set up press the Recall key and make sure the letters In the top right say INT for internal memory SDC is SD card and you will need to press the inc or dec key to change Find the correct set up number and press enter The set up number will then appear at the top of the screen with the letter R next to it to indicate it has been recalled 13 ...

Страница 14: ...Running Measurements 14 ...

Страница 15: ...Nor 140 Button 1 Table Functions 15 Button 1 displays table of figures Button 1 again displays table of percentiles Button 1 again returns you to the main screen ...

Страница 16: ...Nor 140 Button 2 Frequency Analysis Button 1 displays table of figures Button 1 again shows stats at that highlighted frequency Use cursor to select frequency 16 ...

Страница 17: ...tton 2 NR Values In the frequency screen scroll right to the bottom NR and NC rating displayed at the end of the measurement This is in the latest version of the 140 and due out next year on the 145s and 150s 17 ...

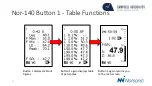
Страница 18: ...Nor 140 Button 3 Function Display Sound Pressure Level Leq Max Min 18 ...

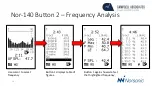
Страница 19: ...Nor 140 Button 9 A Pre weighting Display 19 ...

Страница 20: ...Single Axis Vibration FFT Assessment 20 ...

Страница 21: ...Nor 140 Vibration The units for the front screen can be changed in the Miscellaneous menu screen ...

Страница 22: ...Nor 140 Vibration To power the accelerometer you need to change the input type to IEPE or ICP on older versions of the Nor 140 ...

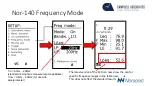
Страница 23: ...Nor 140 Vibration Change the frequency mode to have a w next to 1 3 to widen the frequency bands down to 0 4Hz ...

Страница 24: ...Nor 140 FFT Option Select Mode button 7 and option 6 X Frequency Y Level View window can be changed by using the up and down arrow keys ...

Страница 25: ... and Measurement Use set up and measurement duration to set the number of averages NA the duration of sample and the resolution Use the left and right cursor keys to highlight the tonal frequency 89 36Hz in this example ...

Страница 26: ...Notes 26 ...

Отзывы: