Norlake SMP27-12 Скачать руководство пользователя страница 7


7/20  171216  


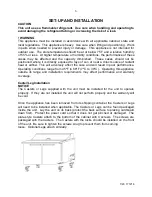
Once the Casters or Legs installed the unit can be returned to its upright position.  Be 

sure to work in pairs when returning the unit to the upright position.   


NOTICE 

Do not operate the unit for 1 hour after returning the unit to its upright position to allow 

the oil to settle in the Compressor. 


Shelf Installation 

The appliance is supplied with one Shelf per door and four Shelf Supports per Shelf.  

Install the Shelf Supports on the Shelf Pilasters (factory installed on inside walls) at the 

height desired.  All Shelf Supports must be at the same height for each Shelf.  Install the 

Shelf on the Self Supports. 


Pans/Pan Adapter Bars/Cutting Board 

Food Pans 

The unit comes with a number of 4” deep 1/6

th

 size pans installed to fit the pan opening.  

All pans should be cleaned prior to use.  The unit will accept up to 6” deep pans of 

various sizes to accommodate your needs. 

Pan Adapter Bars 

The unit comes with an array of locking-in-place Pan Adapter Bars installed to secure 

the pans in place.  Pan Adapter Bars can be added or removed to fit your  pan size 

requirements. 

Cutting Board 

The unit comes with a 9.5” deep  reversible  Cutting Board.  Clean the Cutting Board 

prior to use.  The Cutting Board is secured in place by Cutting Board Brackets mounted 

on each end of the unit. 


Содержание SMP27-12

Страница 1: ...on and Maintenance Instructions Please read this manual completely prior to installing and operating this equipment This manual describes how to install operate and maintain the product in order to ob...

Страница 2: ...FT PANS 1 6TH ELECTRICAL REFRIGERANT WEIGHT lbs SP27 8 6 7 8 115 60 1 3 5 R290 165 SP36 10 9 1 10 115 60 1 3 5 R290 203 SP48 12 12 5 12 115 60 1 3 5 R290 251 SP60 16 15 9 16 115 60 1 3 5 R290 278 SP72...

Страница 3: ...you sign off on it Make sure the driver signs and dates the delivery receipt acknowledging the damages This is critical in protecting yourself should a claim need to be filed You can consult the carri...

Страница 4: ...ow basic precautions including but not limited to the following Only qualified service technicians should install and service this appliance This appliance must be installed in accordance with applica...

Страница 5: ...serious injury could occur or the appliance could be damaged Use caution when opening doors or lids and keep fingers out of pinch points areas Do not use combustible sprays or aerosols around the appl...

Страница 6: ...and will result in poor performance Operating conditions range from 45 F to 86 F 7 C to 30 C Operating this appliance outside its range and installation requirements may affect performance and warrant...

Страница 7: ...must be at the same height for each Shelf Install the Shelf on the Self Supports Pans Pan Adapter Bars Cutting Board Food Pans The unit comes with a number of 4 deep 1 6th size pans installed to fit t...

Страница 8: ...ottom 145683 Left Hand Hinge to reverse the door swing 1 Disconnect the cabinet from power 2 Lay the cabinet on its back 3 Open the door more than 90 and remove and save the 4 hexagonal bolts that sec...

Страница 9: ...e Top Hinge Plate should be at a 90 degree angle to the door and sticking out to the front of the door when the spring is relaxed 10 Place the Door on the cabinet by inserting the pin on the Bottom Hi...

Страница 10: ...re adjustments Loading Product Once that cabinet has been operating at the desired temperature for a sufficient period of time product can be loaded into the cabinet Prior to loading product adjust th...

Страница 11: ...steel cleaners and soft cloth when cleaning Cleaning Exterior and Interior Surfaces Use mild soap warm water solution and a soft cloth to clean the cabinet exterior Wipe with the grain of the metal to...

Страница 12: ...osition turn it clockwise to set a desired temperature Confirm unit is isolated on a power circuit Poor performance Move the unit from direct sunlight Move the unit away from heating devices Install t...

Страница 13: ...13 7 20 171216 Wiring Diagram...

Отзывы: