
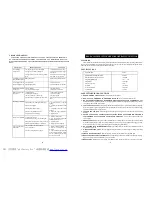


Characteristic
Minimum Operating Air Pressure
Maximum Operating Air Pressure
Stapler Length Range
Stapler Size
Stapler Capacity
Air Inlet
Air Consumption
Tool Weight
Value
60 PSI
100 PSI
3/8" -- 1/4"
18 Gauge
100
1/4" NPT
3.8 CFM
3.59 lbs
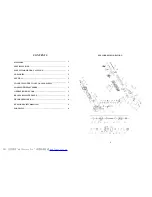
1
SPECIFICATIONS
SUMMARY
Y
ou will need the instructions for the safety warning and cautions, assembly instructions, operating and maintain-
ing procedures, exploded view drawing and parts list. Keep your invoice with these instructions. Keep the instruc-
tions and invoice in a safe and dry place for future reference.
READ ALL INSTRUCTIONS BEFORE OPERATING THE TOOL
1. Lubricate as instructed.
2. Check air supply.
3. Replace spring.
4. Replace damaged internal
parts.
1. Replace joint guider.
2. Use the recommended and
undamaged fastenerls.
3. Tighten screws.
4. Replace piston assembly.
1. Replace piston assembly.
2 . Adj ust to ad e qua te ai r
pressure.
3. Check cylinder cap spring for
broken coils or reduced length.
Check if exhaust port of cylin-
der cap is restricted.
1. Replace bumper or pusher
spring.
2. Clean drive channel of front
plate.
3. Check hose and compressor
fittings.
4. Replace O-ring or lubricate.
5. Replace seal.
4
TROUBLE SHOOTING
PROBLEM
Air leaking at
Trigger area
PROBLEM CAUSE
SOLUTION
1. O-ring in trigger valve is damaged.
2. Trigger valve head is damaged.
3. Trigger valve stem, seal or O-ring is dam-
aged.
1. Check and replace O-ring.
2. Check and replace trigger
valve head.
3. Check and replace trigger
valve stem, seal or O-ring.
Air leaking between
body and drive guider
Damaged bumper.
Air leaking between
body and cylinder cap
1. Screw loose.
2. Damaged gasket.
1. Tighten screws.
2. Check and replace gasket.
Blade driving fastener
too deeply
1. Worn bumper .
2. Air pressure is too high.
1. Replace bumper.
2. Adjust the air pressure.
Check and replace bumper.
Runs slowly or has
power loss
Tool skips a fastener
Fasteners are jammed
Tool will not drive
down tight
1. Insufficient oil.
2. Insufficient air supply.
3. Broken spring in cylinder cap.
4. Exhaust port in cylinder cap is blocked.
1. Worn bumper or damaged spring (53).
2. Dirt in drive guider.
3. Inadequate airflow to tool.
4. Worn or dry O-ring on piston.
5. Cylinder cap seal leaking.
1. Joint guider is worn.
2. Fasteners are wrong size or damaged.
3. Magazine or front plate screws are loose.
4. Blade in piston assembly is damaged.
1. Worn blade in piston assembly.
2. Lack of power.
3. Slow cycling and loss of power.
STOP USING THE TOOL IMMEDIATELY IF ANY OF THE FOLLOWING PROBLEMS
OCCUR. SERIOUS PERSONAL INJURY COULD OCCUR. ANY REPAIRS OR REPLACE-
MENTS MUST BE DONE BY A QUALIFIED PERSON OR AN AUTHORIZED SERVICE CENTER
ONLY.
SAFETY WARNINGS& CAUTIONS
1. KEEP WORKING AREA CLEAN.
Cluttered areas invite injuries.
2. DON
’
T ALLOW CHILDREN AT THE WORKING AREA.
Don
’
t let them handle the tool.
3. DO NOT OPERATE THIS TOOL IF UNDER THE INFLUENCE OF ALCOHOL OR DRUGS.
Read
warning label on prescriptions to determine if your judgment or reflexes are impaired while taking drugs. If there
is any doubt, do not attempt to operate.
4. USE SAFETY GLASSES.
Safety glasses should conform to ANSI Z87.1 specifications. Before operating,
wear safety glasses against flying debris from the front and side. Safety glasses should be worn when loading,
operating, unloading or servicing this tool.
5. USE EAR PROTECTION.
The working area may be exposed to high noise levels that can lead to hearing
damage.
6. NEVER USE OXYGEN COMBUSTIBLE GASES, BOTTLED GASES OR HIGH PRESSURE
COMPRESSED GAS AS A POWER SOURCE FOR THIS TOOL.
The tool may explode and cause
serious injury.
7. DRESS SAFELY.
Protective gloves and nonskid footwear or safety shoes are recommended when working
with and operating this tool. Don
’
t wear loose clothing or jewelry. They can get caught in moving parts. Also,
wear a protective hair covering to prevent long hair from getting caught in the tool.
8. DO NOT FIRE INTO HARD MATERIALS.
Do not attempt to shoot toward hard or brittle material such
as concrete, steel or tile.
9. WHEN OPERATING TOOL.
keep the proper footing and balance to avoid damage resulting from losing
balance.
10. CHECK DAMAGED PARTS.
Before using tool, carefully check if there is any part damaged.
11. REPLACE PARTS AND ACCESSORIES.
Only allow the use of the same replacement parts while servicing.
Approved accessories and replacement parts are available.
12. KEEP ALERT.
Watch what you are doing. Use common sense. Do not operate any tool when you are tired.
文件使用
"pdfFactory Pro"
试用版本创建
www.fineprint.cn