NordicTrack NTCCC59021 Скачать руководство пользователя страница 8

8

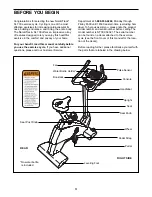
HOW TO OPERATE THE EXERCISE CYCLE

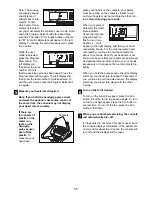
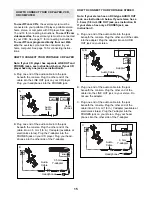
HOW TO MOVE AND LEVEL THE EXERCISE
CYCLE

Stand in front of
the exercise cycle,
hold the handle-
bars firmly, and
placed your foot
against one of the
wheels. Tip the
exercise cycle until
it can be moved on
the wheels. Care-
fully move the exercise cycle to the desired location
and then lower it. Due to the weight of the exercise
cycle, use extreme caution while moving it.

If the exercise
cycle rocks slightly
during use, turn the
leveling feet under
the rear stabilizer
until the rocking
motion is eliminat-
ed.  

HOW TO ADJUST THE SEAT POST 

For effective exer-
cise, the seat
should be at the
proper height. As
you pedal, there
should be a slight
bend in your knees
when the pedals
are in the lowest
position. To adjust
the height of the
seat, first turn the
seat post knob
counterclockwise
two or three turns

to loosen it (if the knob is not loosened enough, it may
scratch the seat post). Next, pull the knob, slide the
seat post to the desired height, and then release the
knob. Move the seat post up and down slightly until
the pin on the knob snaps into one of the holes in
the seat post. 
Then, turn the knob clockwise until it is
tight.

HOW TO ADJUST THE SEAT

The seat can be
adjusted to the posi-
tion that is the most
comfortable for you.
Before adjusting
the seat, dismount
the exercise cycle;
do not adjust the
seat while you are
sitting on it. 
To
adjust the seat, first
turn the seat knob
counterclockwise
two or three turns to
loosen it. Slide the seat forward or backward to the
desired position, and then firmly tighten the seat knob. 

HOW TO ADJUST THE PEDAL STRAPS

The pedal straps
can be adjusted to
the position that is
the most comfort-
able for you. Press
the tabs on the ped-
als, adjust the
straps to the
desired position,
and then release
the tabs.

Pedal

Strap

Tab

Wheel

Leveling

Foot

Seat

Post

Seat

Seat

Knob

Seat

Seat

Post

Knob

Содержание NTCCC59021

Страница 1: ...future reference Serial Number Decal QUESTIONS As a manufacturer we are com mitted to providing complete customer satisfaction If you have questions or if there are missing parts please call 1 888 936...

Страница 2: ...r suitable clothing when using the exercise cycle do not wear loose clothing that could become caught on the exercise cycle Always wear athletic shoes 8 Always keep your back straight when using the e...

Страница 3: ...Customer Service Department at 1 888 936 4266 Monday through Friday 8h00 until 18h30 eastern time excluding holi days To help us assist you please note the product model number and serial number befor...

Страница 4: ...the key number of the part from the PART LIST on page 22 The second number refers to the quantity needed for assembly Note Some small parts may have been pre attached for shipping If a part is not in...

Страница 5: ...down in the direction shown Slide the Upright onto the Frame 1 Be careful to avoid pinch ing the Wire Harnesses 42 43 Attach the Upright to the Frame with four M8 x 40mm Button Screws 54 and four M8...

Страница 6: ...ket 7 Move the Seat 9 to the desired position Insert the Seat Knob 10 into the slot in the side of the Seat Bracket and tighten the Seat Knob into the Seat Carriage 8 59 Slot 7 20 5 Have another perso...

Страница 7: ...t to the desired position Adjust the Right Pedal Strap not shown in the same way 8 22 24 25 INSTALLING THE RECEIVER FOR THE OPTIONAL CHEST PULSE SENSOR If you purchase the optional chest pulse sensor...

Страница 8: ...turns to loosen it if the knob is not loosened enough it may scratch the seat post Next pull the knob slide the seat post to the desired height and then release the knob Move the seat post up and dow...

Страница 9: ...a target heart rate as you exercise The console also features iFIT com interactive technol ogy Having iFIT com interactive technology is like hav ing a personal trainer in your home Using the included...

Страница 10: ...u have completed a lap a new lap will begin The Training Zone bar The Training Zone bar will show your pace and the approximate inten sity level of your exercise For exam ple if three or four indicato...

Страница 11: ...ng on the contacts closest to you and your fingers must be touching the other con tacts Avoid moving your hands When your pulse is detected the Heart Rate indicator above the right dis play will begin...

Страница 12: ...f an indicator to the left of any lit indicator is flashing see drawing b decrease your pace When no indicator is flash ing your pace matches the pace setting for the current segment Important The pac...

Страница 13: ...rate pro gram 2 is designed to keep your heart rate between 50 and 85 of your maximum heart rate Follow the steps below to use a heart rate program Begin pedaling to activate the console See step 1 o...

Страница 14: ...help you to keep your heart rate near the heart rate setting for the current segment The lit indicators in the bar will show your actual pace When you hold the handgrip pulse sensor or wear the option...

Страница 15: ...r available at electronics stores Plug the Y adapter into the PHONES jack on your CD player Plug your head phones into the other side of the Y adapter HOW TO CONNECT YOUR PORTABLE STEREO Note If your...

Страница 16: ...the Y adapter into the LINE OUT jack on your stereo HOW TO CONNECT YOUR COMPUTER Note If your computer has a 3 5 mm 1 8 in LINE OUT jack see instruction A If your computer has only a PHONES jack see...

Страница 17: ...he adapter into the AUDIO OUT jack on your VCR B Plug one end of the audio cable into the jack beneath the console Plug the other end of the cable into the adapter Plug the adapter into an RCA Y adapt...

Страница 18: ...y button is pressed your personal trainer will begin guiding you through your workout Simply follow your personal trainer s instructions The program will function in almost the same way as a resistanc...

Страница 19: ...w the desired links on our Web site to select a program Read and follow the on line instructions for using a program Follow the on line instructions to start the program When you start the program an...

Страница 20: ...ment Repeat until the console displays correct feedback When the Reed Switch 46 is correctly adjusted reattach the Right Side Shield 27 and the Right Pedal 21 HOW TO ADJUST THE DRIVE BELT If you can f...

Страница 21: ...exercise must be aerobic Aerobic exercise is activity that requires large amounts of oxygen for prolonged periods of time This increases the demand on the heart to pump blood to the muscles and on th...

Страница 22: ...Bracket 42 1 Upper Wire Harness 43 1 Lower Wire Harness 44 1 Adjustment Bracket 45 1 Clamp 46 1 Reed Switch Wire 47 1 Drive Belt 48 1 Flywheel Axle 49 1 Shoulder Screw 50 2 Flange Screw 51 4 Stand off...

Страница 23: ...5 36 37 38 39 40 41 42 43 44 66 67 68 48 49 50 50 51 53 53 53 54 54 55 55 54 54 55 55 56 56 56 56 57 58 54 54 60 60 57 57 62 63 63 52 63 59 59 69 69 64 65 65 65 65 65 65 45 46 57 47 57 55 55 55 55 19...

Страница 24: ...use costs of removal installation or other consequential damages of whatsoever nature Some provinces do not allow the exclusion or limitation of incidental or consequential damages Accordingly the abo...

Отзывы: