1
2
3
4
5
6
7
8
9
10
11
12
13
14
15
16
17
18
19
20
21
22
23
26
27
24
25
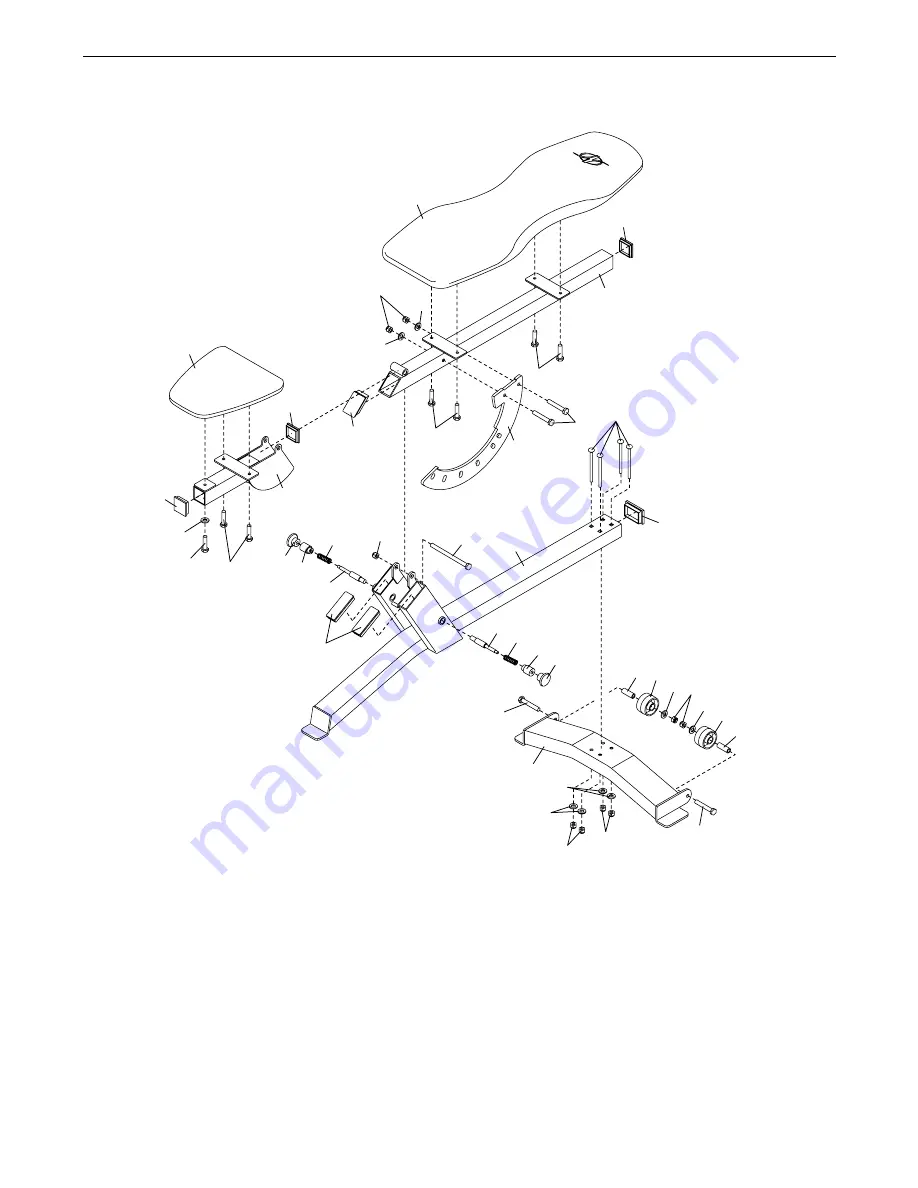
EXPLODED DRAWING—Model No. NTB12920
R0103A
Страница 1: ...Serial Number Decal Under Seat QUESTIONS As a manufacturer we are com mitted to providing complete customer satisfaction If you have questions or if there are missing or damaged parts we will guarante...
Страница 2: ...k Cover LIMITED WARRANTY Back Cover NordicTrack is a registered trademark of ICON Health Fitness Inc TABLE OF CONTENTS The decal shown here has been placed on the weight bench If the decal is missing...
Страница 3: ...away from moving parts 8 Always wear athletic shoes for foot protec tion while exercising 9 The weight bench is designed to support a maximum user weight of 300 pounds and a maximum total weight of 6...
Страница 4: ...eve the specific results you want For your benefit read this manual carefully before using the weight bench If you have additional ques tions please call our Customer Service Department toll free at 1...
Страница 5: ...7 M10 x 63mm Button Head Bolt 21 M10 Washer 22 PART IDENTIFICATION CHART Refer to the drawings below to identify small parts used in assembly The number in parentheses by each draw ing is the key numb...
Страница 6: ...NTIFICATION CHART on page 5 Tighten all parts as you assemble them unless instructed to do otherwise As you assemble the weight bench make sure all parts are oriented as shown in the drawings Place al...
Страница 7: ...nner Caps 8 into the Seat Frame 4 Lubricate the M12 x 87mm Button Head Bolt 17 with grease Have a second person pull the Knobs 13 out as far as they will go With the Adjustment Arm 5 under the welded...
Страница 8: ...M6 x 16mm Screws 18 an M6 x 68mm Screw 27 and an M6 Washer 26 7 Make sure that all parts are properly tightened before you use the weight bench The use of all remaining parts will be explained in ADJ...
Страница 9: ...bench can be cleaned with a damp cloth and a mild non abrasive detergent Do not use solvents 9 ADJUSTING THE BACKREST To adjust the angle of the Backrest 6 hold onto it with one hand and pull the low...
Страница 10: ...est 7 1 Seat 8 3 50mm Square Inner Cap 9 2 38mm x 100mm Inner Cap 10 1 50mm x 75mm Inner Cap 11 2 Wheel 12 2 Axle 13 2 Knob 14 2 Spring 15 2 Threaded Collar 16 2 Adjustment Pin 17 1 M12 x 87mm Button...
Страница 11: ...1 2 3 4 5 6 7 8 8 9 10 11 11 12 13 14 15 16 13 14 15 16 17 18 18 18 19 20 21 21 22 22 22 22 12 23 23 23 26 22 22 23 27 24 8 25 EXPLODED DRAWING Model No NTB12920 R0103A 11...
Страница 12: ...uct ed return any defected part for replacement or if necessary the entire product for repair USER S MANUAL It is VERY IMPORTANT THAT YOU READ THE MANUAL before operating the Product Remember to do th...