background image

USER’S MANUAL

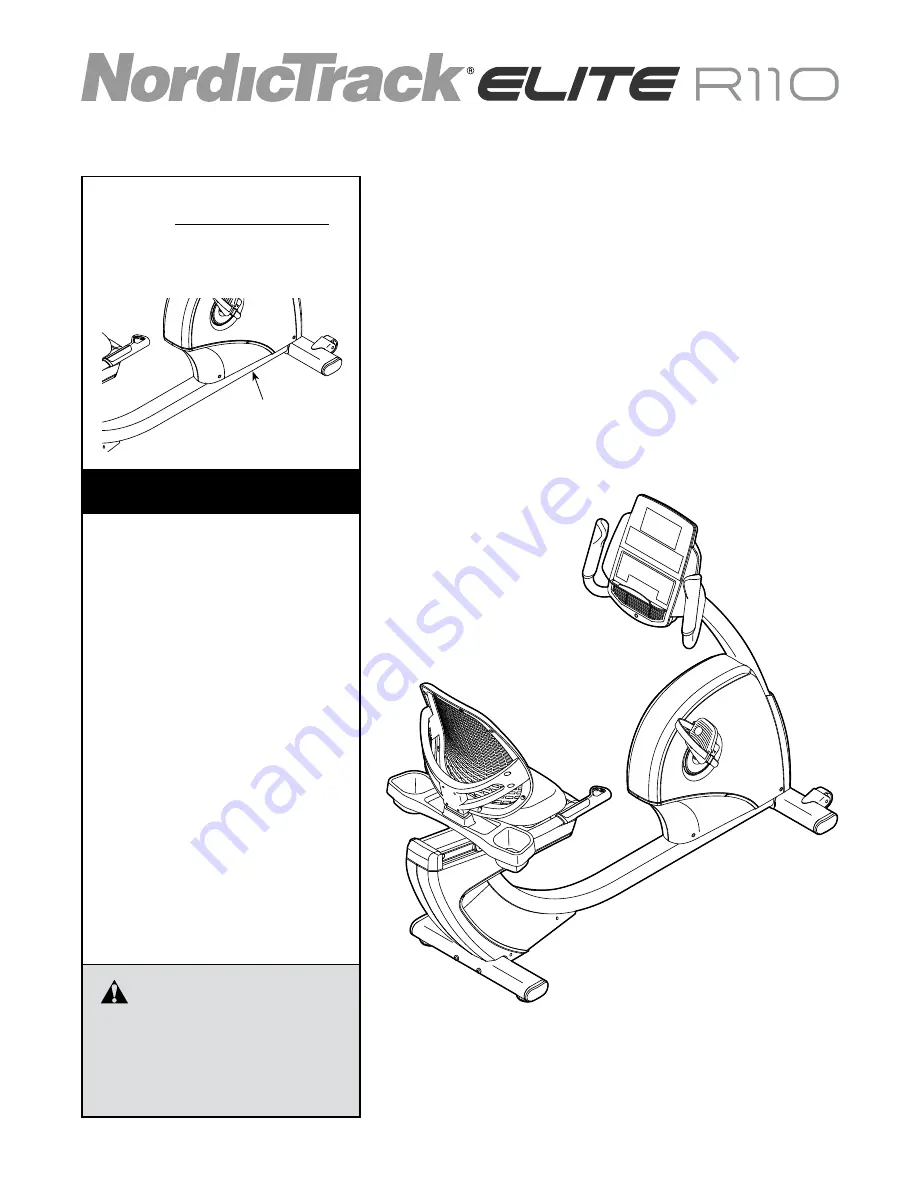
Serial Number 

Decal (under 

frame)

Model No. NTEVEX89915.0

Serial No.                                      

Write the serial number in the 

space above for reference.

    CAUTION

Read all precautions and instruc-

tions in this manual before using 

this equipment. Keep this manual 

for future reference.

CUSTOMER SERVICE

UNITED KINGDOM

Call: 

0330 123 1045

From Ireland: 

053 92 36102

Website: 

www.iconsupport.eu

E-mail: 

[email protected]

Write: 

ICON Health & Fitness, Ltd.

Unit 1D, The Gateway

Fryers Way, Silkwood Park

OSSETT

WF5 9TJ

UNITED KINGDOM

AUSTRALIA

Call: 

1800 993 770

E-mail: 

[email protected]

Write:

ICON Health & Fitness

PO Box 635

WINSTON HILLS NSW 2153

AUSTRALIA

www.iconeurope.com

Содержание Elite R110 NTEVEX89915.0

Страница 1: ... Keep this manual for future reference CUSTOMER SERVICE UNITED KINGDOM Call 0330 123 1045 From Ireland 053 92 36102 Website www iconsupport eu E mail csuk iconeurope com Write ICON Health Fitness Ltd Unit 1D The Gateway Fryers Way Silkwood Park OSSETT WF5 9TJ UNITED KINGDOM AUSTRALIA Call 1800 993 770 E mail australiacc iconfitness com Write ICON Health Fitness PO Box 635 WINSTON HILLS NSW 2153 AU...

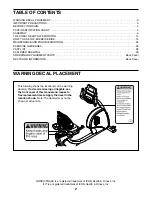
Страница 2: ...e WARNING DECAL PLACEMENT 2 IMPORTANT PRECAUTIONS 3 BEFORE YOU BEGIN 4 PART IDENTIFICATION CHART 5 ASSEMBLY 6 THE CHEST HEART RATE MONITOR 14 HOW TO USE THE EXERCISE BIKE 15 MAINTENANCE AND TROUBLESHOOTING 24 EXERCISE GUIDELINES 26 PART LIST 28 EXPLODED DRAWING 30 ORDERING REPLACEMENT PARTS Back Cover RECYCLING INFORMATION Back Cover TABLE OF CONTENTS NORDICTRACK is a registered trademark of ICON ...

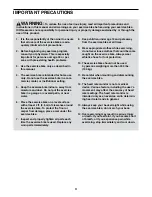
Страница 3: ...vel surface with at least 2 ft 0 6 m of clearance around the exercise bike To protect the floor or carpet from damage place a mat under the exercise bike 7 Inspect and properly tighten all parts each time the exercise bike is used Replace any worn parts immediately 8 Keep children under age 12 and pets away from the exercise bike at all times 9 Wear appropriate clothes while exercising do not wear...

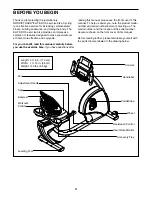
Страница 4: ...ection of features designed to make your workouts at home more effective and enjoyable For your benefit read this manual carefully before you use the exercise bike If you have questions after reading this manual please see the front cover of this manual To help us assist you note the product model number and serial number before contacting us The model number and the location of the serial number ...

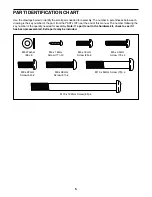
Страница 5: ...ION CHART Use the drawings below to identify the small parts needed for assembly The number in parentheses below each drawing is the key number of the part from the PART LIST near the end of this manual The number following the key number is the quantity needed for assembly Note If a part is not in the hardware kit check to see if it has been preassembled Extra parts may be included ...

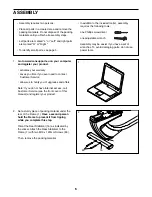
Страница 6: ...se power tools ASSEMBLY 1 2 Set a sturdy piece of packing material under the rear of the Frame 1 Have a second person hold the Frame to prevent it from tipping while you complete this step Orient the Rear Stabilizer 16 as indicated by the sticker Attach the Rear Stabilizer to the Frame 1 with two M10 x 122mm Screws 65 Then remove the packing material 16 2 65 1 1 Go to www iconsupport eu on your co...

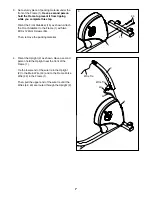
Страница 7: ...er to the Frame 1 with two M10 x 122mm Screws 65 Then remove the packing material 1 3 65 15 4 2 42 43 1 Wire Tie Wire Tie 4 Orient the Upright 2 as shown Have a second person hold the Upright near the front of the Frame 1 Tie the lower end of the wire tie in the Upright 2 to the Main Wire 43 and to the Frame Pulse Wire 42 in the Frame 1 Then pull the upper end of the wire tie until the Wires 42 43...

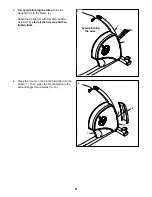
Страница 8: ...he Upright 2 onto the Frame 1 Attach the Upright 2 with four M10 x 62mm Screws 70 start all the Screws and then tighten them 1 58 13 14 6 Press the mount on the Front Shield 58 into the Frame 1 Then press the Front Shield into the Left and Right Front Shields 13 14 6 1 5 ...

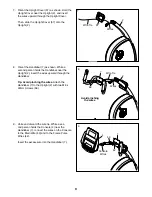
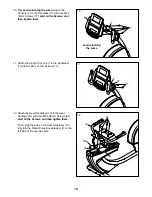
Страница 9: ...second person holds the Handlebar near the Upright 2 insert the wires upward through the Handlebar Tip Avoid pinching the wires Attach the Handlebar 7 to the Upright 2 with two M8 x 22mm Screws 69 2 Avoid pinching the wires 9 4 7 42 43 Console Wires 9 Untie and discard the wire tie While a sec ond person holds the Console 4 near the Handlebar 7 connect the wires on the Console to the Main Wire 43 ...

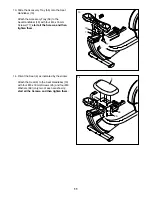
Страница 10: ...ighten them 11 Attach the Upright Cover 57 to the Handlebar 7 with two M4 x 16mm Screws 77 11 57 7 77 12 41 42 Wire 10 67 12 Attach the Seat Handlebar 10 to the Seat Carriage 41 with four M8 x 38mm Screws 67 start all the Screws and then tighten them Then plug the wire on the Seat Handlebar 10 fully into the Frame Pulse Receptacle 42 on the left side of the exercise bike ...

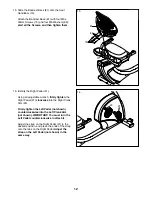
Страница 11: ...t Handlebar 10 with four M4 x 16mm Screws 77 start all the Screws and then tighten them 88 10 9 25 14 14 Orient the Seat 9 as indicated by the sticker Attach the Seat 9 to the Seat Handlebar 10 with four M6 x 18mm Screws 25 and four M6 Washers 88 only two of each are shown start all the Screws and then tighten them ...

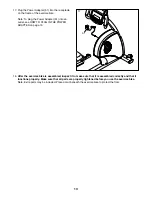
Страница 12: ...ustable wrench firmly tighten the Right Pedal 21 clockwise into the Right Crank Arm 23 Firmly tighten the Left Pedal not shown counterclockwise into the Left Crank Arm not shown IMPORTANT You must turn the Left Pedal counterclockwise to attach it Adjust the strap on the Right Pedal 21 to the desired position and press the ends of the strap onto the tabs on the Right Pedal Adjust the strap on the L...

Страница 13: ...TO PLUG IN THE POWER ADAPTER on page 15 51 17 18 After the exercise bike is assembled inspect it to make sure that it is assembled correctly and that it functions properly Make sure that all parts are properly tightened before you use the exercise bike Note Extra parts may be included Place a mat beneath the exercise bike to protect the floor ...

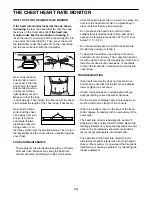
Страница 14: ...er that may trap moisture Do not expose the heart rate monitor to direct sunlight for extended periods of time and do not expose it to temperatures above 122 F 50 C or below 14 F 10 C Do not excessively bend or stretch the heart rate monitor when using or storing it To clean the transmitter use a damp cloth and a small amount of mild soap Then wipe the transmit ter with a damp cloth and thoroughly...

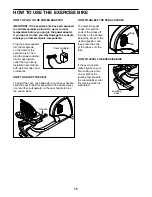
Страница 15: ... TO ADJUST THE SEAT To adjust the seat push downward on the seat handle slide the seat forward or backward to the desired posi tion and then pull upward on the seat handle to lock the seat in place HOW TO ADJUST THE PEDAL STRAPS To adjust the pedal straps first pull the ends of the straps off the tabs on the pedals Adjust the straps to the desired position and then press the ends of the straps ont...

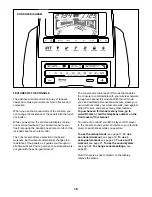
Страница 16: ...oal workout The console also features an iFit mode that enables the console to communicate with your wireless network through an optional iFit module With the iFit mode you can download personalized workouts create your own workouts track your workout results race against other iFit users and access many other features To purchase an iFit module at any time go to www iFit com or call the telephone...

Страница 17: ...at you have pedaled in miles or kilometers Pulse This display mode will show your heart rate when you use the handgrip heart rate monitor or the included chest heart rate monitor see step 5 Resistance Resist This display mode will show the resistance level of the pedals for a few seconds each time the resistance level changes Speed This display mode will show your pedaling speed in miles per hour ...

Страница 18: ...nd then your heart rate will be shown For the most accurate heart rate reading hold the contacts for at least 15 seconds If the display does not show your heart rate make sure that your hands are positioned as described Be careful not to move your hands excessively or to squeeze the contacts tightly For optimal perfor mance clean the contacts using a soft cloth never use alcohol abrasives or chemi...

Страница 19: ...gment of the profile will begin to flash If a different resistance level and or target speed is programmed for the next segment the resistance level and or target speed will appear in the display for a few seconds to alert you The resistance of the pedals will then change As you exercise you will be prompted to keep your pedaling speed near the target speed for the cur rent segment When an upward ...

Страница 20: ... Step Resistance buttons Note If you manually change the resistance during a calorie goal workout the length of the workout will adjust automatically to ensure that you meet your calorie goal Note The calorie goal is an estimate of the number of calories that you will burn during the workout The actual number of calories that you burn will depend on various factors such as your weight In addition ...

Страница 21: ... a user 4 Select an iFit workout To select an iFit workout press one of the iFit buttons Before some workouts will download you must add them to your schedule on www iFit com Press the Map button the Train button or the Lose Wt button to download the next workout of that type in your schedule Press the Compete button to compete in a race that you have previously scheduled Press the Track button to...

Страница 22: ...on page 18 9 When you are finished exercising the console will turn off automatically See step 7 on page 18 For more information about iFit go to www iFit com HOW TO USE THE SOUND SYSTEM To play music or audio books through the console sound system while you exercise plug a 3 5 mm male to 3 5 mm male audio cable not included into the jack on the console and into a jack on your MP3 player CD player...

Страница 23: ...ed if the exercise bike is displayed in a store Press the Enter button repeat edly to turn the demo mode ON or OFF Units The currently selected unit of measurement will appear in the display To change the unit of measurement press the Enter button repeatedly To view distance in miles select ENGLISH To view distance in kilometers select METRIC Contrast Level The currently selected contrast level wi...

Страница 24: ... To avoid damaging the console use only a manufacturer supplied regulated power adapter HOW TO ADJUST THE REED SWITCH If the console does not display correct feedback the reed switch should be adjusted To adjust the reed switch first unplug the power adapter not shown See EXPLODED DRAWING A on page 30 Using a standard screwdriver gently release the tabs on the Top Shield 44 Slide the Top Shield up...

Страница 25: ...the Front Shield and slide the Top Shield upward Remove all the Screws 77 85 from the Left and Right Front Shields 13 14 make sure to note the loca tion of each size of Screw Using a standard screwdriver gently release the tabs on the right Shield Disc 52 Rotate the Shield Disc and remove it Then gently remove the Right Front Shield 14 Next loosen the M6 x 20mm Hex Screw 84 Tighten the M10 x 50mm ...

Страница 26: ...ic Exercise If your goal is to strengthen your cardiovascular system you must perform aerobic exercise which is activity that requires large amounts of oxygen for prolonged periods of time For aerobic exercise adjust the intensity of your exercise until your heart rate is near the highest number in your training zone WORKOUT GUIDELINES Warming Up Start with 5 to 10 minutes of stretch ing and light...

Страница 27: ...illes Stretch With one leg in front of the other reach forward and place your hands against a wall Keep your back leg straight and your back foot flat on the floor Bend your front leg lean forward and move your hips toward the wall Hold for 15 counts then relax Repeat 3 times for each leg To cause further stretching of the achilles tendons bend your back leg as well Stretches Calves achilles tendo...

Страница 28: ... Top Shield 45 1 Clamp 46 1 Reed Switch Wire 47 1 Drive Belt 48 4 Stabilizer Cap 49 1 Left Handlebar Grip 50 2 Flange Screw 51 1 Power Adapter 52 2 Shield Disc 53 1 Heart Rate Monitor 54 1 Chest Strap 55 8 Carriage Bearing 56 1 Accessory Tray 57 1 Upright Cover 58 1 Front Shield 59 8 Carriage Bushing 60 2 Rail Rod 61 1 M6 x 20mm Shoulder Screw 62 4 Rod Cap 63 2 Brake Spacer 64 5 M6 x 15mm Screw 65...

Страница 29: ...ld 99 4 M6 Small Washer 100 1 Clip Nut 101 1 Power Receptacle Wire 102 2 6 x 12mm Screw 103 1 M8 x 28mm Hex Screw Assembly Tool User s Manual Key No Qty Description Key No Qty Description Note Specifications are subject to change without notice For information about ordering replacement parts see the back cover of this manual These parts are not illustrated ...

Страница 30: ...4 77 2 4 20 69 69 77 58 57 9 7 49 56 70 77 77 77 77 77 77 77 85 77 77 77 77 77 72 52 52 97 98 102 100 94 94 38 38 38 38 53 54 25 25 88 88 94 38 81 77 77 77 8 75 75 75 88 88 77 EXPLODED DRAWING A Model No NTEVEX89915 0 R0615A ...

Страница 31: ... 83 82 6 12 27 26 41 55 55 55 55 59 89 89 89 74 59 89 89 59 18 89 64 99 32 89 55 59 74 74 99 73 64 74 63 63 64 91 91 91 91 96 99 10 5 60 62 93 71 62 80 80 60 62 62 93 71 28 28 95 95 22 24 50 92 16 19 19 48 101 48 48 48 65 85 17 65 66 87 67 67 17 42 103 77 77 EXPLODED DRAWING B Model No NTEVEX89915 0 R0615A ...

Страница 32: ...ST and the EXPLODED DRAWING near the end of this manual ORDERING REPLACEMENT PARTS This electronic product must not be disposed of in municipal waste To preserve the environment this product must be recycled after its useful life as required by law Please use recycling facilities that are authorized to collect this type of waste in your area In doing so you will help to conserve natural resources ...

Отзывы: